- Install and Add ADB to Path on Mac and Setup Global ADB
- Set up ADB Path in Mac Terminal Bash Profile
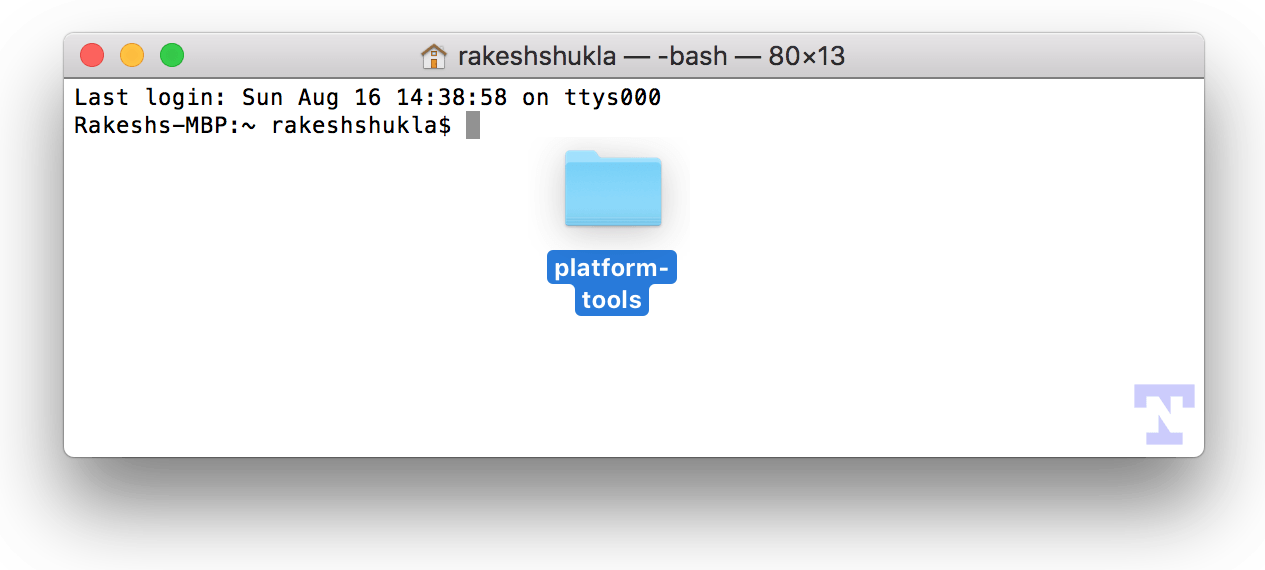
- Add Terminal Shortcut to Platform-Tools
- Install and Use ADB and Fastboot on Mac
- ADB and Fastboot Platform-Tools for Mac
- ADB or Fastboot Not Found on Mac Error
- Installing ADB and Fastboot on Mac
- Method 1: Drag ‘Platform-tools’ Folder to Terminal
- Method 2: Type or Paste Folder Path in Terminal
- Using ADB and Fastboot Commands in Mac Terminal
- Настроить adb на Mac OS X
- Вариант 1 – Использование Homebrew
- Вариант 2 – Вручную (только инструменты платформы)
- Вариант 3. Если у вас уже установлен Android Studio
- Вариант 4 – MacPorts
- Вариант 5 – Вручную (с SDK-менеджером)
Install and Add ADB to Path on Mac and Setup Global ADB
Can we set up global ADB on Mac by adding ADB variable environment? I had this question in mind while writing a tutorial on setting up system-wide ADB and Fastboot on Windows. “ADB command not found” is a common issue for Android users trying to run ADB commands on Mac. Fortunately, there’s an easy way to add ADB to a path on Mac by setting up PATH variable in bash profile and enable universally present ADB and Fastboot.
Besides, there’s another trick that involves dragging the ‘Platform-tools’ folder to the Mac Terminal. By doing so, you can immediately trigger ADB and Fastboot and start using commands without adding the folder path manually.
Once you have set up global ADB and Fastboot by adding ADB or Platform-tools to a path via a Bash profile in the Mac Terminal, you’ll be able to run ADB commands from any screen.
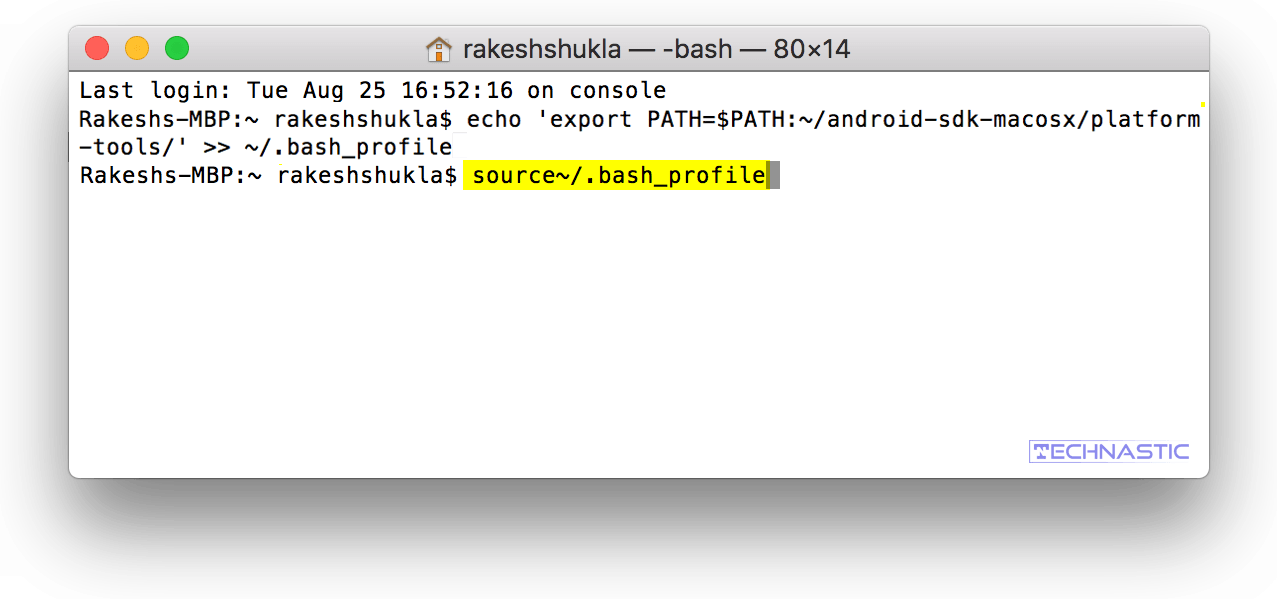
Set up ADB Path in Mac Terminal Bash Profile
If you want to enjoy global access to the ADB and Fastboot command-line tools right after launching the Mac Terminal, follow the steps described below.
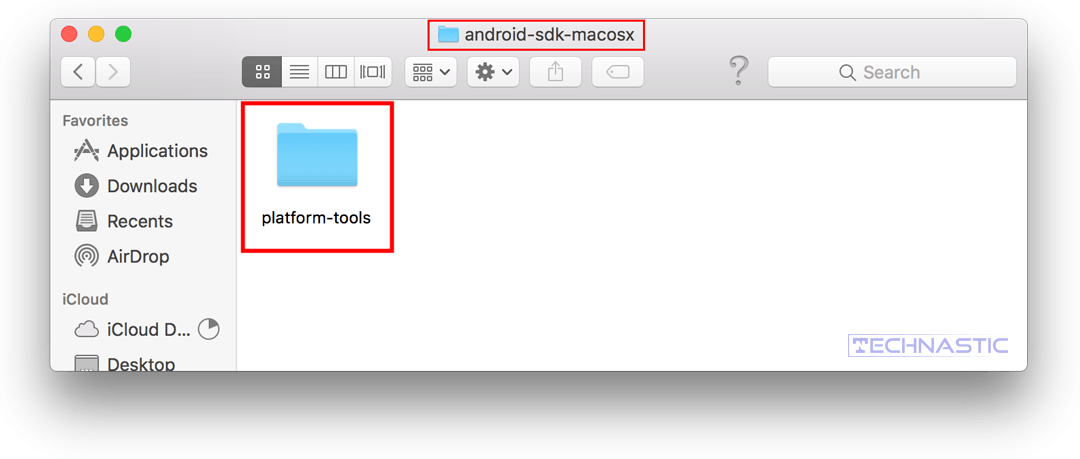
- Download the latest Android SDK Platform-tools that contain ADB and Fastboot drivers for Mac. Extract the downloaded zip to get a folder named ‘platform-tools‘.
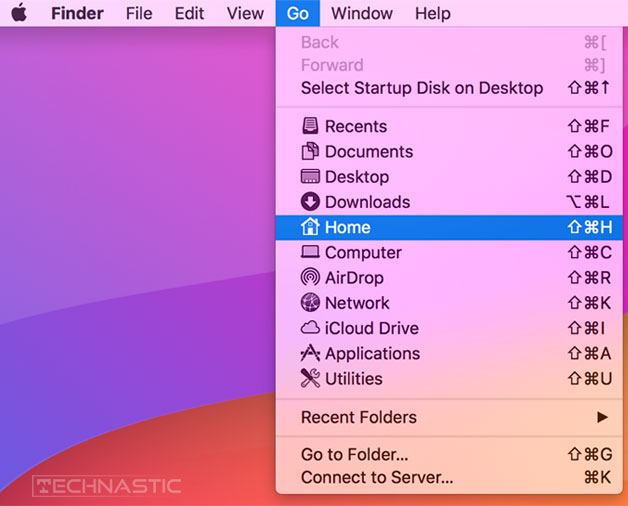
- Now open the Home directory on your Mac. If you don’t know how to do that, there are 3 ways to open it.
- Press Command+Shift+H on your keyboard.
- Press Command+Shift+G and enter ‘
/’.

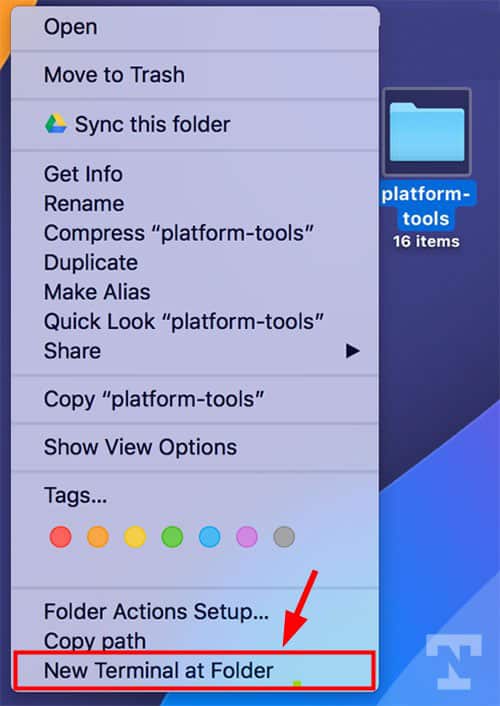
Add Terminal Shortcut to Platform-Tools
Finally, here’s the easiest method to add any folder path to the Mac terminal. Just follow the tip described below to get rid of typing the ‘platform-tools‘ folder path in the Mac Terminal every time you have to use ADB and Fastboot commands. It doesn’t provide a global or system-wide ADB support as the above method does.
- Open System Preferences on your Mac.
- Click on Keyboard.

- On the next screen, click on Shortcuts and select Services from the left pane.
- Now, look for Files and Folders in the right pane and enable New Terminal at Folder.
- The shortcut will be added to the folder context menu. You can close the System Preferences window.
- Just right-click on the ‘platform-tools‘ folder icon and select the New Terminal at Folder option.
- When the Terminal window is launched, you can run any ADB and Fastboot command directly without typing the folder path.

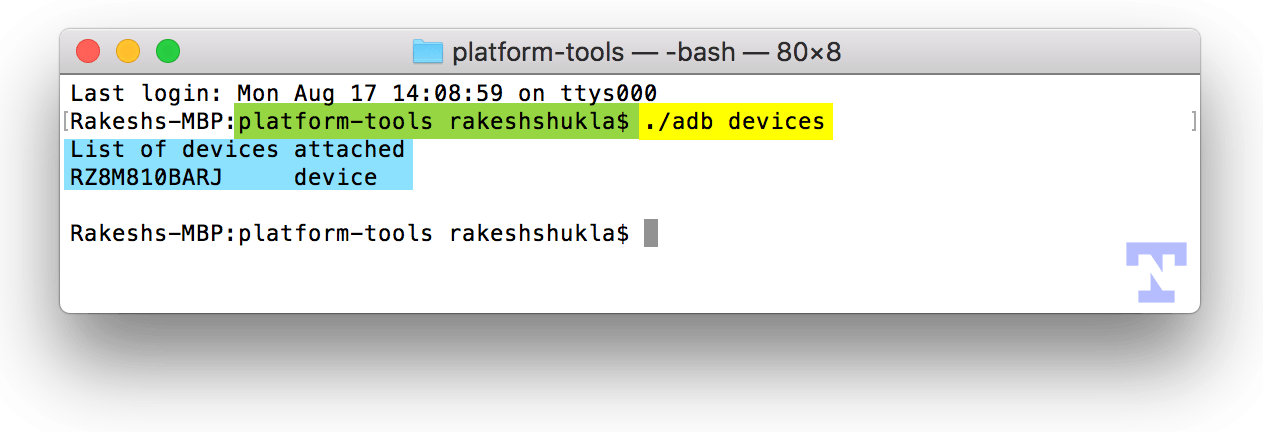 List of ADB devices in Mac Terminal
If you want to learn more about ADB and Fastboot, read my tutorial describing some more ways to install ADB on Mac. You should also check out these ADB Shell commands and other stuff that you can do on your Android device with ADB.
Источник
Install and Use ADB and Fastboot on Mac
ADB and Fastboot are multi-purpose command-line tools for Android that can be used via Windows, Mac, and Linux. If you try to use ADB commands in the Mac terminal without setting up ADB and Fastboot platform tools, you’ll get errors like “adb command not found”, and “fastboot command not found” on Mac. In this tutorial, I’ll be showing you how you can install and use Android SDK Platform-tools on Mac.
Whether you want to backup your Android device, debug it, sideload an APK, unlock the bootloader, install an OTA update zip, uninstall system apps, root, and flash TWRP recovery, tweak device settings, or gather key information about your device, ADB and Fastboot are essential tools. If you own an Android smartphone or tablet and don’t have any clue as to how you can install and use ADB and Fastboot on your Mac, this tutorial is just for you.
ADB and Fastboot Platform-Tools for Mac
In order to install ADB and Fastboot for Mac, there first thing you need to do it to download the latest Android SDK Platform-tools for Mac.
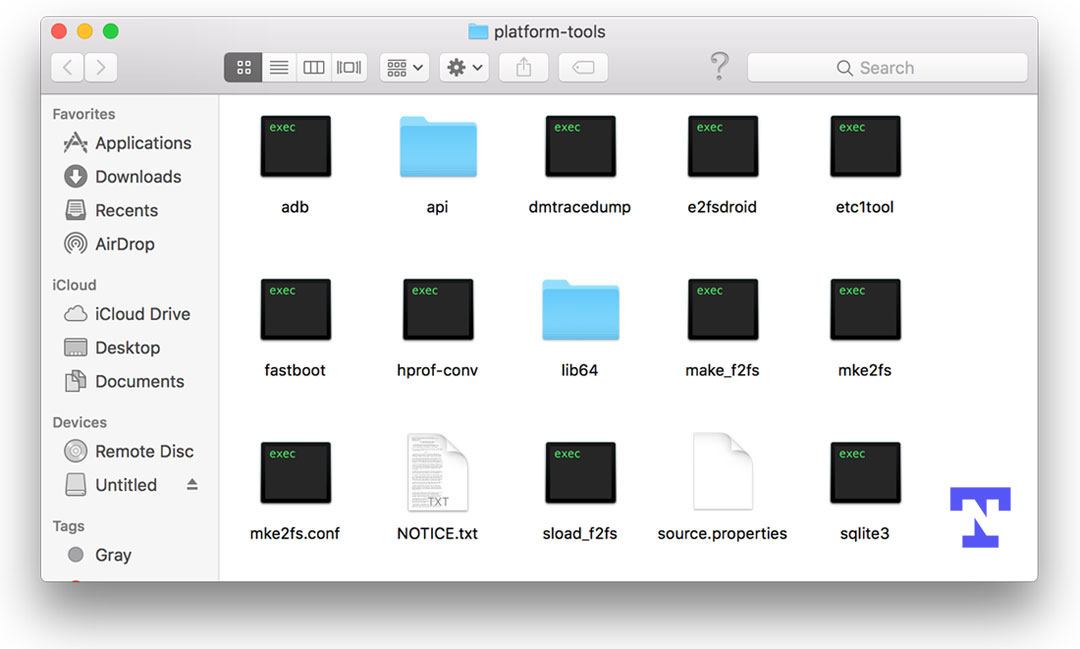
Having downloaded the SDK Platform-tools for Mac, you’ll need to extract the zip file.
Please be informed that ADB or Fastboot tools can’t be installed as a program or app on macOS. If you double-click the ‘adb‘ executable file, you’ll get the following error in the Mac Terminal.
“adb” cannot be opened because the identity of the developer cannot be verified or confirmed.
You’ll get the same error if you or try to run ‘fastboot‘ on Mac. Therefore, it’s important that you set up ADB and Fastboot correctly.
ADB or Fastboot Not Found on Mac Error
There is another scenario where you may get one of the following errors in the Mac Terminal.
adb: command not found
fastboot: command not found
adb devices not found
Whether you get the “adb command not found mac” or “fastboot command not found mac” error, it’s because you aren’t executing the ADB commands in the Mac Terminal the way you’re supposed to. I have already written a guide to fix ADB or Fastboot is not recognized error on Windows, and in this guide, we’ll see how to solve this issue on Mac.
Installing ADB and Fastboot on Mac
Being a lifelong Windows user, I didn’t know how to use ADB commands in Mac Terminal. I had to google about it after getting my Macbook Pro. At first, one may think that doing certain things are more complicated on Mac than Windows but once you get familiar with it, things become easy.
If you having a hard time using ADB or Fastboot commands on your Mac, follow the steps below to learn the correct way to set up and use them.
Method 1: Drag ‘Platform-tools’ Folder to Terminal
- Download the latest SDK Platform-tools.zip file for Mac from above.
- Extract the Zip file using Mac’s default Archive Utility app. you’ll have a new folder called ‘platform-tools‘ on your desktop.
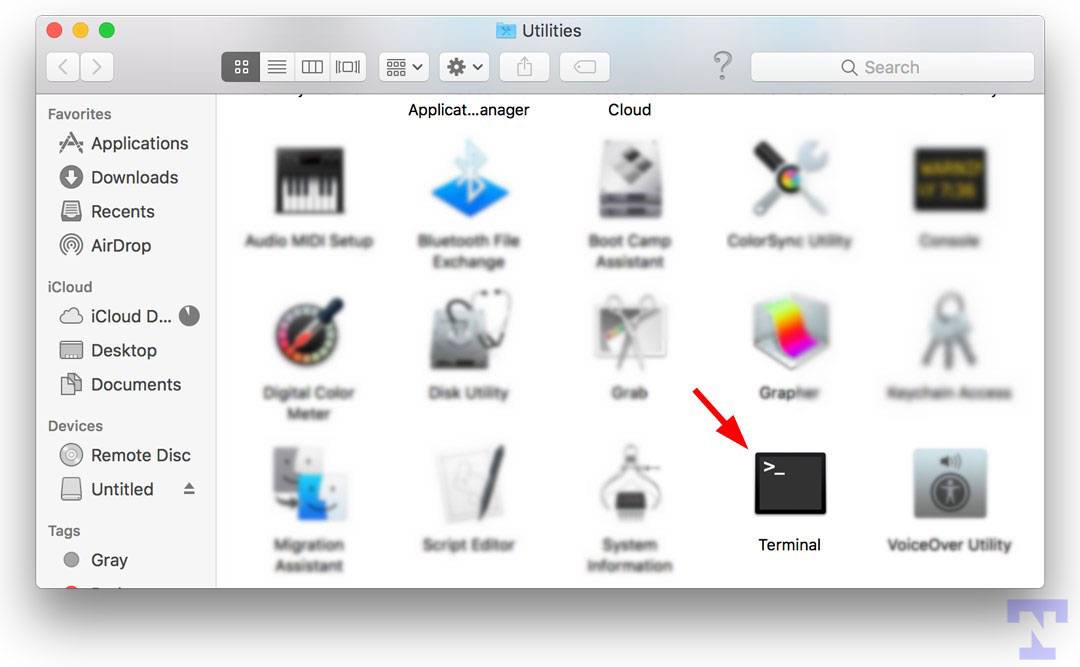
- Now, click on the Go option on the Mac Finder and select Utilities.
- You’ll find Terminal among the list of Mac Utilities. Double-click it to launch the Mac terminal window.
- When the Terminal is launched, click on the ‘platform-tools‘ folder icon, hold the Command button and drag it to the terminal window.
- Doing so will CD (change directory) or set the Terminal’s path to the ADB and Fastboot files on your Mac.

You can now execute any ADB or Fastboot command without any error.
Method 2: Type or Paste Folder Path in Terminal
As you saw above. you must add the ‘platform-tools’ folder path to the Mac Terminal to run ADB and Fastboot commands. You can also do that by either manually typing the path to the folder containing ADB and Fastboot files or just by copying and pasting the folder path in the terminal. You can read my tutorial describing 5 ways to copy file and folder path on Mac OS X.
- Launch the Terminal by navigating to Go > Utilities on your Mac.
- Now type the path of the ‘platform-tools‘ folder and press the Enter key.
- Alternatively, you can press the Option key and right-click on the folder icon and select Copy “platform-tools” as Pathname in the context menu and then paste the path in the Terminal.
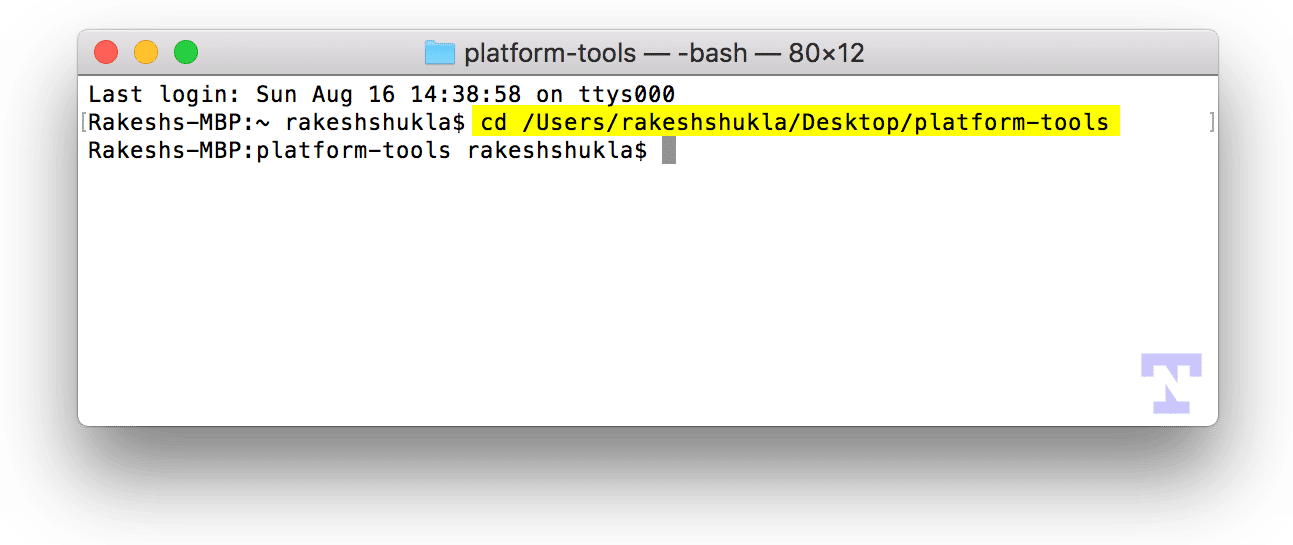
You are all set to issue ADB commands in the Mac Terminal and you won’t get the ‘adb command not found‘ error. To verify that you have done everything properly, type the following command, and press the Enter key.
If you want an easier way to install and use ADB and Fastboot, read my detailed tutorial on adding ADB to a path on Mac to enjoy global ADB access.
Using ADB and Fastboot Commands in Mac Terminal
Now that you have properly set up ADB and Fastboot on your Mac, let’s see how we can run commands.
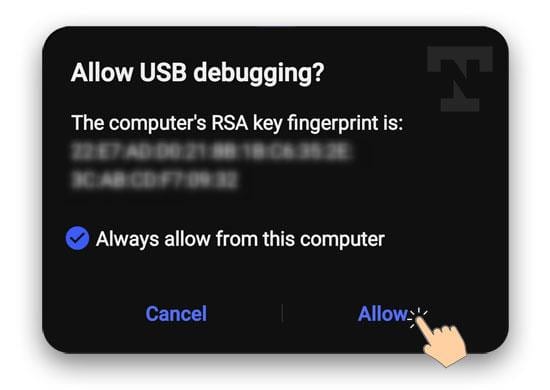
- Go to the Developer Options on your Android device and enable USB debugging.
- Now, connect your Android device to your Mac. You should also extend the screen lock time out from display settings on your phone or tablet.
- Open the Mac Terminal using any of the 3 methods I described above and issue the following command.
- Keep an eye on your Android phone’s display as you run the above command and authorize ADB or USB debugging on your device by selecting Allow when prompted.
- You’ll see your devices listed in the Mac terminal window. It means that ADB daemon is ready to communicate with your device.
Are you aware of the powerful features of ADB and Fastboot and the tasks you can perform using commands? Don’t forget to check out my huge list of commands with an explanation.
Источник
Настроить adb на Mac OS X
Я потратил некоторое время на то, чтобы определить, как настроить adb на Mac, поэтому я считаю, что писать, как его настроить, может быть полезно для некоторых людей. Adb – это инструмент командной строки для установки и запуска приложений Android на вашем телефоне / эмуляторе
Если вы поместите папку android-sdks в другой каталог, замените путь каталогом. Android-sdks / platform-tools находится в
Примечание: это было первоначально написано в разделе «Установка ADB на MAC OS X», но этот вопрос был закрыт как дубликат этого.
Вариант 1 – Использование Homebrew
Это самый простой способ и обеспечит автоматическое обновление.
Начать использовать adb
Вариант 2 – Вручную (только инструменты платформы)
Это самый простой способ получить ручную установку ADB и Fastboot.
Удалите старую установку (необязательно)
Перейдите на страницу https://developer.android.com/studio/releases/platform-tools.html и нажмите ссылку SDK Platform-Tools for Mac .
Перейдите в папку «Загрузки»
Разархивируйте загруженные инструменты
Переместите их где-нибудь, вы случайно не удалите их
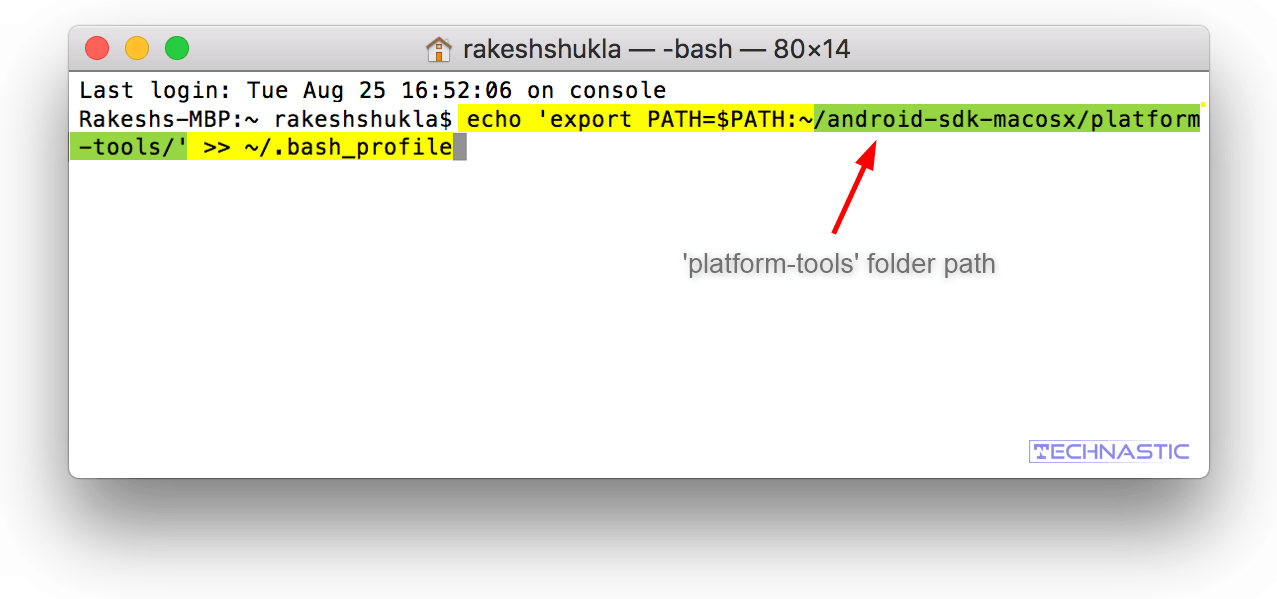
Добавить platform-tools на ваш путь
Обновите свой профиль bash (или перезапустите приложение терминала)
Начать использовать adb
Вариант 3. Если у вас уже установлен Android Studio
Добавить platform-tools на ваш путь
Обновите свой профиль bash (или перезапустите приложение терминала)
Начать использовать adb
Вариант 4 – MacPorts
Установите Android SDK:
Запустите диспетчер SDK:
Снимите все флажки, кроме Android SDK Platform-tools (необязательно)
Установите пакеты, получив лицензии. Закройте диспетчер SDK.
Добавьте platform-tools на свой путь; В MacPorts они находятся в /opt/local/share/java/android-sdk-macosx/platform-tools . Например, для bash:
Обновите свой профиль bash (или перезапустите терминал / оболочку):
Начните использовать adb:
Вариант 5 – Вручную (с SDK-менеджером)
Удалите старую установку (необязательно)
Загрузите Mac SDK Tools с сайта разработчика Android в разделе «Получить только инструменты командной строки» . Обязательно сохраните их в папке «Загрузки».
Перейдите в папку «Загрузки»
Разархивируйте загруженные инструменты
Переместите их где-нибудь, вы случайно не удалите их
Запуск диспетчера SDK
Снимите все флажки, кроме Android SDK Platform-tools (необязательно)

- Нажмите « Install Packages , примите лицензии, нажмите « Install . Закройте окно диспетчера SDK.

Добавить platform-tools на ваш путь
Обновите свой профиль bash (или перезапустите приложение терминала)
Начать использовать adb
ПРИМЕЧАНИЕ. Путь для adb изменился с тех пор, как Android Studio 1.0.xx
Для оболочки bash используйте:
Для оболочки tcsh используйте:
Лично я просто источник моего .bashrc в моем .bash_profile:
Поэтому я положил его в свой .bashrc. И я использую Android Studio, так что это был другой путь.
Вам также может потребоваться следующее:
Вот несколько мудрой информации:
Запустите терминал и перейдите в свою домашнюю папку.
Откройте и отредактируйте файл .bash_profile.
Если у вас нет файла .bash_profile на вашем компьютере, то создайте его. Введите команду ниже, чтобы создать новый файл. После создания выполните шаг 2.
Сохранить строку ниже)
Обновите файл, используя команду ниже.
Теперь вы должны увидеть свой путь к Android.
Это работает безупречно ….
В терминале Запустите обе команды рядом друг с другом
Если вы используете Android Studio в MAC OS X, вы можете выполнить следующую команду в своем приложении терминала:
И вы должны показывать список с вашими устройствами Android, подключенными через USB-кабель в вашем MAC, например, примерно так:
cd sdk/platform-tools/ а затем использовать ./adb devices
Подводя итог этому:
Создайте и откройте файл bash_profile
touch .bash_profile
open -e .bash_profile
Добавьте путь к папке инструментов платформы (в Android SDK)
export PATH=»$PATH:/Users/USERNAME/PATH TO ANDROID SDK/platform-tools/
Запустите команду . .bash_profile . .bash_profile для обновления (нет необходимости перезапускать терминал)
Если вы используете ZSH и имеете Android Studio 1.3: 1. Откройте файл .zshrc (находится в вашем домашнем каталоге, файл скрыт, поэтому убедитесь, что вы видите скрытые файлы). 2. Добавьте эту строку в конец: alias adb=»/Users/kamil/Library/Android/sdk/platform-tools/adb» 3. Выход из терминала 4. Откройте терминал и введите в adb devices 5. Если он сработает, он предоставит вам список всех подключенных устройств
В моем случае: я сделал следующее (на mac):
- Резервное копирование «.bash_profile» и «.profile»
- Очистил все связанные с андроидами пути.
- Создал новые пути, но на этот раз я перетащил соответствующие папки: в терминал. Я сделал это для «.bash_profile» и «.profile».
- Затем после успешного сохранения файлов каждый. Я перезапустил терминал, чтобы быть уверенным в тех изменениях, которые я сделал.
- Затем я продолжил тестирование, если adb сейчас отвечает … путем ввода: (в терминале) устройств adb
- Мне все еще не повезло (мои устройства), где не показывалось, но я снова перезапустил adb.
- Я продолжал делать «adroid update adb». Это только что убило и перезапустило adb
- Я попробовал еще раз, пока устройства не показывались.
- Я полностью поддерживал свое устройство Android и возвращал весь телефон обратно к заводским настройкам по умолчанию, перешел на активацию устройства для разработки и разрешил отладку usb в своих настройках> приложениях.
Я снова попробовал команду «adb devices», и все было в порядке, устройство было видно.
Всего наилучшего. Просто не сдавайся. Мне потребовалось много проблем. Все самое удачное.
Это полностью сработало для меня, после некоторого разговора после установки Android Studio:
Убедитесь, что у вас есть файл .bash_profile. Это должно быть в вашем каталоге [username].
В любом каталоге, в котором вы находитесь, введите следующее:
Теперь, как правило, у вас будет этот точный путь, но если нет, то используйте любой путь, который у вас есть папка инструментов платформы
Из каталога, в котором находится ваш .bash_profile, введите следующее:
Теперь введите adb devices . Вы должны увидеть ответ «Список подключенных устройств». Теперь вам не нужно каждый раз обращаться к каталогу инструментов-инструментов, чтобы ввести более загадочную команду, например, ./adb devices .
Источник


