- Настройка виртуальных хостов Apache в macOS
- Подключаем vhosts
- Настраиваем виртуальные хосты
- Редактирование /etc/hosts
- Настраиваем права доступа
- Проверка работы
- Set up Virtual Hosts on macOS Big Sur 11 in Apache
- Allow the vhosts configuration from the Apache configuration file httpd.conf
- Edit the vhosts.conf file
- Map Your IP address to localhost
- Restart Apache
- Losing Localhost
- Restart Apache
- Changing the WebServer Default User
- Find Your User and Group
- Restart Apache
- Настройка виртуальных хостов в Apache под Mac OS X
- Настройка виртуальных хостов
- И немного о правах
- Jason McCreary I build things with my hands
- What are Virtual Hosts?
- A Cleaner Configuration
- Mapping the .local extension
- A note about permissions
- In Closing
Настройка виртуальных хостов Apache в macOS

В данной статье я расскажу, как добавить виртуальные хосты в Apache.
Виртуальные хосты предназначены для того, чтобы создавать несколько сайтов на одном сервере. Фактически каждый виртуальный хост представляет собой отдельный сайт, со своим адресом и директорией, где размещаются его файлы.
После установки Apache создается один виртуальный хост с именем localhost. Вы можете открыть его в браузере по адресу http://localhost. Директория, в которой размещаются файлы данного сайта /Library/WebServer/Documents.
Есть несколько способов для добавления своих хостов в Apache. Можно прописать информацию о них в одном файле, а можно создать для каждого хоста свой отдельный конфигурационный файл с соответсвующим именем. Я буду использовать второй способ.
Файлы с настройками хостов мы будем размещать в одной директории /private/etc/apache2/vhosts. Файлы будут иметь имена вида mysite.local.conf.
Подключаем vhosts
Сначала нам нужно отредактировать конфигурационный файл Apache. Необходимо добавить в него директиву, которая будет подключать директорию, в которой мы будем создавать конфигурационные файлы хостов.
Откройте файл для редактирования, для этого выполните в терминале команду:
Найдите в файле строку #Include /private/etc/apache2/extra/httpd-vhosts.conf .
Под этой строкой добавьте новую строку:
Сохраните изменения и закройте файл. Чтобы закрыть файл и сохранить изменения, нажмите Ctrl+X, затем введите Y и нажмите Enter.

Мы добавили директиву, которая говорит о том, что Apache должен подключать все файлы с расширением .conf из директории /private/etc/apache2/vhosts.
Настраиваем виртуальные хосты
Создадим директорию /private/etc/apache2/vhosts , которую мы добавили в кофигурацию Apache на предыдущем шаге. Чтобы создать директорию выполните в терминале команду:
Перейдем в эту директорию:
Создадим конфигурационный файл _default.conf. В нем мы пропишем конфигурацию виртуального сервера по умолчанию. Создайте новый файл, выполнив в терминале:
Введите следующую конфигурацию:
Сохраните и закройте файл.
Теперь создадим конфигурацию для нашего виртуального хоста (сайта). Для примера мы будем создавать сайт с адресом mysite.local, а файлы сайта будем размещать в домашней директории в каталоге mysite (полный путь будет иметь вид /Users/Yury/mysite, вместо Yury должно быть ваше имя пользователя).
Выполните в терминале:
В конфигурации мы указали директорию (/Users/Yury/mysite), в которой располагаются файлы нашего сайта. Задали адрес сайта mysite.local. Указали, где будут храниться лог файлы с ошибками и информацией о доступе к сайту.
Прежде, чем наш сайт станет доступен по адресу http://mysite.local необходимо добавить информацию о нем в файл /etc/hosts.
Редактирование /etc/hosts
В файле /etc/hosts прописывается соответсвие IP адреса и текстовый адрес хоста (что-то вроде локального DNS).
Нам нужно добавить наш адрес mysite.local. Для этого откройте файл /etc/hosts:
И добавьте в файл строку:

Настраиваем права доступа
Иногда требуется выставить правильные права доступа на директорию, в которой хранятся файлы сайта. Если этого не сделать, то при доступе к сайту мы получим ошибку 403 Forbidden. Такую же ошибку мы получим, если директории не существует.
В нашем случае нам нужно установить права доступа на директорию /Users/Yury/mysite. Для этого выполните в терминале команду:
Проверка работы
Теперь наберите в браузере адрес сайта: http://mysite.local
Если все пройдет успешно, то вы увидете ваш сайт.
Источник
Set up Virtual Hosts on macOS Big Sur 11 in Apache
Setting up Virtual Hosts in Apache on on macOS Big Sur is straight forward after you have your local Web Development environment up and running – get your web development up and running first including Apache, PHP and MySQL on macOS following this macOS Big Sur Apache/PHP/MySQL guide here if required.
This guide will also work in macOS Catalina, Mojave, High Sierra and Sierra.
The process of setting up Virtual Hosts is done easier in the Terminal either using nano or vi with sudo or as a root user, or you can you a GUI visual editor like BBEdit which allows access to the /private/etc directory by clicking ‘Show Everything” in the open dialog box.
Allow the vhosts configuration from the Apache configuration file httpd.conf
Open the httpd.conf
Search for ‘vhosts‘ and uncomment the include line
Edit the vhosts.conf file
Open this file to add in the virtual host.
An example domain in the file is given of the format required to add in additional domains, just follow this to create your new virtual host:
We can take this example and extend on it, if you wanted a domain named apple.com for example, you can copy the existing text block and edit to suit:
So in the example above a vhost for apple.com is created and the document root is in the Sites/apple folder, in the text block above I have also added in some log files, what you need to change is the document root location username and domain name to suit your needs. Finish and save the file.
Now also you need to map the IP address to be the localhost.
Map Your IP address to localhost
Add the Domain and ‘www‘ alias to resolve to the localhost address
Restart Apache
Check out your local vhost domain in the browser
Losing Localhost
One caveat to note about virtual hosts is that once set up you lose your older document root previously at /Library/WebServer/Documents or accessed in the browser at http://localhost what happens is that you get a 403 Forbidden Error. But the
To get around this, you need to add in a vhost for localhost and declare this vhost before any of the others, in the same file:
Restart Apache
Changing the WebServer Default User
One of the frustrations of using the Users/username/Sites folder for vhosts is the permissions issues with things like updates and authentication.
This is because the default webserver user which runs httpd is known as _www, which will not be the user in your local account. If your machine is only in use by you and the webserver will run only under your account then you can change the user.
Find Your User and Group
In the Terminal use the id command to see your username and group
You will get a bunch of user groups, you need your primary user uid and group gid names
Change this back in /etc/apache2/httpd.conf
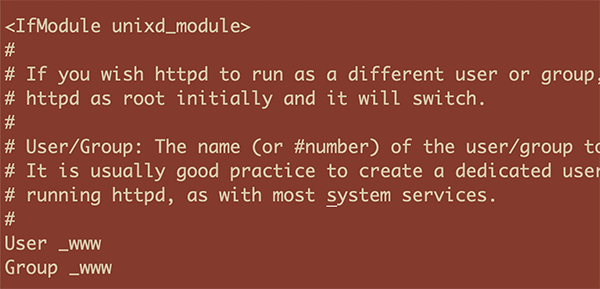
Restart Apache
Restart Apache and now you are running httpd as your local account.
That’s it, the guide will also work on macOS Catalina, Mojave, High Sierra and Sierra.
Источник
Настройка виртуальных хостов в Apache под Mac OS X
По умолчанию настройки виртуальных хостов Apache на Mac OS X находятся в файле /etc/apache2/extra/httpd-vhosts.conf
Для начала открываем терминал и переходим в root режим:
Далее редактируем файл конфигураций Apache:
Найдите в нем следующую строчку:
И замените ее на:
Теперь нам необходимо создать эту папку:
Создайте конфигурационный файл виртуального хоста по умолчанию:
И добавляем в него:
Этот файл служит в качестве виртуального хоста по умолчанию. Когда Apache не может найти соответствующий виртуальный хост, он будет использовать первую конфигурацию. Технически этот файл не нужен, поскольку он просто повторяет конфигурации из http.conf. Тем не менее, он обеспечивает локальную настройку сервера.
Создайте файл конфигурации виртуального хоста:
И добавьте в него следующее:
Перезагрузим веб — сервер Apache:
Если у вас возникли какие-нибудь проблемы, попробуйте выполнить команду, которая проверит настройки:
Настройка виртуальных хостов
Для того, чтобы у вас заработал сайт в браузере, по пути site.loc необходимо отредактировать файл hosts:
Добавьте строчку в конце файла. Имя хоста должно соответствовать ServerName в настройках Apache:
Чтобы очистить локальный кеш DNS, выполните следующую команду:
Теперь можно запрашивать наш сайт по http://site.loc
Проверить ошибки в настройках сервера можно с помощью команды:
И немного о правах
При запросе вашего сайта, вы можете получить в ответ 403 Forbidden, вероятно, это проблема с правами на чтение. Проще говоря, пользователь Apache не имеет на это прав.
Выполните следующую команду, чтобы это исправить:
Источник
Jason McCreary I build things with my hands
Main Thread November 30, 2014 • 5 min read
mountaindogmedia left the following comment on my post for installing Apache, PHP, and MySQL on Mac OS X:
Jason, have you tried a modified Include statement for virtual hosts to map a directory? So instead of /etc/apache2/extra/httpd-vhosts.conf as indicated, one would use /etc/apache2/extra/vhosts/*.conf and then just create a default.conf for the first virtual host, and then add/edit/delete vhost files as needed. I think it would be easier to manage host files and changes.
Indeed, mountaindogmedia, this is an easier way. In fact, this is the default configuration for many servers.
By default, the Apache Virtual Host configuration on Mac OS X is located in a single file: /etc/apache2/extra/httpd-vhosts.conf . You need to edit the Apache configuration to include this file and enable virtual hosts.
Over the years, I have created many virtual hosts. Each time editing httpd-vhosts.conf . To mountaindogmedia’s point, this becomes difficult to manage. Furthermore, Apache configurations often get reset when upgrading Mac OS X. In the same amount of steps (two), you can adopt a more manageable configuration.
What are Virtual Hosts?
The term Virtual Host refers to the practice of running more than one web site on a single machine.
By default, the Apache configuration on Mac OS X serves files from /Library/WebServer/Documents accessed by the name locahost . This is essentially a single site configuration. You could mimic multiple sites by creating subdirectories and access a site at localhost/somesite .
This is not ideal for several reasons. Primarily, we would rather access the site using a name like somesite.local . To do that, you need to configure virtual hosts.
A Cleaner Configuration
First, open the Terminal app and switch to the root user to avoid permission issues while running these commands.
Edit the Apache configuration file:
Find the following line:
Below it, add the following line:
This configures Apache to include all files ending in .conf in the /private/etc/apache2/vhosts/ directory. Now we need to create this directory.
Create the default virtual host configuration file.
Add the following configuration:
I create this file to serve as the default virtual host. When Apache can not find a matching virtual host, it will use the first configuration. By prefixing this file with an underscore, Apache will include it first. Techincally this file is not needed as it simply repeats the configuraton already in httpd.conf . However, it provides a place to add custom configuration for the default virtual host (i.e. localhost ).
Now you can create your first virtual host. The example below contains the virtual host configuration for my site. Of course, you will want to substitute jasonmccreary.me with your domain name.
Create the virtual host configuration file:
Add the following configuration:
This VirtualHost configuration allows me to access my site from http://jasonmccreary.local for local development.
Note: I use the extension local. This avoids conflicts with any real extensions and serves as a reminder I am developing in my local environment.
Note: The Require all granted configuration became available in Apache 2.4 which comes with Mac OS X Yosemite. If you are running a version of OS X before Yosemite, use the equivalent 2.2 configuration in the upgrading Apache examples.
The final step is to restart Apache:
If you run into any problems, run:
This will test your Apache configuration and display any error messages.
Mapping the .local extension
In order to access sites locally you need to edit your hosts file.
Add a line to the bottom of this file for your virtual host. It should match the value you used for the ServerName configuration. For example, my site:
I like to run the following to clear the local DNS cache:
Now you can access your site using the .local extension. For example, http://jasonmccreary.local.
A note about permissions
You may receive 403 Forbidden when you visit your local site. This is likely a permissions issue. Simply put, the Apache user ( _www ) needs to have access to read, and sometimes write, to your web directory.
If you are not familiar with permissions, read more. For now though, the easiest thing to do is ensure your web directory has permissions of 755 . You can change permissions with the command:
In my case, all my files were under my local
/Documents directory. Which by default is only readable by me. So I had to change permissions from my web directory all the way up to
/Documents to resolve the 403 Forbidden issue.
Note: There are many ways to solve permission issues. I have provided this as the easiest solution, not the best.
In Closing
Any time you want to add a site to Apache on your Mac, simply create a virtual host configuration file for that site and map it in your hosts file.
Find this interesting? Let’s continue the conversation on Twitter.
Источник


