Set up MIDI devices using Audio MIDI Setup on Mac
If you use MIDI devices or a MIDI interface connected to your Mac, you can use Audio MIDI Setup to describe the configuration of your MIDI devices. There’s a default configuration already created, but you can set up your own.
You can use this configuration information for apps that work with MIDI, such as sequencers, to control your MIDI devices.
Note: Make sure your MIDI devices are connected to your Mac. If you’re using an interface device, connect any other MIDI devices you’re using to the interface. Also check that any software provided by the manufacturer of the MIDI devices has been installed. For more information, see the documentation that came with your devices.
View a MIDI configuration
In the Audio MIDI Setup app  on your Mac, choose Window > Show MIDI Studio.
In the MIDI Studio window, click the Choose MIDI Configuration pop-up menu (it may show Default), then choose the configuration you want to view.
In the toolbar, click the following buttons to change how the configuration is shown:
Show Icon View  : Devices in the configuration are shown as icons. If a device isn’t connected, its icon is dimmed. To view information about a device, such as channel properties and ports, and to add or remove ports, double-click the device’s icon.
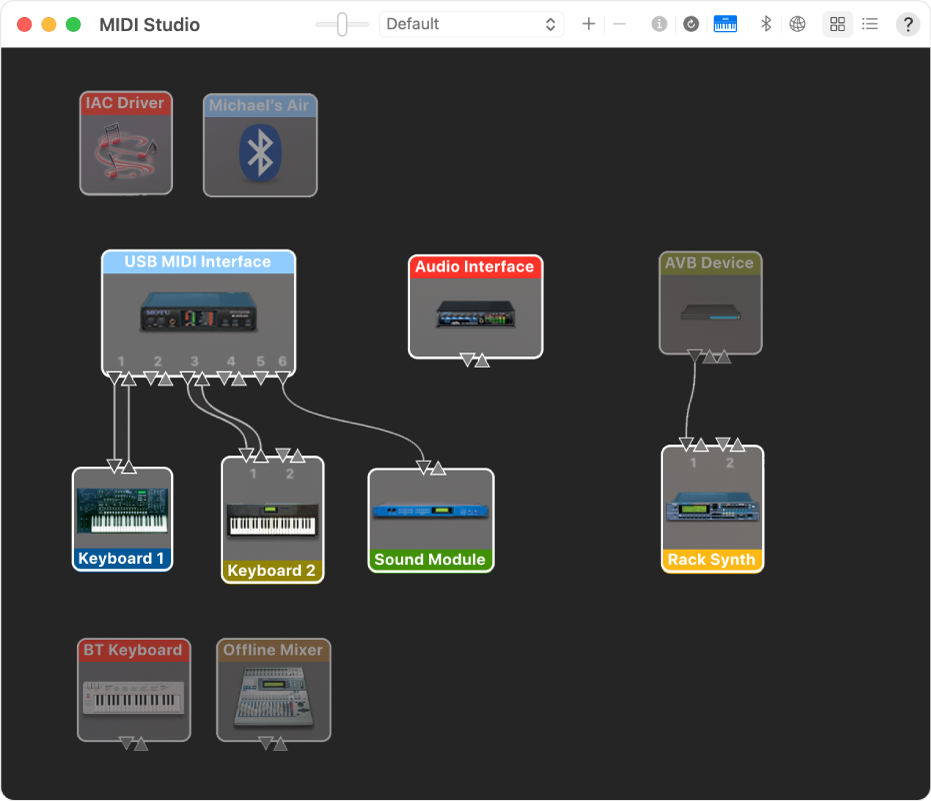
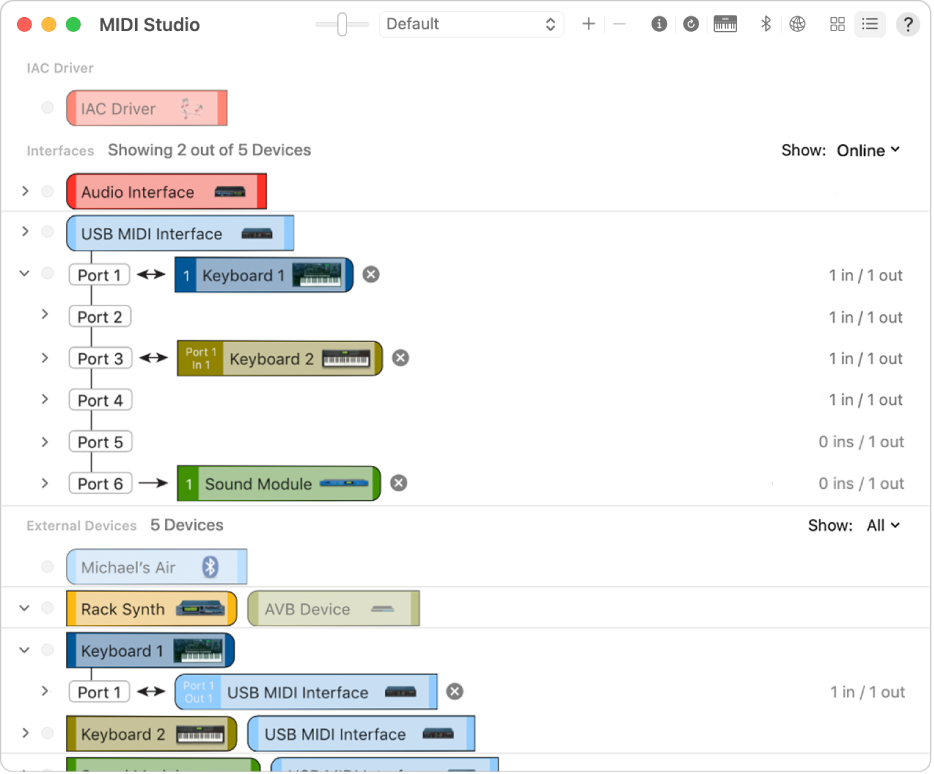
Show List View  : Devices in the configuration are shown in a list, organized by type (such as Interface or External Device). If a device isn’t connected, it’s dimmed. To filter which devices are shown, click the Show pop-up menu, then choose an option (such as Online or Connected). To view information about a device, double-click the device. To view its ports, or to connect or disconnect devices, click the device’s disclosure triangle.
Create a MIDI configuration
In the Audio MIDI Setup app on your Mac, choose Window > Show MIDI Studio.
In the MIDI Studio window, click the Choose MIDI Configuration pop-up menu (it may show Default), then choose New Configuration.
Enter a name for the new configuration, then click OK.
To add a new external MIDI device, click the Add button  in the MIDI Studio toolbar.
To set properties and add or remove ports for the MIDI device, double-click the device, or select it, then click the Device Info button  in the toolbar.
In the Properties window, do any of the following:
Describe the device: Enter a name for the MIDI device; the name appears in apps you use with the device. If you know the manufacturer and model, you can enter those.
Change the device icon: Click the MIDI device’s icon to open the Icon Browser, select a different icon to represent the device, then click the new icon to close the Icon Browser.
Change the device color: Click the color well, select a different color to use for the MIDI device, then close the Colors window.
Set the device channels and other properties: Click Properties, then click the channels to use for transmitting and receiving audio. To deselect a channel, click it again. Also select whether to use the MIDI Beat Clock, the MIDI Time Code, or both, then select other features.
Add or remove ports: Click Ports, click the Add button below the list of ports, then specify the MIDI In and MIDI Out connectors for the port. To delete a port, select it in the list, then click the Remove button  .
.
Select MIDI-CI profiles for interface devices: If an interface device supports MIDI-CI, click MIDI-CI to see the profiles available on each channel. To turn a profile on or off, select or deselect its checkbox.
Repeat steps 4 through 7 for each MIDI device you want to include in the configuration.
In the MIDI Studio window, specify the connection between MIDI devices:
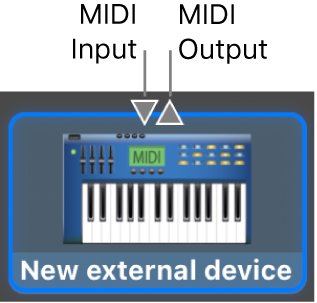
In Icon View , drag the In or Out connectors at the top of a device icon to the corresponding connector on another device icon.
In List View , click a device’s disclosure triangle, click the Port disclosure triangle, click the Add Connection icon, then use the pop-up menus to specify the connections.
If you have a MIDI interface connected to the USB port on your Mac, it should appear in the MIDI Studio window. If it doesn’t, see If a connected MIDI device isn’t shown.
You can’t specify a “MIDI thru” connection between two MIDI devices. To indicate a MIDI thru connection, connect the two MIDI devices to the same port of the MIDI interface device.
Edit a MIDI configuration
In the Audio MIDI Setup app on your Mac, choose Window > Show MIDI Studio.
In the MIDI Studio window, click the Choose MIDI Configuration pop-up menu (it may show Default), then choose Edit Configurations.
Select a configuration, then click Duplicate, Rename, or Delete.
When you’re finished making changes, click Done.
Источник
Тестирование настройки MIDI
Используйте программу «Настройка Audio-MIDI» на компьютере Mac для тестирования настройки MIDI.
Ниже приведены инструкции по тестированию настройки MIDI с помощью программы «Настройка Audio-MIDI».
- Подключите MIDI-контроллер (такой как клавиатура) к компьютеру Mac. Если используется MIDI-интерфейс, подключите его к компьютеру Mac, а контроллеры подключите к MIDI-интерфейсу.
- Откройте программу «Настройка Audio-MIDI» в подпапке «Утилиты» папки «Программы».
- Выберите «Окно» > «Показать MIDI‑студию». Устройства MIDI, подключенные к компьютеру Mac, отображаются в окне «MIDI-студия» значками. Значки устройств, которые не подключены в данный момент, затенены.
- Выберите устройство, которое требуется протестировать, затем щелкните в меню MIDI-студии.

- Чтобы протестировать входящий MIDI-сигнал на устройстве, щелкните стрелку вниз на значке для выбранного устройства. Каждый MIDI-порт на устройстве имеет собственный набор стрелок. Если на устройстве есть индикаторы состояния для передачи данных MIDI, индикатор для соответствующего порта должен светиться. Если устройство подключено для аудиовывода и настроено для приема на том же самом канале MIDI, оно также будет издавать звук.
- Чтобы протестировать MIDI-вывод устройства, воспроизведите ноту на MIDI-контроллере. При получении этого сигнала компьютером Mac в MIDI-студии будет выделена стрелка вверх для соответствующего порта MIDI-вывода на устройстве.
- Чтобы остановить тестирование, щелкните .

Если MIDI-контроллер или интерфейс не отвечают во время выполнения любого из этих тестов, убедитесь, что они совместимы с версией macOS на компьютере Mac. Обратитесь к производителю за поддержкой. Если обновление доступно, следуйте инструкциям производителя для обновления устройства или ПО.
Если из MIDI-модулей не слышен звук
Если индикаторы на MIDI-интерфейсе горят во время тестирования, убедитесь, что кабели из MIDI-портов на интерфейсе подключены к MIDI-портам на модуле.
Если звук по-прежнему не слышен, убедитесь, что аудиовыходы модулей подключены к микшеру или другой системе усиления. Если модуль оснащен разъемом для наушников, попробуйте подключить к модулю наушники для проверки звука.
Информация о продуктах, произведенных не компанией Apple, или о независимых веб-сайтах, неподконтрольных и не тестируемых компанией Apple, не носит рекомендательного или одобрительного характера. Компания Apple не несет никакой ответственности за выбор, функциональность и использование веб-сайтов или продукции сторонних производителей. Компания Apple также не несет ответственности за точность или достоверность данных, размещенных на веб-сайтах сторонних производителей. Обратитесь к поставщику за дополнительной информацией.
Источник
Set up audio devices in Audio MIDI Setup on Mac
Use Audio MIDI Setup to set up audio input and output devices, such as microphones and multichannel audio interfaces. You can also use it to route audio from iOS and iPadOS devices directly into your Mac.
Available settings in Audio MIDI Setup depend on the audio device you’re using. For example, you can adjust the volume for each channel your audio output device has available.
Connect your audio devices to your Mac and, if necessary, install any software included with the devices.
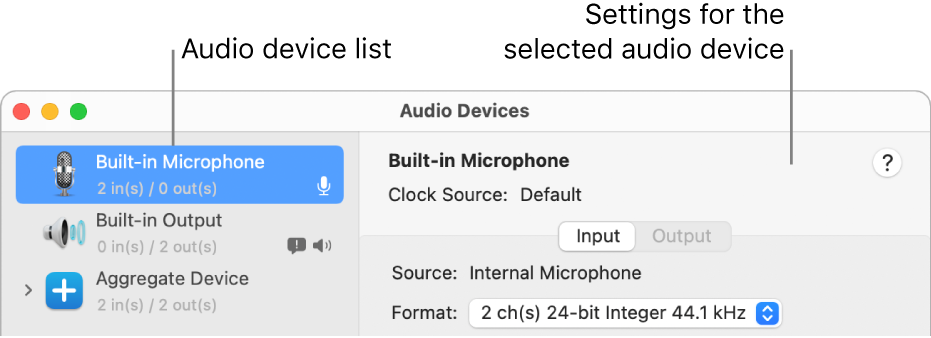
In the Audio MIDI Setup app on your Mac, in the sidebar of the Audio Devices window, select a device.
Note: For iOS and iPadOS devices, first click Enable, then select the device. You may be asked to unlock your device with a passcode or to trust the device.
Control-click the device, or click the Configure Selected Device pop-up menu  at the bottom-left of the sidebar, then choose how the device is going to be used:
For sound input: Choose Use This Device for Sound Input.
For sound output: Choose Use This Device for Sound Output.
For playing system sounds: Choose Play Alerts and Sound Effects Through This Device.
On the right side of the Audio Devices window, choose the options available for the device you selected:
In most cases, “Clock source” is set to the default.
Click the Format pop-up menu, then set the sample rate and bit depth. Make sure they match the appropriate settings for your audio device.
If your Mac supports the hardware sample rate converter, the Hardware Rate Converter pop-up menu is available in the Input pane. When you choose Automatic from the pop-up menu, the hardware sample rate converter is turned on if the audio samples coming in are PCM and formatted according to the international standard IEC 60958-3. The hardware sample rate converter is turned off if the input stream is encoded. You can also choose Enable or Disable from the menu, to keep the hardware sample rate converter turned on or off.
If software volume control is available for your device, the Volume sliders appear blue to indicate that they’re active. Drag the sliders to set the volume for each channel.
To set up a surround (multichannel) speaker configuration, click Configure Speakers, then set up the configuration.
Источник
Audio MIDI Setup: Your Mac’s Secret Sound Manager
Your Mac’s Sound Preference Pane is the go-to place for choosing audio inputs and outputs, but it isn’t the only place you can go in OS X to manage your Mac’s sounds. Even though Audio MIDI Setup may sound intimidating, it’s loaded with controls that go far beyond what its name implies and can help you fine tune the audio quality your Mac pumps out.
You can find the Audio MIDI Setup app tucked away in Applications > Utilities . Once launched, you can choose any audio input or output available and make adjustments that go beyond the basic features in the Sound Preference Pane.
My MacBook Pro, for example, has the usual built-in speakers for output, but I also have Audioengine’s D3 DAC connected to a USB port. It’s a 24-bit digital-to-analog converter that gives me much better audio than my Mac’s built-in audio chip can manage. I can set my audio sample rate to 44.1 kHz, 48 kHz, 88.2 kHz, or 96 kHz — but only from Audio MIDI Setup.
 Audio MIDI Setup lets you control sample rates for your speakers and mics
You can set the sample rate for audio output devices by first selecting the device from the left-side column, and then clicking the Output tab. Now use the Format pop-up menu to choose the sample rate you want. Higher is generally better, but don’t bother to choose a setting that’s beyond quality you can hear; if it doesn’t sound better to you, don’t bump the sample rate up, and there’s no point in wasting processor time on something that isn’t giving you audio quality beyond what you can hear.
Some audio outputs support multichannel. You can set that by clicking Configure Speakers , and then choosing Stereo or Multichannel. Use Stereo for 2-speaker setups, and Multichannel for surround sound setups.
You can set panning for multi-channel speaker setups
Every speaker connected to that output will appear, and you can assign specific channels to exactly the speaker you want. From here, you can also drag the blue dot to set panning.
I set my D3 to 88.2 kHz because that sounds great with my Audioengine A5+ speakers. Yep, I’m a little spoiled with my Mac’s audio setup.
You can set the sample rate for input devices, such as microphones, from Audio MIDI Setup, too. My Rode Podcaster mic is set to 44.1 kHz because I use it to record my speaking voice. No surprise there considering I spend so much time recording podcasts.
There are a couple buttons tucked away at the bottom of the device list. The plus button lets you create Multi-Output Devices — or groups of outputs that act as a set of speakers. I set up one that includes my D3 and AirPlay so I can play the same audio at my desk and through my home entertainment center. Think of it as a poor man’s Sonos in that you can play the same music through speakers in different parts of your home or office simultaneously.
You can group outputs together to play audio simultaneously through multiple speaker sets
Aggregate Devices, also available from the plus button, let you group together audio outputs to create your own multi-channel system from speakers you already own. Multi-Output and Aggregate devices show up in the Sound Preference Pane’s Output tab just like the rest of your speakers.
The gear button hides a pop-up menu where you can set default input and output devices, and even set specific outputs for general audio and system sounds. Translation: You can use one set of speakers just for your Mac’s alert sounds. You can do this, too, from the Sound Effects tab in the Sound Preference Pane.
All audio sources, including multi-output groups show up in the Sound Preference Pane
Once your speakers and mics are set up just the way you want, it’s OK to select them from the Sound Preference Pane if you don’t feel like launching Audio MIDI Setup just to switch speakers. Think of Audio MIDI Setup as your super charged Sound Preference Pane.
With great power comes great responsibility, so use your new-found skills for good. Don’t play crappy music. Life is too short for that.
Источник


