- Автоматическое монтирование сетевых дисков (Samba) в macOS
- Как автоматизировать монтирование smb-ресурсов при старте системы macOS
- Mac os automount smb
- Why automount may be useful
- Create a local mount point
- Modify the master map
- Creating the resources map
- Activate the changes
- Optional configuration changes
- Finder integration
- Автоматизация монтирования samba-разделов в Mac OS
- Причины неудобств
- На первых порах
- Безопасность
- Улучшения и расширение
- Перспективы
- Mac os automount smb
- Hint Options
Автоматическое монтирование сетевых дисков (Samba) в macOS
Работа в сети Windows с маков периодически омрачалась не понятным поведением сетевых ресурсов. Довольно часто в левой колонке Finder сервер (SMB) не отображался, хотя точно был в сети и его всегда можно подключить принудительно по ip адресу или по сетевому имени. Сделать это можно из меню Finder -> Переход -> Подключение к серверу.
Проблема не новая и наблюдается не только с этим конкретным NAS. Стоит отметить, что на NAS одновременно были включены протоколы SMB и Apple Filing Protocol (AFP), но пользователи подключались и работали в основном по первому.
В конце-концов мне надоело каждый раз объяснять пользователям как принудительно подключиться к сетевому ресурсу, если он вдруг перестал отображаться в Finder. Подобные действия вызывали у них сложности и я решил разобраться с данным вопросом раз и навсегда, чтобы больше не дергали.
Как автоматизировать монтирование smb-ресурсов при старте системы macOS
Ранее я рассказывал про автоматическое монтирование smb-ресурсов при загрузке Linux. На macOS это делается несколько иначе, несмотря на схожесть внутреннего устройства. Конечно, можно извратиться и сделать скрипт в Automator, но есть гораздо более легкий путь.
Для начала подключаемся к требуемому smb-ресурсу, любым способом — выбрав его в Finder или принудительно по ip (если ip постоянный).
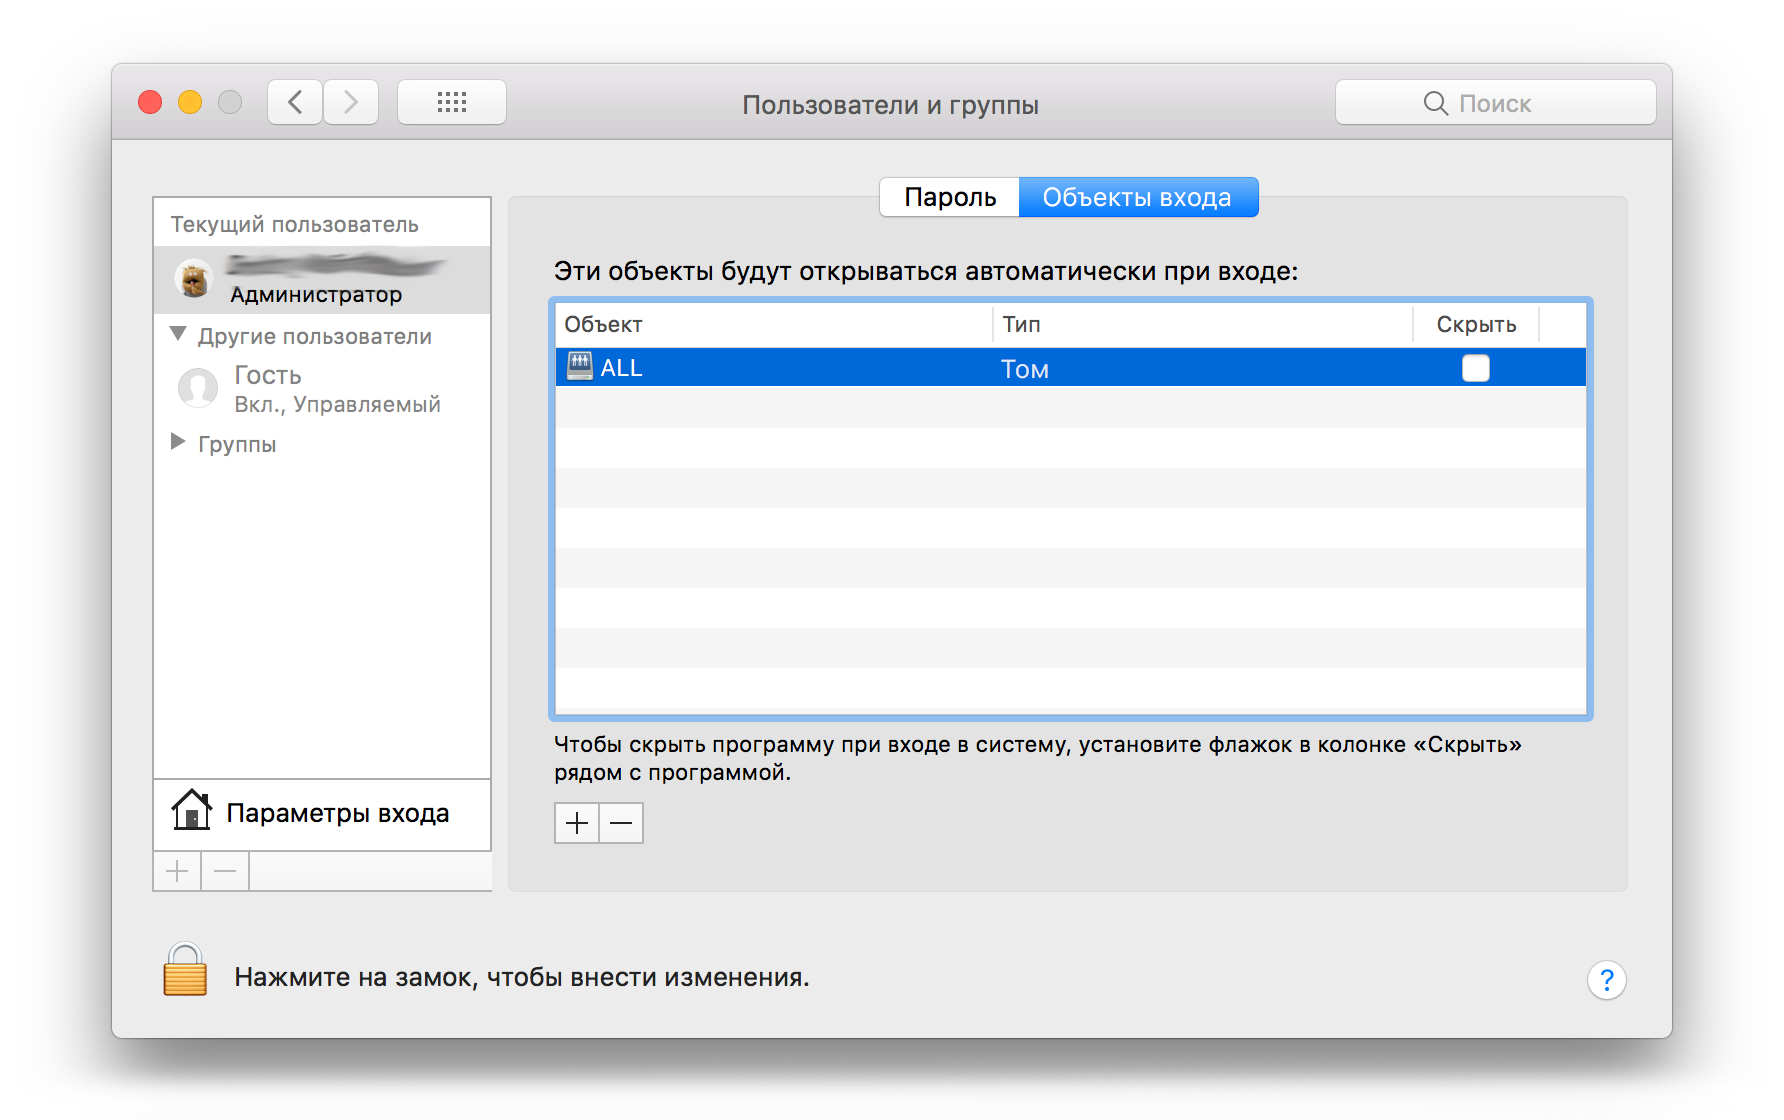
Далее заходим в Системные настройки -> Пользователи и Группы (внизу увидите замочек для разблокировки настроек). У своей учетной записи во вкладке «Объекты входа» добавляем уже примонтированный том через плюс (+), либо просто перетаскиваем его мышкой из Finder. Готово.
Если считаете статью полезной,
не ленитесь ставить лайки и делиться с друзьями.
Источник
Mac os automount smb
A quick tip on how to use the Mac OS X automount command to automatically mount a remote filesystem. You will need to be comfortable with the OS X command-line for this but once you know how it is fairly simple.
Last updated: Feb 5, 2020
Why automount may be useful
I have a number of remote filesystems that are stored on Network Attached Storage (NAS) devices connected to my local network wireless router. For example, I use a share on a NAS device to host all of my media for use with the Plex Media Center. Anytime I run Plex on a computer I need to mount that share in order to be able to play the media. Likewise I have a number of cron scripts that run nightly to sync local filesystems on my Mac with a share on the NAS device.
(As an aside I should mention that remote syncing is not intended as a replacement for backups or a version control repository for your Xcode projects).
Now it would be a pain if I had to manually mount those remote filesystem shares everytime I wanted to run Plex or some other application or script. One possible option is to have them permanently mounted by adding them as login items to my OS X account (mount the share and then drag the disk icon from your desktop into the Login Items tab of your account settings in the System Preferences application). However these are filesystems that I do not generally want to see on the desktop and which sometimes are not even reachable.
A better approach in this case is to use the automount service that is part of Mac OS X. A few very simple configuration steps will allow the automount service to automatically manage access to a remote filesystem mounting it only when it is accessed and unmounting it later when it is no longer being used.
Create a local mount point
To get started you need to create a local directory that will be managed by the automount service. All remote filesystems will appear under this directory which acts as a trigger to the automount service. I keep these remote filesystems under the directory /mnt/Resources . The Resources directory is created and managed by the automount service but you will need to create the /mnt directory if it does not exist. You will need to use sudo to create the directory.
Note that starting with Catalina the root file system is now read-only. I have moved the mount point to the user writable filesystem /System/Volumes/Data :
Modify the master map
The automount process reads the file /etc/auto_master to retrieve a list of directories that it should control. I’ve placed my resource maps in a separate map file ( /etc/auto_resources ). The one line modification to add /System/Volumes/Data/mnt/Resources to the auto_master file is as follows:
So any time an attempt is made to access a directory under /System/Volumes/Data/mnt/Resources the automount process will check the auto_resources map file to determine if it needs to mount a remote filesystem.
Creating the resources map
Let’s assume we have a remote filesystem /media on a NAS device named nas001 . Also we will assume the filesystem is formatted as a Microsoft Windows (SMB) filesystem as it is also accessed by Windows devices (true in my case). To automatically mount that filesystem anytime we attempt to access it under /System/Volumes/Data/mnt/Resources/media we need to add a map to the /etc/auto_resources file as follows:
- This assumes that anonymous access to the filesystem is allowed otherwise you need to include a username and password (e.g. ://username:password@nas001/media ).
- The hostname of the remote device must be in the local /etc/hosts file or otherwise defined by DNS. On my local systems I simply include it in the /etc/hosts file.
- You can add other remote filesystems to the same map file and they will also be mounted under /System/Volumes/Data/mnt/Resources . Add each new filesystem map on a separate line.
Activate the changes
Any time you modify the map files you need to inform the automount service in order for them to become active:
Optional configuration changes
A number of options can be changed in the /etc/autofs.conf configuration file. The only option that you are likely to ever want to change is the timeout period. This is time that the automount service will wait before unmounting a filesystem that has not been accessed. This is set to 1 hour (3600 seconds) in the /etc/autofs.conf that ships with OS X:
Finder integration
It should be noted that filesystems that are automounted in this way will not show up automatically in the sidebar of the OS X Finder application. Nor will they automatically appear as disk icons on the desktop. If that is important you may want to simply add the share as a login item and have it mounted whenever you login.
For filesystems that are accessed by scripts or applications I prefer having them automatically mounted and unmounted in the background on demand. You can of course always go to the directory in the Finder using the Go > Go To Folder… command and entering /mnt/Resources.
Источник
Автоматизация монтирования samba-разделов в Mac OS
Причины неудобств
Каждый раз для подключения к самбе надо изрядно потыкать мышкой: Finder -> Подключение к серверу -> ввод имени сервера (-> первый раз ещё и пароль спросят) -> выбор папок, которые нужно подключить -> Ok. Потом, если захочется делать бэкап в примонтированную по самбе директорию, прийдётся ещё и образ .sparsebundle создавать, и монтировать ещё и его. Всё это, возможно, и не сильно напрягает, если делать раз в пару недель на стационарном ПК, который постоянно находится в одной и той же сети и не выключается так же, как и сервер. Но когда это надо делать после каждого включения/пробуждения ноутбука — это ни в какие ворота не лезет. Плюс к этому выяснилось, что если не отмонтировать разделы и сменить сеть (скажем прийти к соседу в гости), то система изрядно виснет после выхода из сна, ибо не находит сервер с шарами, а, в редких случаях, ещё и в kernel panic случается. Всё это сильно омрачило радость поднятия сервера и мечты о том что больше я даже вспоминать не буду о бэкапах, пока они мне не понадобятся (тьфу тьфу тьфу). Было решено, что процесс нужно автоматизировать.
На первых порах
В попыхах были нагуглены способы монтирования самбы и тут же родился маленький скрипт из парочки идентичных команд следующего вида:
Так же было найдено как сделать аттач образа для TimeMachine:
hdutil оказался более смышлёным и создание папок не потреловал.
Первая версия скрипта была готова.
Безопасность
Очень напрягало указание пароля в явном виде при монтировании. Почитав ман для mount_smbfs узнал про nsmb.conf. Но идея так же не шибко понравилась, так как всё равно пароль хранится где-то в файле в открытом виде. Тут же вспомнил, что через GUI пароль спрашивают единожды, а далее вытаскивают из keychain. Захотелось использовать её. Оказалось автоматически, как если бы взял nsmb.conf и дописал ключик -N к mount_smbfs, пароль подставляться не будет (чуда не произошло). Прийдёся его сначала получать через security и затем передавать в нужное место. Для сих целей была нагуглена и переделана под свои нужды функция:
После этого явное указание пароля было заменено на:
Паранойя отступила, но любознательность и перфекционизм остались, поэтому дело продолжилось.
Улучшения и расширение
Захотелось сделать один скрипт для монтирование всего и сразу, да так сделать, чтобы он расширяемый было и повторять код много раз не пришлось, плюс чтобы смотрел что уже в системе примонтировано и второй раз монтировать не пытался. Сказано — сделано. Опишу всё по-порядку.
Для определения примонтированости, на первом этапе, был использован самый «топорный» метод
Но сразу же стало понятно, что директория может и присутствовать, но не являться точкой монтирования для чего-либо. Поэтому сделал функцию для проверки:
Метод тоже не идеален, но уже гораздо лучше, нежели простая проверка наличия директории.
То же самое было сделано и для проверки образа бэкапа:
После некоторых раздумий и чтения форумов метод раздулся и стал сразу проверять примонтирован ли образ, и, если нет, то монтировать его.
Далее нужна была функция для выполнения проверок и автоматизации по монтированию любого количества шар с сервера. Вот какой она получилась:
Внимательный читатель заметит, что во-первых: можно и имя сервера передавать в параметрах к функции, а не хардкодить его, а во-вторых: в скрипте встречается неизвестная функция is_samba_exist.
Отвечаю по-порядку: 3-й параметр для функции было делать лень, ибо пока второго сервра с самбой не планируется; функция is_samba_exist имеет следующий вид:
Несложно догадаться, что функция проверяет наличие шары с указанным именем в текущей сети.
Таким образом основная часть скрипта стала простой, понятной и расширяемой:
На последок, по образу и подобию вышеописанного скрипта, был создан ещё один, но уже для отмонтирования сразу всего:
Вот и всё. Дальше скрипты были унесены к своим собратьям в
/.script. Получили короткие алиасы в .bash_profile и стали помогать мне с самбой.
Перспективы
В будущем, когда дойдут руки, хочется подружить скрипты со SleepWatcher, дабы выполнялись они после выхода из сна и перед уходом в него же. То есть, чтобы совсем ничего не надо было делать руками и автоматизация стала полной.
Источник
Mac os automount smb
 Under Windows you can easily assign a drive letter to a network share, so that every time you login to your account you will have ready access to it. There appears to be no such equivalent under OS X. (You can include them in your user’s Login Items list, but each share in the list will spawn a Finder window when it connects.)
I have been digging at the problem for quite some time since I switched to OS X, and I can now give you the solution I found to work the best. It is not trivial, but with the help of this screencast, it should prove rather easy.
Method 1: Using Apple Script
- Fire up Script Editor.
- Type volume mount "smb://server name/share name" for each share you want to automount. For example, volume mount "smb://nas/mp3" in my example.
- Test the code.
- Save the code as an AppleScript.
- Save the code as an application.
- Add the application to your System Accounts Login Items.
Read on for a solution using Automator.
Method 2: Using Automator
- Open the Finder and click on the Network icon.
- Click on workgroup name (maison in my example).
- Click on server name (nas in my example).
- Click on the Connect button.
- Take note of share names and network server name on a piece of paper.
- Open Automator.
- Click on Finder under Library section.
- Click and drag Get Specified Servers into rightmost screen section.
- Click on the + sign in the Get Specified Servers window.
- Type smb://server name/share name in the Address: field, and click Connect (smb://nas/mp3 in my example).
- Repeat the previous step for the remaining shares you wish to automount.
- Click and drag Connect to Servers under the Get Specified Servers section.
- Click the Run button to test your workflow.
- Save your workflow as a Workflow and Application.
- Add your new Application to your System Accounts Login Items.
If you need more assistance, watch the screencast at the above link.
- Currently 2.71 / 5
You rated: 5 / 5 (7 votes cast)
Hint Options
Just one comment. This has been discussed over and over in the forums for over a year. I’m surprised it hasn’t been included in the Hints section earier.
Have to admit though that the videos are a plus for those who are more visual.
You can also just drag the volume (once mounted) to the Login Items under your account settings in System Preferences, that seems to be the easiest way I’ve seen and it works with all forms of volumes.
Yes. I don’t know why people always seem to forget this. Works like a charm. 15 steps is 14 too many.
Maybe that’s why the article says
You can include them in your user’s Login Items list, but each share in the list will spawn a Finder window when it connects.
Clearly the whole point of the hint is to have the share mounted without spawning a new window.
Or you could just drag an alias to the share into the startup items and it will accomplish the same thing. Only you won’t have to test a script 🙂
Maybe this will help some, being that if the share is mounted, you still have to click on the icon to open the finder window.
I use my PB at work and home, I have shares I connect to on my home internal network that I do not need access to at work and vice versa.
This is how I do it:
1. Mount your share the way you normally do.
2. Create an alias for that icon on the desktop. (cmd+click: create alias)
3. When you reboot, and need that share, you just click on it.
I keep my aliases in a folder on the desktop (I have a lot of shares at work), and when I need a share, I open the folder and click on the icon. Has worked great for me. And for those of you that are in the same boat as I am, but do not want to goto finder: go: connect to server, for every connection every day you need it, maybe this will help you out too.
BTW, the above, I believe I got that from a post here somewhere
Indeed, I think aliases are the best (and easiest) solution if you don’t absolutely need your shares to be automatically mounted at login but you just want easy access to them.
It seems a lot of people who are new to MacOS don’t know about this and how useful aliases can be, so it is worth repeating it.
It’s also worth mentioning that you can also create an alias directly to a folder somewhere deep in the hierarchy of a network share. When you later open the alias, the share will automatically mount and you will be taken directly to this folder, which gives you even faster access.
I do something similar, only I put the aliases into Favorites, which is my default Finder window. If I need something mounted, double-click and I’m set.
I try not to use the Desktop, except for transitory things, and for a «bucket» folder that I call «Stuff,» which I clean out every few weeks.
I put the aliases in a folder somewhere in my home directory, then put that folder in the Dock. A right-click on the folder and I can select any share to mount.
I’ve gone one step further. I’ve removed Network Drives from my desktop, and placed an alias to each of the drives I mount instead. Then I can double-click, drag-n-drop or otherwise onto any of these.
I still use a script (similar to the one above) for mounting one share, which is where my iTunes library lives.
I’ve been using scripts like this for years now for our Macs to connect to server shares, both AFP and SMB. I find it stupid that Apple doesn’t give OS X users an easy way to add auto mounts. It can be done quite nicely in an Open Directory system with managed accounts though. But not with a stand alone OS X system.
The AS solution is easier to work with than the Automator workflow primarily because the Automator one doesn’t allow you to edit the URL paths after you’ve added them. You essentially have to remove it and add it back in. Retarded!
Also note that if the share you’re connecting to requires authentication you’ll need to include that in the code to get true auto-mount behavior (or it will ask for authentication when it attempts to mount). Such as:
mount volume «smb://username:password@server_address/share»
I found that the easiest method is to go the Automator way. I have several Automator actions that will mount and unmount my shares. I installed the Automator plugin for quicksilver and now all I need to do is invoke quicksilver and launch my actions.
When I get to work I launch «Mount Work Shares» and when I leave for the day I run «Unmount Work Shares». I have similar actions set up for when I get home.
I prefer not to have my shares mount automatically as I don’t always need them. I have also set up individual actions for just certain drives — as sometimes I just need one share not all 20 of them.
If you don’t always need your shares, it seems that the solution of using aliases might be better for you (see operator207’s comment above).
Not to pour cold water on this, but this information doesn’t work very well for people with MacBooks and PowerBooks who frequently switch locations where these shares may or may not be available. For instance, if you’re at the office and mount the share, but then leave to go home and you don’t unmount these shares, they persist when you arrive at home and hang your Mac. Its a major oversight in OS X and how it handles network volumes.
In addition, its very rare that my MacBook Pro is «shut down» when I arrive at work each day. Usually, its sleeping, and this script does not help.
There is a hint for sleeping and mounting here:
but in our testing, it just doesn’t work very well. There’s got to be a better solution out there.
Same with my Macbook Pro.
So. I wrote a Python script that is run every 2 minutes (or maybe every minute, i can’t remember). It has a list of shares and mountpoints. If they’re mounted, the script exits. If not, then it pings the hosts. If they’re up, it then mounts the shares.
Yeah, apple needs to do some work in this area, you shouldn’t have to have a CS degree to have automounted shares on portable machines.
Automounting Sharepoints at Startup:
I have a share at home and two at work mounting dynamically. I just have to remember not to try to access one of the other from the wrong place — it hangs the Finder, but not for very long. Otherwise this works great.
Not for SMB shares, unfortunately.
All you gotta do for a graceful exit on failure (due to the shares not being available) is add a «try» statement to the script, like this:
try
mount volume «smb://user:pass@smbserver.lan/share»
end try
(you might need to wrap that in a ‘tell application «Finder»‘ statement, though)
A method similar to what I’m doing has been shown already, but I’ll show what I have, since it seems to work really well for me:
First off, my laptop is almost never turned off — and I almost never log out, so the login items trick isn’t that useful to me. However, the laptop does go to sleep whenever I close the lid, so that immediately points me to SleepWatcher.
SleepWatcher allows you to use two scripts, one for on sleeping, and one for on waking up.
If you create the automator workflow as described in the hint above, and then add it to sleepwatchers wakeup script, it will attempt to connect everytime your laptop wakes up. Just add something like «open
/connectToMyServers.app» to the script.
Then, I add something like «umount /Volumes/SERVER_NAME» for each server that I have in the automator workflow to sleepwatcher’s sleep script.
This removes the hassle of having connected drives when you go off network ( assuming you sleep when you move your machine ), and reconnects to the servers if they are available.
I’m sure there is a better way of managing it ( could use automator to manage the disconnects too I’m sure ), but this is working really well for me right now.
I’ve been using a similar method to this for years to mount an afp server volume on my laptop at home . . .my wife and I save all real data to the server instead of our local homedirectories. An applescript of the form mount vol afp://user:password@server_IP:sharename works perfectly.
Recently I reorganized my backup routines for the laptops . . .and created a second share on the server with identical share permissions as the original . . .call them share1 and share2.
I’m running into an issue when the second script is run . . .what I want to do is keep share1 always mounted and only mount share2 when needed for the backup. Running the script is easy . . .but the problem occurs when it is run.
If share1 is already mounted and I run the script to mount share2 . . .I get some random combination of the following: (a) an error dialog that says Disk some volume can’t be found with an OK and Edit button, (b) proper operation of the script with share2 mounting normally or (c) same as #1 except the volume mounts when I click the OK button. Clicking the Edit button in either (a) or (c) gives me an error that says Script Editor can’t open the dictionary of the application because it is not scriptable.
Both scripts are saved as universal binary application bundles.
Both scripts work properly if neither volume is currently mounted when they are run.
If I mount share2 then run the script for share1 . . the same scenarios as (a) through (c) above occur.
Both shares are shared via SharePoints on a G4 running Tiger (non server version). Permissions are assigned as follows: Owner = admin user on the G4, Group=shareusers with R/W, and everybody=R/W. Shareusers is a group created via SharePoints that has a single user in it. The user is a server non admin account.
Both scripts are run with the userid/password correspoding to the single user in the shareusers group.
Any idea what might be going on . . .or how to get the second volume to mount correctly consistently?
the problem i’ve got is that i have several nfs mounts on the same server, so the 1st mounted is named /Volumes/serverName, the 2nd is /Volumes/serverName-1, etc: order-dependent:-P
makes problems for logical links.
I’m getting this problem too, anybody got any idea how to resolve?
I’ve tried to apply this tip with AFP Volumes that are password protected. This isn’t any form of automount for me since now it would ask me for my username and password every time I log in. The method of just dragging the volume on my startup objects works better since KeyChain Access uses my stored password there and doesn’t make me confirm the mount every log in.
I have no luck using ‘mount volume’ in AScript or using Automator to mount an nfs:// or cifs:// volume. This is the volume type WesternDigital NetCenter uses with it’s Shared Volumes. I can use their utility and I can mount the volume using the Finder’s Go/Connect To Server menu, as well as double click on an alias.
In AScript I get a network file permission error when trying to mount the nfs:// format, both w and w/o including my username and pw in the ‘mount volume’ command, and an error of type -36 when trying to mount the cifs:// format.
I would like to be able to script this or use Automator and welcome any suggestions.
Источник


