- Install Docker Desktop on Mac
- System requirements
- Mac with Intel chip
- Mac with Apple silicon
- Install and run Docker Desktop on Mac
- Quick start guide
- Updates
- Uninstall Docker Desktop
- Segmentation violation exception with Docker edge on macos big sur beta 10 #5026
- Comments
- navxio commented Oct 28, 2020 •
- Expected behavior
- Actual behavior
- Information
- Diagnostic logs
- Steps to reproduce the behavior
- jtka commented Oct 29, 2020
- globalstripe commented Nov 4, 2020 •
- Vardiak commented Nov 7, 2020
- dorinclisu commented Nov 8, 2020 •
- Docker does not works on Mac OS Big Sur beta 10 (20A5395g) #4997
- Comments
- matiasiglesias commented Oct 16, 2020 •
- Expected behavior
- Actual behavior
- Information
- Diagnostic logs
- Steps to reproduce the behavior
- stephen-turner commented Oct 16, 2020
- djs55 commented Oct 16, 2020
- matiasiglesias commented Oct 16, 2020 •
- joshelson commented Oct 20, 2020
- matiasiglesias commented Oct 21, 2020 •
- joshelson commented Oct 21, 2020
- phedoreanu commented Oct 21, 2020
- stgarf commented Oct 26, 2020
- BrunoVillanova commented Nov 4, 2020
- stephen-turner commented Nov 10, 2020
- Install macOS Big Sur Or Catalina In A Virtual Machine Using Docker-OSX
- How to install macOS (OSX) in QEMU + KVM using Docker-OSX
- How to remove Docker-OSX
Install Docker Desktop on Mac
Estimated reading time: 7 minutes
Welcome to Docker Desktop for Mac. This page contains information about Docker Desktop for Mac system requirements, download URLs, instructions to install and update Docker Desktop for Mac.
Download Docker Desktop for Mac
System requirements
Your Mac must meet the following requirements to install Docker Desktop successfully.
Mac with Intel chip
macOS must be version 10.14 or newer. That is, Mojave, Catalina, or Big Sur. We recommend upgrading to the latest version of macOS.
If you experience any issues after upgrading your macOS to version 10.15, you must install the latest version of Docker Desktop to be compatible with this version of macOS.
Docker supports Docker Desktop on the most recent versions of macOS. That is, the current release of macOS and the previous two releases. As new major versions of macOS are made generally available, Docker stops supporting the oldest version and supports the newest version of macOS (in addition to the previous two releases). Docker Desktop currently supports macOS Mojave, macOS Catalina, and macOS Big Sur.
At least 4 GB of RAM.
VirtualBox prior to version 4.3.30 must not be installed as it is not compatible with Docker Desktop.
Mac with Apple silicon
You must install Rosetta 2 as some binaries are still Darwin/AMD64. To install Rosetta 2 manually from the command line, run the following command:
Install and run Docker Desktop on Mac
Double-click Docker.dmg to open the installer, then drag the Docker icon to the Applications folder.

Double-click Docker.app in the Applications folder to start Docker. In the example below, the Applications folder is in “grid” view mode.

The Docker menu ( ) displays the Docker Subscription Service Agreement window. It includes a change to the terms of use for Docker Desktop.
Here’s a summary of the key changes:
- Our Docker Subscription Service Agreement includes a change to the terms of use for Docker Desktop
- It remains free for small businesses (fewer than 250 employees AND less than $10 million in revenue), personal use, education, and non-commercial open source projects.
- It requires a paid subscription for professional use in larger enterprises.
- The effective date of these terms is August 31, 2021. There is a grace period until January 31, 2022 for those that will require a paid subscription to use Docker Desktop.
- The existing Docker Free subscription has been renamed Docker Personal and we have introduced a Docker Business subscription .
- The Docker Pro, Team, and Business subscriptions include commercial use of Docker Desktop.
Click the checkbox to indicate that you accept the updated terms and then click Accept to continue. Docker Desktop starts after you accept the terms.
If you do not agree to the terms, the Docker Desktop application will close and you can no longer run Docker Desktop on your machine. You can choose to accept the terms at a later date by opening Docker Desktop.
For more information, see Docker Desktop License Agreement. We recommend that you also read the Blog and FAQs to learn how companies using Docker Desktop may be affected.
Quick start guide
If you’ve just installed the app, Docker Desktop launches the Quick Start Guide. The tutorial includes a simple exercise to build an example Docker image, run it is a container, push and save the image to Docker Hub.

Congratulations! You are now successfully running Docker Desktop. Click the Docker menu () to see Preferences and other options. To run the Quick Start Guide on demand, select the Docker menu and then choose Quick Start Guide.
Updates
When an update is available, Docker Desktop displays an icon to indicate the availability of a newer version.
Starting with Docker Desktop 4.1.0, the Software Updates section in the General tab also notifies you of any updates available to Docker Desktop. You can choose to download the update right away, or click the Release Notes option to learn what’s included in the updated version. If you are on a Docker Team or a Business subscription, you can turn off the check for updates by clearing the Automatically Check for Updates checkbox in the General settings. This will also disable the notification badge that appears on the Docker Dashboard.
To encourage developers to stay up to date, Docker Desktop displays a reminder two weeks after an update becomes available. You can dismiss this daily reminder by clicking Snooze. You can skip an update when a reminder appears by clicking the Skip this update option.
Docker Subscription Service Agreement
Beginning on August 31, 2021, you must agree to the Docker Subscription Service Agreement to continue using Docker Desktop. Read the Blog and the Docker subscription FAQs to learn more about the changes.
Click Download update When you are ready to download the update. This downloads the update in the background. After downloading the update, click Update and restart from the Docker menu. This installs the latest update and restarts Docker Desktop for the changes to take effect.
When Docker Desktop starts, it displays the Docker Subscription Service Agreement window. Read the information presented on the screen to understand how the changes impact you. Click the checkbox to indicate that you accept the updated terms and then click Accept to continue.
If you do not agree to the terms, the Docker Desktop application will close and you can no longer run Docker Desktop on your machine. You can choose to accept the terms at a later date by opening Docker Desktop.
Docker Desktop starts after you accept the terms.
Uninstall Docker Desktop
To uninstall Docker Desktop from your Mac:
- From the Docker menu, select Troubleshoot and then select Uninstall.
- Click Uninstall to confirm your selection.
Uninstalling Docker Desktop destroys Docker containers, images, volumes, and other Docker related data local to the machine, and removes the files generated by the application. Refer to the back up and restore data section to learn how to preserve important data before uninstalling.
Источник
Segmentation violation exception with Docker edge on macos big sur beta 10 #5026
Comments
navxio commented Oct 28, 2020 •
|
Expected behavior
Actual behavior
Information

Diagnostic logs
Steps to reproduce the behavior
- Install macos big sur beta 10
- run docker desktop (stable/edge)
The text was updated successfully, but these errors were encountered:
jtka commented Oct 29, 2020
This happened to me as well when I installed VirtualBox kernel extension. Uninstalling the extension let me start the docker.
globalstripe commented Nov 4, 2020 •
Yep, Virtualbox. I also installed virtual box and did a docker update today. Same issue.
Thanks for posting those cmds on how to remove the extensions! That did the trick for me.
Another Big Sur update tonight!
Vardiak commented Nov 7, 2020
This problem is not present in Docker 2.3.0.5 and seems to appear in 2.4.
dorinclisu commented Nov 8, 2020 •
This happened to me as well when I installed VirtualBox kernel extension. Uninstalling the extension let me start the docker.
How can we completely remove these extensions? Next time I restarted macos I had to run the commands again before docker worked.
I even uninstalled virtualbox app the official way, it’s quite despicable that it leaves junk in the system..
Источник
Docker does not works on Mac OS Big Sur beta 10 (20A5395g) #4997
Comments
matiasiglesias commented Oct 16, 2020 •
|
Expected behavior
Fatal error on docker startup
Actual behavior
Information
Diagnostic logs
Steps to reproduce the behavior
- Fresh start Mac Os
- Open Application folder
- Double click on docker icon
- Error is shown


The text was updated successfully, but these errors were encountered:
stephen-turner commented Oct 16, 2020
Thanks, it worked in previous Big Sur betas so something must have changed in the OS. We’ll look into it.
djs55 commented Oct 16, 2020
@matiasiglesias thanks for your report.
Unfortunately I could not reproduce the failure — I’m running Docker 2.4.0.0 (48506) on Big Sur beta (20A5395g) and it seems ok so far. Could you upload diagnostics by running
when it completes it will print something like
Please quote the ID on the ticket and I’ll take a look at the logs!
matiasiglesias commented Oct 16, 2020 •
joshelson commented Oct 20, 2020
Same issue here on latest Big Sur update with Edge release. If it helps, appears to be a json issue.
matiasiglesias commented Oct 21, 2020 •
I’ve reseted my mbp to factory refaults with Mac OS Big Sur Beta 11 build 20A5395g and Docker Desktop 2.4.0.0 build 48506. Everything worked perfect until it occurred to me to install VirtualBox 6.1.16 build 140961 and the «Segmentation violation exception» error reappeared. I could fix it by uninstalling VirtualBox and everything went back to work again
joshelson commented Oct 21, 2020
Can confirm what @matiasiglesias says. Same issue for me.
phedoreanu commented Oct 21, 2020
I’ve also upgraded VirtualBox to 6.1.16,140961 and since then Docker 2.4.2.0,48975 was able to start.
stgarf commented Oct 26, 2020
For me removing VirtualBox actually fixes this issue. Eek. Something strange w/ the kernel extension interactions maybe?
BrunoVillanova commented Nov 4, 2020
Same here. Uninstalled VirutalBox and Docker is working again.
stephen-turner commented Nov 10, 2020
Thanks for all the reports. We have a workaround incoming.
Источник
Install macOS Big Sur Or Catalina In A Virtual Machine Using Docker-OSX

Docker-OSX is a project that makes macOS run near native using OSX-KVM inside a Docker container. Using this, you’ll be able to install macOS in a QEMU virtual machine (via Docker), and run the macOS Catalina or Big Sur desktop, or boot to the OSX shell.
The Docker-OSX project provides four Docker images:
- sickcodes/docker-osx:latest — original base recovery image using macOS Catalina
- sickcodes/docker-osx:big-sur — original base recovery image using macOS Big Sur
- sickcodes/docker-osx:naked — supply your own .img file (using -v «$
/disk.img:/image» ) - sickcodes/docker-osx:auto — large (
19.4GB) docker image that boots to OSX shell (has SSH enabled, using user as the username and alpine as the password; you need about 50GB of disk space to run this image)
- X11 Forwarding
- Full auto mode: boot straight to OSX shell and even run commands as runtime arguments
- Kubernetes Helm Chart. See ./helm
- SSH on localhost:50922
- VNC version on localhost:8888 (the VNC version is in a separate directory due to the security risks involved with using VNC)
- Create an ARMY of the same exact container using docker commit
- Xfvb headless mode
The project also includes instructions for various tweaks, like forwarding additional ports, changing screen resolution, enable network forwarding, allow USB passthrough, quick start instructions for using the large pre-made image and using your own image, and more (all available on the project’s page).
It’s worth noting from the start that Apple doesn’t allow installing macOS on non-Apple hardware, so to use this legally, your OS must be installed on Apple hardware. Also, to use this, your computer CPU needs to support hardware virtualization; see the KVM checklist from here to find out if your CPU supports it (you can also run sudo kvm-ok which will return «KVM acceleration can be used» if everything is ok).
On my Ubuntu 20.10 desktop, installing macOS using the sickcodes/docker-osx:big-sur image took about 55 minutes. The Docker image takes about 3.2 GB of disk space, while the container space usage for this is around 35 GB.
You may want to also check out Sosumi, a snap package that makes it easy to download and install macOS Catalina in a virtual machine on Linux, which also uses QEMU + KVM, and is based on macOS-Simple-KVM. It’s worth noting that Sosumi hasn’t been updated since around the time it was first released.
Below you’ll find instructions for using Docker (Docker-OSX) to run a macOS (Catalina or Big Sur) base recovery image, install and run macOS (with the option of setting a custom resolution; with no options specified it uses 1920×1080). There are also instructions for removing the container.
How to install macOS (OSX) in QEMU + KVM using Docker-OSX
Before continuing, make sure your computer supports hardware virtualization and that it’s enabled in the BIOS (you could check using sudo kvm-ok which will return «KVM acceleration can be used» if everything is ok). Once this is done, you can continue with the rest of the instructions below.
Start by making sure you have Docker installed (also see the official Docker installation documentation).
Also install QEMU on the host system if you haven’t already. You may also need to add your user to the kvm group using sudo usermod -aG kvm $USER for this to work properly.
As for required disk space, read my comment from further up this article for a rough estimation. For sickcodes/docker-osx:auto you’ll need about 50 GB of disk space to use it.
2. Start Docker-OSX.
Run macOS Big Sur or Catalina using Docker-OSX (for other options, see the Docker-OSX project page — e.g. you can run it headless, using your own image, run sickcodes/docker-osx:latest allowing SSH into macOS, etc.; you may also want to check out these custom QEMU arguments that can be used for setting the number of CPU cores, available RAM, etc.):
- Run the macOS Big Sur (change the WIDTH and HEIGHT values to the screen resolution you want to use for your macOS Big Sur virtual machine; I’m using 1600×900 below) using the base recovery image:
- Run macOS Catalina (change the WIDTH and HEIGHT values to the screen resolution you want to use for your macOS Big Sur virtual machine; I’m using 1600×900 below) using the base recovery image:
This may take a few minutes.
The above Docker run commands use the basic options for launching macOS (basic recovery image, used to install macOS) in QEMU using Docker, provided by the Docker-OSX project page with the addition of options for screen resolution. If you remove the GENERATE_UNIQUE , DEVICE_MODEL , WIDTH and HEIGHT options, the virtual machine will use the default (1920×1080) screen resolution.
3. Use Disk Utility to format the largest QEMU HARDDISK.
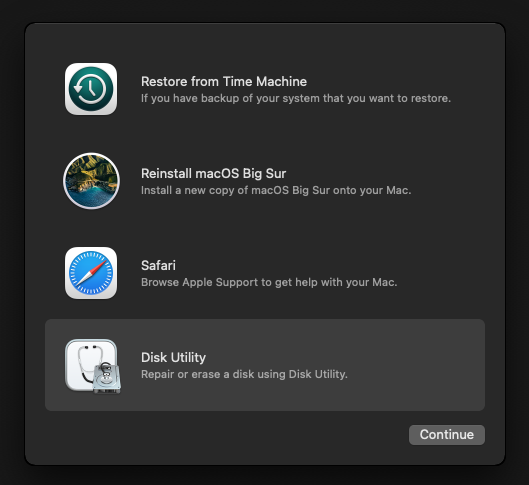
After a few minutes, the macOS virtual machine will start. Boot to macOS Base System and choose Disk Utility from the menu:
Next, in the Disk Utility tool, check which is the largest hard disk on the left from the 2 QEMU HARDDISK Media, and click on the largest one (it’s 214,75 GB in the version I’m using for testing this).
Tip: to have the QEMU virtual machine release your mouse, press Ctrl + Alt + g (in some cases, that’s only Ctrl + g ).
Now click the Erase button from the Disk Utility toolbar to format this hard disk:
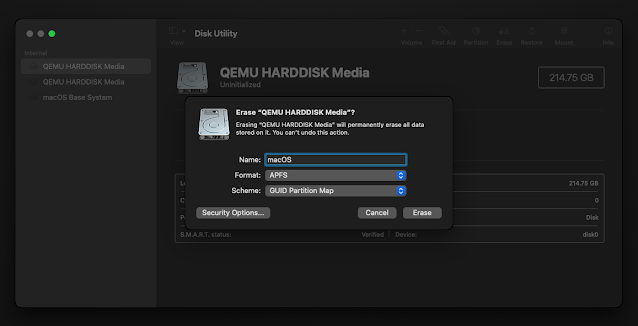
Set a name for the disk, e.g. «macOS», and leave the other options to their defaults (they are Format: APFS for macOS Big Sur and Mac OS Extended (Journaled) for macOS Catalina, with the Schema being GUID Parition Map for both).
Once you’ve finished erasing the largest QEMU HDD, close the Disk Utility dialog.
4. Install macOS in the virtual machine.
After closing Disk Utility, you’ll once again get to the menu from where you can start Disk Utility, etc. This time though, you’ll need to select the option to Reinstall macOS Big Sur (or, if you’re using the sickcodes/docker-osx:latest image which has Catalina, this option is called just Reinstall macOS ):
Click Continue , then Agree , and you’ll get to a screen from where you can choose the HDD you’ve formatted under step 3 (it shows up using the name you’ve entered when erasing it, e.g. macOS in our example). Select the HDD and click Continue :
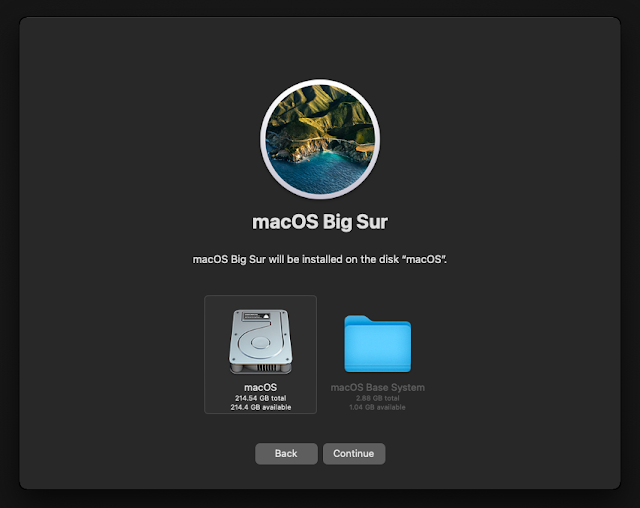
The macOS Big Sur / Catalina (depending on which image you chose) installation will now start:
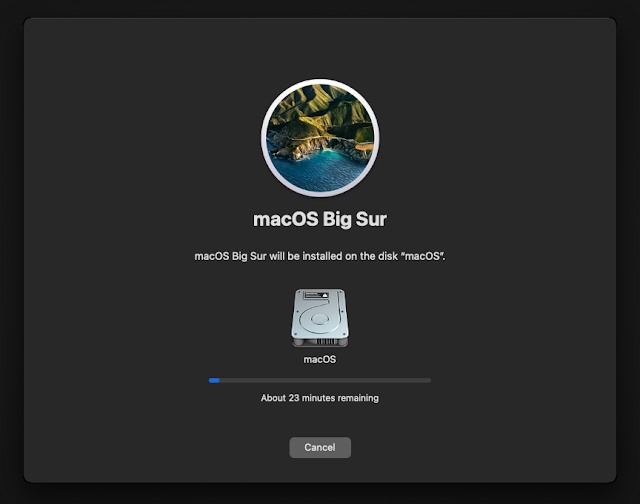
After a while, the mac OSX virtual machine will restart. Choose the macOS Installer entry on boot:
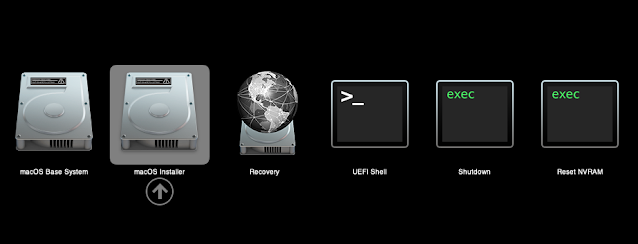
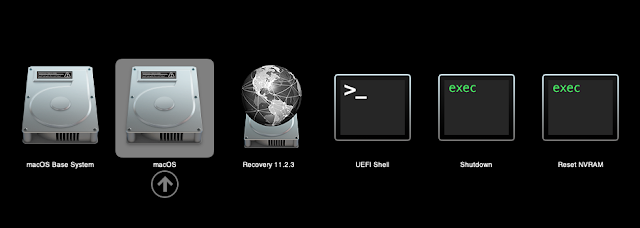
Once the installation has finished, this boot entry becomes just «macOS», and allows you to boot into your new macOS installation inside a virtual machine:
Now you’ll need to choose your country or region, optionally sign in with your Apple ID, agree to the terms and conditions etc., as well as create your computer account (username and password).
Note that after installing macOS and booting it for the first time, I had to select the macOS entry twice (it rebooted after choosing it for the first time). Also, there’s mouse lag (and general lag) through the macOS installation process, but this no longer occurs (or is much less noticeable; this depends on your computer hardware) once you run the installed macOS virtual machine.
5. Start your newly installed macOS virtual machine.
When you want to start your newly installed macOS virtual machine, run docker ps -a to see the container ID and/or name:
Then start the container:
Replace Container_ID_or_Name with the container ID or name obtained using the previous command.
How to remove Docker-OSX
So you’ve decided you want to remove Docker-OSX. Start by running the following command to get a list of Docker container names and IDs:
Using this command, identify the container you want to remove. Now stop and remove the container using:
Replace ID_or_Image with the container ID or image as obtained using the previous command.
To remove the Docker-OSX image, start by using this command to list existing Docker images:
Next, remove the Docker-OSX image using:
Replace Image_ID with the image ID you’ve got using the previous command.
Источник


