- Как запустить Mac с загрузкой с USB, внешнего жесткого диска или CD/DVD
- Как запустить Mac с загрузочного диска CD/DVD?
- Как загрузиться на Mac с внешнего устройства хранения USB?
- Как запустить Mac с другого жесткого диска (USB) /выбрать загрузочный диск по умолчанию из системных настроек macOS?
- macOS не загружается с внешнего жесткого диска, что делать?
- How to create a bootable Windows 10 USB on Mac
- Format USB to ExFAT (Under your own risk)
- Format USB with the terminal
- Copy Windows files to USB — Method 1
- Open Windows ISO
- Copy files
- UNetbootin — Method 2
- Check the path name of your USB Disk.
- Download UNetbootin:
- Makes the USB booteable
- Booting from USB Media: A Comprehensive Overview
- How to boot a Mac from USB media
- Boot from USB: Windows
- Linux USB Boot Process
- Creating USB boot media
Как запустить Mac с загрузкой с USB, внешнего жесткого диска или CD/DVD
MacOS может быть запущена на Mac различными способами, о которых мы уже писали информативную статью. В этом же материале мы подробно остановимся на режиме запуска Mac с загрузкой с CD/DVD, USB или с внешнего жесткого диска.
Запуск Mac с загрузкой с внешнего диска может понадобиться при необходимости запуска другой версии или копии macOS, устранении каких-либо проблем и так далее.
Для запуска необходимо соблюсти следующие условия:
- компьютер базируется на системе Intel;
- том отформатирован с выбором типа раздела GUID;
- на USB-устройстве хранения установлена Mac OS X 10.4.5 или более новая версия.
Как запустить Mac с загрузочного диска CD/DVD?
1. Включите Mac нажатием кнопки питания или перезагрузите компьютер в случае, если он уже запущен.
2. Зажмите клавишу С на клавиатуре и удерживайте до тех пор, пока не появится загрузочное меню. Mac должен загрузиться с CD/DVD установленном в оптическом приводе. Вы также можете нажать левую клавишу мыши при запуске операционной системы для того, чтобы извлечь дисковод.
Записать образ macOS на загрузочный CD/DVD можно при помощи «Дисковой утилиты».
Как загрузиться на Mac с внешнего устройства хранения USB?
1. Подключите к Mac USB-флешку или внешний жесткий диск с установленной macOS (инструкция по установке).
2. Включите Mac нажатием кнопки питания или перезагрузите компьютер в случае, если он уже запущен.
3. Зажмите клавишу ⌥Option (Alt) на клавиатуре и удерживайте до тех пор, пока не появится загрузочное меню.
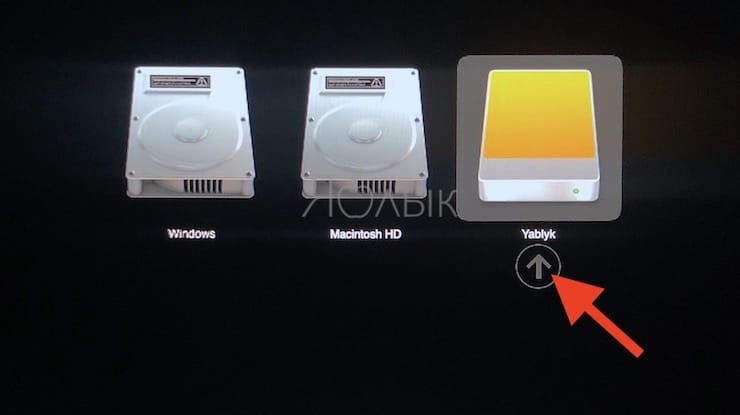
4. Выберите нужный том при помощи мыши, стрелок или трекпада.
Примечание: Если нужный том не отображается, подождите несколько секунд, пока Менеджер загрузки завершит сканирование подключённых дисков.
5. Нажмите клавишу Return (Enter), чтобы загрузить компьютер Mac с выбранного тома.
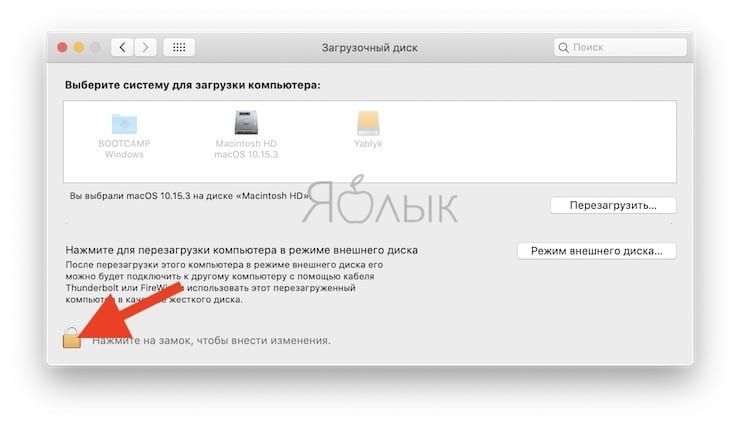
Как запустить Mac с другого жесткого диска (USB) /выбрать загрузочный диск по умолчанию из системных настроек macOS?
1. Откройте меню → Системные настройки…
2. Перейдите по иконке «Загрузочный том».
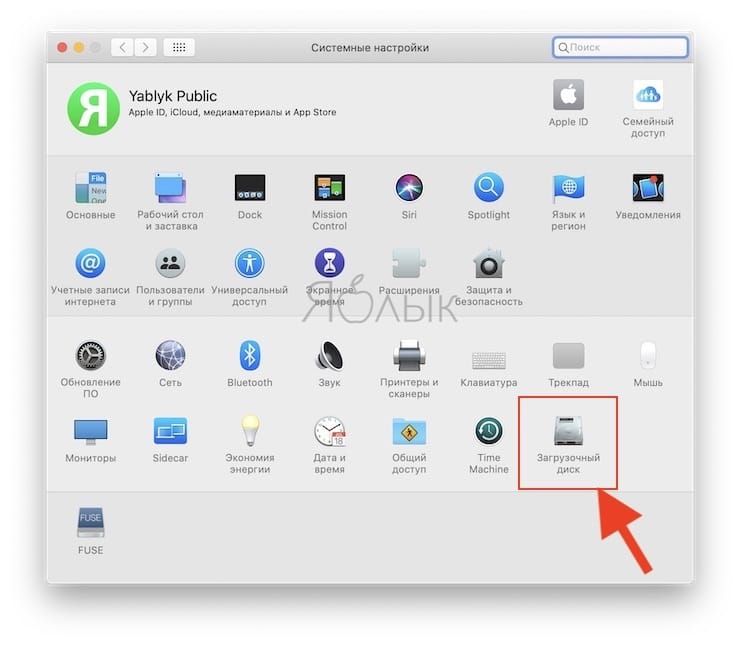
3. Из списка доступных томов выберите нужный диск, который будет использоваться в качестве загрузочного.
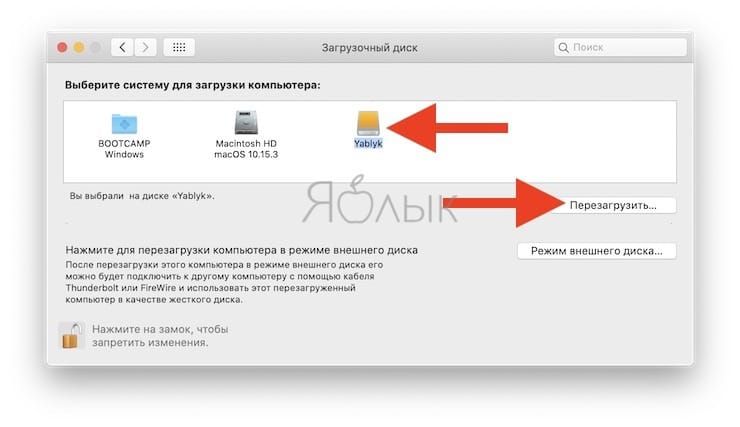
После перезагрузки macOS или следующем запуске? Mac запустит операционную систему с выбранного тома.
macOS не загружается с внешнего жесткого диска, что делать?
Ответ:
1. Некоторые старые внешние USB-накопители требуют дополнительного питания. Не исключено, что его необходимо подключить к внешнему источнику питания или задействовать второй USB в Mac.
2. Убедитесь что внешний накопитель включён (опять же, прерогатива старых USB-дисков).
4. Убедитесь в том, что диск отформатирован с выбором типа раздела GUID.
5. Попробуйте подключить внешний диск к другому порту USB.
6. Убедитесь в том, что внешний диск является загрузочным.
7. Подключите диск напрямую, без использования USB-хаба.
How to create a bootable Windows 10 USB on Mac
The last release of Mac OS doesn’t have the option to create a bootable USB from Bootcamp like previous versions, and it is a problem because that require uses other tools.
I am updating this post today Dec 12, 2018. The reason is that I was only using UNetbootin to create the bootable USB, I will leave guide as a second method since it still working, and I will explain to you how you can create the bootable Windows USB without extra software.
The first step for both methods requires to format your USB device to NTFS, this is the default filesystem, alternative you can use ExFAT but the installation could fail.
Format USB to ExFAT (Under your own risk)
In order to boot from the USB, you need to format the USB to ExFAT, you can do it using Disk Utility (it comes with MacOS).
This step is the same for both methods. You need to show all the devices in Disk Utility» before to start the process.

Select your USB device in the list (not the partition), right click and then click on the Erase option:

In the next screen make sure you select these two options:
- Format: ExFAT
- Scheme: Master Boot Record
Click the Erase button.

If for some reason it fails, probably is because MacOS still using the USB, just repeat the steps, but if you see a screen similar to above screen is because the operation is successful.

Format USB with the terminal
You also can format the USB from the terminal, but you have to take care to use the correct device because, if you use the wrong name you will lose everything.
With this command you can list the device on MacOS:
This is an example, my USB is the disk2:

This command is to format the USB, the last parameter is the the USB:

Copy Windows files to USB — Method 1
This process is very easy doesn’t require to install other software, and they are just a few steps:
Open Windows ISO
Just double click on the ISO image, MacOS mount the image automatically. 
Copy files
Now you only need to copy the files and paste them to the USB.
- Command + A Select all files.
- Command + C Copy files.
- Go to your USB Command + V paste the files.

This process could fail if you are using a USB with FAT32 because the file install.win is over 4GB, if this is the case try to open the terminal and copy paste the files from there (no always works. Try to follow the instructions to format the USB in ExFAT, NTFS works for some BIOS).

This is the command to copy the files from the ISO to the USB:
And that is all, now you can try boot from the USB.
UNetbootin — Method 2
I will show you how you can use UNetbootin to create a bootable USB, it can be used no only for Mac but for Windows and Linux distributions too.
UNetbootin is free software and it is also available for Windows and Linux.
Check the path name of your USB Disk.
Always in Disk Utility, select the new partition that we created in the previous step, and click on the information button, it will give you the information about the new partition.

You also can use the terminal and the command diskutil to see the list of drives:
Download UNetbootin:
Download the dmg directly from the Website.
And copy the app to the /Application folder.
I prefer to use homebrew to install applications, you can check this article for more information: Installing Applications on Mac with Homebrew:
Makes the USB booteable
Open UNetbootin and you only need select 3 options:
- Diskimage and ISO
- Now we need open the ISO Windows image that is on our computer.
- Select your USB device on UNetbootin.
- Click on the OK, button and wait to the process end it will take a time.

NOTES:
- I tested other tools like dd and Etcher but they are not working because Windows requires extra steps, for the moment this is the only easy tool that I know that works if you are on Windows try Rufus.
- Some users reported that UNetbootin is not working, if after to format the USB drive and change the block size is not working for you try another Drive with enough space.
Booting from USB Media: A Comprehensive Overview
While fans of different operating systems might debate which one is the most stable, reliable, flexible or user-friendly, there’s one inarguable point: Every machine – regardless of the OS – can run into issues.
And while users historically would pop a boot media disk into their DVD or CD drive, many computers no longer come with optical disk drives. As a result, booting from USB media is becoming the standard.
How you start that rescue media can vary depending on the operating system you are using, but there are a few general guidelines that can help get your machine started, regardless of the OS you prefer.
So if your system is unstable, you need to run a diagnostic tool on the hard drive, or you just want to load a Linux desktop just to see what it’s all about, let’s look at how you start your machine using rescue USB boot media.
How to boot a Mac from USB media
Getting your Mac to load from a USB drive is fairly straightforward.
- Insert the USB boot media into an open USB slot.
- Press the Power button to turn on your Mac (or Restart your Mac if it’s already on).
- When you hear the startup chime, press and hold the Option key. Holding that key gives you access to OS X’s Startup Manager. Once the Startup Manager screen appears, release the Option key. The utility will look for any available drives that include bootable content.
- Using either the pointer or arrow keys on the keyboard, select the USB drive you wish to boot from.
- Once selected, either hit the Return key or double-click your selection. The machine will start to boot from the USB drive.
NOTE: Have multiple USB devices connected to your Mac? Don’t worry. The Startup Manager only lists drives that include bootable content.
Boot from USB: Windows
Starting your PC using USB rescue media is not difficult, although it first requires an adjustment in the BIOS (Basic Input Output System). That’s because the BIOS settings include the boot sequence the machine follows when starting up. The boot order tells the machine which devices to search for the software needed to launch the computer and the priority each device in that search.
If you’re booting from USB media, you must change the BIOS boot order so the USB device is listed first. Otherwise the computer will load from the hard drive as normal.
Start by plugging the thumb drive into a USB port. Then to change the BIOS boot sequence:
- Press the Power button for your computer.
- During the initial startup screen, press ESC, F1, F2, F8 or F10. (Depending on the company that created your version of BIOS, a menu may appear.)
- When you choose to enter BIOS Setup, the setup utility page will appear.
- Using the arrow keys on your keyboard, select the BOOT tab. All of the available system devices will be displayed in order of their boot priority. You can reorder the devices here.
- Move USB to be first in the boot sequence.
NOTE: If you cannot find USB or Removable Devices among the device options, your BIOS may list it under Hard Drive Devices. In that case, you’ll need to:
- Move Hard Drive Devices to the top
- Expand to show all hard drive device options
- Move USB device to the top of that hard drive list
In the future, your computer will first check the USB port for boot media when starting up. That won’t be a problem, since the BIOS will move to the next device in the boot sequence . unless you keep the boot media in the USB port. Then the system will launch from that device every time.
Linux USB Boot Process
To boot Ubuntu from USB media, the process is very similar to the Windows instructions above.
- Confirm the BIOS boot sequence lists the USB drive first, or make that change as needed.
- After the USB flash drive is inserted into the USB port, press the Power button for your machine (or Restart if the computer is running).
- The installer boot menu will load, where you will select Run Ubuntu from this USB.
- Ubuntu will launch and you can begin to working in the system – setting preferences, reconfiguring the system as needed, or running any diagnostic tools.
Creating USB boot media
Regardless of the operating system you are using, booting your machine from USB media does not need to be difficult. A general understanding how your system loads can provide the basics needed to understand what is going on when you use boot media.
Creating USB boot media doesn’t need to be difficult either, although there are several options to consider.
For Mac users, we recommend visiting Apple’s support page on USB boot media. It provides guidance that is specific to the iteration of OS X you are running (i.e. Sierra, High Sierra, Yosemite, etc.) to help you get the boot version you need.
Windows and Linux users might consider Acronis Disk Director 12, which includes an intuitive Boot Media Builder that streamlines the process and offers tremendous flexibility for the type and kind of boot media you can create, including WinPE media.


