- How to create a bootable installer for macOS
- What you need to create a bootable installer
- Download macOS
- Use the ‘createinstallmedia’ command in Terminal
- How to Create a Bootable Installer for macOS
- Get a bootable flash drive
- Get macOS installation files
- Create bootable USB drive with Mac Disk Utility
- Use Terminal to create a bootable installer
- Boot your Mac from a USB drive
- Don’t forget to back up your files
- How to create a bootable macOS Big Sur installer drive?
- How to make a bootable copy of Catalina on USB drive?
- What is a bootable installer?
- How do I make a bootable Yosemite installer?
- How do I make a bootable USB from an ISO file on a Mac?
- Can I use Rufus on Mac?
- How to Create a Bootable Mac OS USB on Windows
- Method 1: Using TransMac
- Method 2: Using PowerISO
- Share this:
- This article has 1 comment
How to create a bootable installer for macOS
You can use an external drive or secondary volume as a startup disk from which to install the Mac operating system.
These advanced steps are primarily for system administrators and others who are familiar with the command line. You don’t need a bootable installer to upgrade macOS or reinstall macOS, but it can be useful when you want to install on multiple computers without downloading the installer each time.
What you need to create a bootable installer
- A USB flash drive or other secondary volume formatted as Mac OS Extended, with at least 14GB of available storage
- A downloaded installer for macOS Big Sur, Catalina, Mojave, High Sierra, or El Capitan
Download macOS
- Download: macOS Big Sur, macOS Catalina, macOS Mojave, or macOS High Sierra
These download to your Applications folder as an app named Install macOS [ version name ]. If the installer opens after downloading, quit it without continuing installation. To get the correct installer, download from a Mac that is using macOS Sierra 10.12.5 or later, or El Capitan 10.11.6. Enterprise administrators, please download from Apple, not a locally hosted software-update server. - Download: OS X El Capitan
This downloads as a disk image named InstallMacOSX.dmg. On a Mac that is compatible with El Capitan, open the disk image and run the installer within, named InstallMacOSX.pkg. It installs an app named Install OS X El Capitan into your Applications folder. You will create the bootable installer from this app, not from the disk image or .pkg installer.
Use the ‘createinstallmedia’ command in Terminal
- Connect the USB flash drive or other volume that you’re using for the bootable installer.
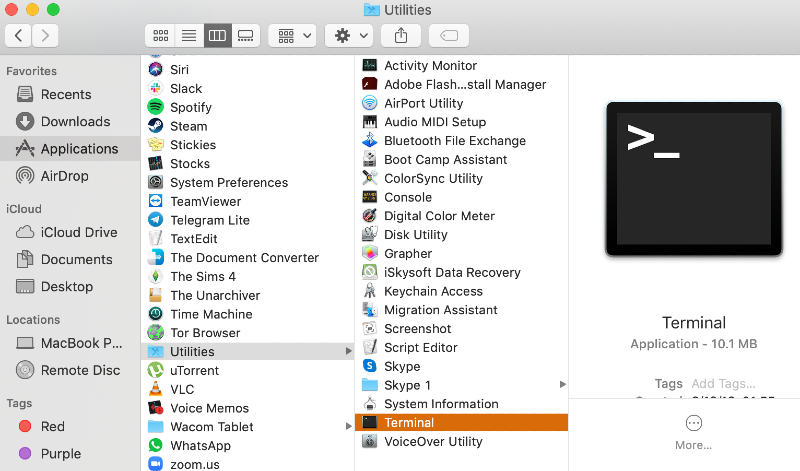
- Open Terminal, which is in the Utilities folder of your Applications folder.
- Type or paste one of the following commands in Terminal. These assume that the installer is in your Applications folder, and MyVolume is the name of the USB flash drive or other volume you’re using. If it has a different name, replace MyVolume in these commands with the name of your volume.
Big Sur:*
Catalina:*
Mojave:*
High Sierra:*
El Capitan:
* If your Mac is using macOS Sierra or earlier, include the —applicationpath argument and installer path, similar to the way this is done in the command for El Capitan.
After typing the command:
- Press Return to enter the command.
- When prompted, type your administrator password and press Return again. Terminal doesn’t show any characters as you type your password.
- When prompted, type Y to confirm that you want to erase the volume, then press Return. Terminal shows the progress as the volume is erased.
- After the volume is erased, you may see an alert that Terminal would like to access files on a removable volume. Click OK to allow the copy to proceed.
- When Terminal says that it’s done, the volume will have the same name as the installer you downloaded, such as Install macOS Big Sur. You can now quit Terminal and eject the volume.


Источник
How to Create a Bootable Installer for macOS
A bootable macOS (previously, OS X) install disk is a portable device containing all the necessary installation files for a selected version of macOS. Why would you want to create an external boot drive for your Mac?
Such a tool allows you to install any version of macOS on multiple Apple computers easily. You can also use it to reinstall the operating system on a Mac that won’t startup. It’s a handy appliance—even more so if you use a small external flash drive that you can carry in a pocket.
It’s a good idea to keep your Mac optimised when you’re asking to create a bootable USB drive. You can do that with MacKeeper’s Find & Fix feature, which will scan your Mac for a variety of different problems.
- Select Find & Fix from the menu in MacKeeper
- Click Start full scan
- When the scan is finished, review the results, and click Fix items safely
MacKeeper can do everything from finding malware to updating your apps for you. You can try out the different tools for free , so download it, and see what you think.
In this article, you’ll find detailed instructions and answers to your questions on how to make a bootable USB on Mac.
Get a bootable flash drive
For your external disk to run macOS, you can choose as a USB flash drive, as well as an SSD or HDD. Whichever type of drive you choose, make sure that it has at least 12GB of free memory.
Bear in mind—when you download an installer, the disk will be reformatted to suit the operating system you’re trying to run. Give your disk the name of the operating system, e.g., Sierra, Mojave, Catalina.
In the following instructions, we will use a USB flash drive as an external carrier example.
Get macOS installation files
You might want to keep installing files on an external drive if you think you might need to install the operating system multiple times or on different computers. If, however, you only want to reinstall macOS once on one computer, you don’t have to use a carrier. In this case, the system will be installed on that Mac, and the installation files will disappear when the process is finished.
You can create a bootable installer for any operating system if you have the right installer. In older versions of macOS, you could find all the previous installers in the list of purchased apps in your App Store account in older macOS versions.
If, however, you’re running macOS Mojave or Catalina, you’ll need to look for older versions on Apple’s official website. To save you the trouble, here’s a list of macOS installers:
Create bootable USB drive with Mac Disk Utility
Now that you have the installation files ready on your Mac, you can move them to your USB drive for future use.
To install macOS on an external hard drive:
1. Connect the USB to your MacBook
2. Open Disk Utility by following Applications → Utilities → Disk Utility
3. In the sidebar on the left, click on your disk name
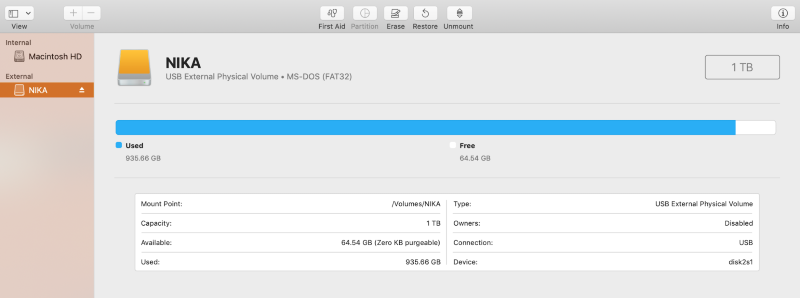
4. Before formatting the disk, make sure it’s backed up
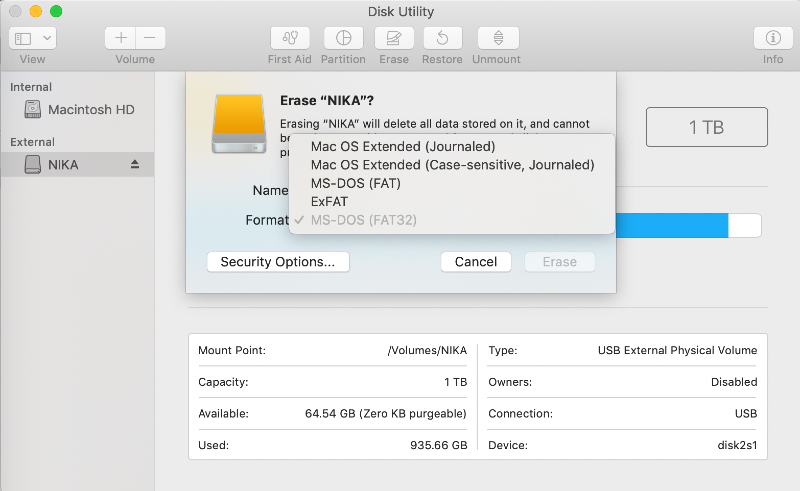
5. Click on Erase
6. Choose OS X Extended (Journaled) for format and GUID Partition Map for scheme
7. Open the macOS installer that you downloaded earlier
8. Click past the license agreement until you reach the page asking you which disk you want to install the OS on. It’s set on your internal hard drive by default—click on Show All Disks and choose your macOS USB drive instead
9. Click Continue and wait for the installation to be complete
Now your flash drive runs the version of macOS that you want. You can run this OS when you connect the disk to your Mac—the Mac itself will keep its operating system.
Use Terminal to create a bootable installer
Another way to create a bootable installer for macOS is to use Terminal. Make sure that you have the installation files on your Mac before trying this step out.
How to make a bootable USB on Mac:
Open Terminal by following Applications → Utilities → Terminal
2. Connect the USB drive to your Mac
3. Type in: sudo /Applications/Install\ macOS\ Mojave.app/Contents/Resources/createinstallmedia —volume /Volumes/MyVolume—if you want to install macOS Mojave. MyVolume is the name of your external drive
4. Click Enter and type in your password
5. You’ll see a warning about the disk being erased—confirm the action. Bear in mind that your external drive will be reformatted, and all data will be deleted from it
At the end of the process, you’ll receive a notification. You can now quit Terminal, eject your flash drive and use it for other installations.
If you simply want to upgrade to Catalina from an older version of macOS, the steps are much more straightforward—simply search for the name of the OS in the App Store and click Get to download the installation files, and start the process on your computer.
Boot your Mac from a USB drive
Having made your flash drive bootable, you can use it on many different devices to install macOS.
Here’s how to install macOS from an OS X boot USB drive:
1. Connect the carrier to the Mac you want to install the OS on
2. Open the installation manager
3. Select the internal disk of the Mac as the boot volume and click Continue
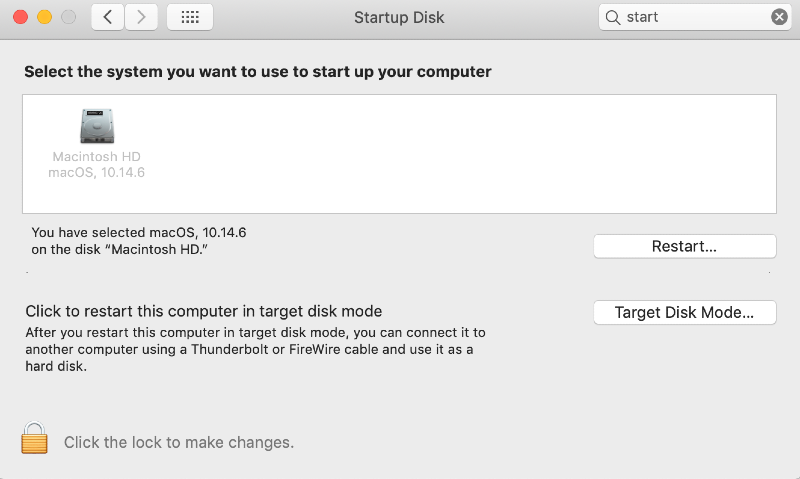
4. Restart the Mac from this disk. To check which disk you’re using as a startup, go to Apple menu → System Preferences → Startup disk. Make sure your internal HD is selected
5. Connect to Wi-Fi—you might need to have some firmware updates during the installation
6. Select the language that you want to use the OS in—it’s set to English by default
7. Go to Utilities and select Install macOS
8. Click on Continue
9. During the process of installations, you’ll occasionally see notifications that will depend on the version of macOS you’re attempting to install
10. When the installation is finished, restart your computer and eject the external drive
Don’t forget to back up your files
As mentioned before, reinstalling macOS and reformatting disks will erase information from the drive. You’ll need to create a backup. You can use an external carrier to back up your Mac with Time Machine—a default app for Macs that allows storing your important data.
How to create a bootable macOS Big Sur installer drive?
To create a bootable macOS Big Sur installer drive with Terminal, follow these steps:
- Download the installer
- Go to Applications > Utilities > Terminal
- Plug in a USB drive
- Enter the command sudo /Applications/Install\ macOS\ Mojave.app/Contents/Resources/createinstallmedia —volume /Volumes/the name of your USB drive
- Hit Enter and type in your password
- Confirm the formatting of the USB drive
- Wait for installation completion and eject the USB drive
Now your bootable macOS Big Sur installer is ready for use.
How to make a bootable copy of Catalina on USB drive?
To make a bootable copy of Catalina on a USB drive, make sure it has at least 12 GB of free memory. Since your USB drive will be formatted in the process, it’s also important to back up the data you store on it. If your USB drive is ready, follow these steps to create a bootable copy of Catalina:
- Download the Catalina installer
- Connect your USB drive
- Open Disk Utility and select your USB drive
- To format the drive, click the Erase button
- Select the OS X Extended (Journaled) format and the GUID Partition Map scheme
- Open the installer and agree to the Terms and Conditions
- Click Show All Disks and select the USB drive as the installation destination
- Click Continue and wait for installation completion
What is a bootable installer?
A bootable installer is an external carrier that contains the full set of installation files and drivers required to install an operating system on a computer.
How do I make a bootable Yosemite installer?
OS X Yosemite can be installed on older models of MacBooks. To create a bootable installer, you’ll need a flash drive with a minimum of 8GB of free space. The easiest way to turn a drive into an installer is through Terminal, but you have to reformat it and name it Untitled.
Then you can go to Terminal and use the same instructions as for uploading the installation files for newer versions of macOS. The only difference is in the command—for Yosemite, the command would look like this:
/Applications/Install\ OS\ X\ Yosemite.app/Contents/Resources/createinstallmedia —volume /Volumes/Untitled —applicationpath /Applications/Install\ OS\ X\ Yosemite.app —nointeraction
How do I make a bootable USB from an ISO file on a Mac?
This is not the best way to create a bootable drive, especially if the ISO image contains an operating system not recommended for Macs. However, there are ways to do it.
To create a bootable drive from an ISO file with Terminal:
- Download the ISO file
- Open Terminal and type in hdiutil convert -format UDRW -o /path/to/target.img /path/to/source.iso
- Insert your external drive
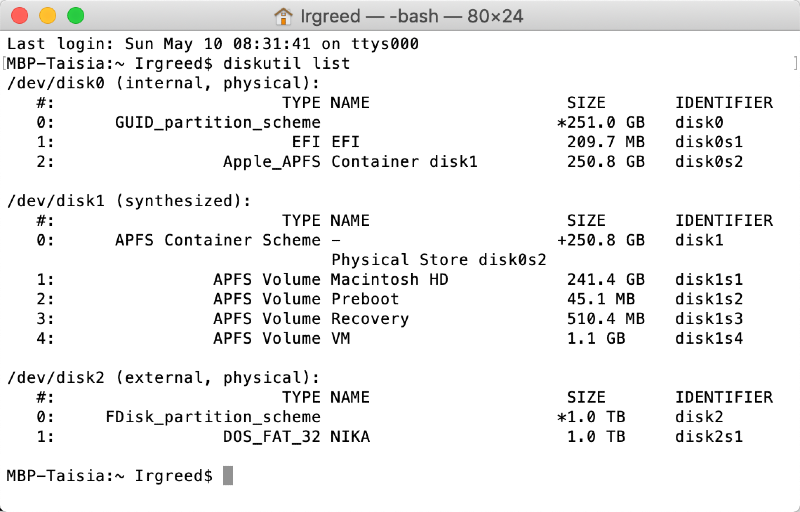
- Type in diskutil list, press Enter and make a note of your drive’s identifier in the list of devices
- Type in diskutil unmountDisk /dev/diskN —N should be the number in your disk’s identifier
- Run sudo dd if=/path/to/downloaded.img of=/dev/rdiskN bs=1m. If you see the error dd: /dev/diskN: Resource busy, go to Disk Utility and unmount the drive to make sure that it’s not being used
- Eject your drive and disconnect it from your laptop. You can do it through Terminal by running diskutil eject /dev/diskN
Can I use Rufus on Mac?
Rufus is an app that lets the user create bootable drives. Unfortunately, there is no current version of macOS that you can use Rufus on.
Источник
How to Create a Bootable Mac OS USB on Windows
Macbooks or iMacs hardly require reinstallation of their Mac OS, but when they do then it’s a fairly difficult process especially if your secondary computer is Windows. Reinstalling Mac OS is a time-consuming process and requires a lot of patience that’s why recommend doing this process in your free time or weekends.
To get started with you require a USB drive with at least 8GB storage (16GB recommended). Then you need a working Mac OS ISO or DMG Installation Image. You can download it from the Apps Store or you can find Mac OS Image at ISORIVER.
There are 2 Methods to Create a Bootable USB drive of Mac OS on your Windows PC.
Method 1: Using TransMac
- Download TransMac’s latest version for Windows from this link.
- Connect your USB drive
- Right Click on your USB drive option in TransMac and select Format Disk for Mac
- After that, right-click the USB Drive and select Restore with Disk Image
- Point to your Mac OS .dmg or .iso file by clicking the add button.
- After that TransMac will create bootable Mac OS USB within few minutes.
- Then you can insert it into your Mac, hold down the option key while turn on and boot your system with this USB.
Method 2: Using PowerISO
Another disk image utility that you can use is PowerISO. It can be used for burning both ISO files and DMG files to USB to create a bootable drive. Follow the steps below to Create a Bootable Mac OS USB on Windows PC.
Step 1: Firstly Download PowerISO and install it in your Windows PC. Launch the app and insert a USB drive into your computer.
Step 2: Import the DMG / ISO file directly by clicking on ‘Burn’ in the toolbar.
Step 3: In the Burn window, select the DMG / ISO file from the Source File section.
Step 4: You can modify the settings to adjust burn speed. The default will be set to the maximum, so you can reduce that.
Step 5: You can choose to finalize the disk and verify it. Any errors in the bootable USB will show up at that point.
Step 6: Now click on “Burn” and wait for the progress bar to reach 100%.
After the successful creation of Bootable Mac OS USB, boot your Macbook from this USB drive by clicking the option button during bootup and select this USB drive.
Watch this Video Tutorial
That’s it for the tutorial If you face any issues or had any query then please let us know in the comment section below. You can also send us an email via the contact us page for personalized support.
Share this:


This article has 1 comment
After starting the Mac with holding option key, i’ve got a blank screnn with mouse pointer. Not possible to choose starter disk. please help
Источник


