- Как изменить размер раздела Boot Camp — Вокруг-Дом — 2021
- Table of Contents:
- Шаг 1
- Шаг 2
- Шаг 3
- Шаг 4
- Шаг 5
- Шаг 6
- Как увеличить размер раздела в Boot Camp
- Как изменить букву любого диска или раздела, в Windows
- 2 способа изменить размер раздела в Windows (все версии)
- How to increase your bootcamp partition without deleting windows. Disk partitioning macOS Catalina (Октябрь 2021).
- Question: Q: How to Resize BootCamp Partition without Deleting it on my Mac computer?
- How to Free Resize Bootcamp Partition without Reinstalling Windows?
- What is Boot Camp Assistant and Bootcamp Partition?
- Why Need to Resize your Bootcamp Partition?
- Best way to resize Bootcamp partition without reinstalling Windows
- Steps to resize Bootcamp partition
- How to Free Resize Bootcamp Partition without Deleting Windows [Partition Magic]
- Summary :
- Quick Navigation :
- Overview of Bootcamp Partition
- What Is Bootcamp
- When Need to Resize Bootcamp Partition
- How to Resize Bootcamp Partition
- Alternatively: Resize Bootcamp Partition without Deleting Windows
- Mac Data Recovery
- Conclusion
- ABOUT THE AUTHOR
Как изменить размер раздела Boot Camp — Вокруг-Дом — 2021
Table of Contents:
Утилита Apple Boot Camp — это программный помощник, который позволяет устанавливать Windows на Mac с процессорами Intel. Установив Boot Camp, вы сможете одновременно запускать обе операционные системы и легко переключаться между экранами. Для установки Windows Boot Camp требует, чтобы вы разметили жесткий диск. Этот процесс делит ваш жесткий диск на два виртуальных диска, один для Mac OS и один для Windows. В отличие от старых компьютеров Mac, компьютеры Mac на базе процессоров Intel, на которых установлены последние версии Mac OS X, позволяют пользователям изменять размер раздела Boot Camp после его создания.

Современные Mac’ы добавляют совместимость Windows с Boot Camp.
Шаг 1
При необходимости установите последнюю версию Mac OS. Изменение размера существующих разделов требует Mac OS 10.4.6 или более поздней версии. Большинство Mac на базе Intel поставляются с этой или более поздней версией, которая уже установлена, поэтому этот шаг вряд ли понадобится большинству пользователей.
Шаг 2
Сделайте резервную копию вашего диска, скопировав важные файлы на другой диск. Это всегда хорошая идея, прежде чем делать что-либо с вашим основным жестким диском.
Шаг 3
Откройте терминал Mac OS, дважды щелкнув «Терминал» в папке «Утилиты». Это дает вам доступ к командам UNIX, которые работают под графическим интерфейсом Mac.
Шаг 4
Найдите свой раздел, набрав «diskutil list» и нажав «Enter». Вы увидите список всех разделов на жестком диске. Загрузочный диск — «/ dev / disk0», в то время как другие будут перечислены как «диск1», «диск2» и т. Д., Каждый с заголовком идентификатора, который сообщает вам имя этого раздела. Ищите тот, который соответствует названию вашего диска Boot Camp.
Шаг 5
Чтобы узнать возможный размер вашего раздела, введите:
diskutil resizeVolume ограничения disk_identifier
Замените «disk_identifier» именем вашего раздела Boot Camp и нажмите «Enter», чтобы просмотреть список текущих, минимальных и максимальных размеров раздела.
Шаг 6
Измените размер раздела, введя «diskutil resizeVolume», затем идентификатор вашего раздела Boot Camp и желаемый размер. Этот размер записан в гигабайтах, но команда удаляет букву «B», чтобы стать просто «G.»
Например, чтобы изменить размер раздела «BootCamp» до 100 гигабайт, введите команду:
«Дискутил resizeVolume BootCamp 100G»
После того, как вы ввели команду, нажмите «Enter», чтобы изменить размер раздела.
Как увеличить размер раздела в Boot Camp

Если вы установили Windows на свой компьютер Mac, то сначала вы разбили жесткий диск на разделы с помощью Boot Camp Assistant. Если вы обнаружили, что хотите .
Как изменить букву любого диска или раздела, в Windows

Как изменить букву любого диска или раздела в Windows на любую нужную букву? Как использовать Управление дисками для изменения букв дисков.
2 способа изменить размер раздела в Windows (все версии)

Как изменить размер раздела в Windows, используя только приложения, включенные в Windows: инструмент командной строки diskpart или Управление дисками.
How to increase your bootcamp partition without deleting windows. Disk partitioning macOS Catalina (Октябрь 2021).
Источник
Question: Q: How to Resize BootCamp Partition without Deleting it on my Mac computer?
Is there any solution to resize my Mac BootCamp Partitions without deleting it and without facing the data loss problems.
Mac Operating System: macOS High Sierra
MacBook Air (2018 or later)
Posted on Dec 27, 2018 3:12 AM
Yes, it is absolutely possible to resize the bootcamp partition without deleting or removing it from your Mac computer. My answer will be applicable for MacBook Pro, iMac, Mac Mini etc. However, before I start let’s tell you something about it.
In Mac computers, Boot Camp is one of the helpful and dual boot feature which helps the user in creating a separate partition and further helps in running 2 different computer operating system on the same Mac machine. This below solution is mainly used to create Windows partition on a Mac drive, so that you can get the opportunity to run even Windows OS while using Mac for plenty of purposes.
At times, initially created Boot Camp partition needs more space, therefore in order to enlarge the size people often format their boot camp drive and recreate it with more space. This process is actually recommended by Mac as Disk Utility can resize an HFS+ (Mac OS) partitions, but not capable enough to revise the size of NTFS based partitions.
However, it is not always necessary to format the full hard drive for resizing the Mac bootcamp partition. Instead you can choose to take image of your Windows Boot Camp partition and then simply restore it. This will preserve all the settings untouched. Below, you will look at steps to enlarge the size of your Windows Boot Camp partition on a Mac based hard disk drive or volume.
Free Available Solution to Resize BootCamp Partition:-
(1) First of all, you need to take the complete data backup of your Windows partition (use a third party tool for image your backup partition) and save it to the desktop computer for further use.
(2) Now, remove the pre existing or old Windows partition and resize the current Mac hard drive partition easily.
(3) Here, after a successful Mac computer partition, create a new Windows partition in free space and set the format to MS-DOS (FAT).
(4) In this step, you need to resize the Mac-boot camp partition according to your requirement using the help of Mac disk-utility and give a new name to this partition.
(5) Further, restart your Mac computer for a new Windows partition and restore the complete Windows data backup partition image you created over newly created Windows partition. (You can try some 3rd party tool to do this task for you more easily and securely)
(6) Finally, run the Mac OS startup disk and check both the partitions properly.
Alternate Solution to Resize BootCamp Partition without Facing Data Loss Problems:-
Although, the above discussed solution is capable enough to enlarge a Mac user Boot camp space, but still there are chances of complete Boot camp drive data loss in case you are unable to restore the image you created and certain other issues while using your Mac computer. Therefore, it is highly recommended to use some safe and reliable application that directly provides you the option to resize your bootcamp partition without facing any kind of data loss errors. You can either using TechSoftwareLogic this Mac hard drive partition manager software or iPartition tool to Resize your BootCamp partition without facing the important data loss problems keeps your data safe and secure.
Источник
How to Free Resize Bootcamp Partition without Reinstalling Windows?
Sometims, you might need to resize Bootcamp partition to make it bigger, then you can use the free AOMEI Partition software, and it allows you to add more space to Bootcamp partition with simple steps.

By Lucas  / Last Updated June 24, 2021
What is Boot Camp Assistant and Bootcamp Partition?
Bootcamp partition is a NTFS partition for installing Microsoft Windows operating system on an Intel-based Macintosh computer. Why you want to install and run Windows on a Mac computer? If you want to install some applications that only work on Windows or just want to make it different from OS X something like that, it’s a good choice for you.
Why you need to create a new partition on your Mac? That’s because the Windows and the Mac works on different format. Mac runs on Mac OS X, and Windows runs on NTFS.
Speaking of Bootcamp partition, you have to know the Boot Camp Assistant. The Apple’s Boot Camp Assistant provides you with 3 functions to run Windows on Mac, including help you to partition your Mac hard drive into 2 partitions (the Mac hard drive must be formatted as Mac OS Extended), install Windows device drivers for Apple hardware and allow you to select which operating system to boot.
Why Need to Resize your Bootcamp Partition?
After you create a NTFS Bootcamp partition using Boot Camp Assistant, you can install Windows on this Bootcamp partition. You may underestimate the size of the Bootcamp partition when you creating the partition for Windows. Thus, with your daily use, the Bootcamp partition mightВ run out of the free space quickly Then, it is necessary to increase the Bootcamp partition to make it bigger.
For this, you can delete the current Bootcamp partition and create a new bigger one again, but that will delete all data and you have to reinstall Windows operating system and other programs from scratch. So, many users are looking for a way to resize Boot Camp partition without reinstalling Windows or losing data.В In this article, we will walk you through the details about resizingВ NTFS Bootcamp partition.
Best way to resize Bootcamp partition without reinstalling Windows
Typically, you may turn to the Disk Utility for help to resize Mac partition, you can locate its location /Applications/Utilities. However, Disk Utility can’t expand or shrink the Bootcamp partition due to it’s a NTFS file system partition. So, it’s not an easy job to resize Bootcamp partition.
If you ask Apple for help, the solution could be backup your data on the Bootcamp partition, remove it, then create a new Bootcamp partition with the size you want and reinstall Windows. As we mentioned before, it’s not the ideal solution for vast majority of users.
Thus, you can turn to the free partition manager:В AOMEI Partition Assistant Standard. ItВ is a free yet professional software to resize the Bootcamp partition without losing data or deleting Windows. The instructions listed below as you can see. To resize BootCamp partition in Windows 10/8/7, there are two ways: increase Bootcamp partition size, and decrease Bootcamp partition size.В Here, we mainly show how to increase Bootcamp partition size.
Steps to resize Bootcamp partition
Before you do:
1. Backup your valuable files or documents in case of data lossВ cause by incorrect human operation.
2. Please release some unallocated space for Bootcamp partition from other Mac partitions with Mac Disk Utility, which is necessary for resizing the Bootcamp partition.
3. Set the Bootcamp as the boot disk, restart the Mac computerВ into Windows environement.
Step 1. Free downloadВ AOMEI Partition Assistant Standard, install it on your Windows, and launch it to enter its main interface.
Step 2. Right click the Bootcamp partition and chooseВ Resize/Move Partition. Or click Bootcamp partition and selectВ Resize PartitionВ at the left column.
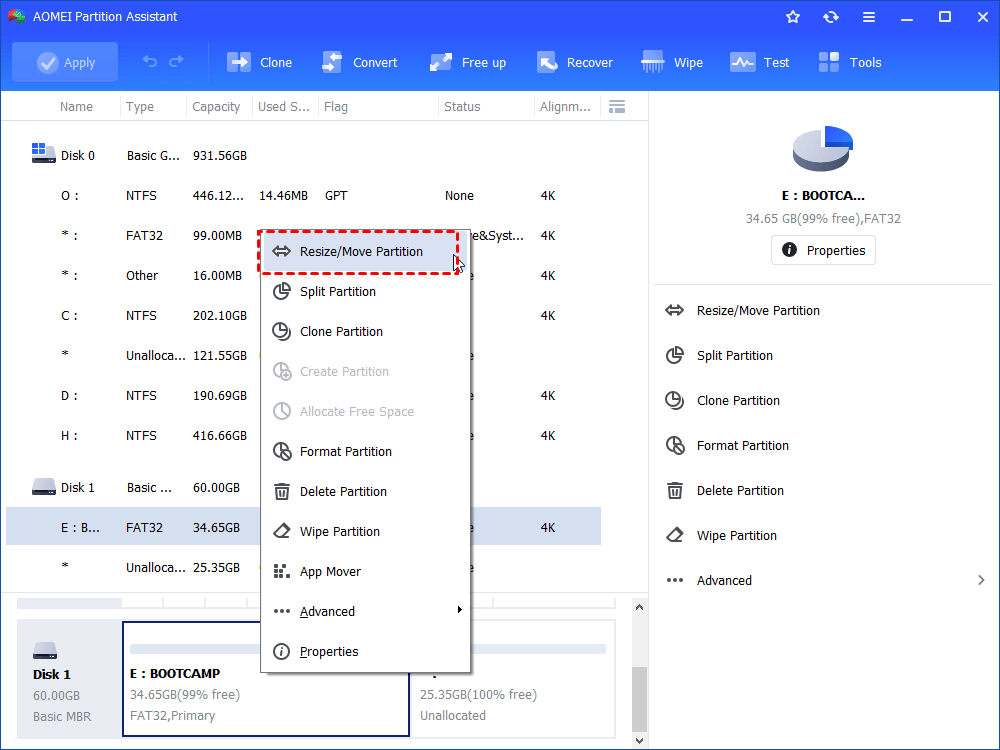
Step 3.В Drag the double-arrow rightward to increase Bootcamp partition size with an unallocated space as you want. ClickВ OKВ to go on.
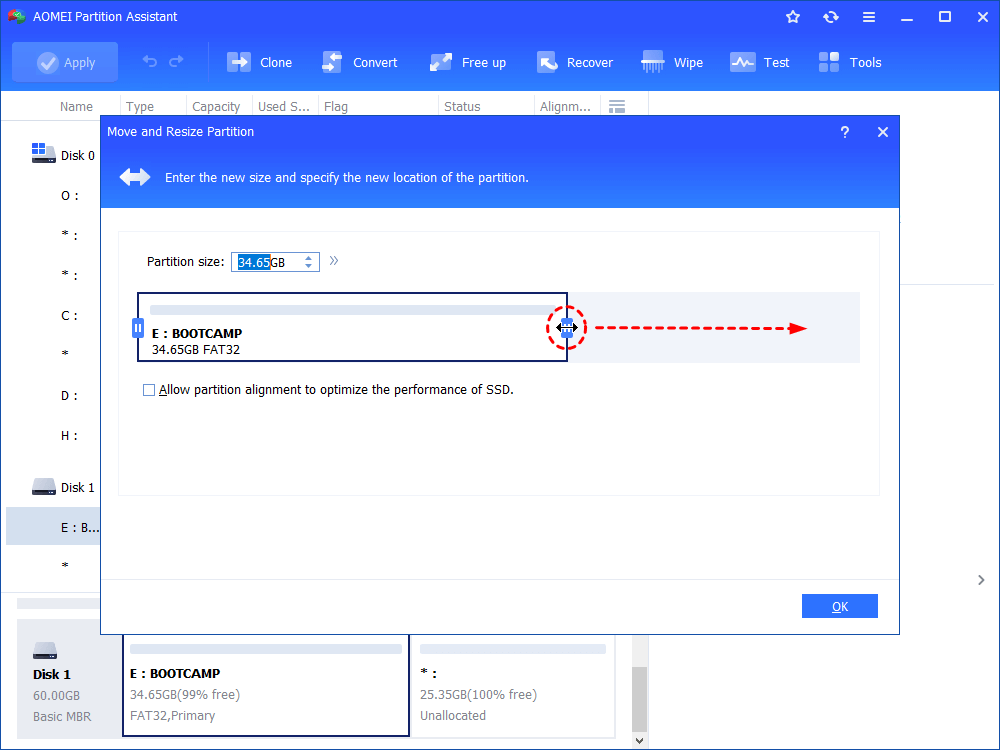
Tip: Drag the double-arrow leftward will shrink the Bootcamp partition if you would like to.
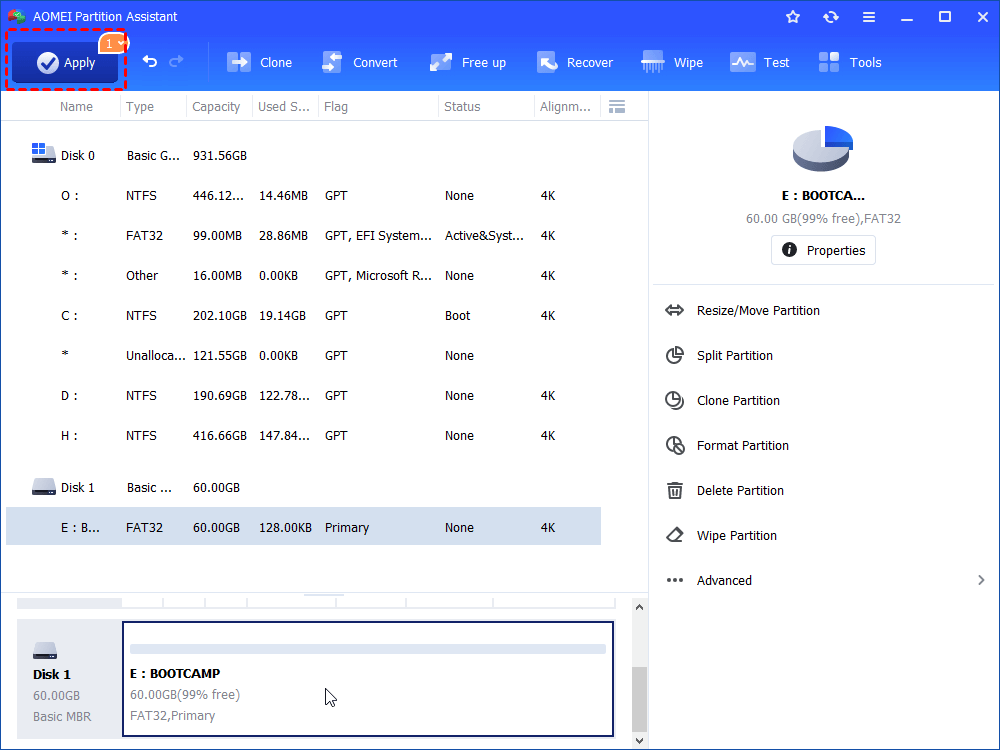
Step 4. PressВ ApplyВ to expand the Bootcamp partition.
At this moment, with the help of AOMEI Partition Assistant Standard, you can resize Bootcamp partition without reinstalling Windows or losing data in Windows 7/8/10. In addition, if you upgrade to ProfessionalВ edition, you can enjoy more advanced functions like: split Windows partition,В extend system partition,В allocate free spaceВ from one to the other, migrate OS to SSDВ between MBR and GPT, convert primary partition to logicalВ without losing data, and more.
Источник
How to Free Resize Bootcamp Partition without Deleting Windows [Partition Magic]
By Bella | Follow | Last Updated August 20, 2020
Summary :
How to resize Bootcamp partition? How do increase Bootcamp partition? How do I reduce Bootcamp partition? Now, this post shows how to effectively and quickly change Bootcamp partition size.
Quick Navigation :
Overview of Bootcamp Partition
A reader had a Windows issue, and didn’t know how to solve it. He wrote:
Hi, I’m running Windows in a Boot Camp partition on my Mac computer. When I first configured Boot Camp I underestimated how much I’d use Windows. However, recently I’m quickly running out of space on my Bootcamp partition. How can I expand the size of the Boot Camp partition?
Have you ever run into the same problem?
Do you know how to effectively resize Bootcamp partition?
Do you know how to change the size of Bootcamp partition without data loss?
Do you know whether there are free yet professional tools to help to extend or shrink Bootcamp partition? Now, if you haven’t found a suitable solution, you could read this post to find answers. On the other hand, if you had solved this problem, you might also like this post since it offers effective yet free solutions.
In general, when it comes to talking about resizing Bootcamp partition, these following questions would be asked: what is Bootcamp partition, when need to change Bootcamp partition size, how to increase/ decrease Bootcamp partition effectively. Next, let’s answer these problems in detail.
What Is Bootcamp
Boot Camp Assistant is a multi-boot utility included with Apple Inc.’s OS X that assists users in installing Microsoft Windows operating systems on Intel-based Macintosh computers.
The utility guides users through non-destructive disk partitioning (including resizing of an existing HFS+ partition, if necessary) of their hard disk drive and installation of Windows device drivers for the Apple hardware.
The utility also installs a Windows Control Panel applet for selecting the boot operating system.
In a word, Boot Camp can help partition your hard drive into 2 partitions. One partition will be used by your Mac to run Mac OS X and the other one will be used to run Windows OS.
However, do you know why we have to make a new partition to install Windows? Well, the reason is that Windows and Mac don’t run in the same format. Mac runs on Mac OS X (Journaled), and Windows runs on NTFS.
Partitioning splits your hard drive into 2 separate sections, each with its own format. This means that you can run Windows OS on NTFS and run Mac on Mac OS X (Journaled) on the same hard drive. Of course, this NTFS partition is called Bootcamp partition which is used to install Windows.
You can read How to install Windows using Boot Camp to know details about installing Windows OS on Mac computer.
When Need to Resize Bootcamp Partition
You can firstly specific the size of Bootcamp partition, and then install Windows on it. However, after running Windows, you may find that your Bootcamp partition is running out of space, and you need to increase its size to continue running Windows OS.
Now, the question is: “How to change the size of Bootcamp partition to meet the needs of Windows?”
Well today, I’m going to make it easy for you.
How to Resize Bootcamp Partition
As we know, if you want to resize Mac partition, you can directly turn to the Disk Utility tool, located in /Applications/Utilities. With this tool, you can grow or shrink HFS+ (Mac OS X) partitions on the fly, with the resizing done live regardless of whether the drive is internal or an external drive, or even the boot volume.
However, Disk Utility can not be used to extend or shrink Bootcamp partition since it is Windows NTFS file system partition. So, it is not an easy task to resize Bootcamp partition.
According to Apple: “If your Windows partition is too small, back up the information on it, delete it, create a larger partition, and then reinstall Windows.” Details are shown here.
Traditional Method: Delete Bootcamp Partition, then Create a New Large One
Step 1: Back up all the information on your Windows partition.
Step 2: Delete Windows from your Mac.
- Start up your Mac in OS X.
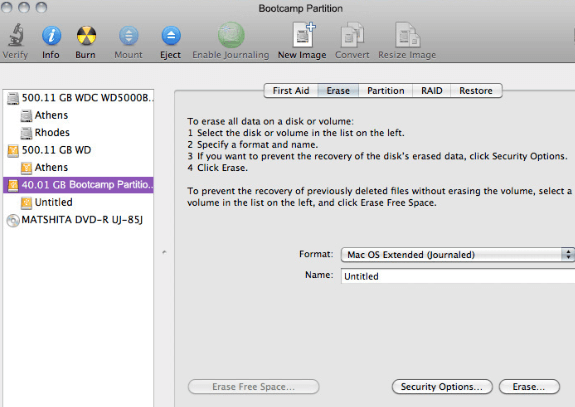
- Open Disk Utility. (To access the Disk Utility in Mac OS X, just press Command+Space to open Spotlight search, type Disk Utility, and press Enter. You can also click the Launchpad icon on your dock, click the Other folder, and click Disk Utility.)
- Select the Windows disk, click Erase, choose the Mac OS Extended (Journaled) format, and then click the Erase button. (picture is below)
Step 3: Shrink Mac partition to release more free space.
Step 4: Create a new large Windows partition in the free space.
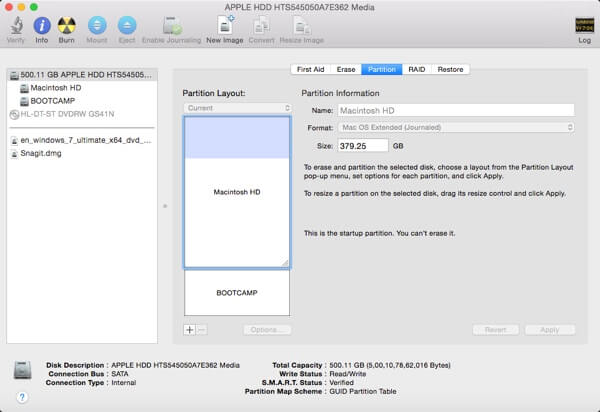
- Select the drive.
- Select the Partition tab
- Click + to add a partition
Step 5: Restore the information you backed up.
On the other hand, with the development of software technology, some software (like Camptune X, Winclone) can help you to resize Bootcamp Partition. And, each tool has its advantages.
To be specific, those familiar with Winclone are aware that with its help you can create a larger Bootcamp partition without losing your original Windows data.
The process involves creating an image of the partition for safe keeping, deleting the original Bootcamp partition with Disk Utility, creating a new, more expansive partition, and then moving the data from the imaged partition to the new one with WinClone.
Although this method is capable enough to enlarge your Bootcamp partition size, you have to delete Windows at first.
Now, you might be wondering:
“Is it possible to resize Bootcamp partition without deleting Windows?”
The answer is positive!
Alternatively: Resize Bootcamp Partition without Deleting Windows
According to a survey, MiniTool Partition Wizard, a piece of free yet professional partitioning software, proves to be an excellent tool for increasing/shrinking Bootcamp partition without deleting Windows. Next, let’s see the detailed steps.
A step-by-step guide to increasing the size of Bootcamp partition
Step 1: Backup all your files (optional but strongly recommended).
Step 2: Use Disk Utility to shrink your Mac partition to release some unallocated space as much as you need to add to the Bootcamp partition.
- Open Disk Utility app from /Applications/Utilities/.
- From the left side of the app, select the hard drive you want to partition.
- On the “Partition” tab, drag the separator bar up and down to resize your hard drive partition. (Alternatively, select the partition you want to resize. Enter size value in GB in Size box.)
- Click the “Apply” button to resize the partition.
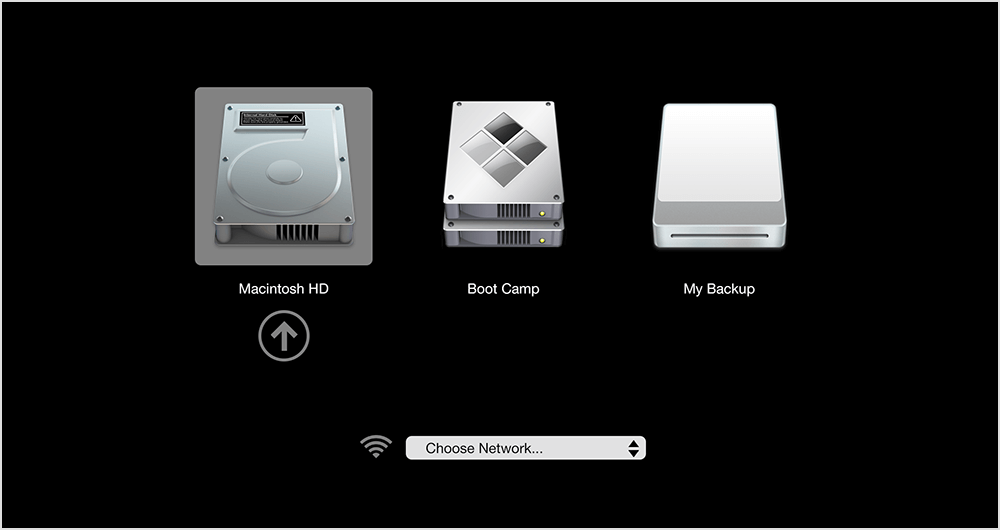
Step 3: Set Boot camp as Boot Disk and restart the Mac.
- Turn on or restart your Mac.
- Immediately press and hold the Option key. After a few seconds, the Startup Manager appears. If you don’t see the volume you want to use, wait a few moments for Startup Manager to finish scanning connected drives.
- Use your mouse or trackpad, or left and right arrow keys to select the volume (Boot Camp) you want to use.
- Double-click or press the Return key to start up your Mac from the volume you selected.
Step 4: Download MiniTool Partition Wizard Free edition from its official website, install it on your computer according to prompts and then launch it to get its main interface.
Step 5: Select the Bootcamp partition and then click “Extend Partition” from the left action panel.
Step 6: Choose the unallocated space from the Take Free Space from and then drag the sliding button to decide how much free space to take. After getting desired space, click “OK” button to go back to the main interface of this free partitioning software.
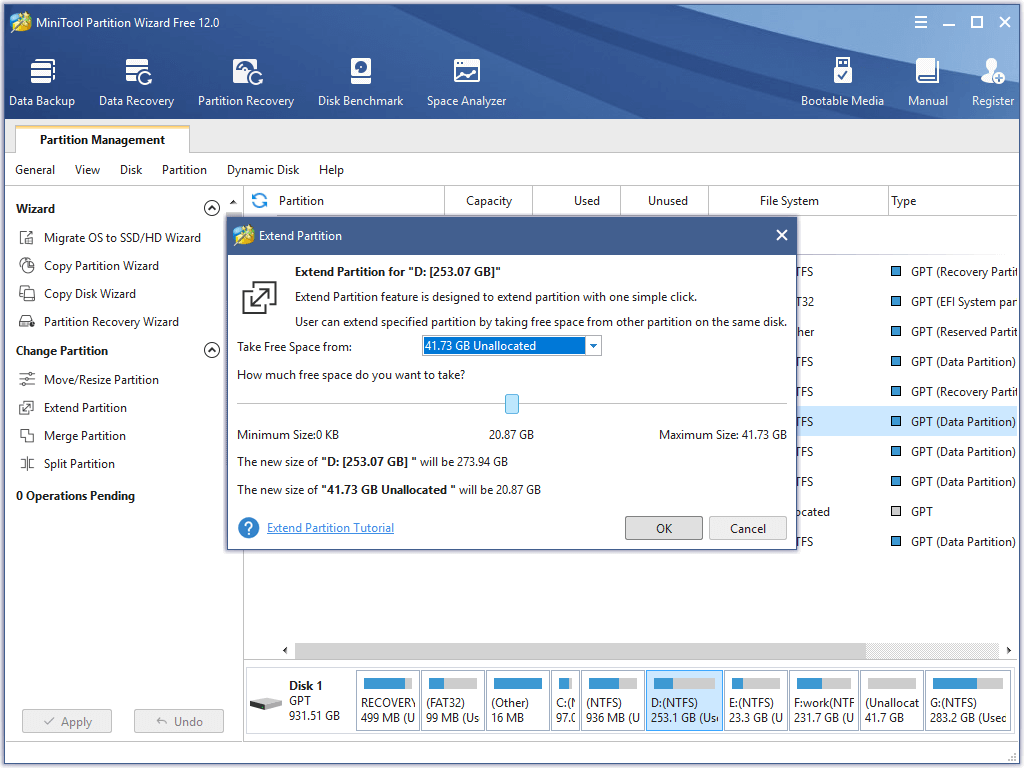
Step 7: At this time, click “Apply” button on the top left corner and tap “Yes” to apply the change.
You will be asked to restart your computer to apply the task since the Bootcamp partition is being used now by Windows. Now, just please choose “Restart now,” and MiniTool Partition Wizard will automatically finish rest of pending jobs.
After all operations done, you have finished increasing the size of Bootcamp partition without deleting Windows.
Video tutorial for resizing your Bootcamp partition without deleting Windows disk partitioning
In addition to extending partition without data loss, MiniTool Partition Wizard can also help to shrink the size of Bootcamp partition. But, how do I reduce the size of a bootcamp partition? Keep reading to find details!
A step-by-step guide to shrinking the size of Bootcamp partition
Step 1: Set Bootcamp as Boot Disk and restart the Mac.
Step 2: Launch MiniTool Partition Wizard in Windows.
Step 3: Select the Bootcamp partition and then click “Move/Resize” in the toolbar or “Move/Resize Partition” from the left Actions and Wizards.
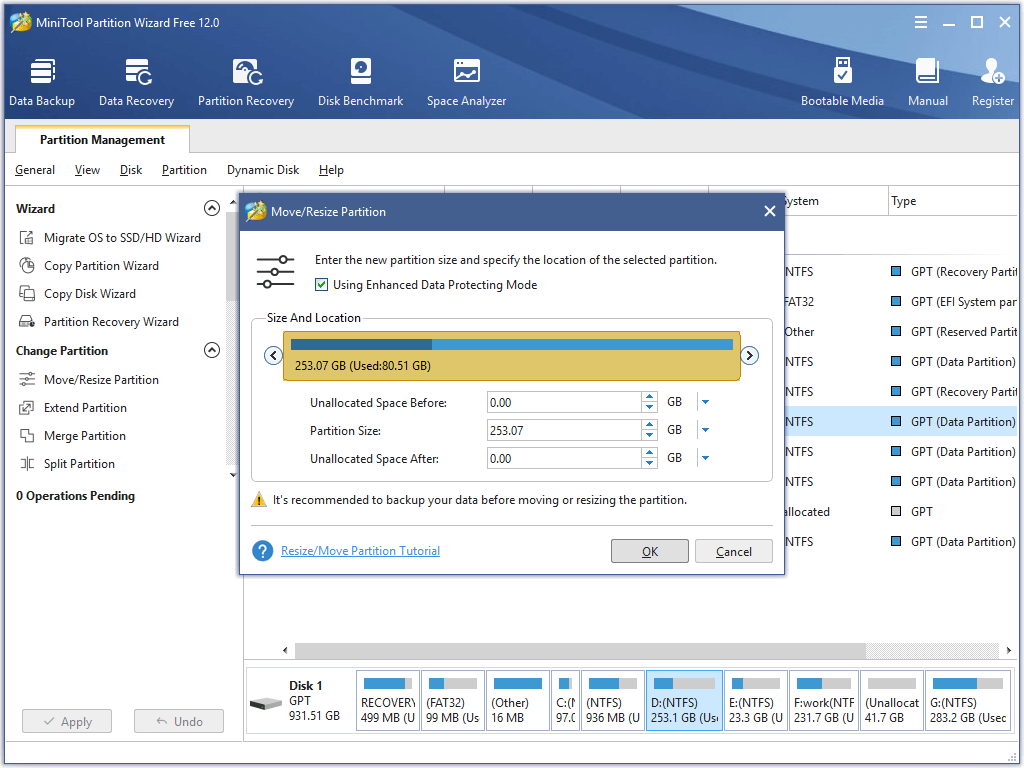
Step 4: Change the length of partition handle to resize partition. After getting desired partition size, click “OK” to go back to the main interface.
Step 5: Click “Apply” button on the top left corner to apply the very change.
However, here we also want to share another tool, MiniTool Mac Data Recovery, for you since you cannot ensure absolute data security all the time. For instance, you may accidentally delete some data and empty the Trash, format/delete your hard drive partition by mistake, and more.
Mac Data Recovery
Now, lots of Mac users choose to run Windows on their Mac with Boot Camp assistance. However, no matter how wonderful an OS is, Mac data loss caused by various reasons happens more and more frequently.
Therefore, Mac lost data recovery has become a big problem annoying many computer users, especially some users have not backed up their data with Time Machine. (Note; you can use Time Machine to back up or restore your Mac. )
Fortunately, MiniTool Mac Data recovery, developed by famous data recovery solution providers based in Canada, can help to recover data that have been lost in a variety of ways like accidental deletion, partition formatting, etc.
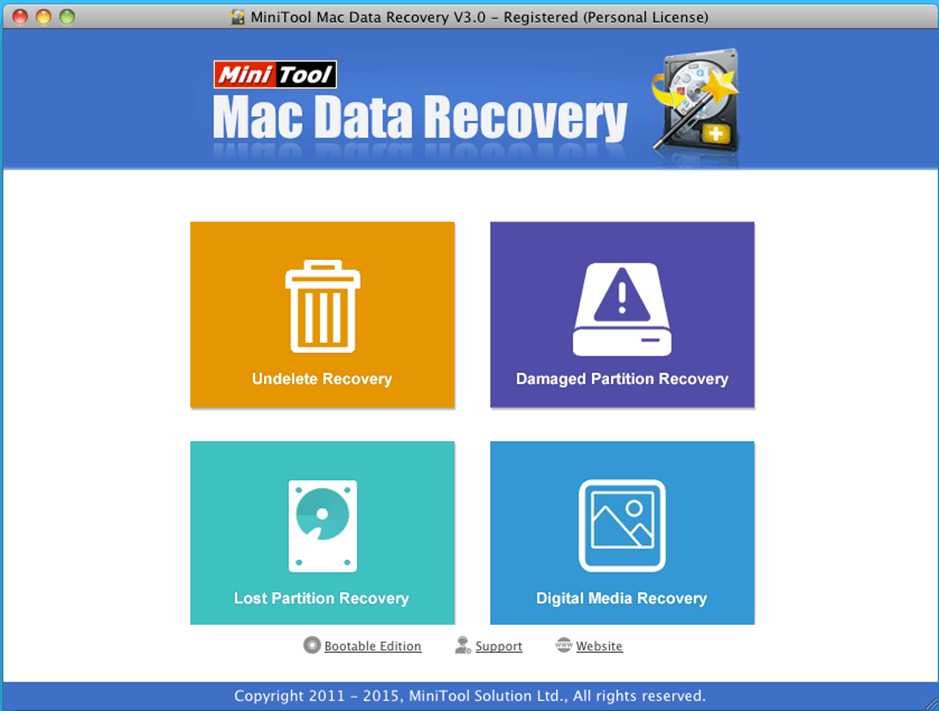
Also, this tool offers wizard-based operation and simple interface, so even a new user can easily handle this Mac data recovery software to recover lost photos, music, videos, emails, documents, and other types of data. What’s more, its operations are read-only , so you can use it to recover lost Mac data without affecting the original data.
Conclusion
Hopefully, this article would help to change the size of Bootcamp partition.
If you have any other suggestions about how to resize Bootcamp partition, please leave it in the following comments below. Thanks in advance!
Like this post on how to extend Bootcamp partition as well as how to reduce Bootcamp partition? Share it with more friends.
ABOUT THE AUTHOR

Position: Columnist
It’s going to be 6 years since Bella came to MiniTool family. She has been writing tech articles for many years. Her special focuses are video editing tips, change video format, data recovery, and manage partitions. She loves to travel and likes to try all new things.
Источник


