- How to record the screen on your Mac
- Use the Screenshot toolbar
- Record the entire screen
- Record a selected portion of the screen
- Trim, share, and save
- Change the settings
- Keyboard Shortcuts to Capture a Screen Shot with Mac OS X
- Сканирование изображений и документов с помощью Mac
- Откройте сканер
- Сканирование страниц при помощи сканера с подающим устройством
- Сканирование изображений при помощи планшетного сканера
- Take screenshots or screen recordings on Mac
- Take pictures or screen recordings using Screenshot
- Take pictures using keyboard shortcuts
How to record the screen on your Mac
You can make a video recording of the entire screen or just a selected portion of it.
Use the Screenshot toolbar

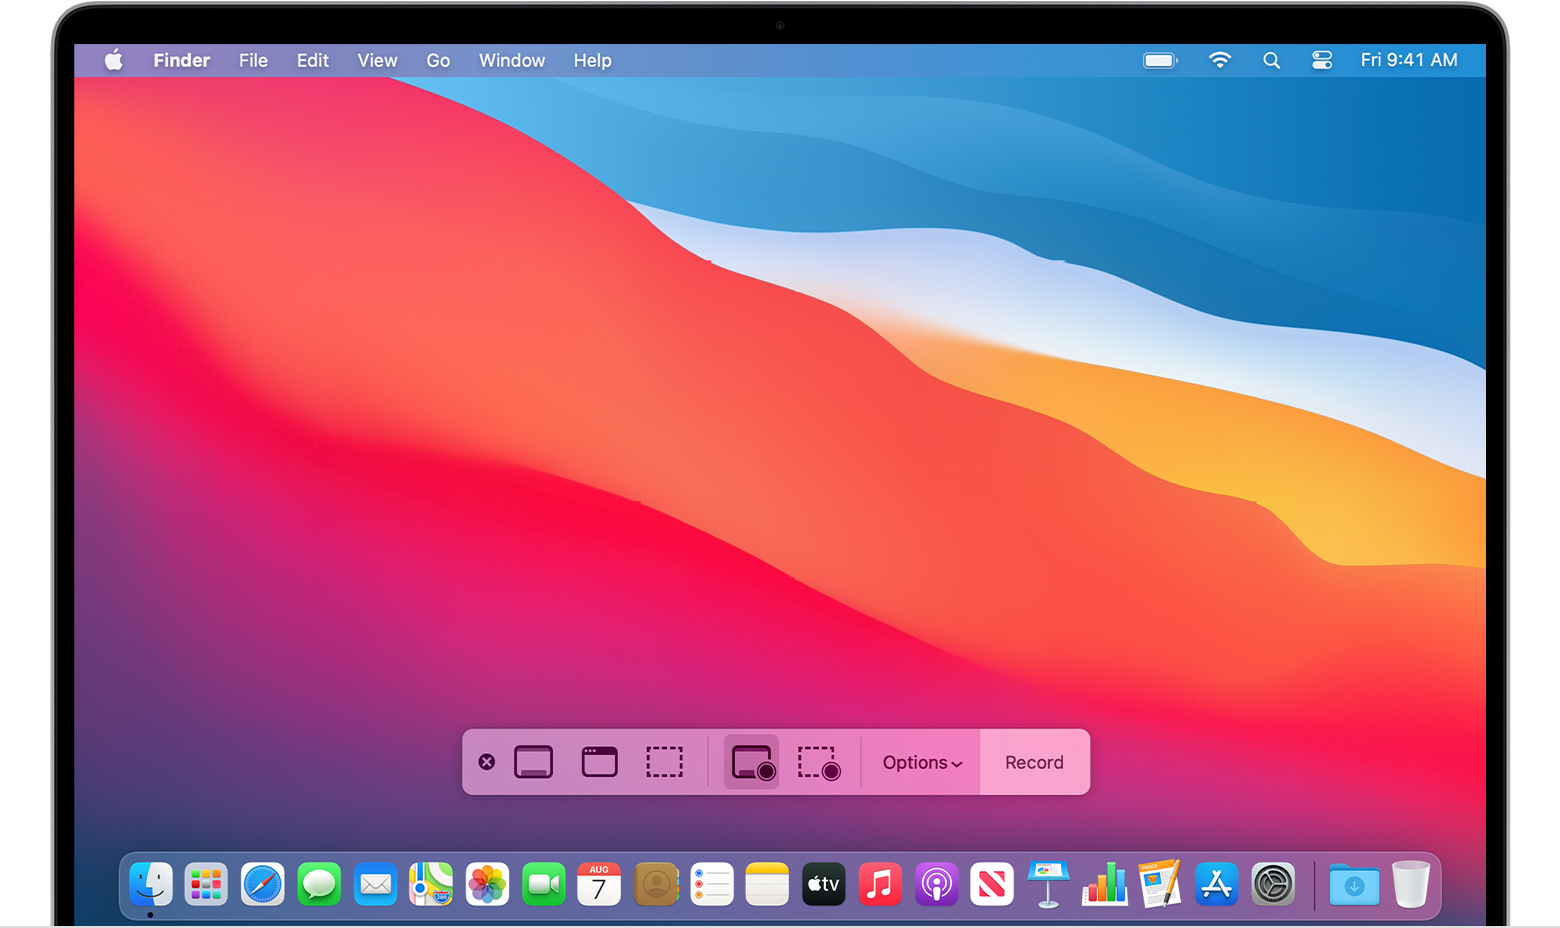
To view the Screenshot toolbar, press these three keys together: Shift, Command, and 5. You will see onscreen controls for recording the entire screen, recording a selected portion of the screen, or capturing a still image of your screen:
Record the entire screen
- Click in the onscreen controls. Your pointer changes to a camera .
- Click any screen to start recording that screen, or click Record in the onscreen controls.
- To stop recording, click in the menu bar. Or press Command-Control-Esc (Escape).
- Use the thumbnail to trim, share, save, or take other actions.
Record a selected portion of the screen
- Click in the onscreen controls.
- Drag to select an area of the screen to record. To move the entire selection, drag from within the selection.
- To start recording, click Record in the onscreen controls.
- To stop recording, click in the menu bar. Or press Command-Control-Esc (Escape).
- Use the thumbnail to trim, share, save, or take other actions.
Trim, share, and save
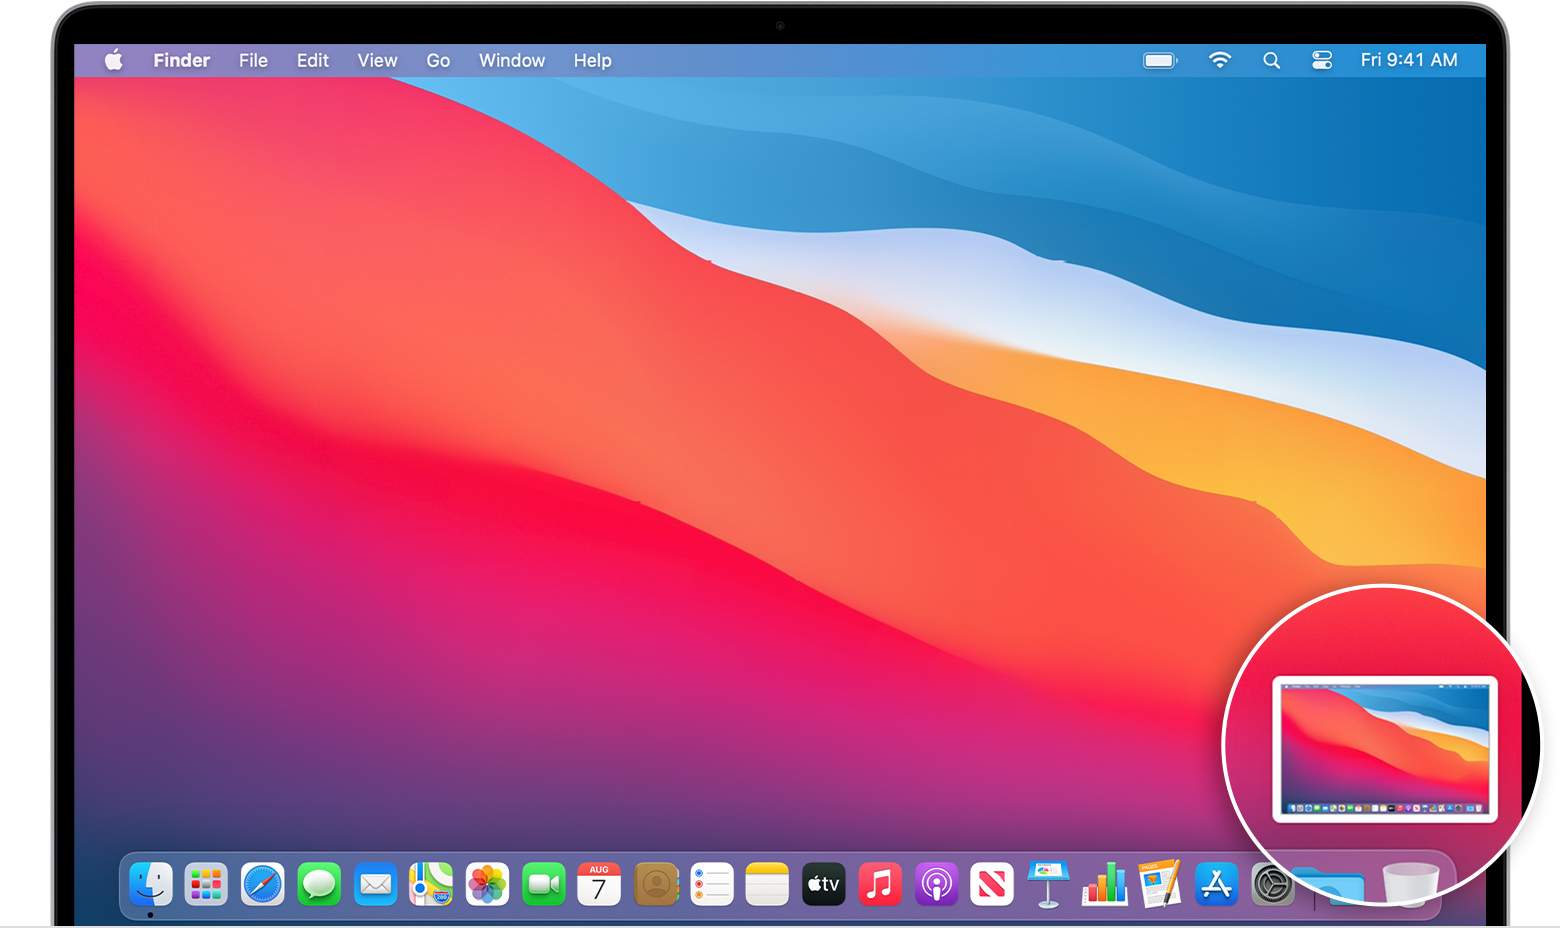
After you stop recording, a thumbnail of the video appears briefly in the lower-right corner of your screen.
- Take no action or swipe the thumbnail to the right and the recording is automatically saved.
- Click the thumbnail to open the recording. You can then click to trim the recording, or click to share it.
- Drag the thumbnail to move the recording to another location, such as to a document, an email, a Finder window, or the Trash.
- Control-click the thumbnail for more options. For example, you can change the save location, open the recording in an app, or delete the recording without saving it.
Change the settings
Click Options in the onscreen controls to change these settings:
- Save to: Choose where your recordings are automatically saved, such as Desktop, Documents, or Clipboard.
- Timer: Choose when to begin recording: immediately, 5 seconds, or 10 seconds after you click to record.
- Microphone: To record your voice or other audio along with your recording, choose a microphone.
- Show Floating Thumbnail: Choose whether to show the thumbnail.
- Remember Last Selection: Choose whether to default to the selections you made the last time you used this tool.
- Show Mouse Clicks: Choose whether to show a black circle around your pointer when you click in the recording.
Источник
Keyboard Shortcuts to Capture a Screen Shot with Mac OS X
The Macintosh operating system has always made it easy to capture a screen shot. A screen shot is an image of your computer desktop or an active window. Here’s a summary of all the keyboard shortcuts you can use to capture your screen in Mac OS X.
A. Entire screen:
- To capture the entire screen, press Command-Shift-3. The screen shot will be automatically saved as a PNG file on your desktop with the filename starting with “Picture” followed by a number, example Picture 1, Picture 2, and so on.
- To copy the entire screen, press Command-Control-Shift-3. The screen shot will be placed on your clipboard for you to paste into another program like PowerPoint, Word, Photoshop, etc.
B. Portion of the screen:
- To capture a portion of the screen, press Command-Shift-4. A cross-hair cursor will appear and you can click and drag to select the area you wish to capture. When you release the mouse button, the screen shot will be automatically saved as a PNG file on your desktop following the same naming convention as explained on the first tip above.
- To copy a portion of the screen to the clipboard, press Command-Control-Shift-4. A cross-hair cursor will appear and you can click and drag to select the area you wish to capture. When you release the mouse button, you can paste the screen shot to another application.
C. Specific application window:
- To capture a specific application window, press and hold Command-Shift-4 then tap on the Spacebar. The cursor will change to a camera, and you can move it around the screen. As you move the cursor over an application window, the window will be highlighted. The entire window does not need to be visible for you to capture it. When you have the cursor over a window you want to capture, just click the mouse button and the screen shot will be saved as a PNG file on your desktop.
- To copy a specific application window, press and hold Command-Control-Shift-4 then tap on the Spacebar. The cursor will change to a camera, which you can move around the screen. As you move the cursor over an application window, the window will be highlighted. The entire window does not need to be visible for you to capture it. When you have the cursor over a window you want to capture, just click the mouse button and you can paste the screen shot into another application.
Computing Tips and Techniques are brought to you by the Information Technology Group for the purpose of sharing a wide variety of technology tips with its clients. The collection of these tips are protected by intellectual property rights, such as copyright. All intellectual property rights belong to the manufacturer of the software product in question.
Источник
Сканирование изображений и документов с помощью Mac
Если у Вас есть сканер или принтер со сканером, Вы, возможно, сможете отсканировать изображение даже без специального программного обеспечения.
Перед выполнением сканирования следует открыть сканер. Затем следуйте инструкциям для сканера с подающим устройством или планшетного сканера.
Примечание. Следующие параметры могут быть недоступны для Вашего сканера. Если эти инструкции отличаются от того, что отображается на экране, обратитесь к документации по используемому приложению.
Откройте сканер
Подключите сканер к Mac, подсоедините питание и включите сканер.
Выберите пункт меню «Apple»

> «Системные настройки», затем нажмите «Принтеры и сканеры».
Выберите сканер в списке слева, затем справа нажмите «Открыть сканер».
Если Ваш сканер используется также в качестве принтера, возможно, перед тем как нажать «Открыть сканер», Вам нужно будет выбрать справа «Сканировать».
Если кнопки «Открыть сканер» нет на экране, может потребоваться настроить сканер, или обратитесь к документации, прилагающейся к сканеру, и выясните, как выполняется сканирование.
Сканирование страниц при помощи сканера с подающим устройством
Если у сканера есть автоматическое устройство подачи, Вы можете отсканировать несколько страниц одну за другой. Аналогичные настройки используются для всех страниц в лотке. Если страницы нужно сканировать по-разному (например, если одни страницы черно-белые, а другие цветные), их следует разделить на несколько партий.
Поместите страницы в подающее устройство сканера.
Выберите пункт меню «Apple»
> «Системные настройки», затем нажмите «Принтеры и сканеры».
Выберите сканер в списке слева, затем справа нажмите «Открыть сканер».
Если Ваш сканер используется также в качестве принтера, возможно, перед тем как нажать «Открыть сканер», Вам нужно будет выбрать справа «Сканировать».
Если кнопки «Открыть сканер» нет на экране, может потребоваться настроить сканер, или обратитесь к документации, прилагающейся к сканеру, и выясните, как выполняется сканирование.
Выберите «Использовать подачу документа».
Задайте параметры сканирования. В некоторых случаях для просмотра всех доступных параметров нужно нажать кнопку «Подробнее». Можно выбрать любое из следующих действий.
Выбрать тип сканируемого изображения: Используйте всплывающее меню «Тип».
Выберите «Текст» для черно-белых изображений с высокой контрастностью, таких как документы; выберите «Черно-белый» для изображений с градациями серого; выберите «Цветной» для цветных изображений.
Для сканирования обеих сторон листа: Выберите «Дуплекс».
Выберите размер отсканированного изображения: Используйте всплывающее меню «Размер».
Выберите, где сохранять отсканированные изображения: Используйте всплывающее меню «Сканировать в».
Если Вы выберете папку, изображения будут сохранены в нее. Если Вы выберете приложение, изображения открываются в этом приложении.
Откорректируйте цвета или экспозицию отсканированного изображения: Во всплывающем меню «Коррекция изображения» выберите режим «Вручную» и воспользуйтесь соответствующими элементами управления.
Если элементы управления коррекцией не отображаются, прокрутите экран вниз или увеличьте высоту окна «Сканер» на экране.
Сканер сканирует страницы по очереди.
Сканирование изображений при помощи планшетного сканера
При помощи планшетного сканера можно отсканировать несколько изображений одновременно и сохранить их в разных файлах, а также выровнять изображения, которые лежали на стекле неровно.
Положите изображения на стекло сканера.
Если Вы хотите сохранить каждое изображение в отдельном файле, заранее проверьте, чтобы между изображениями, лежащими на стекле сканера, был достаточный зазор. Если в изображении много белого цвета, оно может быть воспринято как несколько отдельных изображений.
Выберите пункт меню «Apple»
> «Системные настройки», затем нажмите «Принтеры и сканеры».
Выберите сканер в списке слева, затем справа нажмите «Открыть сканер».
Если Ваш сканер используется также в качестве принтера, возможно, перед тем как нажать «Открыть сканер», Вам нужно будет выбрать справа «Сканировать».
Если кнопки «Открыть сканер» нет на экране, может потребоваться настроить сканер, или обратитесь к документации, прилагающейся к сканеру, и выясните, как выполняется сканирование.
Снимите флажок «Использовать подачу документа», если он установлен.
В раскрывающемся меню «Сканировать в» выберите, куда сохранять отсканированные изображения.
Если Вы выберете папку, изображения будут сохранены в нее. Если Вы выберете приложение, изображения открываются в этом приложении.
Выберите размер сканируемого изображения или документа во всплывающем меню «Размер».
Вы можете выбрать один из стандартных форматов или один из следующих вариантов обработки:
Распознавать отдельные объекты: Каждое изображение будет выравниваться и сохраняться в отдельном файле.
Распознавать общую рамку: Все объекты на стекле сканера будут сохранены в виде одного изображения. Если какой-то из документов лежит неровно, он выравниваться не будет.
Предварительное сканирование позволяет определить, какие объекты лежат на стекле. Для каждого из создаваемых файлов будет выполнено дополнительное сканирование.
В большинстве случаев отсканированные файлы сохраняются на Вашем компьютере. Чтобы узнать точное место сохранения файлов или выбрать другое место, см. документацию сканера. В документации сканера также содержится информация о том, как сохранять отсканированные файлы в определенных форматах для отправки другим пользователям.
Источник
Take screenshots or screen recordings on Mac
You can take pictures (called screenshots) or recordings of the screen on your Mac using Screenshot or keyboard shortcuts. Screenshot provides a panel of tools that let you easily take screenshots and screen recordings, with options to control what you capture — for example, you can set a timer delay or include the pointer or clicks.
Take pictures or screen recordings using Screenshot
On your Mac, press Shift-Command-5 (or use Launchpad) to open Screenshot and display the tools.

Click a tool to use to select what you want to capture or record (or use the Touch Bar).
For a portion of the screen, drag the frame to reposition it or drag its edges to adjust the size of the area you want to capture or record.
Capture the entire screen

Capture a window

Capture a portion of the screen

Record the entire screen

Record a portion of the screen

Click Options if you want.
The available options vary based on whether you’re taking a screenshot or a screen recording. For example, you can choose to set a timed delay or show the mouse pointer or clicks, and specify where to save the file.
The Show Floating Thumbnail option helps you work more easily with a completed shot or recording — it floats in the bottom-right corner of the screen for a few seconds so you have time to drag it into a document, mark it up or share it before it’s saved to the location you specified.
Start the screenshot or screen recording:
For the entire screen or a portion of it: Click Capture.
For a window: Move the cursor to the window, then click the window.
For recordings: Click Record. To stop recording, click the Stop Recording button  in the menu bar.
When the Show Floating Thumbnail option is set, you can do any of the following while the thumbnail is briefly displayed in the bottom-right corner of the screen:
Swipe right to immediately save the file and make it disappear.
Drag the thumbnail into a document, an email, a note or a Finder window.
Click the thumbnail to open a window where you can mark up the screenshot or trim the recording, or share it.
Depending on where you chose to save the screenshot or recording, an app may open.
Take pictures using keyboard shortcuts
You can use various keyboard shortcuts on your Mac to take pictures of the screen. The files are saved to the desktop.
Tip: To copy a screenshot so you can paste it somewhere — like in an email or to another device — press and hold the Control key while you press the other keys. For example, to copy the whole screen, press Shift-Command-Control-3.
Capture the entire screen
Capture a portion of the screen
Press Shift-Command-4, then move the crosshair pointer to where you want to start the screenshot. Press the mouse or trackpad button, drag over the area you want to capture, then release the mouse or trackpad button.
Capture a window or the menu bar
Press Shift-Command-4, then press the Space bar. Move the camera pointer over the window or the menu bar to highlight it, then click.
Capture a menu and menu items
Open the menu, press Shift-Command-4, then drag the pointer over the menu items you want to capture.
Press Shift-Command 5.
Capture the Touch Bar
You can customise these keyboard shortcuts in the Shortcuts pane of Keyboard preferences. On your Mac, choose Apple menu

> System Preferences, click Keyboard, then click Shortcuts.
Screenshots are saved as .png files and screen recordings are saved as .mov files. Filenames begin with “Screenshot” or “Screen Recording” and include the date and time.
You may not be able to take pictures of windows in some apps, such as DVD Player.
Источник


