- How to Install Mac OS Catalina Theme in Ubuntu 20.04
- Тема MacOS для Ubuntu 18.04
- Как сделать Ubuntu похожей на MacOS
- 1. Выбор правильного окружения рабочего стола
- 2. Установка темы Mac OSX Sierra Compact
- 3. Установка темы Mac 11 GTK
- 4. Установка иконок MacOS
- 5. Активация темы и иконок
- 5. Настройка док панели
- 6. Установка обоев рабочего стола
- 7. Установка шрифтов Mac
- Выводы
- Как применить тему MacOS в Ubuntu 20.04?
- How to install macOS Catalina icon theme on Ubuntu
- Installing the macOS Catalina icons on Ubuntu
- Download macOS Catalina Icon Pack
- Method 1: Install the icons for the current user.
- Method 2: Install the icons for all the system users
How to Install Mac OS Catalina Theme in Ubuntu 20.04
This simple tutorial shows how to install Mac OS Catalina style Gnome Shell theme and icons in Ubuntu 20.04 LTS.
Following steps include how to install the GTK theme, icon theme, tweak panel appearance, and install useful extensions. When everything’s done, your Gnome desktop will look like:

1. First install Gnome Tweaks and required theme engines.
Open terminal (press Ctrl+Alt+T on keyboard), paste following command (Ctrl+Shift+V) and run to install some required libraries:
Type user password (no asterisk feedback) and hit Enter.

2. Download / Install Mac OS Catalina Theme:
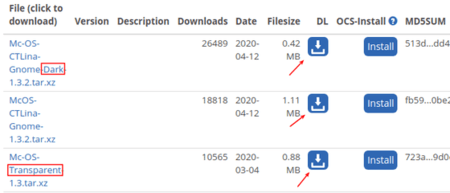
The light, dark, transparent theme packages are available at gnome-look.org page (under files tab).
Select download one or all of the packages as you want. You may also download “Extra” tarball for wallpaper and fonts.
Then install them via:
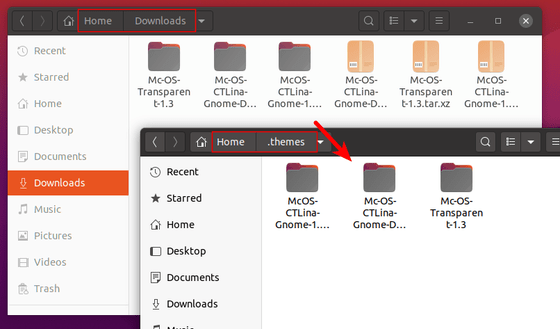
- Go to Downloads folder and extract all the three tarball.
- Open new Files (Nautilus file browser) window.
- Press Ctrl+H to display hidden file folders.
- Then navigate to .themes folder (create the folder if not exist!).
- Finally move the theme package folders from Downloads to .themes.
2. Download / Install Mac OS Icon Theme:
There are a few OS X icon themes available, click here (files tab) to get one of them.
Then install the icons via:
- Go to Downloads folder and extract the tarball.
- Open new Files (Nautilus file browser) window.
- Press Ctrl+H to display hidden file folders.
- Then navigate to .icons folder (create the folder if not exist!).
- Finally move the icon package folders from Downloads to .icons.
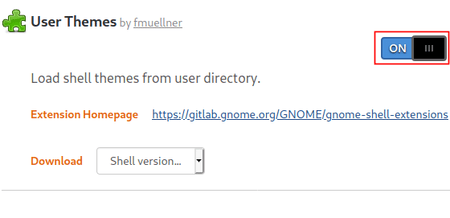
3. Install user theme Gnome Shell extension.
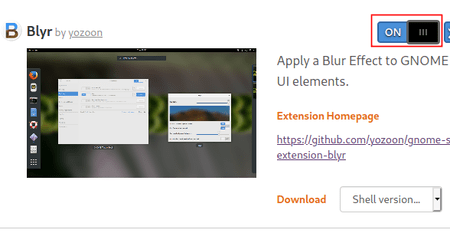
You can skip this step if you have already installed the User Theme extension, and don’t want the Blur effect.
1.) First time installing a gnome shell extension? Do open terminal by pressing Ctrl+Alt+T on keyboard, then run command:

Go to extensions.gnome.org, and click the link to install the browser integration.

2.) Click here to install user theme extension to load shell themes from user directory.
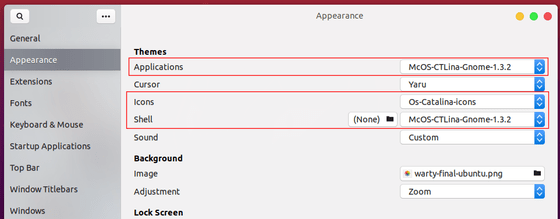
4. Apply the Mac OS Catalina Theme and Icon:
Launch Gnome Tweaks and navigate to Appearance, there you can choose themes for Applications, Icons, Gnome Shell.
5. Adjust the left dock panel.
Open terminal (Ctrl+Alt+T) and run following commands one by one:
- To move left dock panel to bottom, run command:
- To shorten the dock panel, run:
- Move app launcher icon to left:
- Set dock panel background transparency (range from 0 to 1):
Источник
Тема MacOS для Ubuntu 18.04
Вы устали от внешнего вида окружения рабочего стола Ubuntu и хотите попробовать что-то новое, например интерфейс MacOS? Многие пользователи хотят установить интерфейс MacOS из-за его уникального дизайна и элегантного внешнего вида. И вы можете сделать интерфейс Ubuntu похожим на MacOS с помощью темы Mac OS Ubuntu.
Уже создано множество тем, которые полностью изменят внешний вид вашей операционной системы. Это Linux и здесь вы можете сделать всё, что захотите. В сегодняшней статье мы разберём, как устанавливается тема Mac OS для Ubuntu 18.04.
Как сделать Ubuntu похожей на MacOS
В интернете доступны сотни тем, шрифтов, обоев и курсоров, которые помогут сделать Ubuntu похожей на Mac. Если на вашем компьютере уже установлен дистрибутив Ubuntu, вы можете найти в репозиториях несколько пакетов для этой цели, например: Macbuntu Transformation Pack, macOS Sierra и другие.
1. Выбор правильного окружения рабочего стола
В Ubuntu можно использовать несколько вариантов окружения рабочего стола, например Gnome, Unity, Cinnamon, KDE Plasma. Но чтобы Ubuntu выглядела как Mac, нам нужно установить Gnome. Именно для этого окружения созданы самые лучшие темы, имитирующие MacOS.
Последняя версия Ubuntu поставляется по умолчанию с оболочкой Gnome. Если у вас предыдущая версия с Unity или установлено другое окружение, используйте такую команду для установки Unity:
sudo apt install gnome-shell
Если система попросит выбрать менеджер входа, выберите lightdm. Затем вам необходимо установить утилиту Gnome Tweak Tool для выбора и настройки тем. Для этого выполните:
sudo apt update
sudo apt install gnome-tweak-tool
После завершения установки, выйдите из системы и войдите заново, или просто перезагрузите компьютер.
2. Установка темы Mac OSX Sierra Compact
Для оболочки Gnome существует несколько Mac-подобных тем в сети, но лучше всего будет установить тему Mac OSX Sierra Compact. Эта тема наиболее похожа на традиционную MacOS с её градиентами и визуальными эффектами. Скачать тему можно по ссылке.

Загрузите самую свежую версию темы на вкладке Files и распакуйте содержимое архива в папку
/.themes. Для этого можно использовать пункт контекстного меню Nautilus — Извлечь в. , где достаточно выбрать нужную папку:

Папка начинается с точки, и это значит, что она скрыта. Чтобы отображать скрытые файлы, нужно нажать сочетание клавиш Ctrl+H. Если такой папки не существует, вы можете её создать.

3. Установка темы Mac 11 GTK
Если вы хотите более современный плоский дизайн, вы можете установить тему MacOS 11 GTK+ and Shell theme. Нам понадобится два файла: macOS11-GTK.zip и macOS11-Shell.zip.

Скачайте их на вкладке Files и распакуйте содержимое в папку
/.themes, так же как и в предыдущем пункте. Должно получиться вот так:
4. Установка иконок MacOS
Иконки, стилизованные под MacOS X, можно скачать по этой ссылке.

Полученный файл надо распаковать в папку
/.icons в домашней директории:

5. Активация темы и иконок
Затем откройте Gnome Tweak Tool и на вкладке Внешний вид выберите тему для приложений и Shell MacOS 11 или Sierra Compact:

Иконки активируются на этой же вкладке, в строке Значки:

Если пункт выбора темы для Shell не активен, перейдите на вкладку расширения и включите там расширение User Themes.

Для полного применения темы необходимо перезагрузить компьютер.
После активации темы Sierra Compact ваше окружение будет выглядеть вот так:

5. Настройка док панели
Вы можете использовать боковую панель Ubuntu вместо док панели с помощью расширения Dash to Dock. Чтобы опустить панель вниз, активируйте расширение через Gnome Tweak Tool, а затем откройте контекстное меню на значке лаунчера, в нём выберите пункт Параметры Dash to Dock, а затем Расположение на экране — внизу:

Но наиболее похожей на интерфейс MacOS будет панель Plank. Она может использоваться как для запуска приложений, так и для переключения окон. Для установки Plank используйте команду:
sudo apt install plank
Установить тему MacOS для Plank можно из PPA-репозитория:
sudo add-apt-repository ppa:noobslab/macbuntu
sudo apt update
sudo apt install macbuntu-os-plank-theme-v9
Затем останется добавить панель Plank в автозагрузку, при старте она будет автоматически скрывать док панель по умолчанию.

6. Установка обоев рабочего стола
Последнее что необходимо сделать, чтобы ваша система выглядела как MacOS — установить правильные обои. Скачать обои MacOS от NoobsLab можно по ссылке. Архив надо распаковать, а дальше выбирайте, что нравится:

7. Установка шрифтов Mac
Системы MacOS известны своим красивым графическим интерфейсом с чистыми, красивыми шрифтами. Вы можете использовать OpenSource-версию шрифта Garuda или же использовать шрифты MacOS. Для их установки используйте команды:
wget -O mac-fonts.zip http://drive.noobslab.com/data/Mac/macfonts.zip
sudo unzip mac-fonts.zip -d /usr/share/fonts; rm mac-fonts.zip
sudo fc-cache -f -v
Выбрать шрифты для использования можно с помощью Gnome Tweak Tool:

Выводы
В этой небольшой статье мы рассмотрели, как устанавливается тема Mac Ubuntu 18.04, а также разобрали как настроить шрифты, фон рабочего стола и док-панель. Так что если вы хотите, чтобы ваша система выглядела как MacOS, вы уже знаете, что делать.
Источник
Как применить тему MacOS в Ubuntu 20.04?
В системах Linux уже есть много впечатляющих встроенных тем, но вам может надоесть использовать их снова и снова.
В дистрибутивах Linux интересно то, что вы можете изменить всю машинную среду, изменив темы в любое время. Это не только дает новый взгляд на операционную систему, но и обеспечивает особый опыт.
Тема macOS, несомненно, является самой чистой темой среди всех операционных систем. Как насчет того, чтобы установить такую же тему на свой Ubuntu? Коллекция тем для macOS доступна в различных онлайн-источниках, выберите любой популярный сайт и загрузите оттуда свою любимую тему.
Чтобы добавить тему macOS в среду Ubuntu, вам необходимо переделать следующие четыре функции операционной системы:
- Тема.
- Иконки.
- Расположение и внешний вид док-станции.
- Внешний вид оболочки.
Во-первых, нам нужно загрузить » Инструмент настройки Gnome «.
» Инструмент настройки Gnome » — это расширение оболочки Gnome, которое используется для внесения изменений в интерфейс среды. С помощью этого инструмента вы можете полностью изменить внешний вид системы Ubuntu.
Загрузите » Gnome Tweak Tool » с помощью команды (если у вас ее еще нет):

Вы можете получить его из следующих приложений:
Источник
How to install macOS Catalina icon theme on Ubuntu
In today’s tutorial, we will show you step by step guide on how to install the macOS Catalina icon pack, which is a theme inspired by Apple’s macOS.
![]()
U buntu’s default icons look great, but if you want to jazz it up with a shiny macOS inspired theme, you have come to the right place. In today’s tutorial, we will show you step by step guide on how to install the macOS Catalina icon theme.
Installing the macOS Catalina icons on Ubuntu
Before we can start in the installation process, you have to make sure that your system is up-to-date using the following commands:
Download macOS Catalina Icon Pack
Step 1. The Icon pack is available to download from the ‘Gnome-look’ website.
Step 2. Scroll down until you find the download section.
Download the macOS Catalina Icons
Step 3. Now you will be redirected to the download page. In this page, there are two download files:
- “Os-Catalina-Night.tar.xz” –> This for the dark style icons.
- “Os-Catalina-Icons.tar.xz” –> This for the classic or standard style icons.
Download Options
Choose the one you need and download it.
Step 4. After selecting the macOS Catalina style, your pack should be available in a bit. Press the Download button to continue.
Download Confirmation
Step 5. After the download completes successfully, you can open your terminal window and navigate to the Downloads directory.
 NAvigate to the Downloads directory
Step 6. Next, we will extract the download archive using the following command.
Extract the icon pack
Step 7. After the extraction completes successfully, you will find a new directory is created. This directory contains the icons.
 Extraction complete
Step 8. Now to install the icons there are two methods, let’s explore the two ways:
Method 1: Install the icons for the current user.
Create a directory in the current user home using the following command:
Create New Directory
Next, let’s move the icons to the newly-created directory.
Move The Icons To The New Directory
To ensure that the macOS Catalina moved successfully, use the following command.
Ensure The Icons Moved Successfully
Method 2: Install the icons for all the system users
To use the icons for all the system users, you will have to move them to the ‘/usr/share/icons’ using the following command:
Install The Icons For All System Users
To ensure a successful move, use the following command.
Ensure Icons Moved Successfully To All Users
Step 9. Now to enable the icons, we need to install the gnome tweak tools first using the next command:
 Install Gnome Tweak Tools
Step 10. To open the gnome tweak tools, use the following command from your terminal:
 Open The typecatcher Application
The gnome tweak tool will look like the below screenshot:
 The Gnome Tweak Tool Interface
Step 11. Open the Appearance tab from the left panel. Then from the right panel search for the icons menu, open it and search for the new icons and select it.
Choose the download
Now you can take a look at your new macOS Catalina icons!
Источник


