- Change the name of your macOS user account and home folder
- First rename the home folder
- Then rename the account
- Change permissions for files, folders or disks on Mac
- Assign permissions to users and groups
- Apply permissions to all items in a folder or a disk
- Change an item’s owner
- Add or remove a user or group in the Name column
- Изменение параметров раздела «Пользователь» в настройках пользователей и групп на Mac
- How to Change Your Mac User Name
- Make a mistake in your user account name? Fix it now
- What to Know
- Rename Your Home Folder
- Rename Your Account
- Your Mac User Account
Change the name of your macOS user account and home folder
You can rename your macOS user account and home folder, which were named when the account was created.
The name of your macOS user account and the name of your home folder must both be the same. Changing these names does not change or reset the password of your user account.
Because doing this incorrectly could damage your account and prevent you from logging in, you should back up your important data before proceeding.
First rename the home folder
- Log out of the account you’re renaming, then log in to a different administrator account. (If you don’t have another administrator account, you can create one in Users & Groups preferences.)
- Open the Users folder on the startup disk. It contains the home folder for each user. To get there, you can choose Go > Go to Folder from the menu bar, then enter /Users .
- Rename the user’s home folder without using any spaces in the new name. You’ll be prompted to enter the administrator name and password that you used to log in. If you’re using file sharing to share the home folder, you won’t be able to rename it until you stop sharing the folder.
Then rename the account
While still logged out of the account you’re renaming, follow these additional steps:
- Choose Apple () menu > System Preferences, then click Users & Groups.
- Click
 , then enter the administrator name and password that you used to log in.
 - From the list of users on the left, Control-click the user you’re renaming, then choose Advanced Options.
- Change the “Account name” field to match the new name of the home folder. It should have no spaces.
- The account name also appears in the “Home directory” field, after /Users/ . Change that account name to match the new name of the home folder.
- If you want to change the full name associated with your account, update the ”Full name” field as well. It can be any name, and you can use either the full name or the account name to log in to your Mac or make changes that require your name and password.
- Click OK, then restart your Mac.
- Log in to the renamed account, then verify that your old files and folders are visible and the account is working as expected.
 , then enter the administrator name and password that you used to log in.
Источник
Change permissions for files, folders or disks on Mac
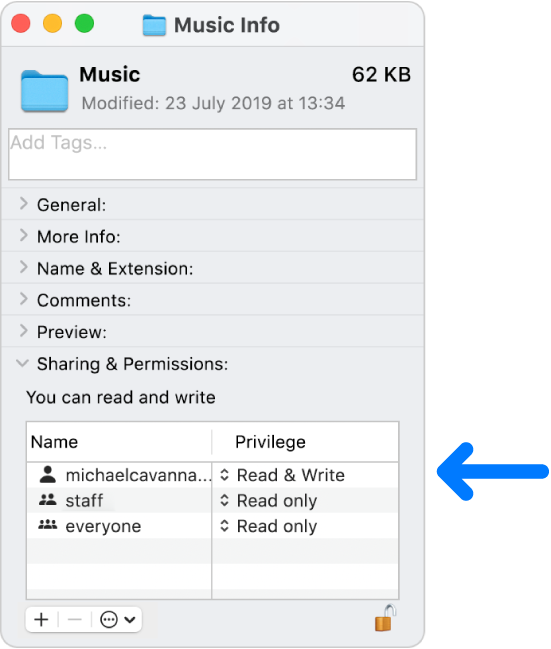
Permission settings determine who can view and alter files on the computer. You change permission settings at the bottom of the Info window for a file, folder or disk in the Finder. For example, you can change permission settings for a folder so that other users who log in to your Mac, or connect to it for file sharing, can view but not change files in a folder.
Assign permissions to users and groups
On your Mac, select a disk, folder or file, then choose File > Get Info.
If the information in Sharing & Permissions isn’t visible, click the arrow  .
.
If the lock at the bottom right is locked  , click it to unlock the Get Info options, then enter an administrator name and password.
Click a user or group in the Name column, then choose a privilege setting from the pop-up menu.
Read & Write: Allows a user to open the item and change it.
Read only: Allows a user to open the item but not change its contents.
Write only (Drop Box): Makes a folder into a drop box. Users can copy items to the drop box, but can’t open it. Only the owner of the drop box can open it.
No Access: Blocks all access to the item.
You can undo any changes to privilege settings for a user or group in the Sharing & Permissions section since opening the Info window. Before closing the Info window, click the Action pop-up menu  , then choose “Revert changes”.
Apply permissions to all items in a folder or a disk
On your Mac, select a folder or disk, then choose File > Get Info.
If the lock at the bottom right is locked , click it to unlock the Get Info options, then enter an administrator name and password.
Click the Action pop-up menu , then choose “Apply to enclosed items”.
Change an item’s owner
On your Mac, select the item, then choose File > Get Info.
If the lock at the bottom right is locked , click it to unlock the Get Info options, then enter an administrator name and password.
If the new owner’s name isn’t listed in the Name column in the Sharing & Permissions section, click the Add button  to add the new owner.
Select the new owner in the Name column, click the Action pop-up menu , then choose “Make __ the owner”.
You can undo any changes to an item’s owner in the Sharing & Permissions section since opening the Info window. Before closing the Info window, click the Action pop-up menu , then choose “Revert changes”.
Add or remove a user or group in the Name column
On your Mac, select an item, then choose File > Get Info.
If the lock at the bottom right is locked , click it to unlock the Get Info options, then enter an administrator name and password.
In the Sharing & Permissions section, do any of the following:
Add a user or group: Click the Add button below the list, select a user or group, then click Select.
Remove a user or group: Select the user or group, then click the Remove button  below the list.
You can undo adding or removing a user or group in the Sharing & Permissions section since opening the Info window. Before closing the Info window, click the Action pop-up menu , then choose “Revert changes”.
Источник
Изменение параметров раздела «Пользователь» в настройках пользователей и групп на Mac
Используйте панель «Пользователь» в разделе «Пользователи и группы» в Системных настройках, чтобы менять параметры своей учетной записи на Mac. Если Вы являетесь администратором компьютера Mac, Вы также можете менять параметры других пользователей этого компьютера. Узнайте, как настроить нового пользователя.
Чтобы изменить эти настройки, выберите меню Apple

> «Системные настройки», затем нажмите «Пользователи и группы». Выберите пользователя слева. Затем, если Вы выбрали себя, нажмите «Пароль» у верхнего края окна. Если другой пользователь вошел в систему Mac, Вы не сможете его выбрать.
Важно! Если Вы забыли пароль для входа или Вам нужна помощь с его вводом, обратитесь к следующим разделам.
Примечание. Если в левом нижнем углу панели отображается закрытый замок  , нажмите его, чтобы разблокировать панель настроек.
Нажмите картинку для ее редактирования, затем выберите новую картинку.
Используйте картинку, входящую в macOS. Нажмите «По умолчанию», затем выберите картинку.
Сделайте фотографию при помощи Mac. Нажмите «Камера». Когда будете готовы, нажмите «Сделать снимок».
Используйте картинку из приложения «Фото». Нажмите «Фото». Чтобы отобрать фотографии по времени, месту или альбому, нажмите стрелку  под фотографиями и выберите группу фотографий. Выберите изображение и нажмите «Далее».
Вместо того чтобы нажимать изображение, Вы можете перетянуть файл из окна Finder  на изображение пользователя.
Нажмите эту кнопку, чтобы изменить пароль для входа в систему и подсказку к паролю. Чтобы открыть Ассистент пароля, нажмите кнопку с изображением ключа  рядом с полем «Пароль». См. раздел Советы по созданию надежных паролей.
Нажмите «Открыть», чтобы посмотреть и отредактировать свою карточку в Контактах. Доступно только для того пользователя, который в данный момент находится в системе.
Разрешить пользователю сбрасывать пароль с Apple ID
Позволяет пользователю сменить свой пароль от компьютера Mac при входе в систему, введя свой Apple ID и пароль. Этот параметр можно использовать, только если у пользователя настроена служба iCloud на данном компьютере Mac. Однако параметр будет недоступен, если функция FileVault включена и настроена таким образом, чтобы пользователь мог сбросить свой пароль при загрузке системы, используя Apple ID.
Разрешить этому пользователю администрировать компьютер
Пользователь становится администратором этого компьютера Mac.
Добавление  и удаление
Чтобы добавить нового пользователя или группу пользователей, нажмите кнопку «Добавить» и введите данные нового пользователя или группы. Чтобы удалить пользователя или группу, выберите их в списке и нажмите кнопку «Удалить» . См. раздел Удаление пользователя или группы.
О политике конфиденциальности Apple см. на странице Политика конфиденциальности Apple.
Об изменении или обновлении имени учетной записи см. в статье на сайте поддержки Apple Изменение имени учетной записи и папки пользователя в ОС macOS.
Чтобы дать разрешение пользователю на доступ к файлам или экрану, к которым открыт общий доступ, необходимо изменить настройки на панелях «Общий доступ к файлам», «Общий экран» или «Удаленное управление» в настройках общего доступа. См. разделы Настройка общего доступа к файлам и Общее использование экрана другого компьютера Mac.
Источник
How to Change Your Mac User Name
Make a mistake in your user account name? Fix it now
What to Know
- From Finder, select Go >Go to Folder, enter /Users, then click the folder and press Enter to type a new name.
- Go to System Preferences >Users & Groups, Control+click the user account, select Advanced Options, and update the Account name.
- Restart your Mac to confirm regular file and folder access.
This article explains how to change the user name on a Mac. Instructions apply to OS X Yosemite (10.10.5) and later.
To ensure you don’t lose file access, back up important data on your Mac with a Time Machine backup or your preferred backup method.
Rename Your Home Folder
The name of your user account and your home folder must be the same for your account to work properly, so the first step is to change the home folder name.
You can’t rename an account you’re logged in to. Log in to a different account with admin permissions or create a spare administrator account. After setting up the second administrator account, complete the following steps.
From the Apple menu, select Log Out UserName (where UserName is the name of the account you want to change).
:max_bytes(150000):strip_icc()/001_change-user-account-and-home-directory-name-2260795-c50c333bd57e457abeb4236586daa154.jpg)
From the login screen, sign in to a different or new administrator account.
From the Finder menu, select Go > Go to Folder, type /Users, and then choose Go to navigate to your home folder.
:max_bytes(150000):strip_icc()/Gotothefolder_macOSCatalina-7028aa5223184606ace4f07fd180c1ec.jpg)
The Users folder contains your current home folder, which has the same name as your account name. Write down the name of your current home folder to reference later.
Select the home folder to rename and press Enter to edit it.
If you shared your home folder, you must stop sharing the folder before you can rename it.
Type the new name (without spaces) you want to use for your home folder, press Enter, and use the administrator password you used to log in when prompted.
:max_bytes(150000):strip_icc()/002_change-user-account-and-home-directory-name-2260795-a1ed7995384448a38074444c0a320bc7.jpg)
Write down the name of the new home folder to reference when renaming your account.
Rename Your Account
After you edit the home folder name, stay signed out of the account you’re renaming, and complete the following steps.
From the Apple menu, select System Preferences > Users & Groups.
:max_bytes(150000):strip_icc()/003_change-user-account-and-home-directory-name-2260795-9716a805d12b4d7085ee037627b1f5c8.jpg)
In Users & Groups, select the lock icon and type the password for your spare administrator account.
:max_bytes(150000):strip_icc()/004_change-user-account-and-home-directory-name-2260795-fe787bc59af54dd581b71e6d424c97c4.jpg)
In the list of users, Control+click the user account name you want to change and select Advanced Options.
:max_bytes(150000):strip_icc()/005_change-user-account-and-home-directory-name-2260795-bc7f7988690d4261960fb72bc78fb487.jpg)
In the Account name field, type the name of the new home folder you created and select OK.
:max_bytes(150000):strip_icc()/006_change-user-account-and-home-directory-name-2260795-3dbbb85ad71842118122ef469e5ebe02.jpg)
You can change the full name for your account at this time, as well, but the account name and user folder name must match.
Close all open windows and dialog boxes and restart your Mac.
Sign in to the account you renamed and verify that you can see and access all your files and folders.
If you can’t sign in to the renamed account or can sign in but can’t access your home folder, the account name and home folder name probably don’t match. Sign out of the renamed account, sign in to the spare administrator account, then repeat this procedure. You may need to restart your Mac again.
Your Mac User Account
Each macOS user account contains information related to your name and primary directory:
- Full name: This is your full name (for example, Casey Cat). It can also be the name you use to sign in to your Mac.
- Account name: The account name is a shortened version of your full name (for example, caseycat). macOS suggests an account name based on the full name you enter, but you can use any name you want.
- Home directory: The home folder name and the account name are the same. By default, the home folder is in the Users directory of your startup disk, but you can relocate the home folder to anywhere you wish.
macOS has come a long way from the days when typos in account names were something you had to live with unless you were willing to look up Mac terminal commands to correct the mistake. Account management is now easy, and you’ll feel like a pro.
Источник


