- Free up storage space on your Mac
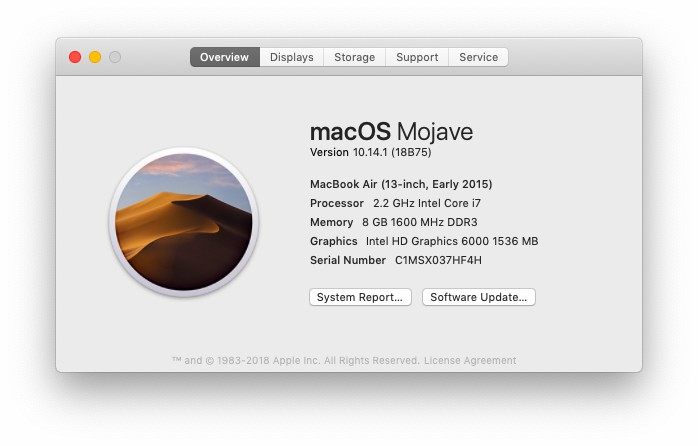
- Find out how much storage is available on your Mac
- Manage storage on your Mac
- Store in iCloud
- Optimize Storage
- Empty Trash Automatically
- Reduce Clutter
- Where to find the settings for each feature
- Other ways that macOS helps automatically save space
- How to free up storage space manually
- How to clear disk space on Mac
- Before we start
- How to check disk space on Mac
- How to clear disk space on Mac
- 1. Clear disk space on Mac with CleanMyMac X
- 2. Clean up duplicate disk folders on Mac with Gemini
- 3. Visualize disk space with Disk Drill
- 4. Use macOS Sierra’s Optimized Storage to see what is taking up space on your Mac
- Keep your disk space under control
- How to Check Storage and Disk Space on Mac Computer
- This article will let you know about the ways to check its memory and optimize it. The post also features Recoverit, the all-rounder data recovery software.
- Part 1. How to Check Storage on Mac
- Problems Caused Due to Low storage Space
- Solutions for the Issue
- Part 2. How to Check Hard Disk Space Available
- Part 3. How to Free Up Space on Mac
- i. Store in iCloud
- ii. Optimize Storage
- iii. Empty the trash
- iv. Reduce Clutter
- Part 4. How to Recover Accidentally Deleted Files on Mac
- RecoveritВ Data Recovery Software for Mac
- Part 5. Tips Against Full Storage on Mac
- Closing Words
Free up storage space on your Mac
Save space by storing your content in iCloud or using built-in tools to find and remove large or unneeded files.
The Optimized Storage features of your Mac help you save storage space by storing your content in iCloud and making it available on demand:
- When storage space is needed, files, photos, movies, email attachments, and other files that you seldom use are stored in iCloud automatically.
- Each file stays right where you last saved it, and downloads when you open it.
- Files that you’ve used recently remain on your Mac, along with optimized versions of your photos.
If you haven’t yet upgraded to macOS Sierra or later, learn about other ways to free up storage space.
Find out how much storage is available on your Mac
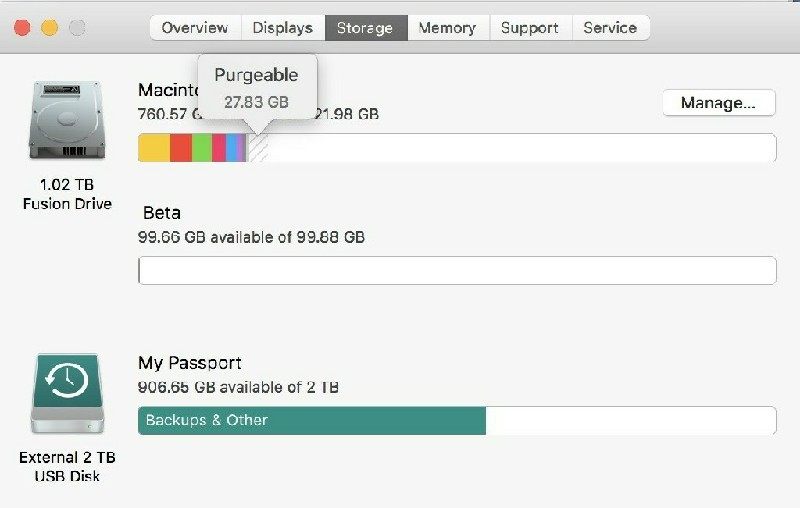
Choose Apple menu > About This Mac, then click Storage. Each segment of the bar is an estimate of the storage space used by a category of files. Move your pointer over each segment for more detail.
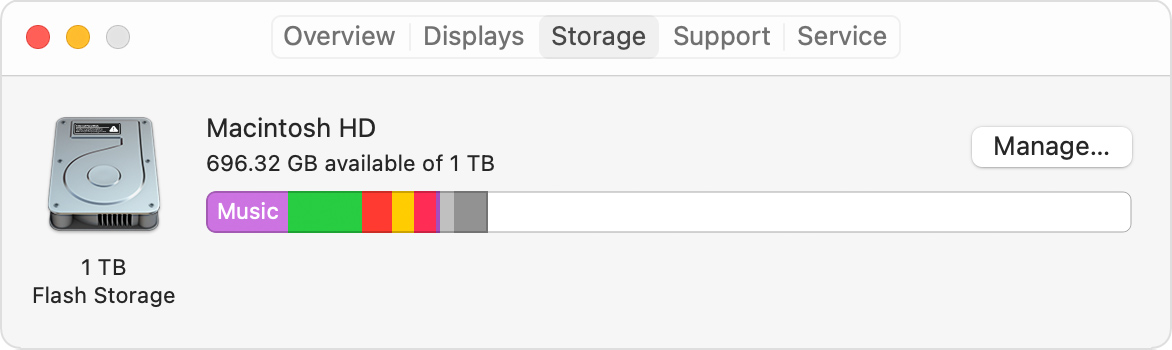
Click the Manage button to open the Storage Management window, pictured below.
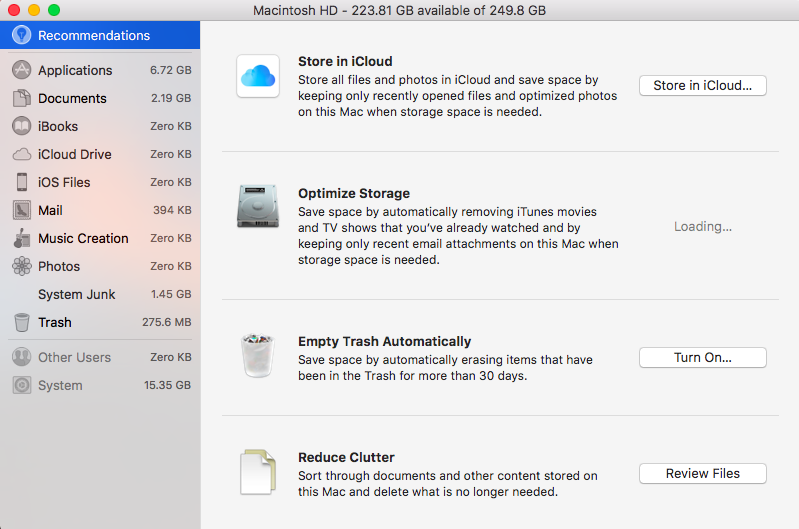
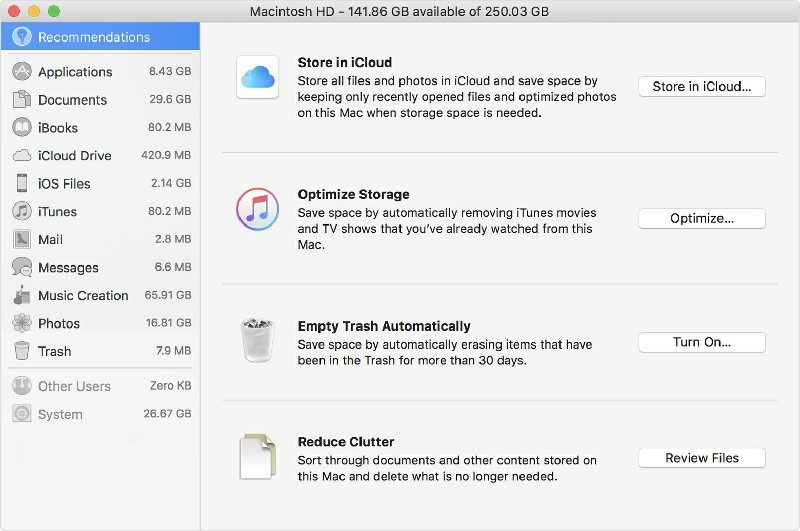
Manage storage on your Mac
The Storage Management window offers recommendations for optimizing your storage. If some recommendations are already turned on, you will see fewer recommendations.
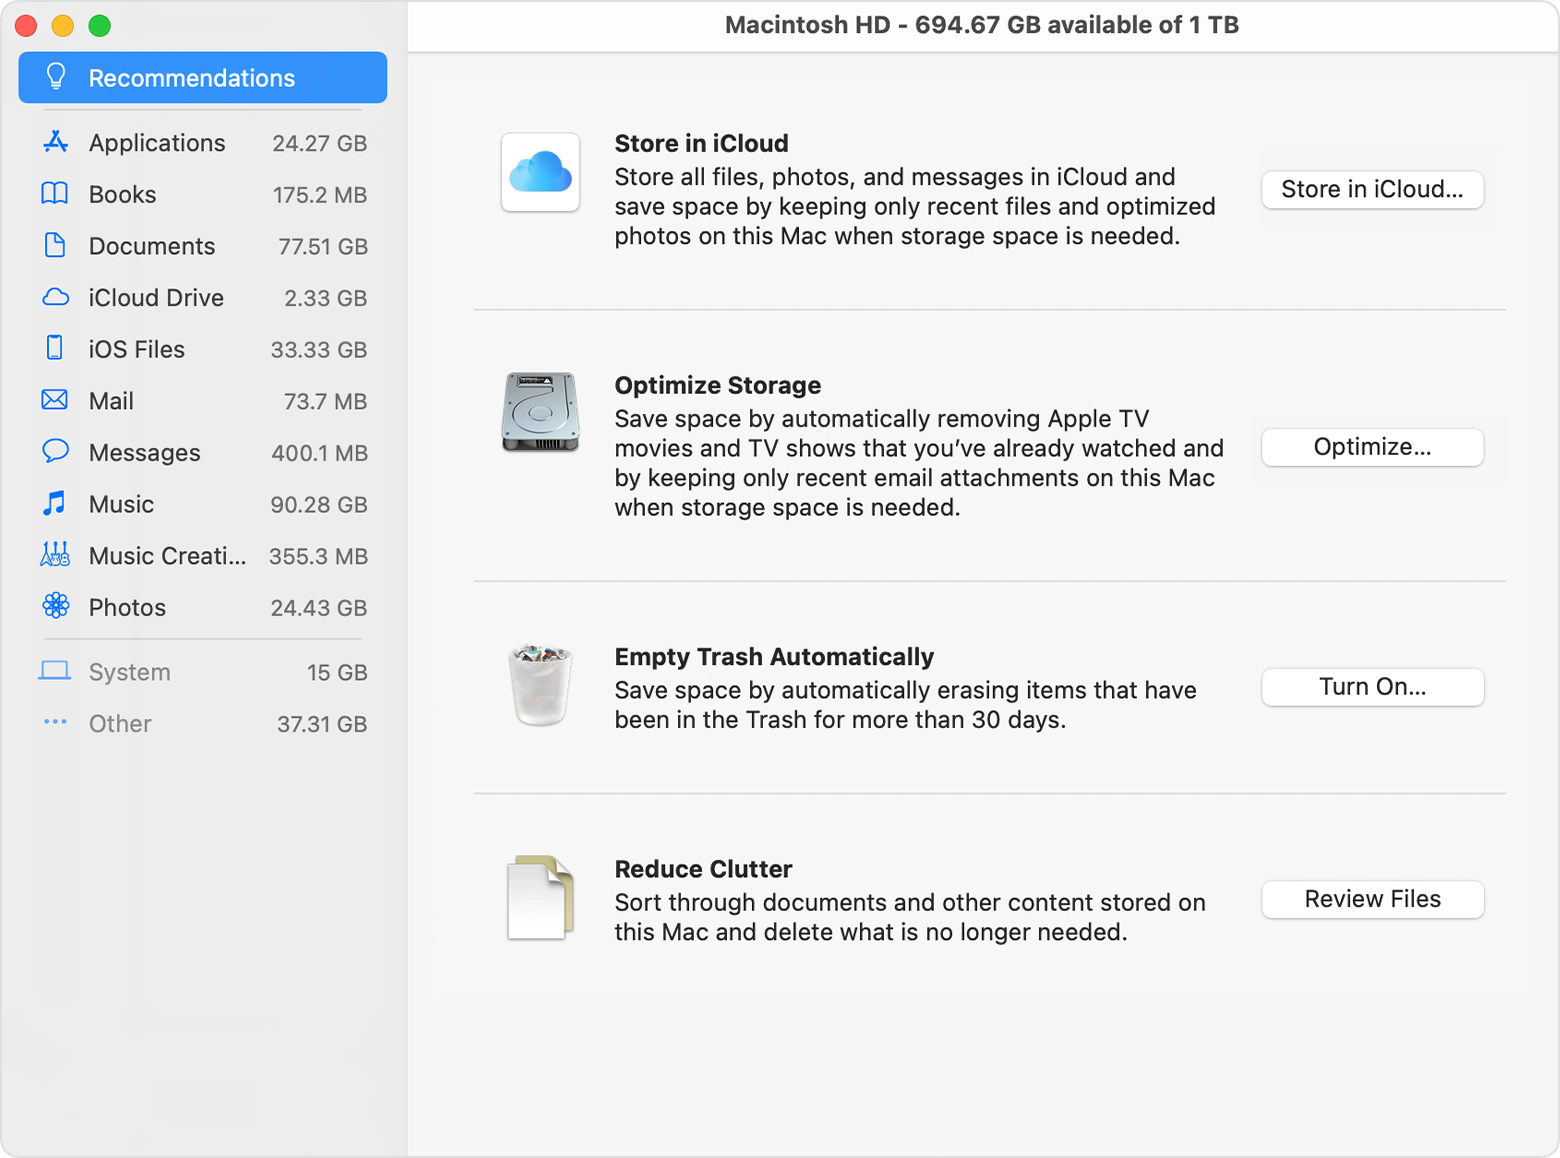
Store in iCloud
Click the Store in iCloud button, then choose from these options:
- Desktop and Documents. Store all files from these two locations in iCloud Drive. When storage space is needed, only the files you recently opened are kept on your Mac, so that you can easily work offline. Files stored only in iCloud show a download icon , which you can double-click to download the original file. Learn more about this feature.
- Photos. Store all original, full-resolution photos and videos in iCloud Photos. When storage space is needed, only space-saving (optimized) versions of photos are kept on your Mac. To download the original photo or video, just open it.
- Messages. Store all messages and attachments in iCloud. When storage space is needed, only the messages and attachments you recently opened are kept on your Mac. Learn more about Messages in iCloud.
Storing files in iCloud uses the storage space in your iCloud storage plan. If you reach or exceed your iCloud storage limit, you can either buy more iCloud storage or make more iCloud storage available. iCloud storage starts at 50GB for $0.99 (USD) a month, and you can purchase additional storage directly from your Apple device. Learn more about prices in your region.
Optimize Storage
Click the Optimize button to save space by automatically removing watched movies and TV shows. When storage space is needed, movies or TV shows that you purchased from Apple and already watched are removed from your Mac. Click the download icon next to a movie or TV show to download it again.
Your Mac will also save space by keeping only recent email attachments on this Mac when storage space is needed. You can manually download any attachments at any time by opening the email or attachment, or saving the attachment to your Mac.
Optimizing storage for movies, TV shows, and email attachments doesn’t require iCloud storage space.
Empty Trash Automatically
Empty Trash Automatically permanently deletes files that have been in the Trash for more than 30 days.
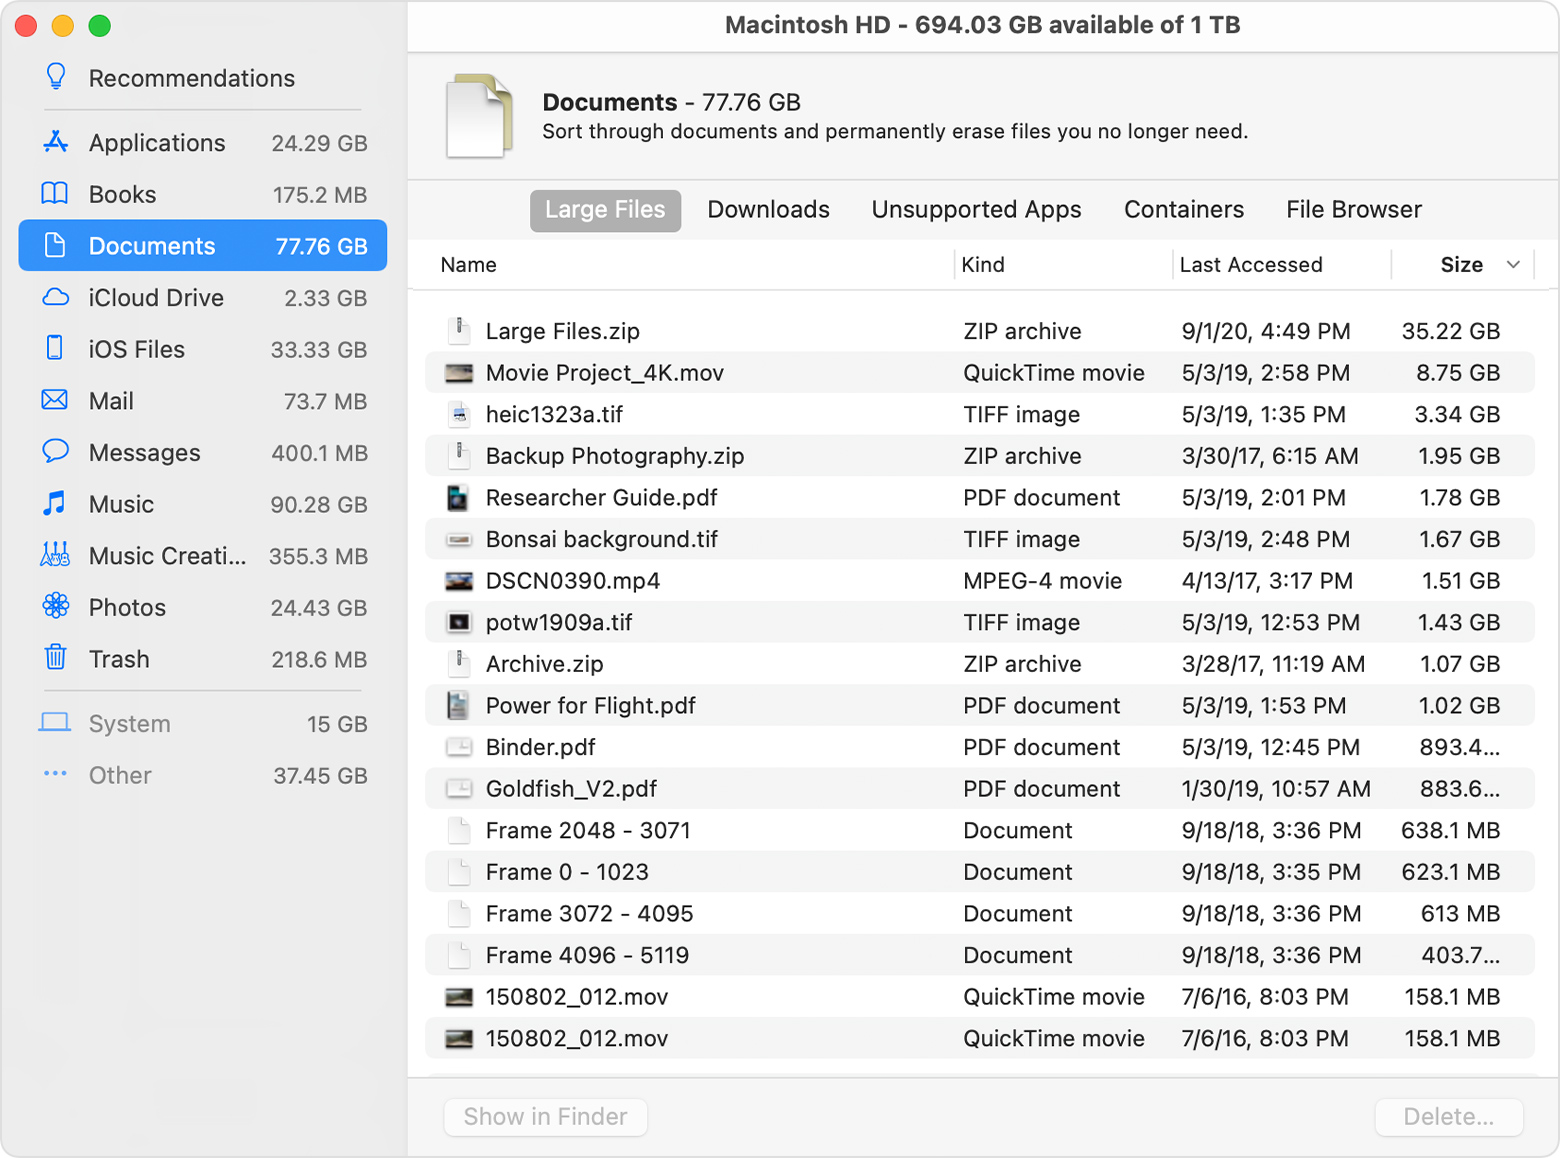
Reduce Clutter
Reduce Clutter helps you identify large files and files you might no longer need. Click the Review Files button, then choose any of the file categories in the sidebar, such as Applications, Documents, Music Creation, or Trash.
You can delete the files in some categories directly from this window. Other categories show the total storage space used by the files in each app. You can then open the app and decide whether to delete files from within it.
Where to find the settings for each feature
The button for each recommendation in the Storage Management window affects one or more settings in other apps. You can also control those settings directly within each app.
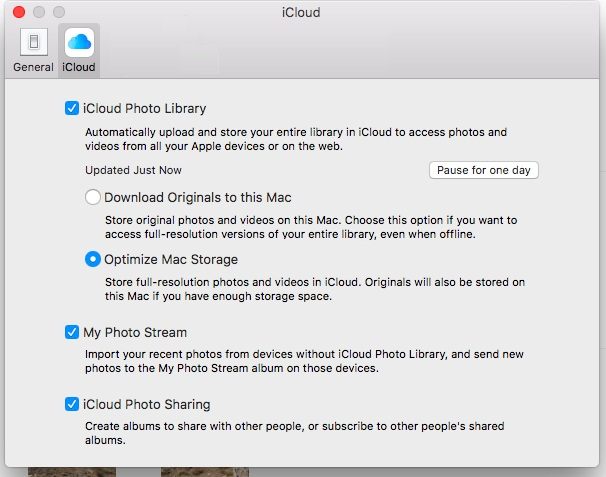
- If you’re using macOS Catalina or later, choose Apple menu > System Preferences, click Apple ID, then select iCloud in the sidebar: Store in iCloud turns on the Optimize Mac Storage setting on the right. To turn off iCloud Drive entirely, deselect iCloud Drive.
- If you’re using macOS Mojave or earlier, choose Apple menu > System Preferences, click iCloud, then click Options next to iCloud Drive. Store in iCloud turns on the Desktop & Documents Folders and Optimize Mac Storage settings.
- In Photos, choose Photos > Preferences, then click iCloud. Store in iCloud selects iCloud Photos and Optimize Mac Storage.
- In Messages, choose Messages > Preferences, then click iMessage. Store in iCloud selects Enable Messages in iCloud.
- If you’re using macOS Catalina or later, open the Apple TV app, choose TV > Preferences from the menu bar, then click Files. Optimize Storage selects “Automatically delete watched movies and TV shows.”
- In you’re using macOS Mojave or earlier, open iTunes, choose iTunes > Preferences from the menu bar, then click Advanced. Optimize Storage selects “Automatically delete watched movies and TV shows.”
- In Mail, choose Mail > Preferences from the menu bar, then click Accounts. In the Account Information section on the right, Optimize Storage sets the Download Attachments menu to either Recent or None.
Empty Trash Automatically: From the Finder, choose Finder > Preferences, then click Advanced. Empty Trash Automatically selects “Remove items from the Trash after 30 days.”
Other ways that macOS helps automatically save space
With macOS Sierra or later, your Mac automatically takes these additional steps to save storage space:
- Detects duplicate downloads in Safari, keeping only the most recent version of the download
- Reminds you to delete used app installers
- Removes old fonts, languages, and dictionaries that aren’t being used
- Clears caches, logs, and other unnecessary data when storage space is needed
How to free up storage space manually
Even without using the Optimized Storage features described in this article, you can take other steps to make more storage space available:
- Music, movies, and other media can use a lot of storage space. Learn how to delete music, movies, and TV shows from your device.
- Delete other files that you no longer need by moving them to the Trash, then emptying the Trash. The Downloads folder is good place to look for files that you might no longer need.
- Move files to an external storage device.
- Compress files.
- Delete unneeded email: In the Mail app, choose Mailbox > Erase Junk Mail. If you no longer need the email in your Trash mailbox, choose Mailbox > Erase Deleted Items.
Источник
How to clear disk space on Mac

Before we start
Having spent some years coding applications for macOS we’ve created a tool that everybody can use. The all-round problem fixer for Mac.

So here’s a tip for you: Download CleanMyMac to quickly solve some of the issues mentioned in this article. But to help you do it all by yourself, we’ve gathered our best ideas and solutions below.
Features described in this article refer to the MacPaw site version of CleanMyMac X.
From the all-in-one solution of disk space analyzers to macOS’ own built-in offering, we’ve found the best ways to keep your system in tip-top condition.
How to check disk space on Mac
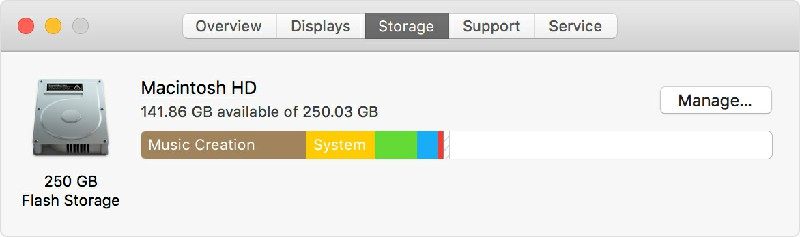
Most of the things that take up disk space on Mac can’t be seen from a top-level overview, but it’s worth keeping a close eye on how much space you have available. You can do this by clicking on the Apple icon in the top-left corner of the screen and selecting “About This Mac.” Select “Storage”, and you’ll see where space is being taken up.
If disk space is at a premium, turn to the following apps to get rid of the things you no longer need, using a Mac disk cleanup. Disk space analyzers are fantastic tools for finding out what is taking up so much space on my Mac.
Before you take action, ensure none of your files will disappear when you clear disk space. Download Disk Drill for free and stop worrying.
How to clear disk space on Mac
1. Clear disk space on Mac with CleanMyMac X
CleanMyMac is the go-to disk space analyzer for over three million people worldwide, particularly for those who want to know how to free up space on your Mac?
And for good reason — it does all the heavy-lifting for you, leaving you with the simple task of clicking a single button to free up space. The app uses a “Smart Cleanup” feature to perform a deep scan of your Mac, analyzing the System, Large and Old Files, Mail, iTunes, Photos, and Trash bins, freeing up 64GB of space on average. Without an effective disk cleanup Mac, you could end up with too much junk taking up too much space.
Using the CleanMyMac Dashboard, you can check the disk space and free up RAM, ensuring your Mac runs smoother and faster.
How to make free space on Mac with CleanMyMac
The simplicity of CleanMyMac is its outstanding feature. To clear disk space, all you need to do is:
- Launch CleanMyMac X (download it for free here).
- Click on Smart Cleanup from the sidebar menu.
- Click on Scan and then Clean.

In the sidebar menu, there are options to scan and clean applications individually using the same “Scan” and “Clean” method.
2. Clean up duplicate disk folders on Mac with Gemini
Duplicate files such as edited documents, photos, or Photoshop files can accumulate rapidly. But they’re hardly ever needed. Rather than trawl through your system trying to perform a disk cleanup manually or risking the loss of potentially useful files in a blanket cleanup, use Gemini to find and delete files safely.
Like CleanMyMac, Gemini has its own “smart” scan and cleanup feature to speed up the process. The app works through your photos, iTunes, documents, and files to find duplicates that can be removed. It also picks out similar files that probably don’t warrant two copies.
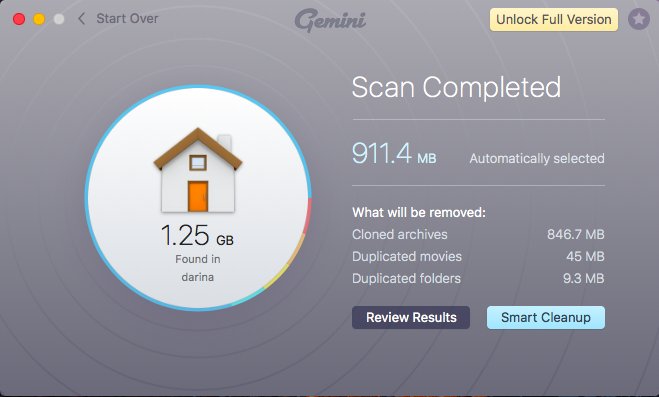
Everything that Gemini finds is placed in a neat interface where you can examine individual files to decide which to keep and which to purge. If something is deleted in error, you’ll still be able to find it in amongst recently deleted files for quick restoration.
3. Visualize disk space with Disk Drill
“The storage option is useful, but what is really taking up space on my Mac?”
Disk Drill can see how to check disk space on Mac.
Disk Drill does exactly what its name suggests: drills down into your disk to analyze and help you visualize what’s hogging space. From a familiar Mac-like interface you can delve into files and delete anything that isn’t needed in a few clicks.
There’s also a useful feature that lets you clean up local folders that are synced with your Google Drive or Dropbox accounts, as well as the ability to identify and remove duplicate files à la Gemini.
If you want to keep a close eye on system performance and carry out a Mac disk cleanup as soon as available space is under threat, Disk Drill includes a feature called S.M.A.R.T. Once enabled, S.M.A.R.T monitoring tracks space, performance, and drive temperature from an icon on your desktop.
4. Use macOS Sierra’s Optimized Storage to see what is taking up space on your Mac
Finally, to make sure things keep on ticking over nicely, make use of macOS’ own Optimized Storage feature. This is another way to see how to check free space on Mac.
Granted, this feature doesn’t offer the heavyweight cleaning capabilities of a CleanMyMac, but it’s useful nonetheless.
By clicking on Details from within Storage, you’ll have access to four features: Store in iCloud, Optimize Storage, Empty Trash Automatically, and Reduce Clutter.
While emptying the trash and reducing clutter are simple ways to free up a small amount of space, Store in iCloud is the outstanding feature. This allows you move items from local storage and save them to your iCloud account.
From Store in iCloud, simply check the boxes for Store files from Desktop and Documents in iCloud Drive and Store photos and videos in iCloud Photo Library. All of your files will then be synced to the cloud. You can then use a Mac disk cleaner to get rid of the locally stored duplicates.
The Optimize option is also useful if you happen to have movies or TV shows that you’ve watched on iTunes. By enabling Optimize, previously watched media will be automatically removed from your computer and kept in iTunes where you can download them again if you get the urge to give a show a rerun.
Keep your disk space under control
A full hard drive results in a slow running, overheating Mac. The best way to keep your system running smoothly with plenty of room for files is to keep on top of disk space. Use these apps to analyze disks and perform routine cleanups.
Источник
How to Check Storage and Disk Space on Mac Computer
This article will let you know about the ways to check its memory and optimize it. The post also features Recoverit, the all-rounder data recovery software.

Sue Wayne
Sep 08, 2021 • Filed to: Solve Mac Problems • Proven solutions
Whether you are a student, businessman, writer, or programmer, you will have terabytes ofВ storage spaceВ on your Macbook and still struggle with the data.
If you check the storage disk space on Mac and are keep an eye on it, you will notice how quickly the storage gets consumed. Therefore, sooner or later, the speed of your MacBook will decrease, and you will have to take action for it. In case you don’t know how to check disk space on Mac or optimize it, this post is just the thing for you. It will walk you through the various options to even check CPU usage on Mac and regulate its hard drive space.
So, without any delay, let’s get down and have a look at how to check disk space on Mac.
Part 1. How to Check Storage on Mac
Those who are using MacBook for their daily work like programming, coding, designing, photography, and other important work know how quickly their storage space gets filled. They know that even the most abandoned storage devices available in the market eventually fail to keep up with their daily need.
The thing is there is too much data that needs processing. There are high-quality 4k videos, full-size photographs, RAW files, documents, and a lot more. The data like the iTunes movies, log files, and applications will use the space.
Even if you somehow avoid all the unnecessary data, the MacBook has to deal with log files, backups, operating system files, updates, and a lot of others. The duplicated files and the cache files created in your system are also an active contributor to the storage problems.
Problems Caused Due to Low storage Space
The filling space of the MacBook doesn’t only prevent you from adding data, but it also has a drastic effect on your system. It gets your system bloated, slows the hard drives, decreases the CPU performance, and even causes heating problems. If you have a hard disk, you will literally be able to hear the spinning of the drive, once it’s full.
Solutions for the Issue
The only solution to deal with this problem is to regularly check the storage on Mac and optimize the system whenever it’s nearly filled. If you don’t know how to check Mac storage, here are the steps that you have to take.
Step 1: Open the hard drive
Step 2: Click on the application tab
Step 3: Now select the utilities from the list
Step 4: Open the activity monitor from here

Step 5: A menu to Check CPU usage Mac will open
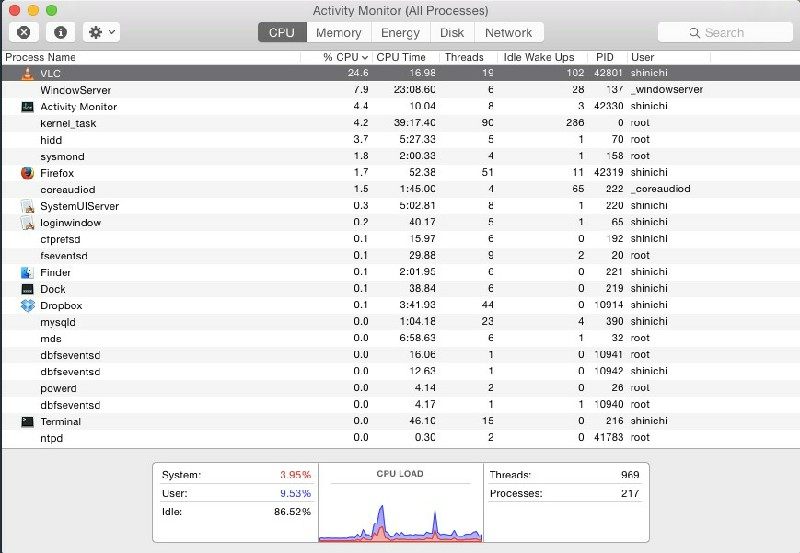
Step 6: Click the storage space button
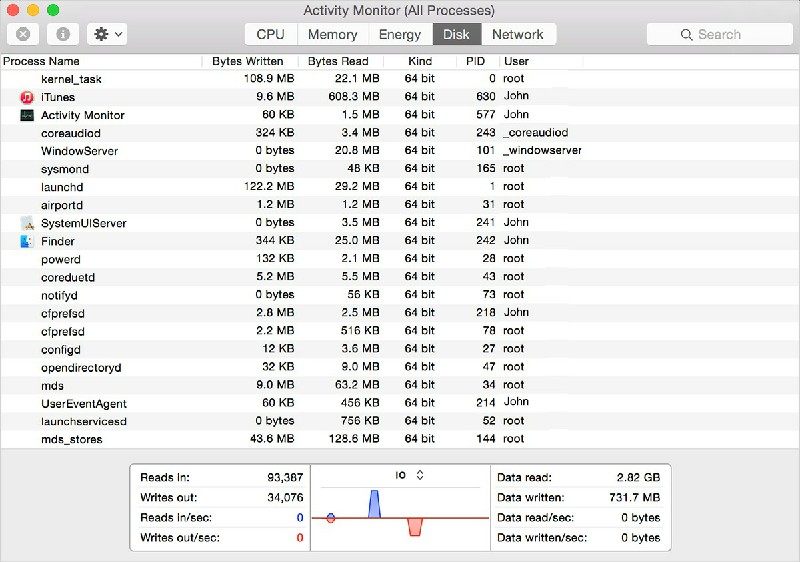
It will display all the storage media with their storage space details
Part 2. How to Check Hard Disk Space Available
If you are in a situation where your MacBook has started to present slower performance and is taking too much time to boot, maybe its time you take a look at the hard disk space.
Low storage in the hard disk increases the data processing load on the system, which then acquires most of the working memory. It hinders the regular working cycle of the Macbook and turns it to a slow and unreliable machine. So at least 10% of the hard drive must be available all the time.
If you have no idea of the space available in your guide and don’t know how to check space on Mac, here’s how you can do it without using any third-party software or complex processing.
Step 1: Click on the Apple logo on the top Screen.
Step 2: Select «About This Mac»
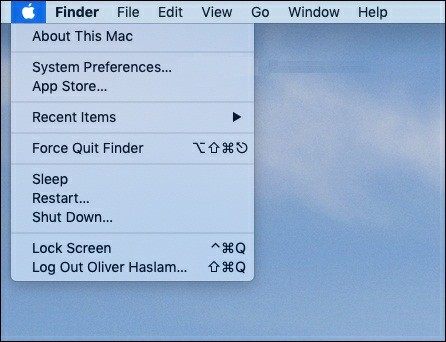
Note: To check the storage on Mac with an older version of OS X, you have to click on more info button before the next step.
Step 3: Click on the Storage tab in the windows that open.
After this step, you will find a list of hard drives and other connected devices with their storage details. Look for the one you need, and you are good to go.
Part 3. How to Free Up Space on Mac
In today’s life, many Mac users are constrained by the limited storage space. The SSDs are quite expensive while the traditional HDDs are slow and not ideal for the fast pace of life. Therefore, the best rescue you have is to check the storage on Mac and optimize it regularly.
Now that you know how to check space on Mac let get down with the optimization process and options you have. Here are the things you have to do:
Step 1: Open the menu that you previously used to check the memory on Mac
Step 2: Click on the manage button that sits next to flash storage media detail
Step 3: It will show you the following options for optimizing the memory space.
i. Store in iCloud
iCloud is the online storage space that comes with every Apple device. You can sign into the storage space using the Apple id and then use it to store data.
After clicking on the iCloud, you will have the following options:
Desktop and documents: If you click this option, all the files in these folders will get uploaded to the cloud storage. Only the recently used records will be kept on the Mac. You have to download the older files if you need them.
Photos: This option let you upload original and high-resolution photographs and video to the cloud library. Only an optimized and space-saving version of the data remains on the Mac. In case you want the original file, you can download it from the iCloud whenever you want.
The basic storage of iCloud is free, but you will have to go for a paid plan if you need additional space. So, it best if you check the storage on Mac that these categories are using, before clicking the options.
ii. Optimize Storage
This option gives you three options for clearing space. You can use it to remove the watched iTunes downloads, prevent automatically download email attachments, or restricting the email attachment downloads to the recent emails only.
iii. Empty the trash
The data that you delete often stay in the trash can and still use the storage space. ‘Empty the trash’ helps you to automate the cleaning of this trash bin. It clears all the files that are older than 30 days.
iv. Reduce Clutter
Reduce the clutter option lets you filter out the large files that you haven’t used for a long time. You can then select the once you don’t need and delete them permanently.
You can also try to free up the storage space manually. Have a look at the things you can do for it.
- Delete old files that are no longer required.
- Move files to external media like a flash drive or external hard drive
- Use compressor to reduce the space requirement of the data
- Remove the unnecessary programs old fonts, languages and dictionaries
- Delete unneeded emails from the mailbox and junk mail folders
- Clear cache, logs and download history of your browser
Part 4. How to Recover Accidentally Deleted Files on Mac
After gaining an overview of how to check MacBook storage space and optimize it, the next step will be to ensure that all your essential files are safe.
Losing the critical data during the optimization or due to accidental deletion can have a very drastic effect on your work. You might have to face losses and do the whole project again. Luckily, MacBook offers the freedom to use third-party recovery software to deal with the problem.
RecoveritВ Data Recovery Software for Mac
If you have lost data from your MacBook whether it’s in the form of an image, document, video, or even camera raw, you will need high-performance software to recover them. Download Recover its data recovery software for this task.
Here’s how you can use Recoverit data recovery software to recover your data.
Step 1. Select the Location
Launch Recoverit data recovery software and select the last location of your deleted files. Now, click on the start button on the lower side of the software window and proceed with the next step.

Step 2. Scan the Drives
Use the all-rounder scan to find the required files from the drive. You can also use filters to enhance the searching process while the software is performing its task.

Step 3. Preview and Recover Files
After the software check memory on Mac, it will list all the files that it has found in the drive. You can then preview the files and select the ones you need. Once you are sure of the data, just click on the Recover button and the software will restore them.
However, the files won’t be getting back to their previous location. You have to either assign them a new address or they will go to the Recoverit’s default location.

Part 5. Tips Against Full Storage on Mac
Knowing how to check MacBook storage may help you to eliminate the memory issues, but its haste. First, you have to check the storage on MacBook, then you have to transfer or delete the data, and if something goes wrong, you have to recover trashed files and deleted data. It is not that bad, but it’s not something that you can do too often.
Therefore, you should try to avoid storage issues in the first place. Have a look at some tips that you can use.
Disk utility can limit the background Ram usage and even deleted the unnecessary logs from the system.
The movies and music that you download need a considerable amount of space. Therefore, if you step up for the online streaming of these things, you can save a lot of system memory. It is also preferable that you start storing the data on a cloud-based server. It will not only decrease the storage but also help to prevent data loss issues.
There are a lot of external storage devices that can offer you high storage space. You can use this device to retain a copy of the data that you rarely use and even use it as a backup device.
- Delete localization data
Most of the applications that you buy or download will have support for multiple languages and other regional features. It is vital to keep up with the diversity but is very storage effective for your Mac. So make sure to localize data files that you don’t need.
Closing Words
Apple tries to provide the very best in their Macbooks. They install high-speed SSD memories, provide support for iCloud services, and have introduced some advanced optimization tools for the storage cleaning.
It’s you who have to understand the limits of the machine and find ways to deal with it. Therefore, get down to your Macbook check its storage usage and take all the necessary action to keep it optimized. Use the cloud sources the external and other storage locations that the technology has offered against the storage problems.
And don’t forget to download Recoverit hard drive recovery software. It can come in handy if you lose an essential file in the optimization process, or due to any other issue.
Источник


