- How to Flush your DNS Cache on Mac
- What is DNS cache?
- Why you should clear DNS cache
- How to flush DNS cache on Mac
- To flush your DNS cache on macOS Big Sur:
- How to сlear the DNS in older macOS versions
- Clearing browser caches with MacKeeper
- The bottom line
- How often should I flush the DNS cache on Mac?
- How do I check my DNS cache on a Mac?
- Is it safe to flush DNS cache?
- How do I clear DNS cache in Safari?
- Как очистить DNS кеш на Mac
- Как очистить DNS кеш на Mac
- Как очистить DNS кеш в macOS Catalina, mac OS Mojave, mac OS High Sierra, Sierra и mac OS El Capitan
- Как очистить DNS кеш на более старых версиях macOS
- Как очистить DNS кеш без использования Терминала
- How to Flush DNS Cache in OS X Yosemite with discoveryutil
- Clear DNS Cache in OS X Yosemite 10.10.4 & OS X 10.10.5
- Clearing DNS Caches in OS X Yosemite (10.10, 10.10.1, 10.10.2, 10.10.3)
- Clear MDNS Cache
- Clear UDNS Cache
- Flush and Reset All DNS Caches in OS X Yosemite
- Checking DNS Cache Details in OS X Yosemite
- How do you know if it changed?
How to Flush your DNS Cache on Mac
Most of the time, your Mac’s DNS cache isn’t something you need to worry about. It works quietly in the background, sending you to the right websites when you ask for them. But if it gets corrupted, then you can run into problems loading sites, with 404 errors being common. One solution is to clear your Mac’s DNS cache.
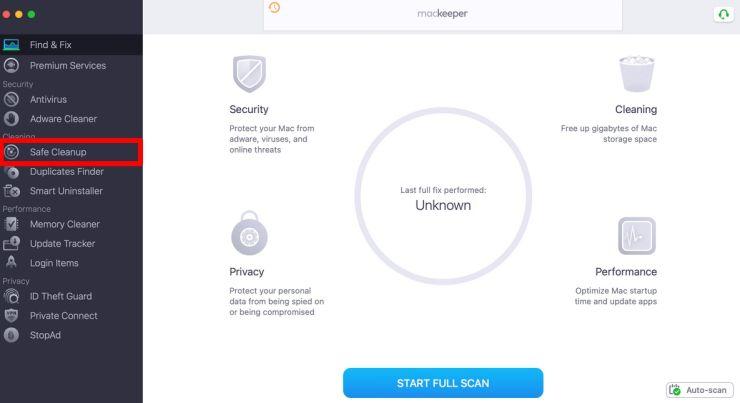
If you’re flashing your DNS cache because you’re experiencing problems, you might have malware on your Mac. It’s worth running a scan with MacKeeper just to be sure.
- Open MacKeeper, and select Antivirus from the menu
- Click Start scan
- Wait for the scan to finish
- If MacKeeper finds any suspicious files, take the recommended actions
Hopefully, your Mac is free of malware, but you should always make sure it’s protected. You can try out MacKeeper for free, and you get one free fix to see what it can do.
Thankfully, you can flush DNS cache on Macs in just a few short steps. In this guide we’ll show you how to flush the DNS cache on your Mac and cover the following key areas:
What is DNS cache?
To understand what a DNS cache is, you first need to know what DNS is. When you load a website, you connect to a DNS (Domain Name System) server online. This looks at the web address in your browser, and it then checks that against a database of IP addresses. These IP addresses tell your web browser where to find the server that contains that website. This process is called a DNS lookup.
The DNS cache is a temporary database on your computer of all the recent DNS lookups it’s carried out. This enables your browser to resolve these lookups faster, thereby cutting down web page loading times.
Why you should clear DNS cache
Over time, the DNS cache can become outdated or corrupted, leading to connectivity problems. It can also be affected by malware, causing your browser to take you to malicious sites or phishing schemes.
Flushing your Mac’s DNS cache can eliminate these problems. However, if you do find your browser redirecting to malicious sites, you should also run a malware scan on your Mac.
How to flush DNS cache on Mac
To flush your DNS cache on macOS Big Sur:
1. Click the Spotlight search button or use Command+Space to do a search
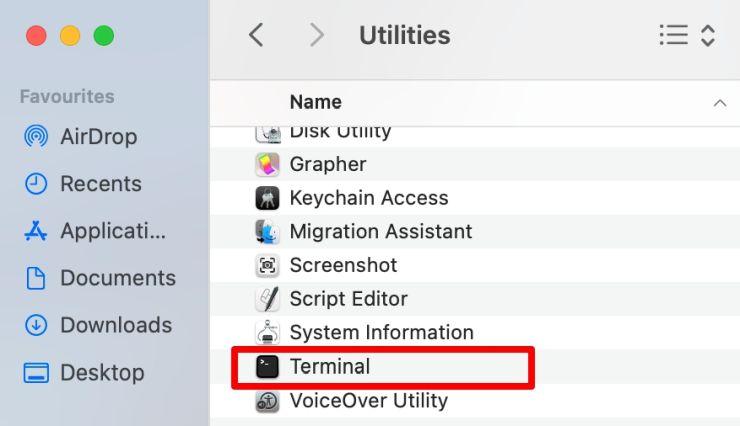
2. Type in Terminal, and double-click the Terminal application under Top Hit to open it

Note: If you’re unable to open Terminal through Spotlight, navigate to Go > Utilities > Terminal or click Applications, open the Utilities folder and then double-click Terminal.
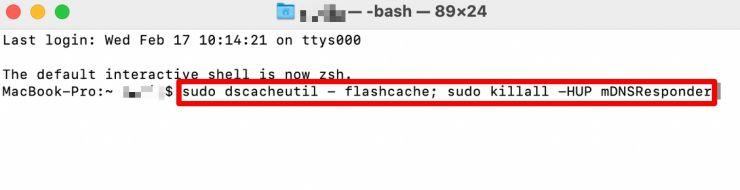
3. Once Terminal is open, enter this command: sudo dscacheutil -flushcache; sudo killall -HUP mDNSResponder
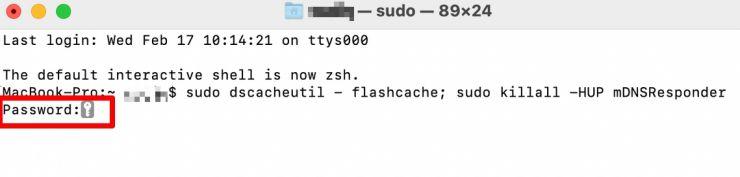
4. Enter your Mac’s password and then press Enter to clear the DNS cache
How to сlear the DNS in older macOS versions
Older macOS versions use different commands. To flush the DNS cache in these older versions, enter these in Terminal:
- In macOS El Capitan or newer, run sudo killall -HUP mDNSResponder
- For macOS Yosemite, enter sudo discoveryutil udnsflushcaches
- In Mac OS Lion, Mountain Lion and Mavericks, the command is sudo killall -HUP mDNSResponder
- In Mac OS Snow Leopard, enter sudo dscacheutil –flushcache
- For MacOS Leopard, run sudo lookupd –flushcache
- And in Mac OS Tiger, use lookupd –flushcache
Once you’ve flushed the DNS cache on your Mac, check the problematic website to see if the problem is fixed and you’re able to visit the site normally again.
Clearing browser caches with MacKeeper
Clearing browser caches regularly for all your browsers can be time consuming. With a cache clearing tool like MacKeeper, you can clean all caches automatically and get the job done in a snap.
MacKeeper can analyze any files that hog space on your Mac, while protecting you from accidentally deleting important system files.
To get clear your browser caches with MacKeeper:
1. Download and install MacKeeper on your Mac
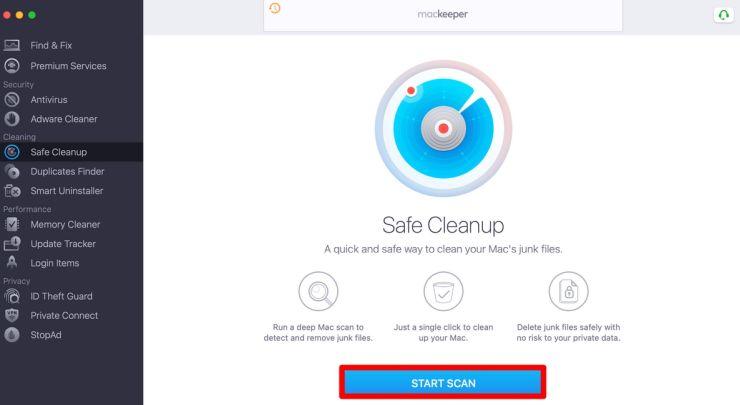
2. Launch the tool and then go to the Cleaning section in the right pane
3. Click Safe Cleanup
4. Click the blue Start Scan button
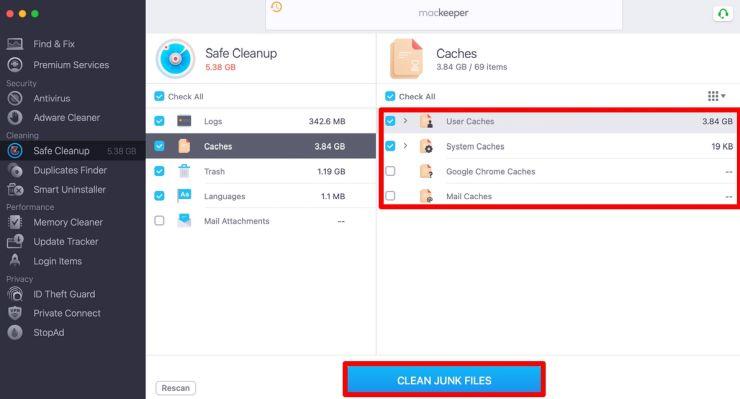
5. Next, check the Caches box, and click to select all the caches you want to clear. These include user caches, system caches, mail caches and browser caches
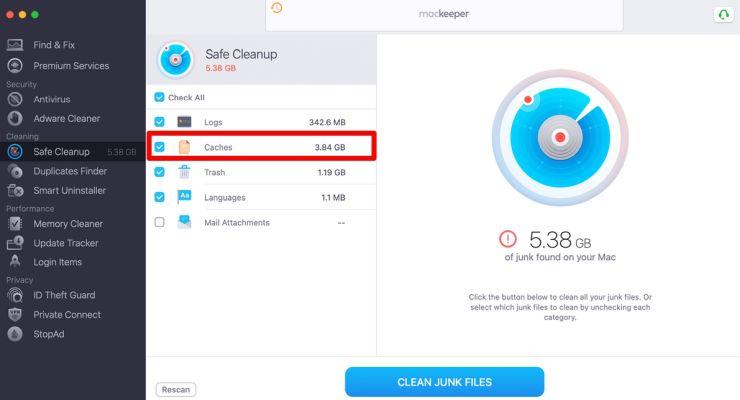
6. Click the blue Clean Junk Files button to confirm your action. MacKeeper will clear all the browser caches and clean any junk files that prevent your Mac from working properly
The bottom line
Clearing your Mac’s DNS cache can help when you’re unable to access a website and you’re not sure what’s causing the problem. With the detailed steps in this guide and cleaning/maintenance tools like MacKeeper, you can resolve the problem, get back to browsing the web and help your Mac run more smoothly.
How often should I flush the DNS cache on Mac?
There’s no recommended time span, but you can do it as often as needed without causing any harm to your Mac.
How do I check my DNS cache on a Mac?
To check DNS cache on your Mac:
- Open the Console app, select your Mac and then enter any:mdnsresponder in the search bar
- Open a Terminal window, and enter sudo killall –INFO mDNSResponder
- Go back to the Console app and view the list of cached DNS records
- You can also check DNS cache entries in your web browser. For example, if you’re using Chrome, enter chrome://net-internals/#dns in the address bar to view the current list of cached DNS records
Is it safe to flush DNS cache?
Yes, it’s safe to flush DNS cache on your Mac. Cached data is simply temporary storage, but flushing DNS cache too often prevents it doing its job of speeding up page loading.
Clearing your Mac’s DNS cache can help you hide your search behavior, protect against manipulation by cybercriminals and solve technical problems when accessing web apps. But there’s no point in doing it if you don’t need to.
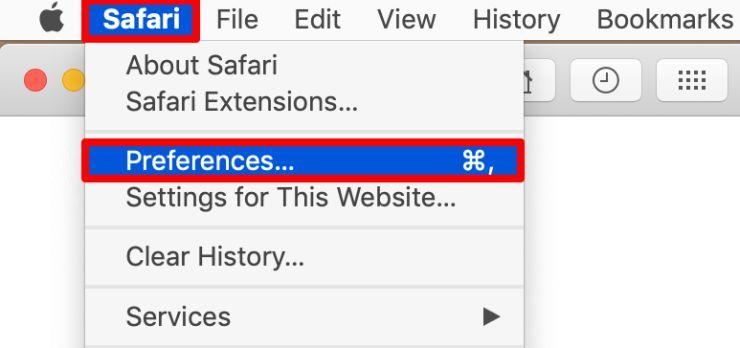
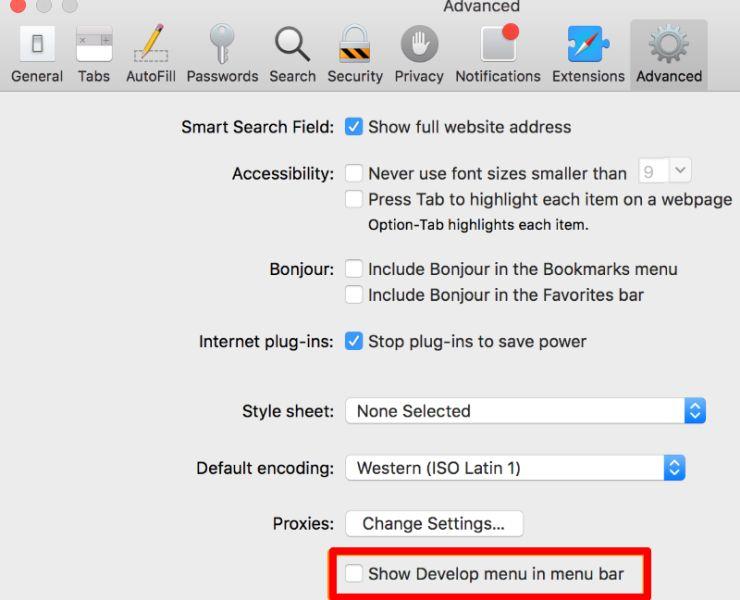
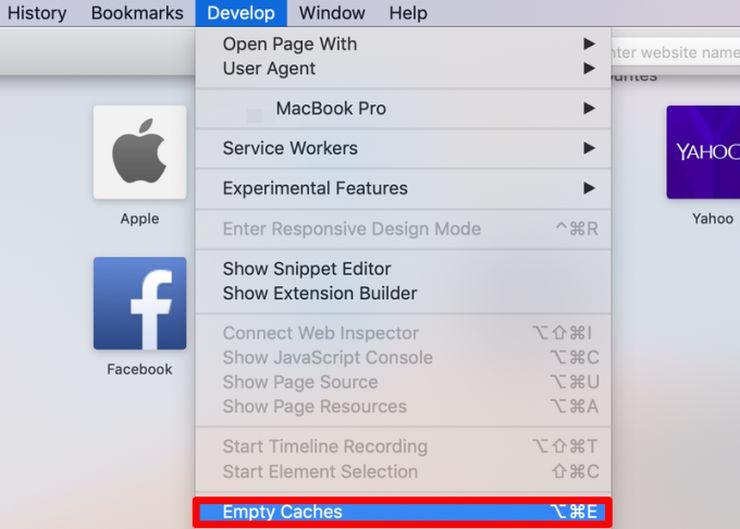
How do I clear DNS cache in Safari?
Safari browser also keeps a DNS cache. When you restart the browser, it clears the cache automatically, but you can do the same manually without relaunching the app.
1. In Safari, go to Safari > Preferences in the menu bar
2. Click Advanced and then tick the Show Develop menu in menu bar box to enable the Develop menu
3. From the menu bar, select Develop > Empty Caches. Once your browser cache is cleared, quit and relaunch the browser
Read more guides:
With over 5 years of supporting Mac users, Ruslana lives and breathes everything Mac. Tech expert, Apple lover, and well, a cutie. Say hi on LinkedIn!
With over 5 years of supporting Mac users, Ruslana lives and breathes everything Mac. Tech expert, Apple lover, and well, a cutie. Say hi on LinkedIn!
Mac working slowly? Feel the benefit of removing digital junk.
Источник
Как очистить DNS кеш на Mac
Благодаря наличию в системе DNS кеша пользователи могут быстрее получать доступ к посещенным ранее сайтам. Однако в ряде случаев кеш может повреждаться, что в свою очередь приведет к проблемам с подключением. Решить эту проблему можно очисткой DNS кеша. Также эта процедура пригодится в том случае, если наблюдаются проблемы с отображением ресурсов, недавно переехавших на новый сервер.

Как очистить DNS кеш на Mac
Сразу стоит отметить, что процесс очистки DNS кеша не отличается особой сложностью. Для этого владельцам яблочных компьютеров будет достаточно просто ввести команду в терминале и подождать некоторое время. Однако вид команды несколько отличается в зависимости от версии операционной системы.
Как очистить DNS кеш в macOS Catalina, mac OS Mojave, mac OS High Sierra, Sierra и mac OS El Capitan
Как уже было сказано выше процесс очистки очень прост. Для удаления кеша надо:
- Открыть приложение Терминал. Сделать это можно двумя способами, используя Spotlight (Command + пробел) и введя в открывшейся строке «Терминал» или найти Терминал в Finder – Приложения – Утилиты.

- В окне терминала ввести команду:
sudo killall -HUP mDNSResponder
- Ввести пароль от учетной записи администратора. При вводе пароль может не отображаться.
Процесс очистки кеша может занять несколько минут.
Как очистить DNS кеш на более старых версиях macOS
В случае с macOS Yosemite в Терминал нужно ввести команду вида:
sudo discoveryutil udnsflushcaches
На macOS Lion, Mountain Lion и Mavericks команда будет иметь вид:
sudo killall -HUP mDNSResponder
На старых системах процесс очистки кеша также происходит не мгновенно.
Как очистить DNS кеш без использования Терминала
Очистить DNS кеш можно и без использования Терминала. Для этого владельцам яблочных компьютеров нужно будет воспользоваться одной из специальных утилит для чистки системы. Одним из таких приложений является PowerMyMac.
Утилита подходит не только для очистки кеша. Она также позволяет отслеживать показатели работоспособности компьютера, удалять ненужные приложения, искать дубликаты файлов, бороться с остатками от удаленных программ и т.д.
В итоге, в лице PowerMyMac владельцы яблочных компьютеров получают в свое распоряжение многофункциональный инструмент. Опробовать приложение можно совершенно бесплатно. Однако полная версия PowerMyMac стоит 20 долларов. Приобрести программу можно на официальном сайте.
Источник
How to Flush DNS Cache in OS X Yosemite with discoveryutil

Some Mac users may encounter situations where they need to flush DNS cache in OS X for a name server to resolve properly, or for some DNS address change to become noticed by their individual computer. This is particularly relevant for system administrators, network admins, and web developers, but there are certainly situations where other users may need to dump and reset DNS caches too, like if a user has modified the /etc/hosts file and they need the changes to take effect without rebooting the Mac.
Longtime Mac users will know that resetting DNS cache has changed in nearly every version of Mac OS X, and OS X Yosemite is no different, likely due to the discoveryd replacing mDNSResponder, and then switching back to mDNSResponder yet again. Regardless, flushing DNS cache in Yosemite remains a terminal command, but it differs slightly depending on the exact release you are using of the OS, and it actually allows you to clear either Multicast DNS or Unicast DNS, or both. You’ll probably want to clear both for good measure if you’re trying to reset all DNS caches on the Mac.
Clear DNS Cache in OS X Yosemite 10.10.4 & OS X 10.10.5
From OS X 10.10.4 moving onward to 10.10.5, including 10.11, Apple has ditched discoveryd and has replaced it (or rather, reverted back to) mDNSResponder. Thus, to clear DNS caches in OS X Yosemite 10.10.4, and 10.11 El Capitan, and presumably onward, the command string is as follows:
sudo dscacheutil -flushcache;sudo killall -HUP mDNSResponder;say cache flushed
That command flushes all DNS caches for OS X 10.10.4+.
Longtime Mac users may recall that command string is basically what worked in the release prior to Yosemite. With that said, earlier versions of OS X Yosemite before 10.10.4 will use a different command string discussed below.
Clearing DNS Caches in OS X Yosemite (10.10, 10.10.1, 10.10.2, 10.10.3)
You’ll need to use the Terminal to reset cache, you can find the Terminal app in /Applications/Utilities/ or launch it with Spotlight. To completely clear all DNS caches in the latest version of OS X, target both MDNS (Multicast DNS) and UDNS (Unicast DNS) with two different commands.
Clear MDNS Cache
sudo discoveryutil mdnsflushcache
Hit return and enter the admin password when requested.
Clear UDNS Cache
sudo discoveryutil udnsflushcaches
Again, hit return and enter the admin password when requested. Note that caches is plural with the latter command, a subtle but important syntax difference.
Flush and Reset All DNS Caches in OS X Yosemite
You can also string the above two commands together if you want, the following will even verbally announce when the caches have been cleared:
sudo discoveryutil mdnsflushcache;sudo discoveryutil udnsflushcaches;say flushed
Indeed MDNS and UDNS caches are different, but I’ve found that for functional DNS cache to actually clear in OS X Yosemite both commands are necessary. It’s entirely possible that you only need to clear one or the other for your own needs.
For those wondering, OS X Yosemite has done away with mDNSResponder, so there’s no need to kill that mDNSResponder process to refresh DNS caches like in prior versions of Mac OS X.
Checking DNS Cache Details in OS X Yosemite
If you are changing or are going to change DNS, and you want to see some details about what is currently cached, you can use the following commands:
Get UDNS cache statistics:
sudo discoveryutil udnscachestats
You can also retrieve specifics about multicast DNS cache with the following:
sudo discoveryutil mdnscachestats
Both of these will offer details as to the number of DNS entries are cached, offering a report that should look like this:
UDNS Cache Stats: Cached 962 of 1750
If you run those commands before and after running the flushcache variations, you’ll find they should be reset to 0 entries cache, like so:
MDNS Cache Stats: lo0: Cached 0 of 2000
How do you know if it changed?
After you’ve flushed cache, if you want to determine if a name server or IP has actually changed you can use the ‘dig’ command with the URL like so:
dig is similar to nslookup, except that it has better output and a few more details included, included query time, the set DNS server used to access the domain, and a timestamp, all of which can be valuable when troubleshooting name server issues. By the way, if the query time for this shows up as sluggish, you should use a tool like namebench to find a faster DNS server for you, often Google DNS or OpenDNS.
Know of another DNS cache trick for the latest versions of OS X? Let us know in the comments.
Источник


