- Share Mac files with Windows users
- Set up file sharing on the Mac
- Provide the information Windows users need
- Connect to a Windows computer from a Mac
- Connect to a Windows computer by browsing
- Connect to a Windows computer by entering its address
- Connect using an Ethernet cable
- Reconnect to recent computers or servers
- Connect to Shared Folder on Windows 10 from Mac OS X
- Step 1 – Configure Windows 10 for Sharing
- Step 2 – Connect to Windows Shared Folder from OS X
- Set up Windows to share files with Mac users
- Set up sharing on a Windows 7, Windows 8 or Windows 10 computer
- Set up sharing on a Windows XP or Windows Vista computer
- Find the information Mac users need to connect to a Windows computer
Share Mac files with Windows users
To let users connect to your Mac from a Windows computer, turn on file sharing and enable SMB sharing.
Set up file sharing on the Mac
On your Mac, choose Apple menu

> System Preferences, then click Sharing.
Select the File Sharing tickbox, then click Options.
Select “Share files and folders using SMB”.
In the Windows File Sharing list, select the tickbox next to the user account that will be used to share files with Windows users, enter the password for that user, then click OK.
Choose View > Network, select your active connection, then click Advanced.
Click the WINS tab, then enter the workgroup name used by the Windows computer.
If you don’t know the workgroup name, on the Windows computer open Control Panel > System and Security > System. (Windows computers normally use either WORKGROUP or MSHOME.)
Click OK, then click Apply.
Provide the information Windows users need
To connect to your Mac, Windows users need the network address for your Mac, and a username and password to use to log in to your Mac.
To find your Mac computer’s network address, choose Apple menu
> System Preferences, click Sharing, then select File Sharing. The address appears below the “File Sharing: On” indicator, and looks similar to this example: smb://17.212.167.33/.
Create an account on your Mac for each Windows user. To create accounts, choose Apple menu > System Preferences, then click Users & Groups.
If you want to use an account that existed before you installed the latest version of macOS, you may need to reset the password for the account in Users & Groups preferences.
Because the passwords of user accounts used for Windows sharing may be stored in a less secure manner, turn off the account when it’s not being used. Before you turn off Windows sharing, turn off all the accounts you enabled. Otherwise, the passwords are still stored less securely.
Источник
Connect to a Windows computer from a Mac
You can connect to Windows computers and servers on your network from your Mac.
For instructions on setting up the Windows computer, see Set up Windows to share files with Mac users.
Connect to a Windows computer by browsing
In the Finder  on your Mac, choose Go > Connect to Server, then click Browse.
Find the computer’s name in the Shared section of the Finder sidebar, then click it to connect. You may need to click All to see all the shared computers.
When you locate the shared computer or server, select it, then click Connect As.
In some cases you need the network area or workgroup for the shared computer. If you don’t have this information, contact the computer’s owner or your network administrator.
If necessary, enter your username and password, then select volumes or shared folders on the server.
Passwords for Windows computers and servers are often 14 characters or fewer. Check with the owner or administrator to be sure.
To make it easier to connect to the computer in the future, select “Remember this password in my keychain” to add your username and password for the computer to your keychain.
Connect to a Windows computer by entering its address
In the Finder on your Mac, choose Go > Connect to Server.
Type the network address for the computer in the Server Address field using one of these formats:
For information about the correct format for network addresses, see Network address formats for shared computers and servers.
Follow the onscreen instructions to type the workgroup name and a username and password, then choose the shared folder you want to access.
If you don’t know the workgroup name and the network name (called the computer name) for the Windows computer, contact the person who owns the computer or your network administrator.
If necessary, enter your username and password and select volumes or shared folders on the server.
Passwords for Windows computers and servers are often 14 characters or fewer. Check with the owner or administrator to be sure you have the correct password.
To make it easier to connect to the computer in the future, select “Remember this password in my keychain” to add your username and password for the computer to your keychain.
Connect using an Ethernet cable
Connect your Mac to the Windows computer using a standard Ethernet cable. If your Mac doesn’t have an Ethernet port, try using a USB-to-Ethernet adapter.
Connecting the two computers creates a small local network that consists of just the two computers.
On the Windows computer, turn on file sharing. Refer to the instructions that came with the Windows computer if you’re not sure how to do this.
Make sure the Internet Connection Firewall is turned off on the Windows computer, or if it’s on, make sure TCP port 445 is open to allow sharing connections.
For more information, refer to the user manual and onscreen help for the Windows computer.
On your Mac, choose Go > Connect to Server, then click Browse, or type the network address for the computer in the Server Address field.
Reconnect to recent computers or servers
Here are some ways to make it easy to reconnect to shared computers and servers you frequently use:
On your Mac, choose Apple menu
> Recent Items, then choose from the list of recent servers.
In the Finder on your Mac, choose Go > Connect to Server, click the pop-up menu to the far right of the Server Address field, then choose a recent server.
Add shared computers, network areas and workgroups to the Finder sidebar. Select the item, then choose File > Add To Sidebar or press Command-T.
Add a shared computer or server to your list of favourites. In the Finder on your Mac, choose Go > Connect to Server, enter the network address, then click the Add button  .
.
If you can’t locate a shared computer or server or connect to it, it may not be available, or you may not have permission to connect to it. Contact the person who owns the computer or the network administrator for help.
Источник
Connect to Shared Folder on Windows 10 from Mac OS X
This little tutorial will save you hours of frustration
I recently upgraded one of my computers to Windows 10 and setup a shared folder so that I could easily transfer files from my MacBook Pro and Windows 7 machines to Windows 10 over the home network. I did a clean install of Windows 10, created a shared folder and attempted to connect to my shared folder from OS X.
Unfortunately, I was not able to connect and it took me a little time to figure it out. In this article, I’ll walk you through the steps to connect to a shared folder on Windows 10 from OS X.
Step 1 – Configure Windows 10 for Sharing
Obviously, the first thing you’ll need to do is create a shared folder on Windows 10. Right-click on the folder, go to Properties and click on the Sharing tab. Go ahead and share the folder and set the permissions to whatever you desire in terms of access.
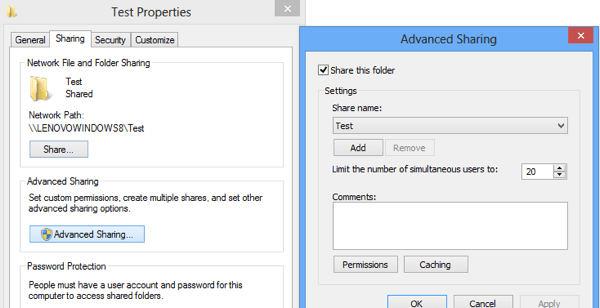
I suggest clicking on Advanced Sharing as you have more fine-grain control over everything. Check the Share this folder box and then give the share a name. Click on Permissions and then add groups or users that you want to give access.
If you want to make it easy and the folder doesn’t have sensitive data, just add the Everyone group and give them Full Control. This way, you’ll be able to access the folder from any computer or device without having to worry about entering credentials.
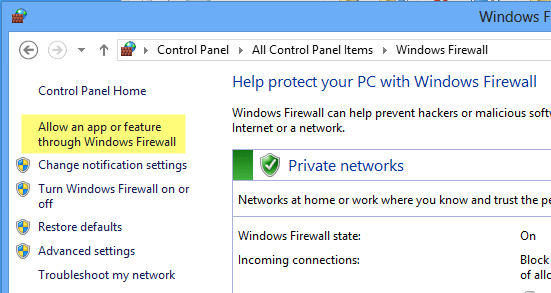
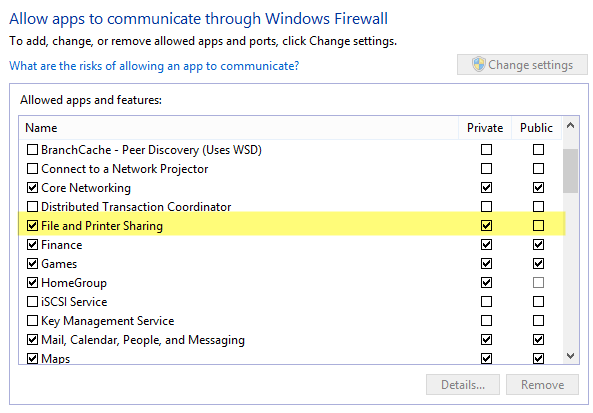
The next thing you need to do is make sure that File and Printer Sharing is turned on and allowed through the Windows Firewall in Windows 10. Go to Control Panel and click on Windows Defender Firewall. Then click on Allow an app or feature through Windows Firewall.
Scroll down until you see File and Printer Sharing and make sure that it is checked for the Private network. You may have to first click on the Change settings button at the top before you can select a box.
Lastly, you can decide how you want users to access the folder on Windows 10. By default, when connecting from another machine, you have to enter the username and password of an account that has access to that shared folder on Windows 10. If you setup a Windows 10 user account without adding a password, you won’t be able to connect to the shared folder.
You’ll first have to add a password and then you could connect. However, if you feel your home network is super secure, you can always turn off password protected sharing, which means anyone can connect to the shared folder without having to type in a username or password.
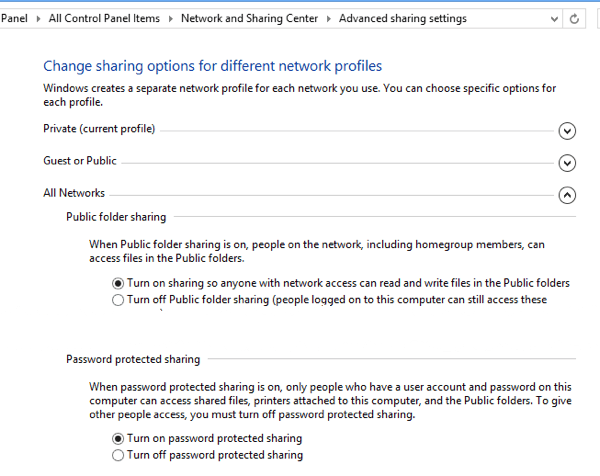
You can do that by going to Control Panel, Network and Sharing Center, Advanced sharing settings and then expanding All Networks. Here you will see an option called Password protected sharing, which you can turn off. I personally keep it turned on, but if you really hate having to type in a username and password to connect, this is an option.
Also, if you use Windows 10 without a password, this would save you from having to setup a password on your account. Note that even if you have a Windows account with a password, if you turn off password protected sharing, then people can still connect without typing any credentials.
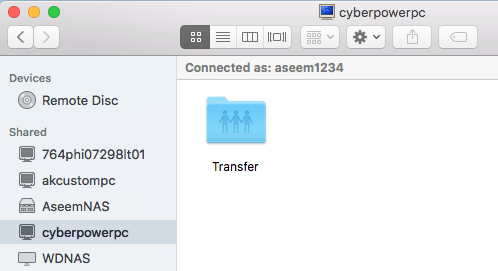
Step 2 – Connect to Windows Shared Folder from OS X
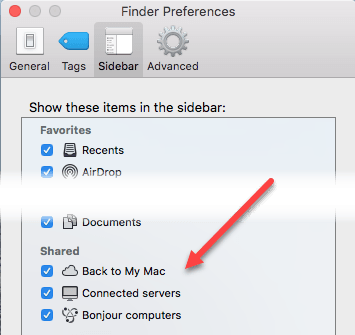
Finally, on the Mac, open Finder and look under the Shared section for the Windows 10 PC. If Shared is not in the sidebar, you have to add it. With Finder open, click on Finder and then Preferences at the top. Click on Sidebar and check all the items under Shared.
Now go back to Finder and wait till your computer shows up. Note that it can take a little while until the Windows 10 PC shows up. If it doesn’t show up after 5 minutes, try restarting the PC once.
If your Windows PC refuses to show up in the Shared devices list in Finder, you can try connecting manually using SMB. To do that, open Finder and click on Go and then Connect to Server.
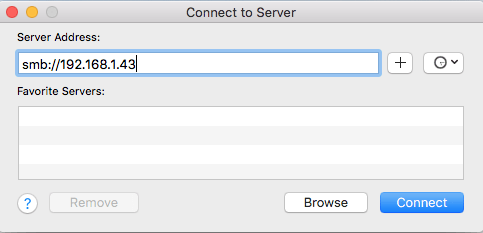
Now type in the following as shown, replacing the IP address below with the IP address of your Windows 10 PC.
Click the Connect button and you’ll be asked to type in credentials again. If that is entered correctly, you’ll be asked which volume you want to mount.

If you’re still not able to connect using SMB, then there is some issue on your Windows PC. You have to make sure the firewall is configured properly.
Once it shows up in the sidebar, go ahead and click on it. When you click on it, it will try to connect and you may get a message saying Connection Failed or Not Connected.
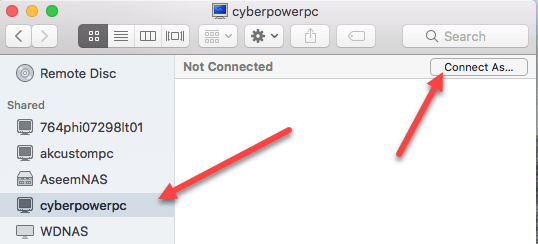
That’s OK! That’s where that password protected folder setting in Windows 10 comes into play. If it’s turned on, you need to connect using the Windows 10 account credentials. You can do that by clicking the Connect As button at the top right.
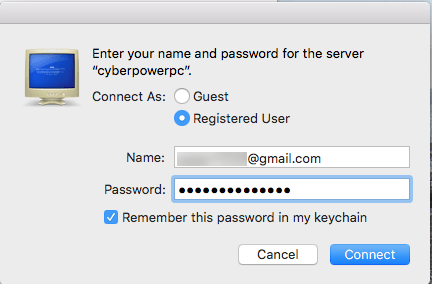
Go ahead and type in your credentials and then click OK. Note that if it’s a Microsoft account you have setup on Windows 10, you’ll need to type in the full email address and the same password that you use to login to your Microsoft account.
That’s about it! Now you should see the Windows 10 shared folders in Finder on your Mac. If you have any questions about connecting to Windows 10 PC from a Mac, post a comment here and I’ll try to help out. Enjoy!
Founder of Online Tech Tips and managing editor. He began blogging in 2007 and quit his job in 2010 to blog full-time. He has over 15 years of industry experience in IT and holds several technical certifications. Read Aseem’s Full Bio
Источник
Set up Windows to share files with Mac users
To let users connect to a Windows computer from a Mac, you need to share a folder on the Windows computer.
Set up sharing on a Windows 7, Windows 8 or Windows 10 computer
To share a folder, right-click the folder’s icon, then choose “Share with.” Choose “Specific people,” then follow the onscreen instructions.
You may need to disable the Internet Connection Firewall in the Advanced pane of the device’s properties. If you can’t disable the Internet Connection Firewall, make sure TCP port 445 is open. For more information, refer to the manual and onscreen help that came with the Windows computer.
You may need to restart the Windows computer after setting it up.
If you have never set up the Windows computer for sharing, open Network and Sharing Centre, then follow the onscreen instructions to set up a new network.
Set up sharing on a Windows XP or Windows Vista computer
To share a folder, right-click the folder’s icon, then choose Properties. Click the Share tab and follow the onscreen instructions.
You may need to disable the Internet Connection Firewall in the Advanced pane of the device’s properties. If you can’t disable the Internet Connection Firewall, make sure TCP port 445 is open. For more information, refer to the manual and onscreen help that came with the Windows computer.
You may need to restart the Windows computer after setting it up.
If you have never set up the Windows computer for sharing, open My Network Places, then follow the onscreen instructions to set up a home or small office network.
Find the information Mac users need to connect to a Windows computer
Mac users need the network address for the Windows computer, the workgroup name, and the username and password for the shared folder.
To find this information on a Windows 10 computer:
For the computer’s workgroup name and computer name, enter “view basic information” in the search field next to the Start button, then choose the Control panel result.
For the names of user accounts available on the computer, enter “view basic information” in the search field next to the Start button, choose the Control panel result, then click “Manage another account.”
For the Internet Protocol (IP) address, click the Wi-Fi icon in the system tray, click Network settings, then click Advanced options; the IP address is listed as the IPv4 address.
To find this information on a Windows 7 or Windows 8 computer:
For the computer’s workgroup name and computer name, open Control Panel > System and Security > System.
For the names of user accounts available on the computer, open Control Panel > User Accounts and Family Safety > User Accounts.
For the Internet Protocol (IP) address, open the Network and Sharing Centre, click View Network Connection, then select an active network connection. In the toolbar, click “View status of this connection” (you may need to click >> to see all the toolbar options). Click Details; the IP address is in the Value column next to “IPv4 Address.”
To find this information on a Windows XP or Windows Vista computer:
For the computer’s workgroup name and computer name, open the System control panel, then click the Computer Name tab.
For the names of user accounts available on the computer, open the User Accounts control panel.
For the Internet Protocol (IP) address, look in the Details pane of the Explorer. You may need to open the Network Connection control panel and select the connection you’re using. The information appears in the Explorer bar.
For detailed instructions on connecting to a Windows computer from a Mac, see Connect to a Windows computer from a Mac.
Источник


