- How to copy and paste on Mac
- Copy or cut
- Paste, or paste and match style
- Paste
- Paste and Match Style
- Quickly Copy a File or Folder Path to the Clipboard in Mac OS X
- Copy a File / Directory Path from the OS X Get Info Window
- Print Path through the Mac Terminal
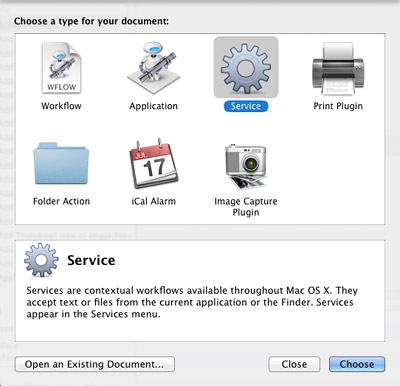
- Create a “Copy Path” Service for the Right-Click Menu
- What is a path anyway?
- Copy file or folder path to the clipboard in Mac OS X Lion
- Move and copy files in Terminal on Mac
- Move a file or folder locally
- Copy a file or folder locally
- Copy a file or folder remotely
- macOS: Use Clipboard in Terminal Without a Mouse
- Why Do I Need to Use Clipboard in Terminal?
- Copying to the Clipboard
- Pasting From the Clipboard in Terminal
- But Wait, There’s More
How to copy and paste on Mac
Copy or cut text or other items from one location, then paste in another location. These methods work in most apps.
Copy or cut
Start by selecting the text or other item to be copied or cut. Then use one of these steps to save the item to your Clipboard so that it can be pasted elsewhere.

- Press Command-C.
- Or choose Edit > Copy from the menu bar.
- Or Control-click (or right-click) the item you selected, then choose Copy from the shortcut menu.

- Press Command-X.
- Or choose Edit > Cut from the menu bar.
- Or Control-click (or right-click) the item you selected, then choose Cut from the shortcut menu.
Paste, or paste and match style
First click to place your insertion point, then use one of these steps to paste your copied item at that location. When you paste and match style, the pasted item matches the font, color, size, or other style of the surrounding content.
Paste

- Press Command-V.
- Or choose Edit > Paste from the menu bar.
- Or Control-click (or right-click) the item you selected, then choose Paste from the shortcut menu.
Paste and Match Style

- Press Option-Shift-Command-V.
- Or choose Edit > Paste and Match Style from the menu bar.
Источник
Quickly Copy a File or Folder Path to the Clipboard in Mac OS X
There are a few ways to retrieve a file or folders full path from Mac OS X, and we’ll cover the two easiest methods here, and also a third option that utilizes a Service to instantly copy any path to the clipboard. First, we’ll use the Get Info panel to pull any items complete path, and then we’ll use another trick that utilizes an under appreciated feature of the Terminal to retrieve any directory or files path. The optional Automator Service provides yet another option to copy file and folder paths, which is then quickly accessible through the right-click menu from the OS X Finder.

Just to clarify, we are looking to copy the path to a file or folder to the clipboard so that it can be pasted elsewhere. This is different from showing the path, which can be made visible in any Finder window through an optional window bar or even in the title bar using a defaults trick.
Let’s get to copying complete paths so that you can use them elsewhere.
Copy a File / Directory Path from the OS X Get Info Window
Perhaps the easiest and most user friendly method, you can easily retrieve any file or folders path from the Get Info window by doing the following:
- Select the file or folder in the OS X Finder, then hit Command+i to summon Get Info
- Click and drag alongside “Where” to select the path, then hit Command+C to copy the full path to the clipboard
Get Info can also be accessed by the control-click and right-click menus. For most use cases and for occasional complete path access, the Get Info trick is simple, fast, efficient, and should fit the bill for most people.
Print Path through the Mac Terminal
Dragging and dropping anything into the OS X Terminal outputs the full path to that item.
- Launch Terminal then drag and drop any item from the Finder into the Terminal window to instantly print the full path
- Select and highlight the path to copy it to the clipboard as usual
This trick is great if you are looking to use the path in the Terminal, otherwise it may not be as easy as the Get Info tip because it requires opening another app.
Create a “Copy Path” Service for the Right-Click Menu
If you find yourself frequently needing to copy and paste file and folder paths, creating an Automator Service will make your life easier because the service then becomes accessible from the OS X Right-Click contextual menu, accessible from anywhere in the Finder. This is an excellent trick from CNet and is very easy to set up yourself:
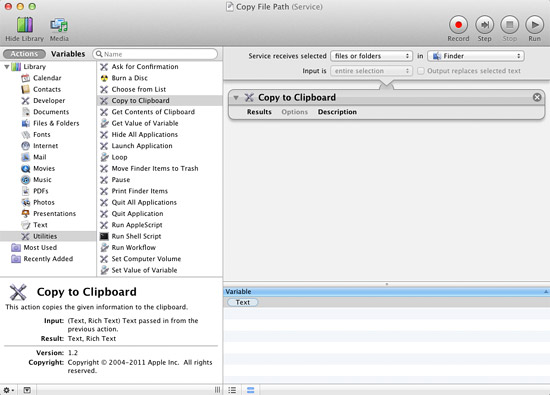
- Launch Automator and create a new “Service”
- Use the search function to look for “Copy to Clipboard” and drag that into the rightside panel of the Service
- Set ‘Service recieves selected’ to “files or folders” and ‘in’ to “Finder” as shown in the screen shot below
- Save the Service with a name like “Copy Path”
Now go anywhere in the Finder, select anything in the filesystem be it a directory or a file, then right-click to reveal the “Copy Path” service item as created.
Choosing that option will instantly copy the chosen items path to the clipboard, which you can then paste elsewhere.
What is a path anyway?
For the unfamiliar, you can think of an items path as it’s address in the file system, pointing to exactly where it resides on the computer. For example, a file named “Testfile.txt” that resides on your user account desktop would have a complete path that would resemble something like this:
For items in the user directories, you can user a tilde to shorthand the path like so:
That shorthand does not work with system files, or for accessing other user files, thus a complete path would be needed. All of the methods we’re sharing will access and copy the complete path, not the short hand, even if the file or directory in question is in the user folders.
Источник
Copy file or folder path to the clipboard in Mac OS X Lion

Learn how to create your own OS X service that lets you copy & paste the paths of files and folders in Finder. After just a few steps you will be able to select items in Finder, press a quick keyboard shortcut, and paste the path(s) anywhere you want.
Mac users have long complained that there’s no easy way to copy the location of a file or folder on their computer and paste it in a document, email, internet browser, etc. There are a bunch of third party utilities and convoluted workarounds to get this functionality, but let’s be honest – they’re all pretty terrible. Even MacYourself’s clever workaround from 2009 doesn’t work anymore in OS X 10.7 Lion.
So what do we do? We take matters into our own hands, of course! Let’s come up with our own solution – and let’s make it awesome.
Before we get started, we should establish some goals. Obviously we want to copy a file path or folder path from Finder and paste it somewhere else for reference. Let’s take that a few steps further and say we want to:
- Support the selection of multiple files and folders at a time
- Require no third party software or plugins to accomplish our goal
- Integrate with Finder so this feels like a real, native solution
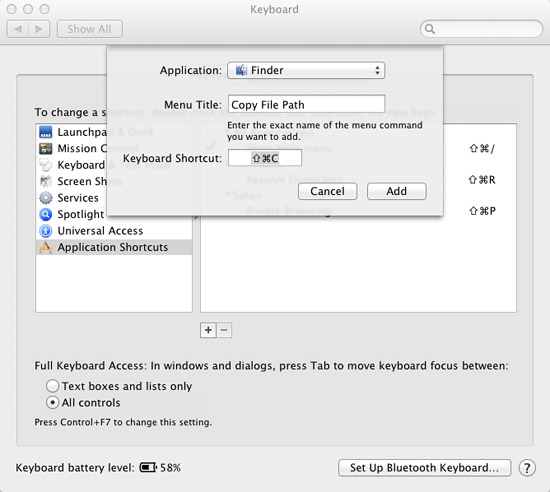
- Set up a keyboard shortcut for quick & easy access
- Copy the path to OS X’s clipboard so it can be pasted in any application
Sounds like a plan! Here we go…
- Launch Automator from your Mac’s Applications folder. If you’ve never used Automator before, that’s not a problem. This is going to be so simple anyone can do it.
- Double-click the Service icon from Automator’s start menu.
Now let’s test our fancy solution! Here’s how it works…
- Select any file or folder (or a mixture of multiple files and folders at once) in Finder.
- Press your keyboard shortcut – in our case, Shift+Command+C. This copies the path to OS X’s clipboard.
- Open a text document, email message, or other place you’d like to use your location path. Press Command+V (or right-click and select Paste) to paste the file path(s). Hopefully you should see something like /Users/YourName/Documents/Work/Files/resume.doc
From now on these 3 easy steps are all you have to do to copy and paste file paths from Finder to your clipboard and, ultimately, another application. Pretty cool!
A few things to mention… If you’re not keen on keyboard shortcuts, the service you created is also accessible when you right-click on an item in Finder and select Services > Copy File Path from the contextual menu. The actual file we created for this service is located in:
/Library/Services in case you ever want to delete it or copy it to put on another Mac. Finally, this tutorial was written specifically for Mac OS X 10.7 Lion, so the steps involving Automator might be a little different if you’re running an older version.
How does this solution work for you? Does it give your Mac the functionality you were looking for?
Источник
Move and copy files in Terminal on Mac
In Terminal, you can move and copy files locally or remotely using the mv , cp and scp command-line tools.
Tip: It’s easier to move and copy files using the Finder. See Organise files in folders.
Move a file or folder locally
In the Terminal app  on your Mac, use the mv command to move files or folders from one location to another on the same computer. The mv command moves the file or folder from its old location and puts it in the new location.
For example, to move a file from your Downloads folder to a Work folder in your Documents folder:
You can also change the name of the file as it’s moved:
Copy a file or folder locally
In the Terminal app on your Mac, use the cp command to make a copy of a file.
For example, to copy a folder named Expenses in your Documents folder to another volume named Data:
The -R flag causes cp to copy the folder and its contents. Note that the folder name does not end with a slash, which would change how cp copies the folder.
Copy a file or folder remotely
In the Terminal app on your Mac, use the scp command to copy a file or folder to or from a remote computer.
scp uses the same underlying protocols as ssh .
For example, to copy a compressed file from your home folder to another user’s home folder on a remote server:
You’re prompted for the user’s password.
The -E flag preserves extended attributes, resource forks and ACL information.
The -r flag, which isn’t used in this example, causes scp to copy a folder and its contents.
Источник
macOS: Use Clipboard in Terminal Without a Mouse

If you do much work at all in the Terminal, there are two macOS commands you should know about but probably don’t. They’re called pbcopy and pbpaste , and they’re extremely powerful. These two commands let you use Clipboard in Terminal without ever raising your fingers from the keys.
You don’t have to use your mouse to copy and paste text in Terminal — it call all be done from the keyboard (Stux)
Why Do I Need to Use Clipboard in Terminal?
If you’re really asking this question, maybe you aren’t as much of a Terminal fanatic as you claim to be. Using pbcopy , you’re able to not only copy the contents of a file into the Clipboard, but also redirect the output of Terminal commands into it.
If you’ve ever tried to easily get the contents of a text file into the Clipboard, you know what a hassle it can be. You have to open the file in TextEdit, highlight the contents, and then use the Copy shortcut. If you want an easier method, pbcopy might just become your new best friend.
Copying to the Clipboard
There are two main uses I have for pbcopy . Those are copying text from a file, and redirecting output from a Terminal command. The first is the easiest:
This will take all of the contents of file.txt and copy it to the Clipboard. You can then access it using the Finder’s Clipboard shortcuts or pbpaste .
Let’s look at a more complicated example. Let’s say I want to generate a text file of all of the processes running on my Mac. I could simply type ps aux and then try to highlight everything, but the output would likely span several screens. To more effectively use Clipboard in Terminal, I just do this:
That command string will pipe the results of my ps command to the Clipboard. Again, I can use the Finder’s Clipboard shortcuts or the pbpaste command to access the text.
Pasting From the Clipboard in Terminal
Next up is pbpaste . This command retrieves the data from the Clipboard buffer, writing to the Terminal. If I just type pbpaste without any arguments, the command will output the Clipboard contents straight into my command line.
Let’s say I want the Clipboard contents to go into a file. For that, I just add an argument:
That would insert the contents of the Clipboard into a file called file.txt .
That’s all cool and stuff, but what about filtering through the data? Take a look at this.
When I ran that set of commands just now, it generated a 430-line text file. What if I wanted to fiilter it to certain processes? For that, I use grep alongside either pbcopy or pbpaste . So, I do this:
Now I have a much more manageable text file; it’s only six lines instead of 430.
But Wait, There’s More
The pbcopy and pbpaste commands are insanely powerful, and I’m not even fully fluent in the intricacies of making the most of them. For example, there are multiple Clibpoards, or pasteboards, that the Terminal commands can work with. You can also specify what type of data to look for first in the pasteboard — plain text, rich text, or Encapsulated PostScript.
If you want to really brush up on how to use pbcopy and pbpaste , I recommend reading through man pbcopy in the Terminal. There are also several topics in the ADC Reference Library available to paid registered developers. These topics include:
- Cocoa > Interapplication Communication > Copying and Pasting
- Carbon > Interapplication Communication > Pasteboard Manager Programming Guide
- Carbon > Interapplication Communication > Pasteboard Manager Reference.
As you can see, these are some pretty powerful commands. I’d say add them to my list of the five best Terminal commands you need to know about.
Источник


