- Question: Q: how do i create a new folder in finder
- Helpful answers
- Organise files in folders on Mac
- Create a folder
- Move items into folders
- Quickly group multiple items into a new folder
- Merge two folders with the same name
- Ways to organise files on your Mac desktop
- Organise items into folders
- Use stacks to organise files automatically
- Arrange files on your desktop
- Change icon size, grid spacing, text size and more
- How to create folders on a Mac computer and organize your files
- How to create a folder on a Mac computer
- Approach #1
- Approach #2
- How to edit and add files to a folder on a Mac
- How to create folders on a Mac
- 3 ways to make a new folder on a Mac
- How to create folders via Terminal
- Create folders to clean up Mac desktop
- Customize folder icons
Question: Q: how do i create a new folder in finder
ibook g4, Mac OS X (10.4.7), norton antivirus
Posted on Feb 7, 2009 4:47 PM
Helpful answers
Then there are 2 ways you can do it.
Drag that newly created folder on top of the HD icon which will move it to the root of the drive.
In Finder>Preferences>Sidebar, check the «Computer» box, back in finder click on Computer on left, select HDD in window, then create the folder.
Feb 16, 2009 1:14 PM
Feb 16, 2009 12:31 PM
There’s more to the conversation
Loading page content
Page content loaded
The information below is in the Finder’s Help menu. Your problem creating a new folder may be due to your not having the correct window activated.
*Creating a folder*
You can create folders to organize your files and applications.
In a Finder window, open the location where you want to create the new folder.
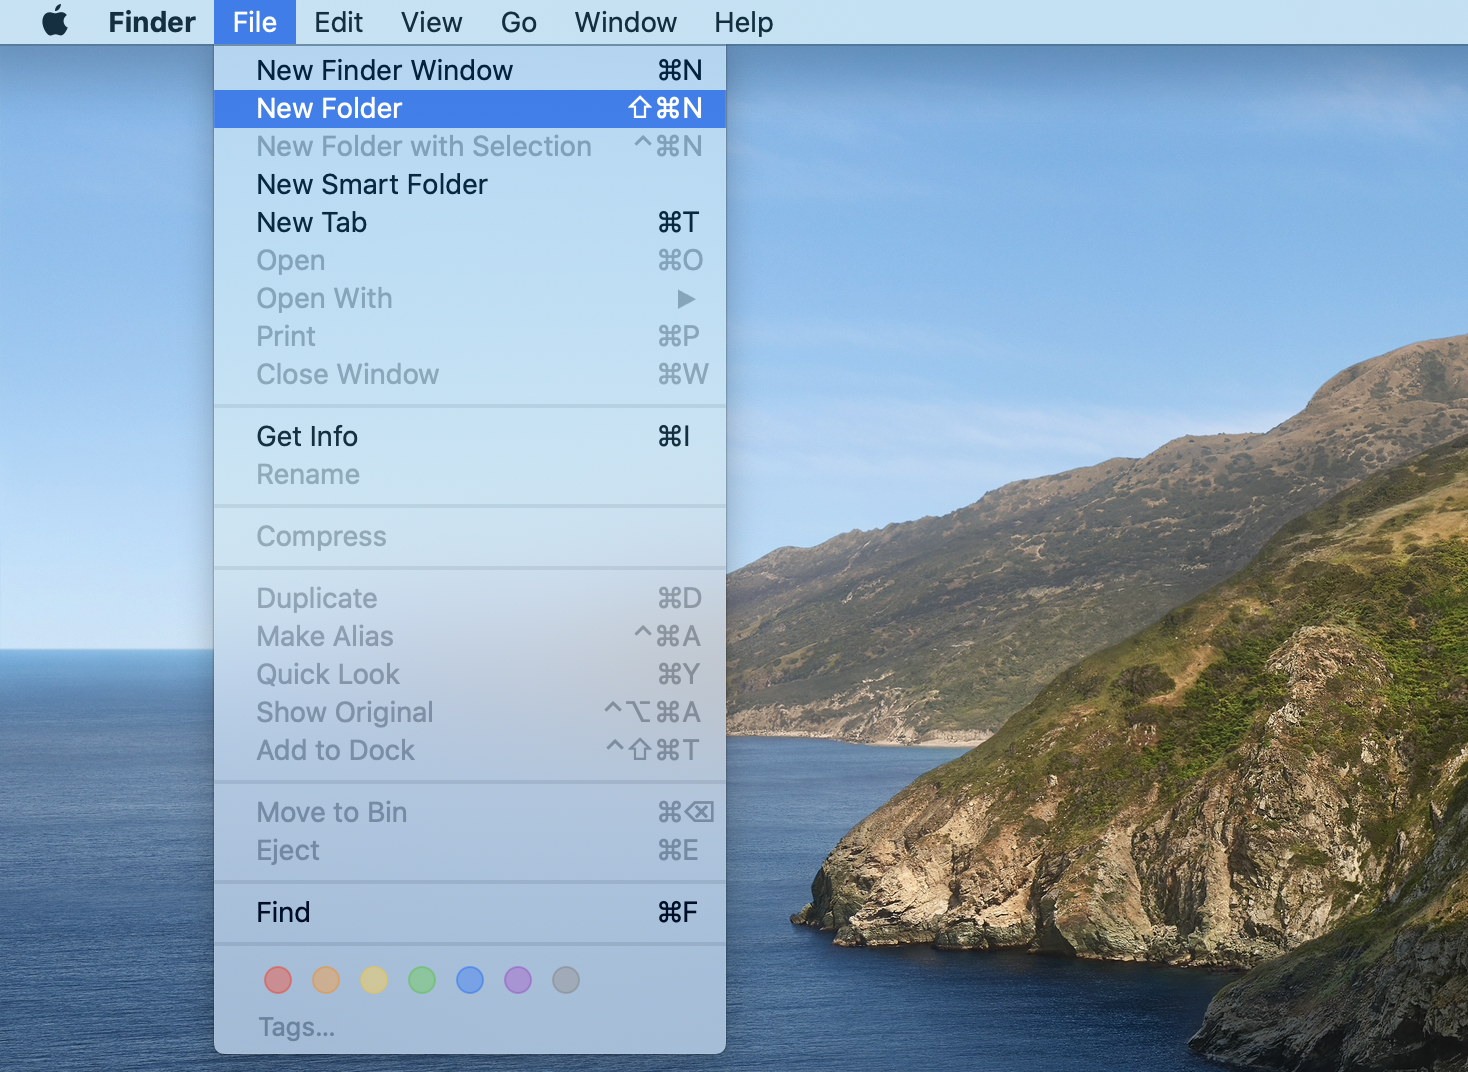
Choose File > New Folder.
To give the folder a new name, select it, then click its current name. Type a name for the folder and press Return.
If the New Folder command is dimmed, you do not have permission to create a folder inside the folder you opened.
*Changing the icon of a file or folder*
You can use custom icons for any file or folder in the Finder. You can create your own icons or download icons from websites on the Internet. Once you have custom images, you can replace icons for items.
In the Finder, select a file whose icon you want to use.
Choose File > Get Info.
Click the icon in the Info window and choose Edit > Copy.
Select the file whose icon you want to replace and choose File > Get Info.
Select the icon in the Info window and choose Edit > Paste.
Источник
Organise files in folders on Mac
Everything on your Mac — documents, pictures, music, apps and more — is organised in folders. As you create documents, install apps and do other work, you can create new folders to keep yourself organised.
Create a folder
On your Mac, click the Finder icon  in the Dock to open a Finder window, then navigate to where you want to create the folder.
Alternatively, click the desktop if you want to create the folder on the desktop.
Choose File > New Folder, or press Shift-Command-N.
If the New Folder command is dimmed, you can’t create a folder in the current location.
Enter a name for the folder, then press Return.
Move items into folders
On your Mac, click the Finder icon in the Dock to open a Finder window.
Do any of the following:
Put an item in a folder: Drag it to the folder.
Put several items in a folder: Select the items, then drag one of the items to the folder.
All selected items move to the folder.
Keep an item in its original location and put a copy in a folder: Select the item, press and hold the Option key, then drag the item to the folder.
Keep an item in its original location and put an alias for it in a new folder: Press and hold the Option and Command keys, then drag the item to the folder to create the alias.
Make a copy of an item within the same folder: Select the item, then choose File > Duplicate or press Command-D.
Copy files to a different disk: Drag the files to the disk.
Move files to a different disk: Press and hold the Command key, then drag the files to the disk.
Quickly group multiple items into a new folder
You can quickly create a folder of items on the desktop or in a Finder window.
On your Mac, select all the items you want to group together.
Control-click one of the selected items, then choose New Folder with Selection.
Enter a name for the folder, then press Return.
Merge two folders with the same name
If you have two folders with identical names at two different locations, you can merge them into a single folder.
On your Mac, press and hold the Option key, then drag one folder to the location that contains a folder with the same name. In the dialogue that appears, click Merge.
The Merge option appears only if one of the folders contains items that are not in the other folder. If the folders contain different versions of identically named files, the only options are Stop or Replace.
To keep a handy list of files together that have something in common, based on criteria you specify, use a Smart Folder.
Источник
Ways to organise files on your Mac desktop
The desktop takes up most of your screen, and it’s the area where you’ll do most of your work. If you keep files — documents, folders and aliases — on your desktop, you can organise them to make it easier to find the items you need.
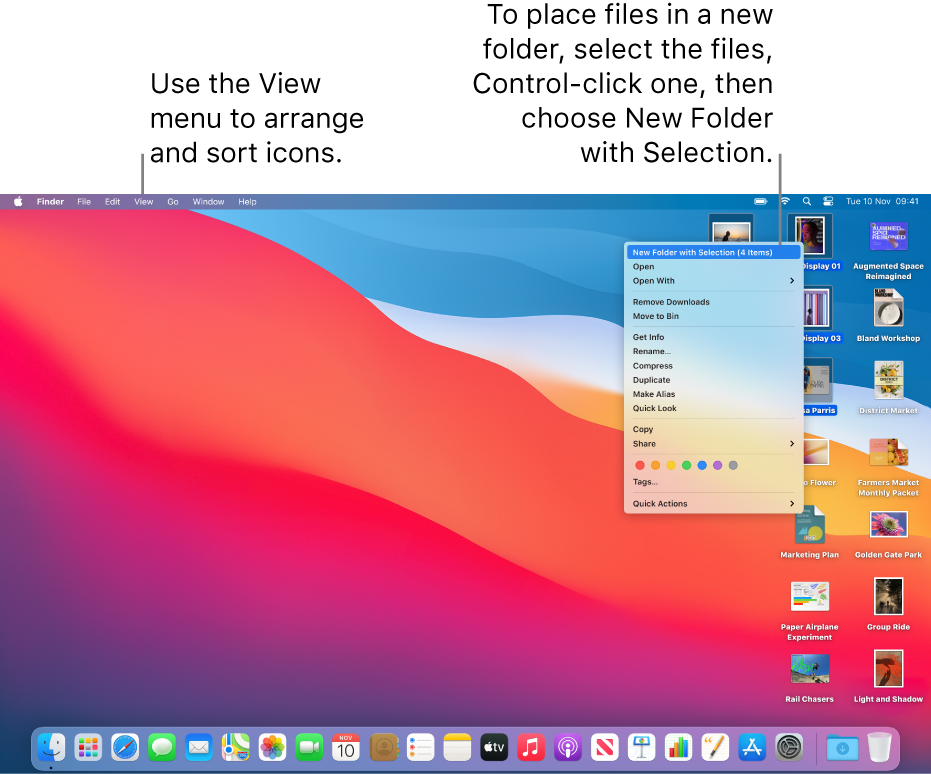
Organise items into folders
You can quickly group items on the desktop into folders. Select all the items you want to group, Control-click one of the items, then choose New Folder with Selection. (Locked items can’t be grouped.)
Use stacks to organise files automatically
Stacks helps you keep files organised in tidy groups on the desktop. You can group stacks by kind, date or tags. When you group by kind, all your images go in one stack, presentations in another, and so on. Any new files you add go immediately to the correct stack — helping you keep everything in order automatically.
Arrange files on your desktop
The desktop gives you many different ways to arrange the files you’re working on. You can keep your files sorted by name, kind, date added, size, tags and more. Click the desktop, choose View > Sort By, then choose an option. If you want to control the placement of your files on the desktop, keep Sort By set to none. You can still arrange files neatly when desired — just click the desktop, choose View > Clean Up By, then choose how you’d like to arrange the files.
Change icon size, grid spacing, text size and more
Click the desktop, choose View > Show View Options, then use the controls to make changes. You can also Control-click the desktop, then choose Show View Options. See Change view options in the Finder.
For more ways to customise the desktop, see Change Finder preferences.
Tip: If you turn on iCloud Desktop and Documents, you can get the same desktop items on another Mac by logging in with the same iCloud account and turning on iCloud Desktop and Documents on that Mac.
Источник
How to create folders on a Mac computer and organize your files
If you want a Mac with a clean desktop, where all your many files are orderly and easy to find, then you’re going to have to get comfortable using folders.
Analogous to the actual cardboard hardware for which a computer folder is named, on a Mac, folders can be used to store any type of file, from a text document to a spreadsheet to photos, music, and more. And you can create and use folders within folders for even more advanced organization.
But before you can use folders to clean up and bring order to your Mac, you need to know how to create them and how to move files into (or out of) them.
How to create a folder on a Mac computer
Approach #1
1. Navigate to the desktop of your Mac. The word «Finder» will be displayed at the top left corner of the monitor beside the apple icon once you’re there — if it says anything else, like «Safari» or «Word,» you are technically still in that program, so just click on an empty space on your desktop.
2. Click the word «File» beside «Finder.»
3. Click «New Folder» from the dropdown menu.
And that’s it, new folder created.
Approach #2
1. Navigate to the desktop of your Mac.
2. Right click on your mouse , or use two fingers held close together to create a right click on your trackpad.
3. Click «New Folder» in the menu that appears.
How to edit and add files to a folder on a Mac
Once your new folder is created, it will be called «untitled folder.» To change its name, you can either do a slow double click on its name, or you can right click on the folder and then choose «Rename.»
To move files into the folder, simply drag them to it by clicking on the file in question and maneuvering it over the folder. And don’t forget that you can use these same techniques to create a new folder within the folder. And within that folder. And down deeper and deeper it goes.
If you ever want to delete a folder, you can either drag it directly to the icon for your computer’s Trash, or right click on the folder and select «Move to Trash» from the menu that appears.
Источник
How to create folders on a Mac
A proper file system is critical for keeping your digital life organized on a Mac. Too often, we allow our ‘desktop’ or ‘documents’ folder to become cluttered with random files.
Some rely on the Mac’s search feature to find files, but what about those times you can’t remember a file name? Even worse: what if the file name is some garbled string of characters instead of having a proper name, or the dreaded ‘untitled document’?
Here, we’ll show you how to create a folder on your Mac, and discuss some best practices for staying organized and productive on your Mac computer.
3 ways to make a new folder on a Mac
There are three main ways to create a new folder on your Mac:
Finder. In your Mac’s Finder utility, you can make a folder for your Mac. The folder appears wherever you currently are in your Finder file tree. Simply go to File > New folder in the Finder menu.
Mouse or trackpad shortcut. From your desktop or in the Finder file system, simply right-click (mouse) or two-finger tap (trackpad) to bring up a menu; the first option is ‘new folder,’ which creates a new empty folder wherever in the system you are.

File selection. Most often used for sub-folders, you can select multiple files and use the mouse or trackpad shortcuts above to create a new folder that has those files in it.

How to create folders via Terminal
Your Mac’s Terminal features is powerful; it’s essentially root access to your entire machine. You can create a file or folder in Terminal, but a word of caution before you proceed: don’t mess with Terminal unless you’re really confident in what you’re doing.
But when you need to create folders Mac terminal is really powerful. Here, we’ll go through how to create a folder on the desktop using your Mac’s Terminal.
- Launch Terminal on your Mac
- Type ‘ cd desktop ‘ into Terminal
- Press enter
- Type ‘ mkdir test-folder-1 ‘
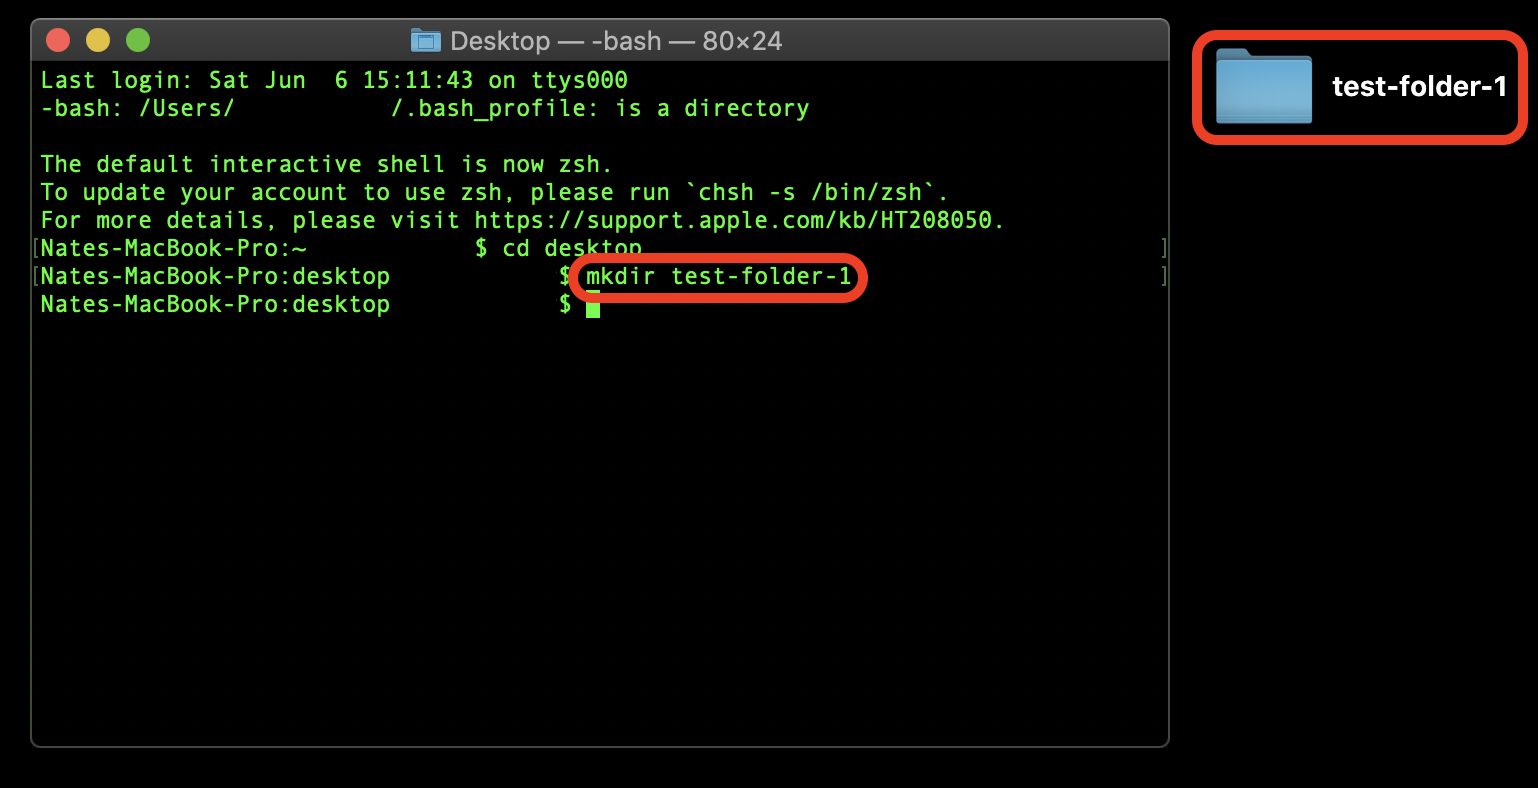
That’s all you have to do! So, a few notes on Terminal commands for creating files and folders. The term ‘cd’ means ‘change directory.’ It’s a navigation command; you could also ‘cd’ into documents, downloads, or any other main destination.
Keep in mind you can’t change directory straight into a sub-folder. If you wanted to access a folder named ‘personal’ in your ‘documents’ folder, you would have to ‘cd’ into documents, then ‘cd’ into personal. It’s a bit laborious.
The ‘mkdir’ command means ‘make directory.’ In computer-speak, any folder is a directory. In the above commands, we’re telling the Mac to go to the desktop and make a folder named ‘test-folder-1.’
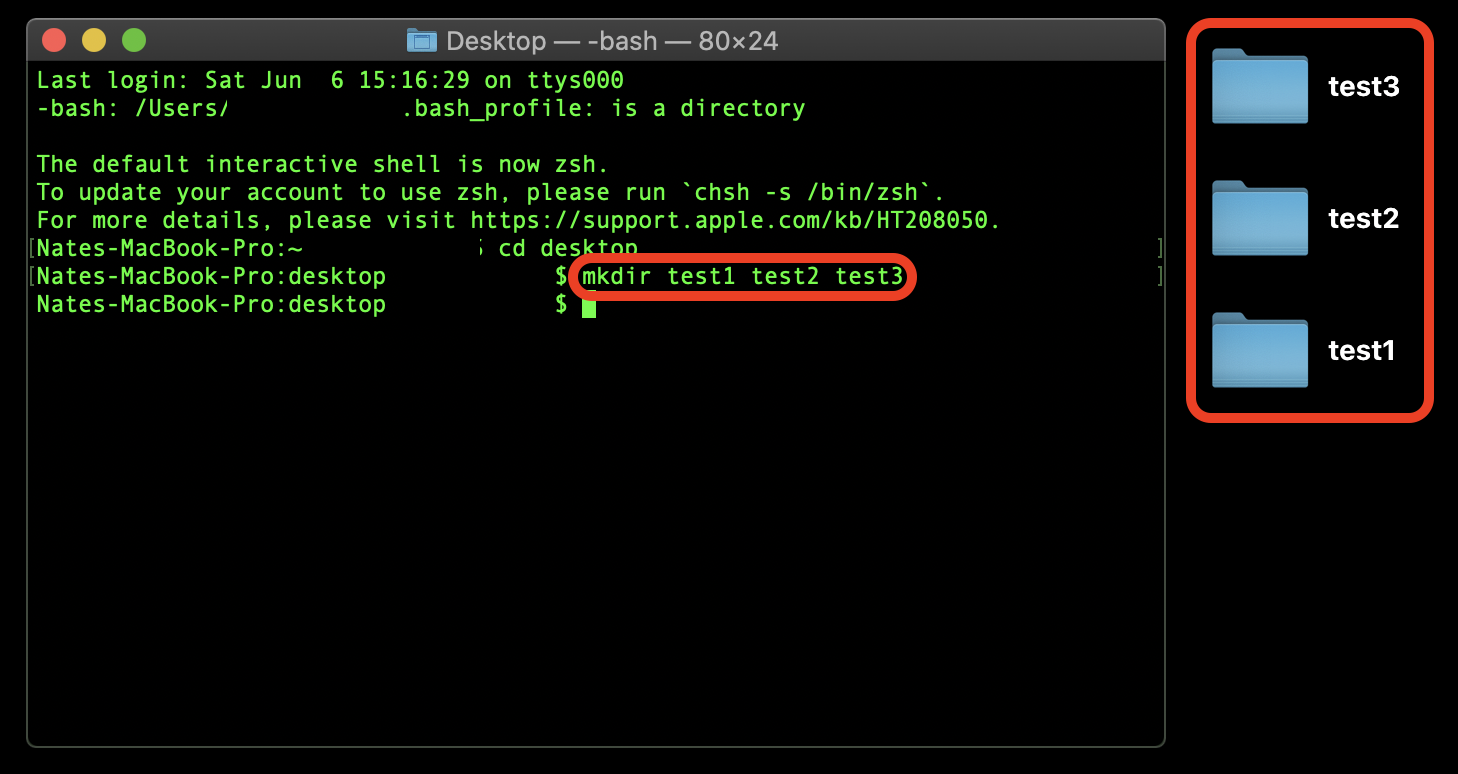
But there’s one great time-saving trick for Terminal: you can create multiple files with one command. Here’s how:
- Launch Terminal on your Mac
- Type ‘ cd desktop ‘ into Terminal
- Press enter
- Type ‘ mkdir test1 test2 test3 ‘
As you can see, this creates three new folders on the desktop. Every time you hit the space bar after the first folder name in a ‘mkdir’ command, Terminal understands it as a new ‘mkdir’ command.
Create folders to clean up Mac desktop
If you don’t feel like remembering all the terminal commands or want a fresh way to create and organize folders on your Mac, you can try some alternative tools.
Spotless is a great tool to manage your files by simply dragging and dropping them onto the app’s pop-up drawer in your Menu bar. Set the rules to sort your files and don’t worry about organizing your desktop anymore!

You can create a schedule for Spotless to organize files on your desktop according to your preferences and the app will automatically take care of the random files.
Let’s say you’re working with three different clients and saving all the related docs to your desktop. Just add ‘client1’, ‘client2’, and ‘client3’, respectively, to your file names, set a rule in Spotless to clean them up in their own folders at the end of the day/week, and there you go – your files will be organized automatically, without you having to sort through them a month later when your desktop is a complete and hopeless mess!
Pro tip: You can also set Spotless to send some items straight to Trash (in case you are creating a lot of temp files which you won’t need later).
This is a feature we really like about Spotless. If you’re the type to create new files instead of updating old ones, Spotless can help mitigate duplicate files by offering to replace newer versions of documents. If you had two versions of ‘invoice-for-house-client1’ and Spotless noticed you wanted them in the same folder, it would tell you there are multiple versions.
From there, it would ask if you wanted to keep both, or replace the older version. This can also be automated. Depending on your workflow, you can choose to have any duplicate file replaced, or keep both. There’s even a confirmation page within Spotless for confirming the changes, and the app keeps track of every cleanup it’s done so you can reverse-engineer when a file may have been replaced.
These conflict resolution patterns, automation, and scheduling features help make Spotless a really useful tool when managing your Mac’s file system.
For those who prefer a lighter tough with handling files on the Mac desktop, there’s Stacks. It’s a built-in Mac utility that organizes desktop files into – yes, stacks. Simply right-click on your desktop and select ‘use stacks’ from the menu. Your Mac will place like files – such as PDFs, images, and text documents – together. It’s really handy for quickly cleaning up a desktop, and keeping it clean, but it’s imperfect.
Keep in mind when you use Stacks, it will be active until you disable the feature. So any new PDFs, for instance, will be placed in the PDF stack rather than standing along on your desktop.
Customize folder icons
An integral part of your folder creation and management are the icons. Did you know that you can customize them?
Image2Icon is a small handy app that can help you do that in three simple steps.
- Drop the image you want to use for the icon into Image2Icon:
- Select your folder icon type:
- Drop the file or folder you want to use the icon for into the circle.
You can color-code your icons, use images that closely correspond to the content, or use Image2Icon to create a unified custom desktop that’s pleasing to look at and unique.
Be as creative with this as you wish.
That’s why we prefer Spotless. The app is wonderful for quick and easy management of your file structure and folders. We especially love that it can be automated, too; it’s a really practical addition to any workflow, and even those who aren’t very busy with creating or editing documents will find Spotless useful. You can set the app to run on your schedule. Maybe a once-a-month cleaning of your file system is in order!
And if you want to customize your icons and make your work experience more visual – use Image2Icon to create unique icons for your folders.
Both apps are available free during a seven-day trial of Setapp, the leading suite of productivity apps available for your Mac. In addition to these two apps, you’ll gain unlimited access to tons of others spanning a wide variety of use-cases. No matter what your needs are, Setapp has great apps you’ll love.
Источник


