- Интересно, как я могу удалить все мои файлы, связанные с python, на Mac
- Шпаргалка: Горячие (hotkeys) клавиши PhpStorm и PyCharm
- Редактирование
- Поиск / замена
- Разное
- Install PyCharm
- System requirements
- Install using the Toolbox App
- Install the Toolbox App
- Install the Toolbox App
- Install the Toolbox App
- Standalone installation
- Install using tar archives
- Install using snap packages
- Silent installation on Windows
- Silent configuration file
Интересно, как я могу удалить все мои файлы, связанные с python, на Mac
Поэтому я пытался установить kivy, что привело меня к установке пипса, и я спустился в кроличью нору с изменяющимися каталогами. Я использую PyCharm для записи.
Я хотел бы удалить все связанные с python (включая все библиотеки, такие как pip) с моего компьютера, и начать с пустых каталогов, поэтому, когда я снова загружу pycharm, проблем не будет.
Я использую Mac, поэтому, если кто-нибудь из вас может дать мне знать, как это сделать на Mac, было бы весьма полезно.
Могу ли я просто открыть finder, искать python и удалить все файлы (есть тонны) или это будет слишком разрушительно? Надеюсь, я достаточно четко изложил свою ситуацию, прошу прокомментировать любые вопросы, чтобы прояснить ситуацию.
Кажется, что работа по переустановке. Киви и Пип теперь работают!
Примечание. У меня возникла проблема: “Я ВЕРЮ, что я перепутал мой каталог пиков (как в том месте, где находился пип), и попытался установить слишком много раз. Force reinstall Я предполагаю, что удалил ненужные файлы pip и переустановил более чистую версию.
Если вы знакомы с приложением терминалов, вы можете использовать командные строки для удаления Python с вашего Mac. Для этого выполните следующие действия:
- Переместите Python в корзину.
- Откройте приложение “Терминал” и введите следующую команду в окне:
alexa $ sudo rm -rf/Applications/Python\3.6/
И для PyCharm:
Или, если этого будет недостаточно:
Перейдите в Приложения> щелкните правой кнопкой мыши PyCharm> переместить в корзину
откройте терминал и запустите следующее: find
/Library / -iname “pycharm”
убедитесь, что все результаты на самом деле связаны с PyCharm, а не что-то еще важное, что вам нужно сохранить. Затем удалите их все с помощью команды: find
/Library -iname “pycharm” -exec rm -r “<>” \;
Источник
Шпаргалка: Горячие (hotkeys) клавиши PhpStorm и PyCharm

Горячих клавиш в IDE PhpStorm и PyCharm гораздо больше, чем в приведенном ниже списке. Здесь я привел только те, которыми пользуюсь сам (* звездочкой выделил наиболее используемые мною горячие клавиши).
Шпаргалка будет обновляться, если начну использовать новые hotkeys.
Для настройки горячих клавиш или добавление собственных сочетаний клавиш перейдите File > Settings > Keymap.
Редактирование
*Ctrl + W — выделение текущего блока. Если нажимать W несколько раз, то будут выделяться родительские блоки по иерархии.
Ctrl + Shift + W — проделывает обратное действие от предыдущего
Ctrl + Y — удаляет строку
*Ctrl + D — дублирует строку
Ctrl + Shift + U — делает выделенный текст или заглавными, или строчными буквами
Ctrl + Delete — удаляет часть от курсора до конца слова
*Ctrl + Alt + L — форматирование кода соответствии с настройками code style.
Ctrl + Shift + V — вставка из истории буфера. Сейчас я пользуюсь *Win + V , стандартным буфером Windows 10 с историей.
*Ctrl + / — закомментировать/раскомментировать текущую строку.
Ctrl + Shift + / — закомментировать/раскомментировать выделенные строки кода.
Ctrl + Shift + J — к текущей строке присоединяет нижнюю.
Ctrl + [ или ] — перемещает курсор в начало или конец блока с кодом, в теле фукции, в теле цикла и т.д.
Ctrl + Shift + ] или [ — выделить код код до конца или до начала блока
*Tab — сделать отступ (табуляцию)
*SHIFT + Tab — убрать отступ
*Ctrl + Alt + Стрелка вверх — перемещает текущую строку вверх.
*Ctrl + Alt + Стрелка вниз — перемещает текущую строку вниз.
Ctrl + Shift + Стрелка вверх — перемещает текущий логический блок вверх (блок if , for и т.д.).
Ctrl + Shift + Стрелка вниз — перемещает текущий логический блок вниз
*Ctrl + Space — выводит возможные варианты автодополнения
Ctrl + курсор мыши над кодом — краткая информация
*Ctrl + клик по названию переменной или метода, или CTRL+B когда курсор установлен на названии, приведет туда, где метод или переменная определены.
*Ctrl + G — перейти к строке по номеру
*Alt + Клик левой кнопкой мышки — мультикурсор, если нужно одновременно несколько курсоров, кликаем мышкой в нужные места, куда нужно их добавить
*Ctrl + Alt + J — обрамление выделенного текста тегом (нужно выбрать первый пункт из всплывающего окошка)
F11 — быстро установить закладку
* Ctrl + F11 — добавить закладку с мнемоникой в текущую строку. В рамках проекта допускается до 10 нумерованных и до 26 буквенных закладок.
Чтобы быстрее перемещаться между нумерованными закладками внутри проекта, нажмите Ctrl+Номер нужной закладки .
Shift + F11 — просмотр всех закладок
Поиск / замена
Двойной Shift — поиск по проекту
*Ctrl + F — поиск в текущем файле
*Ctrl + R — поиск и замена
*Ctrl+Shift+E — вызовет всплывающее окно, в котором показаны последние куски кода в разных файлах, с которыми вы работали
Ctrl + Shift + F — поиск в группе файлов (например в проекте или папке)
Ctrl + Shift + R — поиск и замена в группе файлов
Ctrl + N — найти в каком файле находится класс
*Ctrl + Shift + N — поиск файла по названию
Разное
Ctrl + Alt + S — быстрый доступ к настройкам
*Shift + F6 — переименование файла (выделите в блоке с файлами проекта нужный файл).
Источник
Install PyCharm
PyCharm is a cross-platform IDE that provides consistent experience on the Windows, macOS, and Linux operating systems.
PyCharm is available in three editions: Professional , Community , and Edu . The Community and Edu editions are open-source projects and they are free, but they have fewer features. PyCharm Edu provides courses and helps you learn programming with Python. The Professional edition is commercial, and provides an outstanding set of tools and features. For details, see the editions comparison matrix.
System requirements
| Requirement | Minimum | Recommended |
|---|---|---|
| RAM | 4 GB of free RAM | 8 GB of total system RAM |
| CPU | Any modern CPU | Multi-core CPU. PyCharm supports multithreading for different operations and processes making it faster the more CPU cores it can use. |
| Disk space | 2.5 GB and another 1 GB for caches | SSD drive with at least 5 GB of free space |
| Monitor resolution | 1024×768 | 1920×1080 |
| Operating system | Latest 64-bit version of Windows, macOS, or Linux (for example, Debian, Ubuntu, or RHEL) |
You do not need to install Java to run PyCharm because JetBrains Runtime is bundled with the IDE (based on JRE 11).
Python 2: version 2.7
Python 3: from the version 3.6 up to the version 3.10
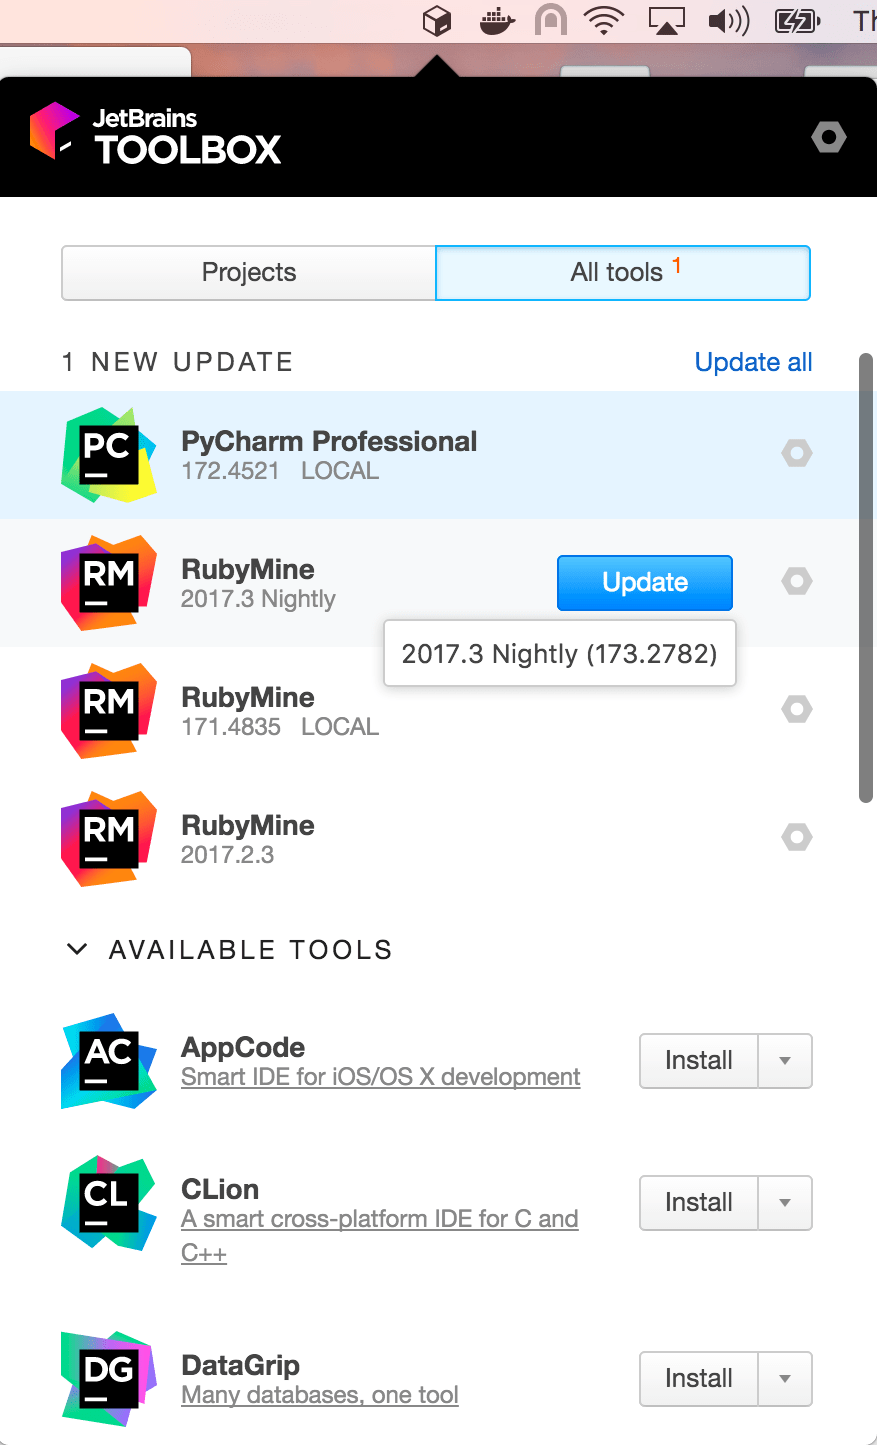
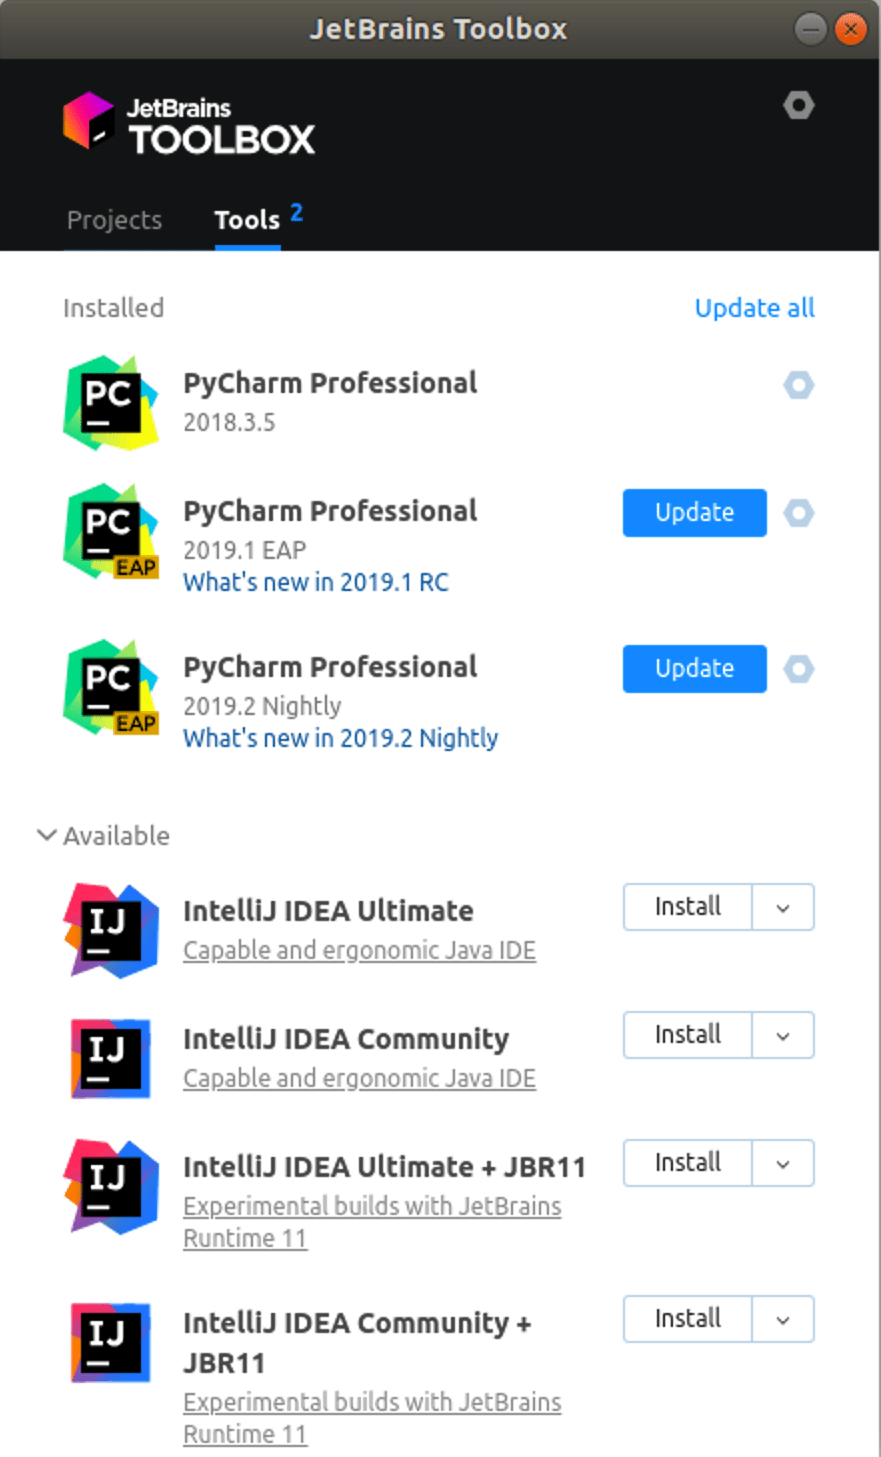
Install using the Toolbox App
The JetBrains Toolbox App is the recommended tool to install JetBrains products. Use it to install and manage different products or several versions of the same product, including Early Access Program (EAP) and Nightly releases, update and roll back when necessary, and easily remove any tool. The Toolbox App maintains a list of all your projects to quickly open any project in the right IDE and version.
Install the Toolbox App
Download the installer .exe from the Toolbox App web page.
Run the installer and follow the wizard steps.
After you run the Toolbox App, click its icon in the notification area and select which product and version you want to install.

Log in to your JetBrains Account from the Toolbox App and it will automatically activate the available licenses for any IDE that you install.
Install the Toolbox App
Download the disk image .dmg from the Toolbox App web page.
There are separate disk images for Intel and Apple Silicon processors.
Mount the image and drag the JetBrains Toolbox app to the Applications folder.
After you run the Toolbox App, click its icon in the main menu and select which product and version you want to install.
Log in to your JetBrains Account from the Toolbox App and it will automatically activate the available licenses for any IDE that you install.
Install the Toolbox App
Download the tarball .tar.gz from the Toolbox App web page.
Extract the tarball to a directory that supports file execution.
For example, if the downloaded version is 1.17.7391, you can extract it to the recommended /opt directory using the following command:
Execute the jetbrains-toolbox binary from the extracted directory to run the Toolbox App and select which product and version you want to install. After you run the Toolbox App for the first time, it will automatically add the Toolbox App icon to the main menu.
Log in to your JetBrains Account from the Toolbox App and it will automatically activate the available licenses for any IDE that you install.
You can use this shell script that automatically downloads the tarball with the latest version of the Toolbox App, extracts it to the recommended /opt directory, and creates a symbolic link in the /usr/local/bin directory.
Standalone installation
Install PyCharm manually to manage the location of every instance and all the configuration files. For example, if you have a policy that requires specific install locations.
To verify the integrity of the installer, use the SHA checksum linked from the Download page.
Run the installer and follow the wizard steps.
Mind the following options in the installation wizard
64-bit launcher : Adds a launching icon to the Desktop.
Open Folder as Project : Adds an option to the folder context menu that will allow opening the selected directory as a PyCharm project.
.py : Establishes an association with Python files to open them in PyCharm.
Add launchers dir to the PATH : Allows running this PyCharm instance from the Console without specifying the path to it.
To run PyCharm, find it in the Windows Start menu or use the desktop shortcut. You can also run the launcher batch script or executable in the installation directory under bin .
There are separate disk images for Intel and Apple Silicon processors.
To verify the integrity of the downloaded disk image, use the SHA checksum linked from the Download page.
Mount the image and drag the PyCharm app to the Applications folder.
Run the PyCharm app from the Applications directory, Launchpad, or Spotlight.
Install using tar archives
Unpack the pycharm-*.tar.gz file to a different folder, if your current Download folder doesn’t support file execution:
The recommended installation location according to the filesystem hierarchy standard (FHS) is /opt . To install PyCharm into this directory, enter the following command:
To verify integrity of the downloaded archive, use the SHA checksum linked from the Download page.
Switch to the bin subdirectory:
Run pycharm.sh from the bin subdirectory.
Install using snap packages
For Ubuntu 16.04 and later, you can use snap packages to install PyCharm.
PyCharm is distributed via two channels:
The stable channel includes only stable versions. To install the latest stable release of PyCharm, run the following command:
The —classic option is required because the PyCharm snap requires full access to the system, like a traditionally packaged application.
The edge channel includes EAP builds. To install the latest EAP build of PyCharm, run the following command:
Run pycharm-professional , pycharm-community , or pycharm-educational in the Terminal.
To create a desktop entry, do one of the following:
On the Welcome screen, click Configure | Create Desktop Entry
From the main menu, click Tools | Create Desktop Entry
When you run PyCharm for the first time, some steps are required to complete the installation, customize your instance, and start working with the IDE.
For information about the location of the default IDE directories with user-specific files, see Directories used by the IDE.
Silent installation on Windows
Silent installation is performed without any user interface. It can be used by network administrators to install PyCharm on a number of machines and avoid interrupting other users.
To perform silent install, run the installer with the following switches:
/S : Enable silent install
/CONFIG : Specify the path to the silent configuration file
/D : Specify the path to the installation directory
This parameter must be the last in the command line and it should not contain any quotes even if the path contains blank spaces.
To check for issues during the installation process, add the /LOG switch with the log file path and name between the /S and /D parameters. The installer will generate the specified log file. For example:
Silent configuration file
The silent configuration file defines the options for installing PyCharm. With the default options, silent installation is performed only for the current user: mode=user . If you want to install PyCharm for all users, change the value of the installation mode option to mode=admin and run the installer as an administrator.
The default silent configuration file is unique for each JetBrains product. You can modify it to enable or disable various installation options as necessary.
It is possible to perform silent installation without the configuration file. In this case, omit the /CONFIG switch and run the installer as an administrator. Without the silent configuration file, the installer will ignore all additional options: it will not create desktop shortcuts, add associations, or update the PATH variable. However, it will still create a shortcut in the Start menu under JetBrains .
Источник


