- Как отключить обновления на Mac
- Отключение автоматических обновлений в MacOS
- Как отключить автоматические обновления на Mac
- Как отключить обновления Mac OS
- Отключение автообновления
- Игнорирование новых версий ОС
- Как убрать индикатор?
- Как отказаться от обновлений совсем?
- Как включить автообновление?
- How to Enable or Disable Automatic Updates on Mac
- macOS automatic update options
- How to Disable/Enable Auto Apps Updates on Mac macOS Monterey, Big Sur or Earlier
- Steps for Enabling Auto Updates Apps on Mac OS X and installed Apps on Mac
- macOS 12, macOS Big Sur, Catalina, Mojave or Newer On Mac
- Method 2: Auto-Download Updates for Apps on MacBook, Mac
- Disable Software Update Using Terminal Command on MacBook
- [Older MacOS] Here You Can get the idea on a turn/ enable auto-updates on Mac OS X Yosemite or Mavericks.
- jaysukh patel
Как отключить обновления на Mac
 Как и другие операционные системы, MacOS то и дело пытается установить обновления. Обычно это происходит автоматически ночью, когда вы не используете свой MacBook или iMac, при условии, что он не выключен и подключен к сети, но в некоторых случаях (например, если какое-то запущенное ПО мешает обновлению), вы можете ежедневно получать уведомление о том, что не удалось установить обновления с предложением сделать это сейчас или напомнить позже: через час или завтра.
В этой простой инструкции о том, как отключить автоматические обновления на Mac, если по какой-то причине вы предпочитаете взять контроль за ними полностью на себя и выполнять их вручную. См. также: Как отключить обновления на iPhone.
Отключение автоматических обновлений в MacOS
Прежде всего отмечу, что обновления ОС все-таки лучше устанавливать, так что даже если вы отключите их, рекомендую иногда выделять время на ручную установку выпущенных обновлений: они могут устранять ошибки, закрывать дыры в безопасности и исправлять какие-то еще нюансы в работе вашего Mac.
В остальном же отключение обновлений MacOS не представляет сложностей и выполняется куда проще, чем отключение обновлений Windows 10 (где они после отключения автоматически включаются снова).
Шаги будут следующими:
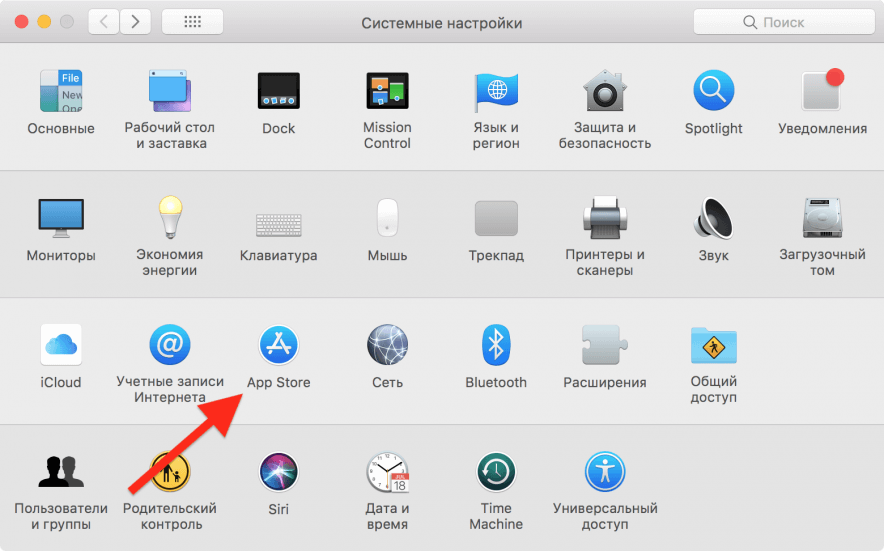
- В главном меню (нажав по «яблоку» вверху слева) откройте системные настройки Mac OS.

- Выберите пункт «Обновление ПО».
- В окне «Обновление ПО» вы можете просто снять отметку «Автоматически устанавливать обновления ПО» (затем подтвердить отключение и ввести пароль аккаунта), но лучше зайти в раздел «Дополнительно».
- В разделе «Дополнительно» снимите отметки с тех пунктов, которые требуется отключить (отключение первого пункта снимает отметки и для всех остальных пунктов), здесь доступны отключение проверки наличия обновлений, автоматической загрузки обновлений, отдельно установка обновлений MacOS и программ из магазина App Store. Для применения изменений потребуется ввод пароля учетной записи.
- Примените сделанные настройки.


На этом весь процесс отключения обновлений ОС на Mac завершен.
В дальнейшем, если вы захотите установить обновления вручную, зайдите в системные настройки — обновление ПО: будет выполнен поиск доступных обновлений с возможностью их установить. Там же можно будет вновь включить автоматическую установку обновлений Mac OS при необходимости.
Дополнительно, вы можете отключить обновления приложений из App Store в настройках самого магазина приложений: запускаем App Store, в главном меню открываем настройки и снимает отметку «Автоматические обновления».
Источник
Как отключить автоматические обновления на Mac

Всего несколько кликов.
Иногда уведомления о доступных обновлениях приходят в самый неподходящий момент. Решение проблемы простое — отключить автоматический поиск апдейтов. Если у вас старенький Mac, которому новые версии операционной системы грозят падением производительности, советуем дочитать инструкцию до конца.
Важно! Помните, что отключая обновления вы лишаетесь регулярных патчей и улучшений стабильности и производительности. Система может стать уязвимой к вирусам и другим угрозам безопасности. С другой стороны, апдейты всегда можно включить обратно.
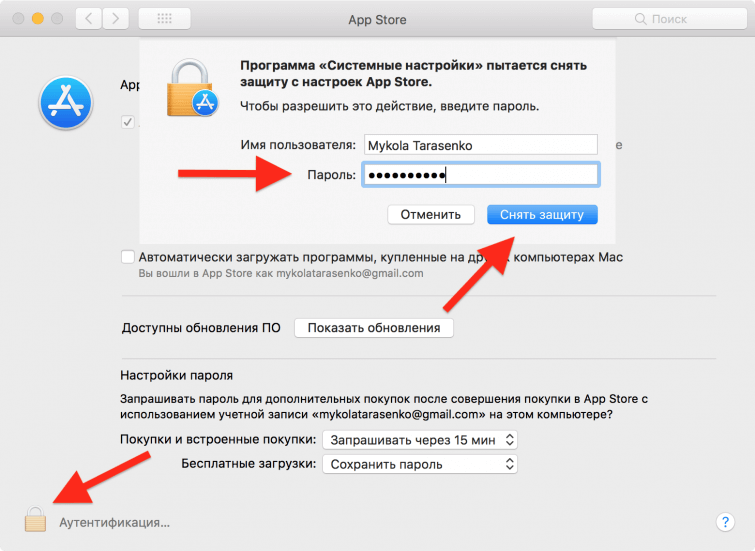
Чтобы отключить функцию автоматического поиска обновлений, откройте меню «Системные настройки» — App Store. Здесь вы увидите, что Mac делает с доступными апдейтами.

Нажмите на замок в нижнем левом углу и введите пароль учетной записи. Так вы сможете менять системные настройки.

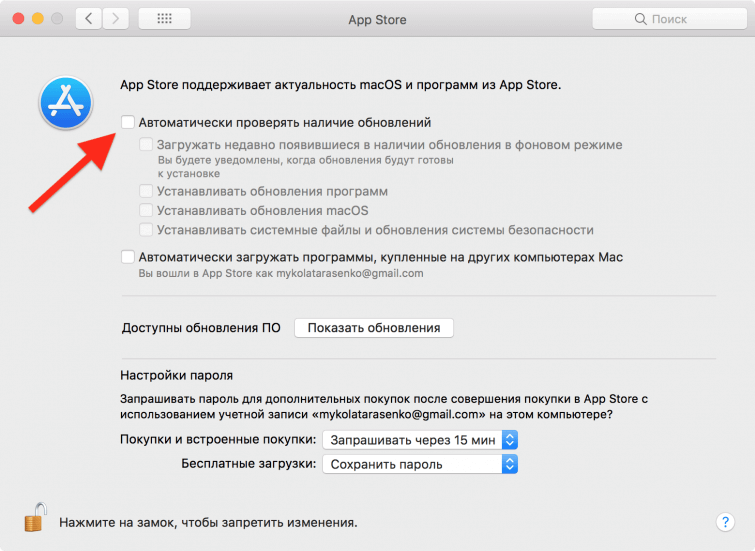
Чтобы отключить поиск обновлений, их загрузку и автоматическую установку, уберите отметку напротив опции «Автоматически проверять наличие обновлений». Закройте окно меню настроек.

Чтобы убедиться, что место на жестком диске не занимает установочный файл macOS, перейдите в меню Finder — «Программы» и посмотрите, нет ли там программы с названием Install macOS High Sierra. Если нашли такую, удалите — так вы осовободите место на накопителе.

После отключения автоматического поиска обновлений вы не будете видеть уведомлений о доступных версиях операционной системы и приложений. Тем не менее апдейты можно будет установить вручную.
Источник
Как отключить обновления Mac OS
MacOS, как и любая другая операционная система, постоянно пытается самостоятельно установить обновления. Запускаются они обычно ночью, если устройство включено и заряжается от сети. Если что-то помешало автообновлению ОС, то ежедневно компьютер будет уведомлять вас об этом и просить выбрать новое время запуска загрузки.
Не все новые обновления операционных систем устраивают пользователей техники Apple. Например, в MacOS Catalina, которую выпустили в 2019 году, не работала часть приложений. Владельцы устройств Mac неоднократно пожалели о переходе на эту версию.
Но что делать, если на компьютере включено автообновление ОС? Ведь компьютер постоянно будет показывать уведомления о наличии новых обновлений, и предлагать выбрать время их запуска. Чтобы такого не было, необходимо:
- Отключить автообновление.
- Поменять настройки, чтобы устройство не реагировала на наличие новых версий ОС.
- Убрать значок наличия обновления на иконке настроек.
Начнем с разбора первого пункта.
Отключение автообновления
Важно! Помните, что отключая обновления вы лишаетесь регулярных патчей и улучшений стабильности и производительности. Система может стать уязвимой к вирусам и другим угрозам безопасности. С другой стороны, апдейты всегда можно включить обратно.
Чтобы устройство самостоятельно не запускало установку нового обновления, нужно:
- Перейти в раздел настроек.
- Выбрать пункт «App Store».
Нажмите на замок в нижнем левом углу и введите пароль учетной записи. Так вы сможете менять системные настройки.
Уберите отметку напротив опции «Автоматически проверять наличие обновлений». Закройте окно меню настроек.
Игнорирование новых версий ОС
Теперь нужно настроить систему так, чтобы она игнорировала новые обновления. Для этого понадобится приложение «Терминал». В командной строке необходимо ввести команду «sudo softwareupdate «macOS Catalina» –ignore». Команда предназначена для версии «Catalina». Вместо нее вы можете указать любую другую MacOS. Этот запрос снова нужно будет подтвердить введением пароля администратора.
Далее следует перейти в раздел обновления программного обеспечения в настройках. Здесь можно проверить, видит ли компьютер наличие обновленных версий MacOS. Если в окне не высветилась ОС, которую вы указали в командной строке, значит всё выполнено верно.
Как убрать индикатор?
Чтобы убрать значок наличия обновления системы, нужно обнулить счетчик уведомлений Dock и перезагрузить его. Это будем делать так же в приложении «Терминал».
В командной строке вводим следующие строчки по очереди:
- «defaults write com.apple.systempreferences AttentionPrefBundleIDs 0».
- «killall Dock».
Нажимаем «Enter». Теперь индикатор обновления пропал.
Как отказаться от обновлений совсем?
Для полного отказа от загрузки обновлений системы, нужно:
- Перейти в менеджер файлов.
- Найти папку Библиотеки.
- Открыть вкладку Bundles.
- Найти документ под названием «OSXNotification.bundle». Переместить его на рабочий стол. Этот документ понадобится в будущем, если вы захотите включить автообновление.
- Открыть приложение «Терминал».
- В командную строку вписать: «softwareupdate –ignore macOSInstallerNotification_GM».
- Кликнуть на Enter.
- Перезагрузить компьютер.
После перезагрузки Mac не будет загружать новые версии операционной системы.
Как включить автообновление?
Не всегда отключение автообновления целесообразно. Разработчики MacOS постоянно работают над усовершенствованием системы безопасности и устраняют ее слабые места. Если вы не будете обновлять компьютер, то рискуете стать жертвой хакеров.
Вернуть автообновление Mac можно по следующему алгоритму:
- Запустить менеджер файлов Finder
- Поместить в папку «Bundles» файл, который сохранили при отключении автообновления.
- Открыть командную строку и вписать в нее «softwareupdate –reset-ignored».
- Нажать «Enter»
- Перезагрузить систему.
Теперь на компьютер снова будут приходить обновления MacOS.
Источник
How to Enable or Disable Automatic Updates on Mac

- You can disable automatic app and OS updates on Mac
- It’s possible to enable automatic downloads and update manually
- This helps if you find updates interrupting your workflow
These days enabling automatic updates has become the norm on practically every operating system. This has its benefits — you don’t have to manually download updates to apps and all critical security patches are downloaded automatically to your phone or computer.
Enabling automatic updates on a smartphone doesn’t really bother most people. Sometimes apps may start crashing after updates but by and large, apps continue to work as expected after updates. You’re also unlikely to be using a bunch of apps at the same time. However, that’s not true on a Mac or a PC.
At any point we’ve got at least eight apps open. Enabling automatic updates is convenient but not the best idea because apps have to be closed before installation can begin. That prompt tends to interrupt our workflow and we’d rather not deal with it in the middle of the work day.
First up, let’s figure out how to enable or disable automatic updates on Mac.
- Click the Apple logo on the top left and open System Preferences.
- Click on App Store. Now you’ll see a bunch of options dealing with automatic updates on macOS.
- To disable automatic updates, click on the tick mark next to Automatically check for updates to uncheck it, which is checked by default.
- To enable automatic updates, click the empty box next to Automatically check for updates. You’ll see a tick mark in the box now.
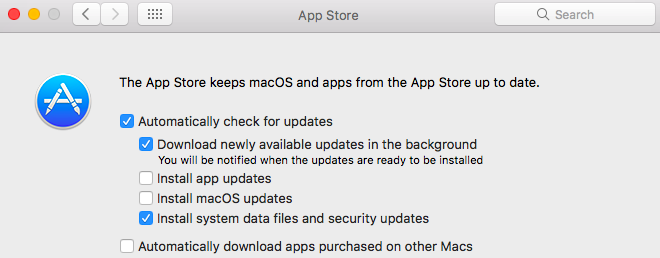
macOS automatic update options
That covers the basics. If you follow these steps, you will either enable or disable the system’s automatic checks for app and macOS updates. There are other options here that let you choose when you want to download and install updates.
The first option is Download available updates in the background. This is enabled by default and macOS automatically downloads all updates in the background and prompts you when they are ready to install. If you disable this, you’ll simply get a notification stating that updates are available. Downloading updates in the background is generally a good idea as you don’t have to wait for downloads to complete when you manually update. However, if you often use cellular data on your Mac, you might end up with a big data bill if you leave this option checked.
The second option is Install app updates and the third one is Install macOS updates. If you enable these both, the system will automatically install — not just download — all updates. We don’t recommend this for most people as it tends to interrupt what you’re doing and gives updates first priority. These options are not enabled by default.
The fourth option is Install system data files and security updates. This is also enabled by default and we recommend that you let it be enabled. It pushes critical security patches to your Mac as soon as they are available, so it’s best have this on at all times.
This should answer your queries around automatic updates on macOS. For OS updates, macOS also lets you automatically install them late at night when you aren’t using the machine. This option pops up as a notification to install updates when you are working, but you can snooze that and have the updates installed at night.
For more tutorials, visit our How To section.
For the latest tech news and reviews, follow Gadgets 360 on Twitter, Facebook, and Google News. For the latest videos on gadgets and tech, subscribe to our YouTube channel.
Источник
How to Disable/Enable Auto Apps Updates on Mac macOS Monterey, Big Sur or Earlier
Last Updated on Jun 5, 2021
Now everything you can manage (disable/ enable auto-updates on Mac OS X) about new updates coming from Apple for your system OS X or install apps in your system. Before this time you don’t have to manage means turn or disable new updates when it will available. after the first OS X release every time Apple gave new updates with some bug fixing and minor system problems. Also, Apple Giving continues new updates in all macOS versions, Care you, Mac, with these tricks, at that time users waiting for all updates should be done when update notification comes. But in the future, you can update this setting for Manually checking new updates on OS X and Apps .
we are happy to help you, submit this Form, if your solution is not covered in this article.
here, auto-updates might cause data loss problems (Not all the time) So you have to enable auto time machine backup.
Automatically updates you can set all the Mac devices: iMac Pro, iMac, Mac Mini, MacBook, MacBook Pro, and MacBook Air.
Steps for Enabling Auto Updates Apps on Mac OS X and installed Apps on Mac
macOS 12, macOS Big Sur, Catalina, Mojave or Newer On Mac
Follow the below steps to enable Auto-Update Apps from the Mac App Store and install it automatically on Mac after download from Mac App Store. This Automatically download and installing process keep your Mac up-to-date and Save lots of time behind regular chack by the mac Owner. Also, these settings fix the error that’s related to an incompatibility with the Outdated macOS Version or App Version as well. So, we recommend to turn it on and Experience the best practice on your Personal Computer.
- Go to the Apple logo from the top mac menu.
- Next, click on the System Preferences option.
- Now, Click on Software Update under the System Preferences option.
Method 2: Auto-Download Updates for Apps on MacBook, Mac
we can download apps update on your MacBook, Mac automatically. This is another method to Allow this settings for you. Follow the below steps,
- Open App Store on Mac from Spotlight Search or Launchpad.
- Next, From the Top Mac Menu App Store > Click on Preferences.
Disable Software Update Using Terminal Command on MacBook
If the above steps are not helpful because of an internal macOS Bug or any Other reason then use the Terminal command. and Stop macOS update in progress.
- Open Terminal on your Mac using Spotlight Search or From Launchpad.
- Type below command and Hit the return to run.
If the installation is stuck and Re-start download, Install macOS process then, First Delete macOS Setup file from the applications folder.
- Open Finder on Mac > Go from top menu > Applications [Search macOS Setup file and Delete].
[Older MacOS] Here You Can get the idea on a turn/ enable auto-updates on Mac OS X Yosemite or Mavericks.
- 1: Go to the Apple menu from the top bar.
- 2: Then, Click on the System Preference option.
- 3: Next, Click on the App Store.
- 4: Setting Mainly Divided into different portions, Free updates, and Premium updates.

first Settings about free updates, if you don’t access just click on lock icon at the bottom and Enter your Mac login Security password, the first time it should be required.
install all the updates after download by various options given there. Do can change its own way.

Step 5: Automatically download purchased the app in the App store. in case if you can’t enable it then the first log in your app store using Apple ID and Password and Check it here again.
Without logged in your app store you don’t enable this option for purchase app automatically download.
Note: to see them all available updates on your OS X and App click on Show updates option.
hope you enjoyed and successfully turn/ enable auto-updates on Mac OS Catalina, OS X High Sierra, EI Capitan, Yosemite (10.10 or later). for Disabled Go for the same process explained above.
jaysukh patel
Jaysukh Patel is the founder of howtoisolve. Also self Professional Developer, Techno lover mainly for iPhone, iPad, iPod Touch and iOS, Jaysukh is one of responsible person in his family. Contact On: [email protected] [OR] [email protected]
Источник


