- FAQ: Форматирование флешки из Терминала
- Disk Management From the Command-Line, Part 1
- Terminology
- Benefits of the Command-Line
- Disk Information with diskutil
- Partition Information
- Verifying and Repairing Volumes
- Erasing Disks
- Filesystem
- Disk Identifier
- Erasing Volumes
- Reformatting Volumes
- Renaming Volumes
- Wrapping Up
- Как стереть диск из командной строки в Mac OS X
- Как стереть диск из командной строки Mac OS
- Форматирование диска в Mac OS с расширенным журналом (JHFS +) из терминала в Mac OS X
- Форматирование диска в Mac OS Extended (HFS +) из терминала в Mac OS X
- Форматирование диска в MS-DOS fat32 из командной строки в Mac OS X
- Форматирование диска в ExFAT из командной строки в Mac OS X
FAQ: Форматирование флешки из Терминала
 Если вы хотите увидеть на нашем сайте ответы на интересующие вас вопросы обо всём, что связано с техникой Apple, операционной системой Mac OS X (и её запуском на PC), пишите нам через форму заявки на обзор или форму обратной связи.
К нам поступил следующий вопрос:
Как формотировать флэшку в Терминале (необходимые команды). В дисковой утилите не получается.
Форматирование производится одной простой командой:
[php]diskutil eraseDisk HFS+ Label disk1[/php]
Но всё не так просто. Вы можете убить всё ценную информацию на компьютере, если не знаете параметров этой команды. Разберём их по порядку:
eraseDisk — указание Терминалу на то, что мы будем производить форматирование
HFS+ — файловая система для форматирования. Для флешки логичнее будет использовать FAT32 — «MS-DOS FAT32» или FAT16 — «MS-DOS FAT16». Кавычки обязательны.
Label — метка диска. Можете ввести всё, что угодно, но желательно, чтобы это было одно слово.
disk1 — самый главный параметр. Это идентификатор стираемого диска. Чтобы узнать его, вам понадобится другая команда:
Она даст примерно такой результат:
[php]/dev/disk0
#: TYPE NAME SIZE IDENTIFIER
0: GUID_partition_scheme *500.1 GB disk0
1: EFI 209.7 MB disk0s1
2: Apple_HFS Irbis 499.8 GB disk0s2
/dev/disk1
#: TYPE NAME SIZE IDENTIFIER
0: FDisk_partition_scheme *500.1 GB disk1
1: Windows_NTFS Work 300.0 GB disk1s1
2: Windows_NTFS Game 200.1 GB disk1s2
/dev/disk2
#: TYPE NAME SIZE IDENTIFIER
0: GUID_partition_scheme *500.1 GB disk2
1: EFI 209.7 MB disk2s1
2: Apple_HFS Distro 8.1 GB disk2s2
3: Microsoft Basic Data 50.0 GB disk2s3
4: Linux Swap 8.0 GB disk2s4
5: Apple_HFS Soft 249.9 GB disk2s5
6: Microsoft Basic Data Storage 183.7 GB disk2s6
/dev/disk3
#: TYPE NAME SIZE IDENTIFIER
0: FDisk_partition_scheme *1.0 TB disk3
1: Windows_NTFS Media 1.0 TB disk3s1
/dev/disk4
#: TYPE NAME SIZE IDENTIFIER
0: Apple_partition_scheme *10.8 GB disk4
1: Apple_partition_map 32.3 KB disk4s1
2: Apple_HFSX arkkeeper 10.8 GB disk4s2
/dev/disk5
#: TYPE NAME SIZE IDENTIFIER
0: FDisk_partition_scheme *1.0 GB disk5
1: DOS_FAT_16 POOL 1.0 GB disk5s1[/php]
Ваша задача — отыскать в этом хаосе флешку. Сделать это можно по метке или по размеру. Запомните номер флешки — это может быть disk3, disk4 или даже disk10. Теперь можно запускать форматирование. В нашем примере мы форматируем флешку в FAT16 с меткой Flash:
[php]diskutil eraseDisk «MS-DOS FAT16» Flash disk5[/php]
В случае удачного форматирования в Терминале вы увидите:
[php]Started erase on disk5
Unmounting disk
Creating partition map
Waiting for disks to reappear
Formatting disk5s1 as MS-DOS (FAT16) with name Flash
Finished erase on disk5[/php]
Источник


Disk Management From the Command-Line, Part 1
Disk Utility within Mac OS X provides a range of disk management tools, from erasing and repartitioning hard disks to restoring images and repairing volumes. It’s a simple way of interacting with attached storage on your Mac.
Beyond this graphical front-end are some powerful command-line tools that we can use directly. In this series, we’ll look at how to replicate the functionality of Disk Utility at the command-line.
The following guide will require the use of an external hard drive which will be erased and partitioned.
Terminology
A partition is a logical storage unit located on a hard disk. A hard disk can contain a single partition, making use of all the space it contains, or it can be split into multiple partitions.
In order to store data on a partition, it needs a filesystem. Once a partition has been formatted, this combination of partition and filesystem is known as a volume.
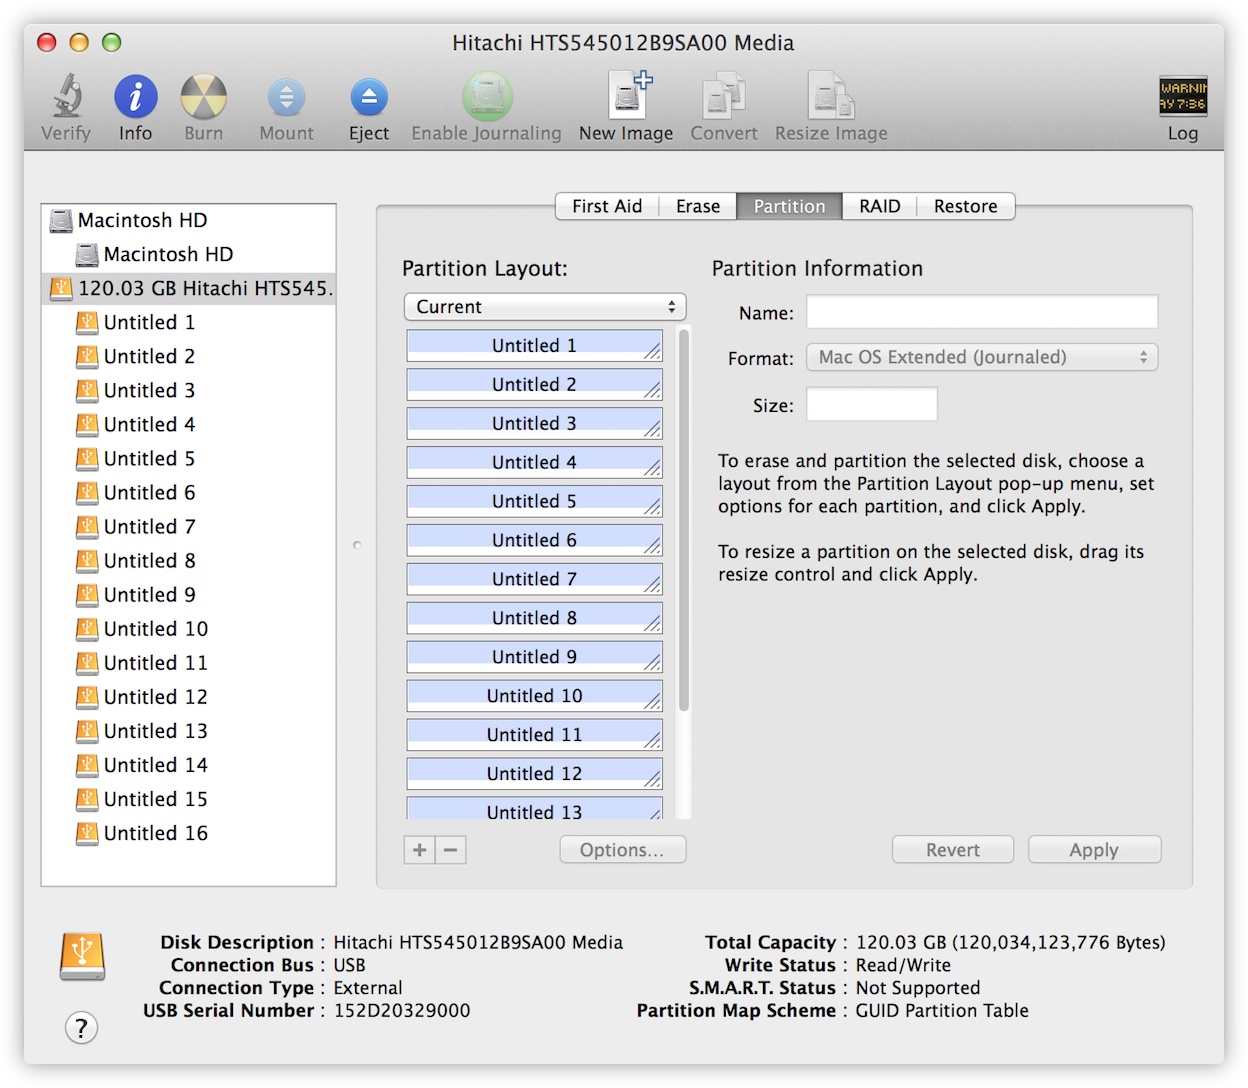
Here’s a USB hard drive that has been split into 16 partitions, all of which will display separately on the Mac as separate volumes since they’ve been formatted, though they are all on the same drive.
Imagine you have a loft apartment that’s just four outer walls. Think of partitioning as putting up dividing walls to create additional rooms. The more walls you put up, the more rooms you’ll have, but all limited to the total amount of space you first had available.
But these rooms can’t be used yet, not until you decide what each room will be. Formatting a disk partition is no different than deciding which room will be the bedroom or kitchen. At that point, it becomes a volume.
With the introduction of OS X Lion, your Mac’s hard disk is split into two partitions with two corresponding volumes. The first is hidden and named Recovery HD for OS X Recovery, allowing you to reinstall OS X without needing any physical media. The second is the more familiar Macintosh HD.
Benefits of the Command-Line
Disk Utility is more than adequate to perform any form of disk management for most users. It’s also safer than the command-line, displaying warning dialogs before proceeding with any potentially destructive functions.
For more experienced users, the command-line offers a greater level of flexibility and control so that what would normally require several different interactions and mouse clicks can be done with just one command.
Disk Information with diskutil
The diskutil command provides many of the features of Disk Utility, from verifying and repairing volumes to changing partition information.
To view the full list of available options for the command, enter the command diskutil .
Partition Information
Using the list option will display some basic information about all available volumes and drives attached. Within Terminal, enter:
In the following screenshot, you can see both the Recovery HD and Macintosh HD, both partitions contained on the Mac’s internal hard disk. An external hard disk is also connected with a volume labeled Untitled.
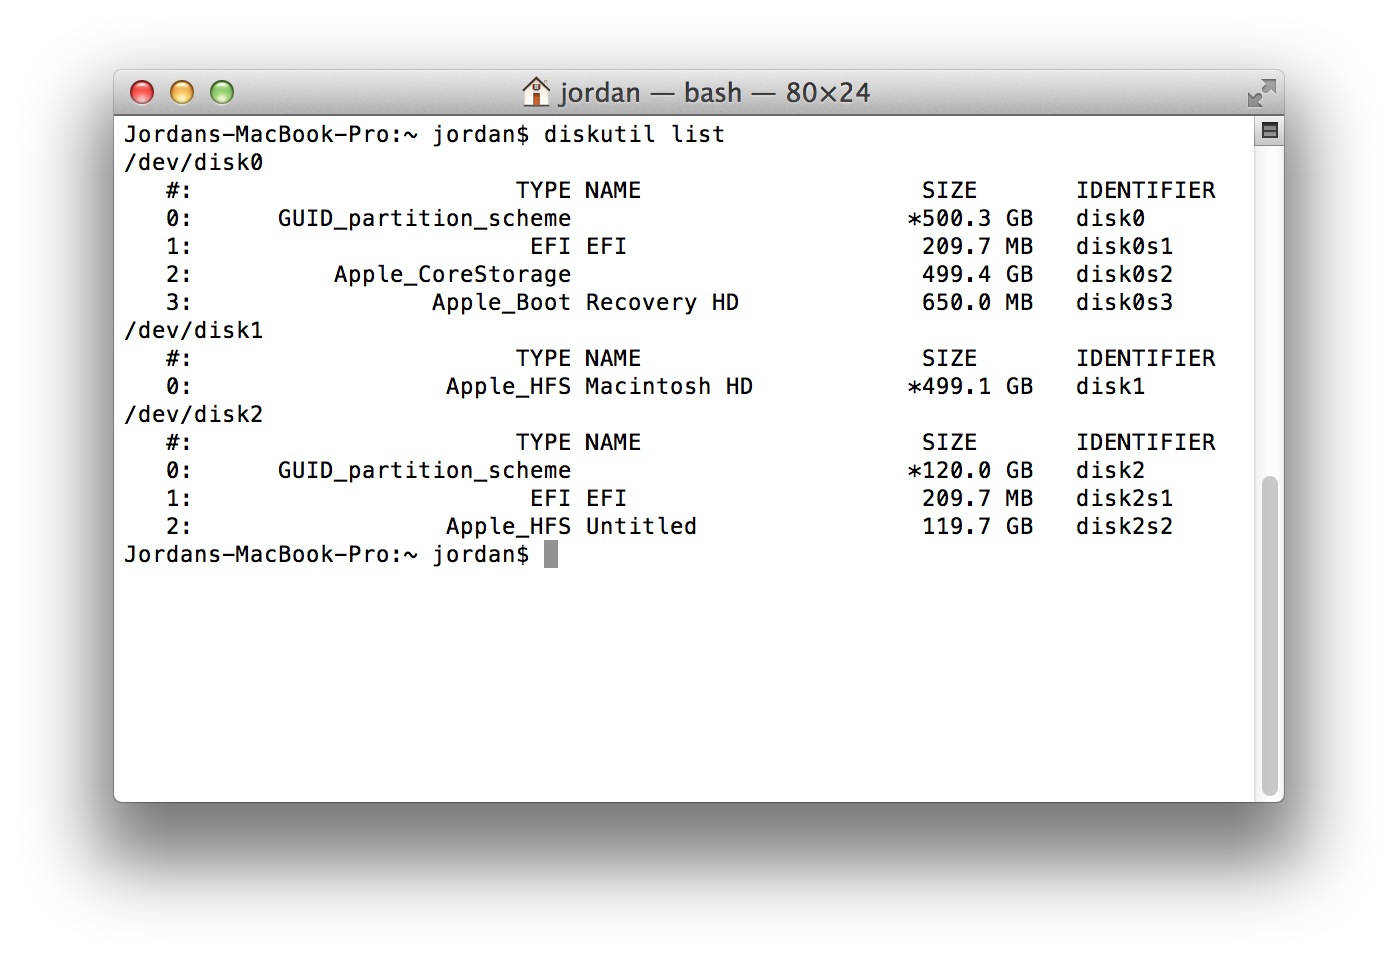
There are some hidden partitions (such as EFI) used for the purposes of providing drivers and settings during boot. These aren’t volumes since they cannot be mounted.
Depending on whether you have features such as FileVault 2 or Fusion Drive, your partition layout might differ slightly to what is pictured above.
For many of the options within diskutil , it’s necessary to use the disk or partition’s Identifier. Using list will provide you with this information.
Should you have a number of disks and only want to view information about a specific one, you can append the disk identifier to the command:
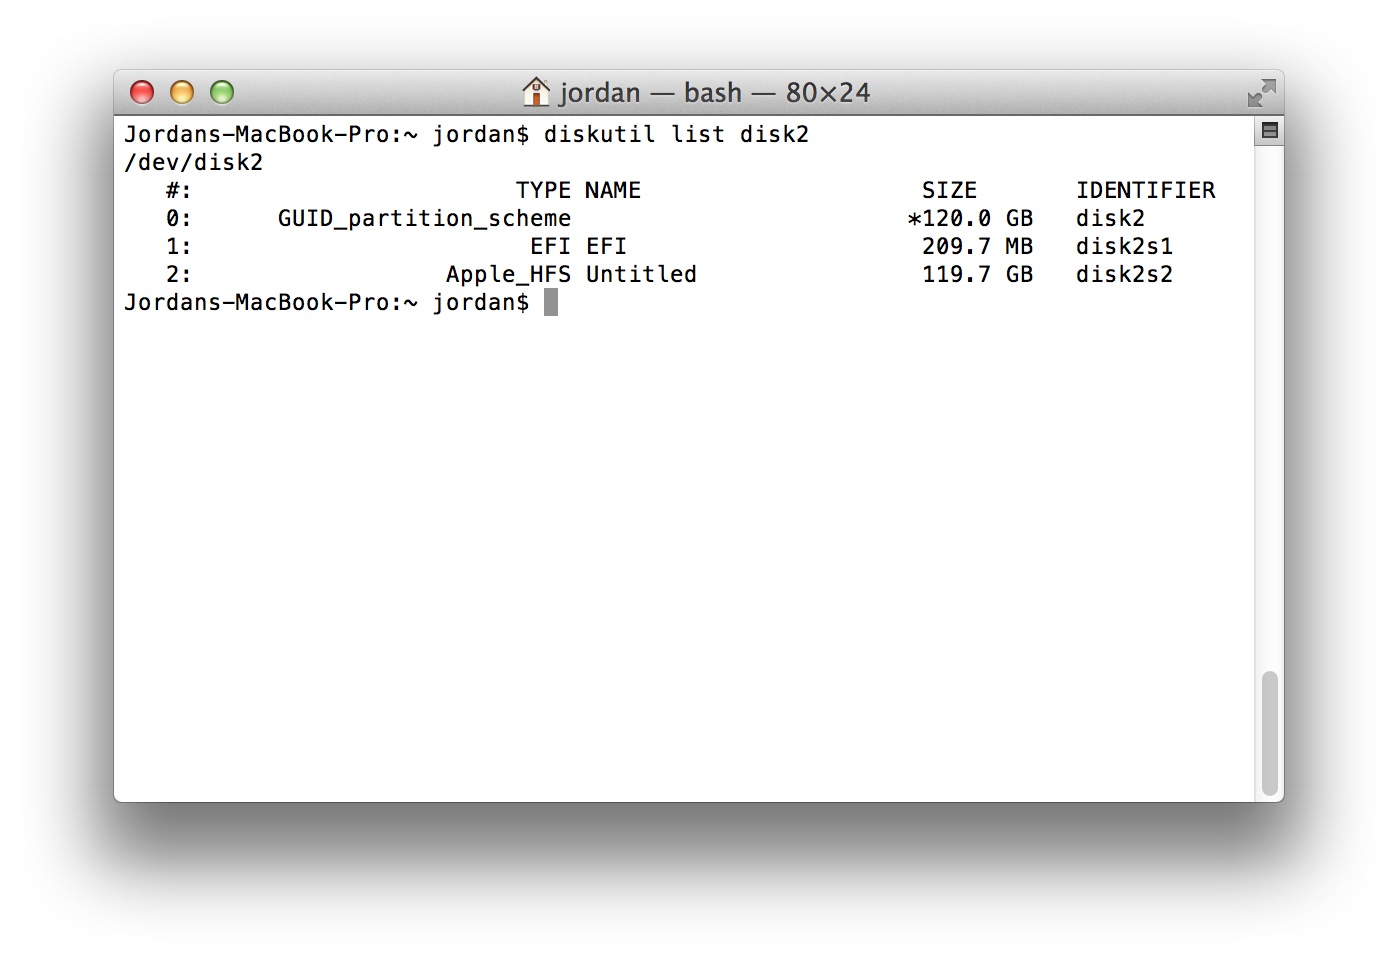
The first number represents the physical disk identifier. The number following the letter «s» represents the partition number. If a disk has three partitions, it would follow this convention:
In addition to list , you can also use info with the corresponding identifier to display even further information, like so:

Verifying and Repairing Volumes
As within Disk Utility, the diskutil command can be used to verify or repair volumes of any errors and is very straightforward to do using either verifyVolume or repairVolume . These options don’t need the disk identifier, just the volume’s name:
If the feedback within Terminal looks familiar, that’s because it’s the same information Disk Utility provides.

Disk permissions can also be verified and repaired using two similar commands:
Erasing Disks
Erasing disks from the command-line can be a dangerous process as there aren’t any warnings or confirmations. One typo could lead to irreversible data loss if there’s no backup to restore from. If you’re not familiar with the command-line, Disk Utility is just as capable.
You can either erase a whole disk which will remove any partitions stored upon it, or individual volumes without affecting others.
To erase an entire disk, you’ll need the disk identifier, enter the following, adjusting the disk identifier to suit:
You’ll notice this command has a little more going on than previous ones. The structure of the command is:
Erasing a whole disk will clear any partitions and create a new, single partition, before formatting it as a volume.

Filesystem
You can specify the filesystem to format the partition in by using any that are supported. The most common would be JHFS+ which is more commonly known as Mac OS Extended (Journaled).
To find out which filesystems you can use, enter:

This simply refers to the name of the volume that will be created. In this instance, I’ve just labelled the volume as «Test».
Disk Identifier
Only the primary part of the identifier (i.e. disk1, disk2, disk3. ) is needed. The additional segment indicating the partition number is omitted.
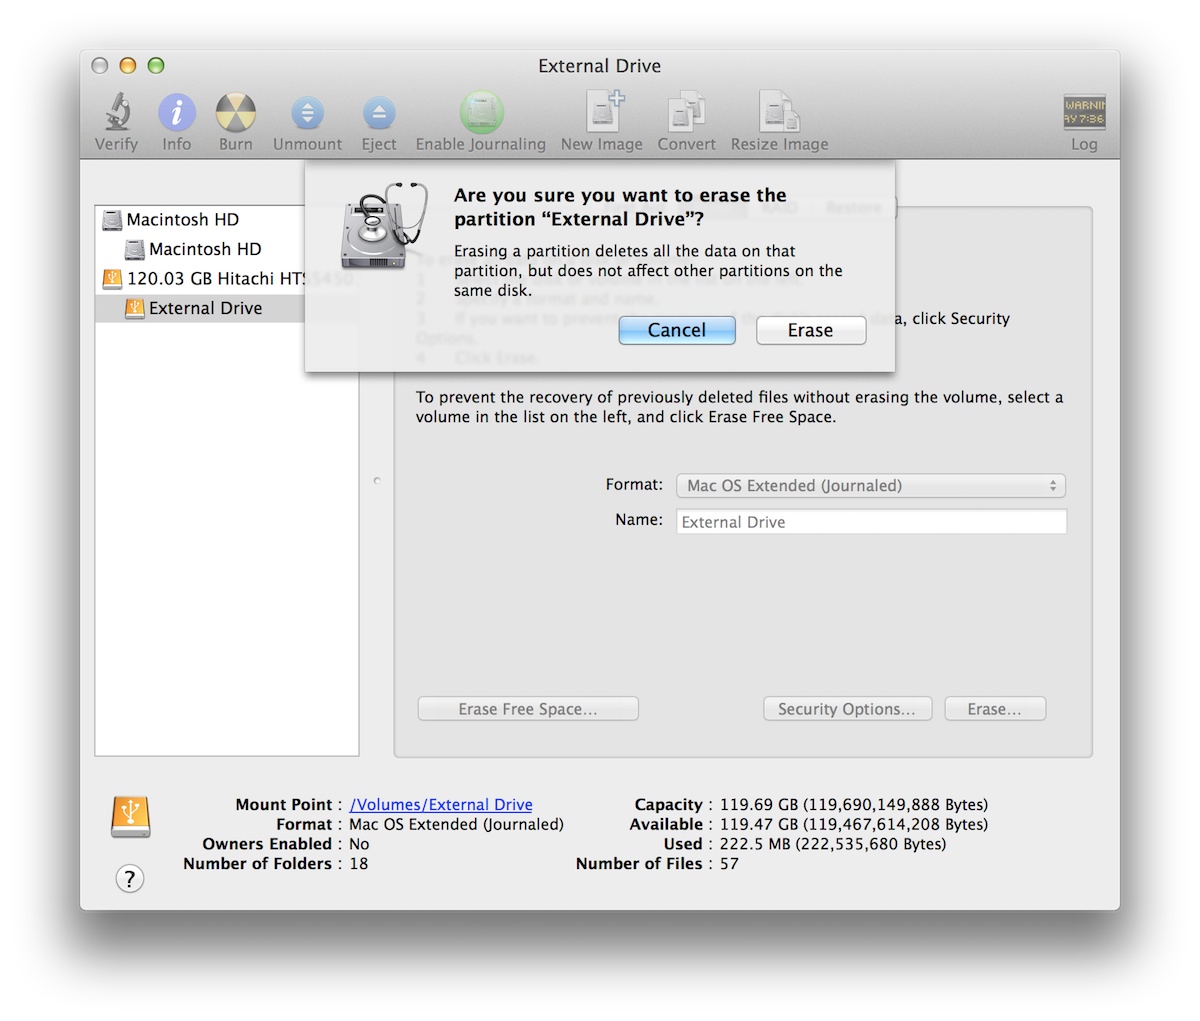
Erasing Volumes
Erasing volumes doesn’t erase or affect the entire disk, only the volume you specify.
Here is an external drive that’s partitioned with two volumes, FirstVolume and SecondVolume. To erase SecondVolume, the command is:
The command’s structure is almost identical to using eraseDisk , only that you specify the volume rather than disk. Should a disk contain multiple volumes, only the one you specify is altered.
Reformatting Volumes
You’ll notice that erasing a volume requires specifying the filesystem and name. This can be a bit tedious if you don’t actually want to change either of these, but simply want to erase the contents.
Instead, the reformat option will erase the contents of the volume without requiring the filesystem or name, provided these are to remain unchanged.
Now, the volume will be erased but retain the existing filesystem and name.
Renaming Volumes
Within the Finder, you can quite easily rename the volume by selecting it on your desktop and pressing the Return key, just like you would any file or folder.
Renaming volumes within the Terminal uses a different method than the renaming of files and folder, something accomplished by using the command:
Wrapping Up
We’ve only scratched the surface of diskutil yet covered quite a lot. While the graphical interface of Disk Utility can be easier to interact with, a task that would involve several steps can be accomplished with just one single command.
In the next part of this series, we’ll cover how to manage partitioning and modify volumes.
You can purchase the complete guide to Disk Management From the Command-Line that includes Building an OS X Triage Drive as an ebook in ePub and PDF format for just $0.99.
Источник
Как стереть диск из командной строки в Mac OS X

Некоторым пользователям Mac может потребоваться возможность стереть диск или стереть жесткий диск из командной строки в Mac OS, задача, которая обычно выполняется через приложение Disk Utility из графического интерфейса. Подход командной строки к стиранию диска в macOS немного отличается и требует точного синтаксиса, чтобы гарантировать, что вы стираете правильный диск, что делает этот метод стирания любого диска подходящим только для опытных пользователей Mac.
Это руководство расскажет, как стереть и отформатировать весь целевой диск, используя исключительно командную строку на любом Mac с macOS или Mac OS X. Вы можете выбрать любую обычную файловую систему для форматирования диска после его стирания, включая ExFAT, FAT32. , HFS + или JHFS +.
Обратите внимание, что здесь делается попытка стереть весь диск из командной строки, это не просто стирание тома или раздела на целевом диске. Весь целевой диск стирается, все данные на целевом диске уничтожаются с использованием этого подхода, без каких-либо томов, разделов или каких-либо данных. Не поймите это неправильно, иначе вы неизбежно потеряете данные, когда они будут стерты и уничтожены. Помните, что командная строка неумолима, если вам неудобно работать в командной строке, было бы гораздо удобнее стереть и отформатировать диск с помощью Дисковой утилиты в стандартном интерфейсе Mac OS X.
Как стереть диск из командной строки Mac OS
Для начала вам нужно запустить приложение «Терминал» на Mac, которое дает доступ к командной строке. Его можно найти с помощью Spotlight, Launchpad или в папке / Applications / Utilities /.
Чтобы стереть диск из командной строки на Mac, мы будем использовать знакомую команду «diskutil» с глаголом eraseDisk и другими соответствующими флагами, чтобы указать параметры того, как мы хотим стереть диск, и определить, какой диск должен быть стерто.
Базовый синтаксис для стирания диска из командной строки в macOS следующий:
diskutil eraseDisk FILE_SYSTEM DISK_NAME DISK_IDENTIFIER
Например, предположим, что вы использовали «diskutil list», чтобы показать все подключенные диски на Mac из командной строки, и вы определили, что соответствующий диск для стирания идентифицирован как / dev / disk6s2, вы хотите, чтобы имя диска было «Очищено», и вы хотите, чтобы новый тип формата файловой системы диска был Mac OS Extended Journaled (JHFS +), синтаксис будет следующим:
diskutil eraseDisk JHFS+ Emptied /dev/disk6s2
Абсолютно важно, чтобы вы использовали правильный синтаксис при идентификации диска, который нужно стереть. Неправильная идентификация может привести к стиранию неправильного диска и безвозвратному уничтожению всех данных на нем. Не облажайся. Если вы не уверены, вы можете найти узел идентификатора диска с помощью «diskutil info« DISK NAME »| grep Device».
В качестве краткого справочника приведены несколько примеров различных методов стирания диска для различных типов форматов файловой системы. Как всегда, убедитесь, что вы изменили дисковый узел в соответствии с вашим диском.
Форматирование диска в Mac OS с расширенным журналом (JHFS +) из терминала в Mac OS X
diskutil eraseDisk JHFS+ DiskName /dev/DiskNodeID
Форматирование диска в Mac OS Extended (HFS +) из терминала в Mac OS X
diskutil eraseDisk HFS+ DiskName /dev/DiskNodeID
Форматирование диска в MS-DOS fat32 из командной строки в Mac OS X
diskutil eraseDisk FAT32 DiskNameGoesHere /dev/DiskNodeIDHere
Форматирование диска в ExFAT из командной строки в Mac OS X
diskutil eraseDisk ExFAT DiskName /dev/DiskNodeID
Опять же, любая из этих команд стирает весь целевой диск и стирает все данные на нем.
Пользователи, которым нужна дополнительная информация или информация о других доступных параметрах, включая настройки MBR и GPT, могут запросить страницу руководства с помощью «man diskutil» и выполнить поиск «eraseDisk» или выполнить команду без каких-либо конкретных деталей, например:
diskutil eraseDisk
Usage: diskutil eraseDisk format name [APM[Format]|MBR[Format]|GPT[Format]]
MountPoint|DiskIdentifier|DeviceNode
Completely erase an existing whole disk. All volumes on this disk will be
destroyed. Ownership of the affected disk is required.
Format is the specific file system name you want to erase it as (HFS+, etc.).
Name is the (new) volume name (subject to file system naming restrictions),
or can be specified as %noformat% to skip initialization (newfs).
You cannot erase the boot disk.
Example: diskutil eraseDisk JHFS+ UntitledUFS disk3
Наконец, стоит упомянуть, что если вы хотите стереть текущий загружаемый диск из командной строки с помощью этого метода, вы должны сделать это с загрузочного диска или из режима восстановления. Одного режима пользователя недостаточно для стирания активно загружаемой операционной системы.
Источник


