Определение модели Mac mini
Информация в этой статье поможет вам определить свою модель Mac mini и ее место в соответствующем семействе компьютеров.
Компьютер Mac оснащен рядом средств, помогающих определить его модель. Самое простое — окно «Об этом Mac», доступное через меню Apple в левом верхнем углу экрана. Еще одно — приложение «Информация о системе». Узнайте, как использовать эти инструменты для определения модели компьютера Mac.
Если компьютера Mac нет под рукой или он не запускается, воспользуйтесь одним из следующих решений.
- Найдите серийный номер, напечатанный на нижней панели Mac, рядом с маркировкой о соответствии стандартам. Он также указан на оригинальной упаковке, рядом с наклейкой со штрихкодом. Чтобы определить модель компьютера, введите этот серийный номер на странице проверки права на сервисное обслуживание.
- На оригинальной упаковке также может быть напечатан артикул Apple, например MGEM2xx/A (xx — код страны или региона). Чтобы узнать модель компьютера, найдите соответствующий артикул Apple в приведенном ниже списке.
Список моделей Mac mini
Модели Mac mini упорядочены по году выпуска, начиная с самой новой. Для просмотра подробных технических характеристик щелкните название модели.
На модели Mac mini, выпущенные в 2014 г. и позже, можно установить последнюю версию macOS. Для более ранних моделей указана последняя совместимая операционная система.
2020 г.

Mac mini (M1, 2020 г.)
Идентификатор модели: Macmini9,1
Артикулы: MGNR3xx/A, MGNT3xx/A
Технические характеристики: Mac mini (M1, 2020 г.)
Руководство пользователя: Mac mini (M1, 2020 г.)

2018 г.

Mac mini (2018 г.)
Идентификатор модели: Macmini8,1
Артикулы: MRTR2xx/A, MRTT2xx/A, MXNF2xx/A, MXNG2xx/A
Технические характеристики: Mac mini (2018 г.)
Руководство пользователя: Mac mini (2018 г.)
2014 г.

Mac mini (конец 2014 г.)
Идентификатор модели: Macmini7,1
Артикулы: MGEM2xx/A, MGEN2xx/A, MGEQ2xx/A
Технические характеристики: Mac mini (конец 2014 г.)
Руководство пользователя: Mac mini (конец 2014 г.)
2012 г.

Mac mini (конец 2012 г.)
Идентификатор модели: Macmini6,1; Macmini6,2
Артикулы: MD387xx/A; MD388xx/A, MD389xx/A
Последняя совместимая версия операционной системы: macOS Catalina 10.15.7
Технические характеристики: Mac mini (конец 2012 г.)
Руководство пользователя: Mac mini (конец 2012 г.)
2011 г.
Mac mini (середина 2011 г.)
Идентификатор модели: Macmini5,1; Macmini5,2
Артикулы: MC815xx/A; MC816xx/A, MC936xx/A
Последняя совместимая версия операционной системы: macOS High Sierra 10.13.6
Технические характеристики: Mac mini (середина 2011 г.)
Руководство пользователя: Mac mini (середина 2011 г.)
2010 г.

Mac mini (середина 2010 г.)
Идентификатор модели: Macmini4,1
Артикулы: MC438xx/A, MC270xx/A
Последняя совместимая версия операционной системы: macOS High Sierra 10.13.6
Технические характеристики: Mac mini (середина 2010 г.)
2009 г.
Mac mini (конец 2009 г.)
Идентификатор модели: Macmini3,1
Артикулы: MC238xx/A, MC239xx/A, MC408xx/A
Последняя совместимая версия операционной системы: OS X El Capitan 10.11.6
Технические характеристики: Mac mini (конец 2009 г.)
Mac mini (начало 2009 г.)
Идентификатор модели: Macmini3,1
Артикулы: MB464xx/A, MB463xx/A
Последняя совместимая версия операционной системы: OS X El Capitan 10.11.6
Технические характеристики: Mac mini (начало 2009 г.)
Источник
Installing Mac OS X Mountain Lion 10.8.4 on a late-2006 Mac Mini (A1176)
This tutorial shows you how to get Mac OS X 10.8.4 (Mountain Lion) running on a late-2006 Mac Mini (model A1176), which officially can only support up to Mac OS 10.6.8 (Snow Leopard), according to this Wikipedia article. Although I have not tested it myself, the same steps would probably work if you have an early-2006 Mac Mini.
Hardware upgrades
Mac Mini 2006 comes with a Core Solo or a Duo Core processor, whereas Mac OS X Mountain Lion requires at least a Core 2 Duo, so you will need to upgrade the processor on your Mac Mini first before continuing. Although it is possible to patch the installer to run on a Core Duo, I would still recommend upgrading for a straightforward installation experience. Compatible processors can be found on eBay for as low as US$20 and available at a wide variety of speeds – 2GHz, 2.16GHz or 2.33GHz. A detailed step-by-step guide on how to upgrade the processor can be found here.
Optionally, to make the whole process worthwhile, it is also recommended to upgrade the RAM. Although the Mac Mini 2006 comes with the Macmini1,1 firmware which can only support up to 2GB of RAM and will not boot if more than 2GB is installed, you can install up to 4GB (2 pieces of 667MHz laptop DDR2 SDRAM) by updating the firmware to Macmini2,1, originally meant for the Mac Mini 2007 family. The steps are summarized below:
- Download the newer firmware from here http://www.mediafire.com/?lfangrn69rxln3q and extract it
- Put the extracted files in /System/Library/CoreServices/Firmware Updates folder. Check the permissions of the files, or just do a chmod 777 on the files to be safe.
- Run the following command in terminal:
sudo bless-mount /-firmware/System/Library/CoreServices/Firmware \ Updates/EFIUpdaterApp.efi-payload/System/Library/CoreServices/Firmware \ Updates/LOCKED_MM11_0055_08B.fd-options “-x-apple-efi payload0-data” -verbose - Turn off the computer by shutting it down from the Apple menu.
- Wait for a few seconds and press the power button until the power LED flashes. Wait until the flashing stops.
- At this point the firmware upgrade is completed. You may see some distorted pictures on the screen, which is normal. Simply turn the Mac Mini off by pressing the Power button, and turn it back on
- After a reboot, the Mac Mini should recognize 4GB of RAM.
- If the machine doesn’t boot up or doesn’t recognize the extra RAM, check that the memory modules have been securely inserted. If it still doesn’t work, try to do a PRAM reset.
The machine can only use around 3.3 GB out of the total of 4GB that is recognized, due to limitations of the 32-bit processor. And while you are at it, take the time to upgrade the hard disk (a 2.5″ SATA drive) to an SSD, preferably 128GB or more. The final configuration, 2GHz Core 2 Duo with 4GB RAM and 128GB SSD, will make your Mac Mini 2006 machine performance more or less in line with the Mac Mini 2009, a much later model.
Preparing the installation
Before you proceed you will need to upgrade the OS on your Mac Mini to Snow Leopard 10.6.8, the last officially supported version. Next, get your Mountain Lion installer media ready – which can be a .DMG image or an actual DVD. After that, download MLPostfactor 0.3 from here, needed to patch the original Mountain Lion installer disk, which does not support the Mac Mini 2006, to run on your machine.
As at the time of writing this article (May 2015), MLPostfactor 0.3 only supports Mac OS up to 10.8.4. Versions 10.8.5 or above are not supported, so make sure that your installer is of the right version.
To make it easier to switch the boot partition without holding the Option key, you may also want to install a boot manager such as rEFIt.
Bypassing MLPostfactor limitation
Here comes the trick. The user interface for version 0.3 of MLPostfactor apparently only supports OS X Lion (10.7) and will refuse to run on 10.6. I tried to trick it by changing the system version number in /System/Library/CoreServices/SystemVersion.plist but things would still not work – MLPostfactor started but could not find Install OS X Mountain Lion.app in the Applications folder even though the installer was clearly there. A workaround would be to use MLPostfactor 0.2, which can run on Snow Leopard, to upgrade the system first to 10.7, and from there upgrade it to 10.8 by running MLPostfactor 0.3 again. I did not attempt this method because it seemed time consuming and most importantly, I had no installer disc for 10.7.
My relief came when I read this article which showed me how to use MLPostfactor from the command line. Apparently there is another MLPostfactor.app folder inside the original MLPostfactor app which can be invoked using the following command to patch the installer:
Surprisingly, there is no version check in the command line version of MLPostfactor and this method actually works to create the 10.8.4 installer partition. There are a few other commands that need to be done to patch the installer partition – refer to the original article for details.
Using MLPostfactor from bash script
A simpler way would be to use the MLPostfactor script written by pjherron available from github. With this script, the steps to upgrade to 10.8.4 from 10.6.8 on your Mac Mini can be summarized as below:
- Download MLPostFactor 0.3 and unzip it to desktop
- Copy the ‘Install OS X Mountain Lion.app’ folder from your 10.8.4 installer disc to the Applications folder
- Create a 8 GB or larger partition on the target drive to host the patched installer. The volume label should be Install and it should be automatically mounted at /Volumes/Install
- Create another partition, 20GB or more, on the target drive where you will install 10.8.4. Alternative, if you do not need the original Snow Leopard partition, you do not need to create this partition and can simply choose to install on the Snow Leopard partition later, losing all existing data.
- Run the upgradesl2ml.sh script and give it 30 minutes to an hour to complete. When done, reboot the machine and choose to boot from the 10.8.4 installer partition just created
- When prompted, choose to install 10.8.4 on the partition created in step 4, or simply overwrite your Snow Leopard partition. It is highly recommended to format the partition and perform a clean install – do not perform an upgrade as there are known issues.
- Let the installer run. The process will either end in an error or a white screen – this is normal. Reboot the machine when this happens.
- Choose to boot from the 10.8.4 installer partition again (not the partition where you installed 10.8.4 to).
- When the installer finishes starting up, choose MLPostfactor from the Utilities menu and let it repair the partition where you’ve just installed 10.8.4
- When the repair is done, reboot your system and choose to boot from your fresh Mountain Lion partition. It should boot normally
- Done, you can now enjoy Mountain Lion on your Mac Mini 2006!
If the installation is successful, the About This Mac dialog should show something similar to below:

Common issues
In my experiment, the final system runs fine without major issues. Application such as Firefox, Skype or even xCode and the iOS simulator could run well. VLC player works well to play normal DivX or Xvid videos. The only major application that is problematic is Dropbox, which couldn’t even install due to error ‘no mountable filesystems’ when mounting the installer DMG. Tuxera NTFS can install and appears to work but will later cause random kernel panic when browsing NTFS partitions in Finder. I had to resort to removing Tuxera and learn to live with read-only NTFS support for now.
If your dock in Finder appears to be transparent after the installation, open Terminal and run the following command to fix it:
Read here for other useful tips and tricks.
Other than the above issues, my installation of 10.8.4 on the Mac Mini is stable and serves me well as my daily work machine. My next attempt would be to install 10.9 (Mavericks) or 10.10 (Yosemite) on this computer. As far as I know, although there are proof-of-concept attempts, nobody has managed to get a stable working system yet, presumably due to challenges in getting graphics drivers to work properly.
Источник
Как установить macOS Catalina на неподдерживаемые Mac

Зачастую с выходом новой версии macOS компания Apple оставляет за бортом некоторые старые Mac. И с выходом Catalina так и случилось: теперь поддерживаются устройства 2012 года и новее. При этом, очевидно, по производительности некоторые модели 2011 года (например, тот же MacBook 15″) быстрее простеньких MacBook с процессорами Core m без активного охлаждения, поэтому урезание поддержки точно не связано с быстродействием старых моделей.
И сторонние разработчики подтвердили это, создав инструмент под названием DosDude Catalina Patcher, который позволяет неофициально установить последнюю версию macOS на многие неподдерживаемые Mac (весь список есть на сайте). При этом стоит понимать, что некоторые функции (например, Sideсar) могут не заработать, а сама система может быть нестабильной или медленной.
Сама инструкция не очень сложна. Для начала скачайте сам патчер по ссылке выше:

Щелкните правой кнопкой мыши на приложение Catalina Patcher и выберите опцию «Открыть», после чего в самой программе дважды нажмите на кнопку «Продолжить»:

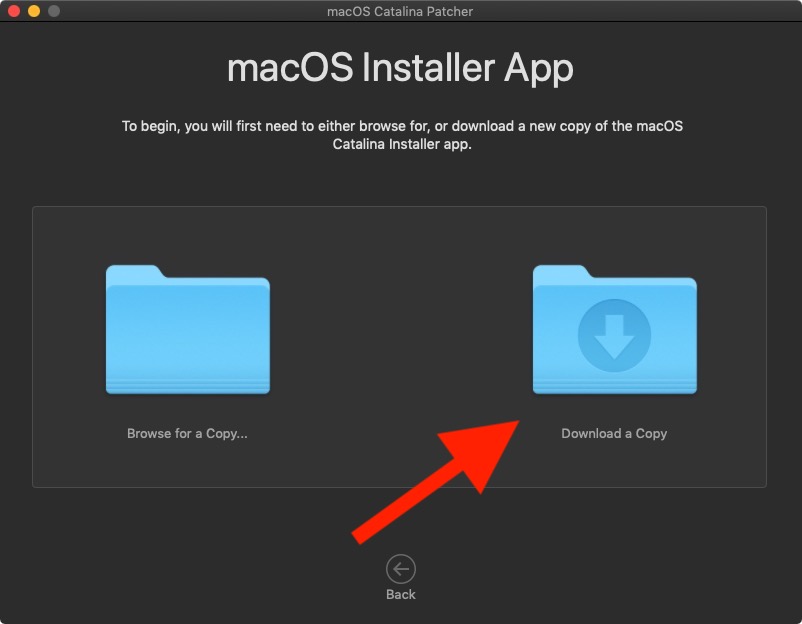
Выберите опцию «Скачать копию»:
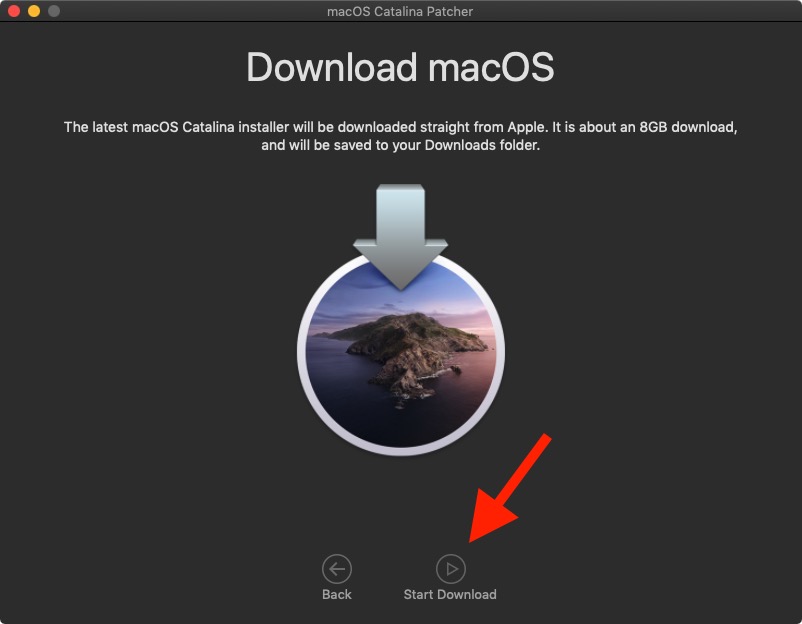
Нажмите на кнопку «Начать загрузку». Сам образ весит 7 ГБ, так что его закачка потребует некоторого времени:
После загрузки подключите к вашему Mac флешку, предварительно отформатированную в Mac OS Extended (журналируемый). В способах установки выберите опцию «Создать загружаемый установщик»:

Выберите свою флешку в списке и нажмите на кнопку «Старт», после чего дождитесь, пока образ не зальется на флешку.
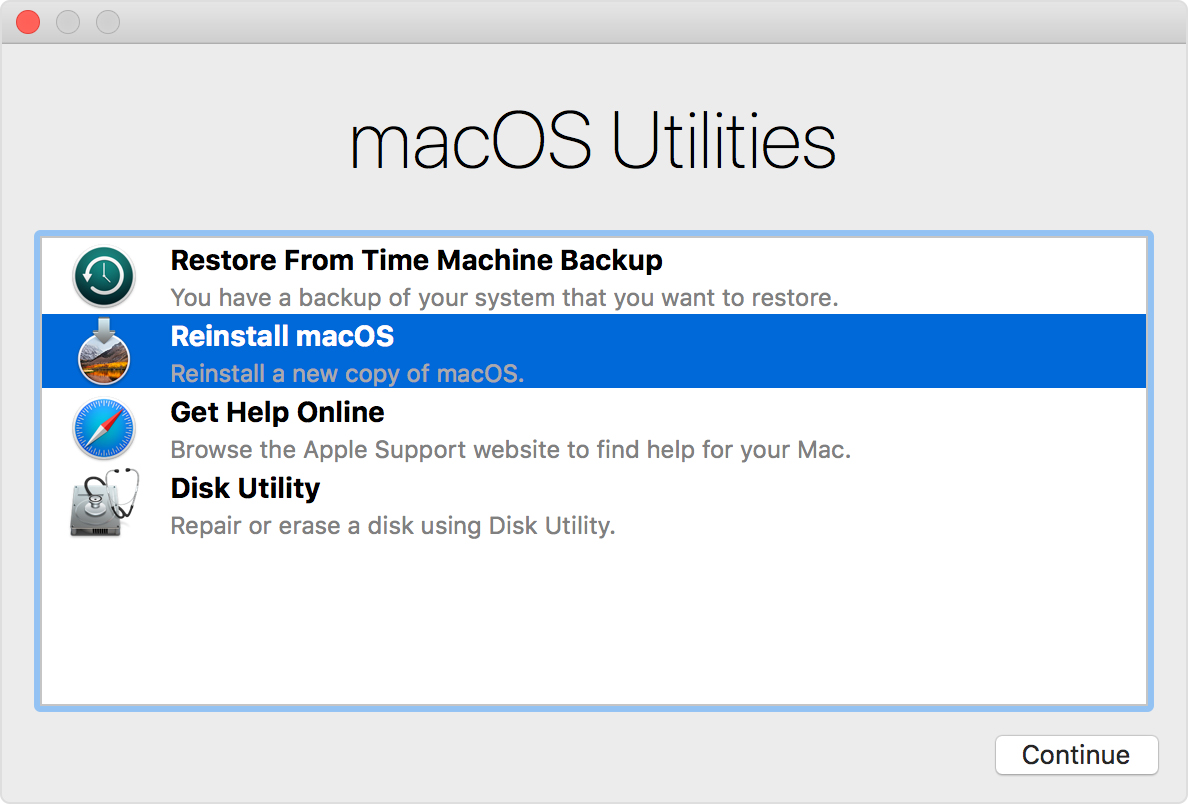
Далее вам нужно перезагрузиться и после звука включения удерживать нажатой кнопку Option, чтобы попасть в стандартное меню, где можно переустановить macOS. Если на вашем Mac в настоящее время установлена версия macOS, предшествующая High Sierra или Mojave, вам необходимо отформатировать накопитель в файловую систему APFS перед установкой Catalina. Для этого перейдите в Дисковую утилиту, выберите системный том и нажмите на пункт «Стереть», затем выберите формат APFS. Если ваш накопитель уже работает на APFS, просто выберите пункт «Переустановить macOS» в окне «Утилиты macOS» и следуйте инструкциям по установке новой версии macOS на ваш Mac:
При этом стоит понимать, что Apple может выпустить обновление для Catalina, которое сделает невозможным работу патчера, так что такой способ не идеален, но все еще он на данный момент позволяет попробовать новейшую версию ОС на старых Mac.
Источник


