- Mac os для hp pavilion
- Устанавливаем Mac OS X на семейство ноутбуков HP ProBook, Elitebook
- Совместимые Wi-Fi карточки (mini-PCI)
- Известные проблемы на данный момент
- Установка OS X Yosemite
- 1. Подготовьте USB-флешку не меньше, чем 8GB, ее нужно будет отформатировать в Дисковой Утилите со следующими параметрами:
- 2. Необходимо создать раздел с Yosemite (понадобится настоящий Mac, либо виртуальная машина с Mac OS X), тут есть 2 варианта:
- 3. Необходимые настройки BIOS:
- 4. Подключите флешку к USB.
- EC Сброс (EC Reset)
- Процесс обновления OS X Yosemite
- [Guide] HP Pavilion G6-1066se macOS 10.13.6 with AMD 6470m
- abdalmoniem
Mac os для hp pavilion

- UEFI bios:
- Скидываем все настройки в default.
- AHCI — enable;
- Vt-d: Disable (+ в Clover дропнуть DMAR таблицу)
- Vt-x: Enable (только для 10.13 и если используете виртуальные машины)
- Intel Virtualization Technology — Enable
- Serial-port: Disable
- XHCI Hand-off: Disable (рекомендуеться)
- XHCI Hand-off: Enabled (только если что то не работает в режиме Disable )
- IOAPIC 24-119 Entries: Enabled (подмечено что у многих с этим пунктом паникует, поэтому тестируйте)
- CSM: Disable (по возможности)
- Fasboot: Disable
- Secure boot: Disable or Other OS
Legacy bios:
. .
[i]Примечание:
- HDD должен быть подключен к SATA-0, контролер Intel.
- . [/i]
Для установки потребуется флешка не менее 8Гб.
- ПК на ОС Windows XP/7/8.
- Скачать утилиту Boot Disk Utility с страницы разработчика cvad или с форума applelife.ru со страницы посвящённой данной утилите.
- Установить по инструкции
- Зайти на флешку в папку EFI\CLOVER\ и удалить папку OEM и файл config-sample (не путать с config.plist).
- Зайти на https://github.com/aci…pleSupportPkg/releases скачать ApfsDriverLoader.efi и скопировать его в папку EFI\CLOVER\drivers64UEFI (необходимо для macOs 10.13 и выше!)
- Добавить в EFI\CLOVER\Kext\Other https://github.com/acidanthera/Lilu/releases
- Добавить в EFI\CLOVER\Kext\Other https://github.com/aci…WhateverGreen/releases
- Скачать образ Mac OS X по указанным ссылкам:
Нажми и качай! - Развернуть скаченный образ на подготовленную флешку.
- Инструкция с applelife.ru пункт «Заливка дистрибутива macOS на второй том загрузочного USB Flash drive:«:
- Перед распаковкой образа необходимо нажать кнопку ^Format disk^.
- В основном окне программы -> Destination Disk — выбираем наш USB Flash Drive -> Part2.
- Нажимаем кнопку «Restore Partition».
- В открывшемся окне проводника выбираем распакованный файл с расширением *.hfs.
- Тем, кто устанавливает на ноутбук (или имеет PS/2 мышь или клавиатуру) , обязательно скачать
 VoodooPS2Controller.kext.zip ( 97,46 КБ )
, новая версия:VoodooPS2Controller.kext.zip ( 93,86 КБ )
положить в папку EFI/CLOVER/KEXT/10.X или Other - Всё, установочная флешка готова, можно приступать к установке.
 VoodooPS2Controller.kext.zip ( 97,46 КБ )
За данный споcоб установки благодарим cvad и Skvo
Данная инструкция написана по материалам с applelife.ru
Установить один из загрузчиков на диск (если он не входит в состав сборки) :
— Загрузчик №1 — Clover (рекомендуется для большинства пользователей);
Как это сделать: UEFI, Legacy BIOS.
— Загрузчик №2 — OpenCore (для опытных пользователей)
— Загрузчик №3 — Chameleon (на данный момент существует для очень старых систем и особых случаев);
*загрузчик устанавливаем только один, на ваш выбор
После входа в macOS первое, что делаем:
- Устанавливаем кекст для сетевой карты;
- Настраиваем SMbios;
- «Заводим» видео-карту (разрешение должно быть правильным, и верхняя строка прозрачная);
- Поднимаем «нативное управление питанием» процессора;
- Поднимаем звук через AppleALC или VoodooHDA
.
21. Ставим програмулинки и «рюшечки».
Источник
Устанавливаем Mac OS X на семейство ноутбуков HP ProBook, Elitebook
Почти все новые модели ноутбуков HP имеют встроенный UEFI и дают больше преимуществ в установке и пользовании Mac OS X, в сравнении с BIOS-загрузчиками, такими как Chameleon или Chimera:
- Быстрая загрузка
- Простая установка и обновление OS X нативными (родными) методами
- Возможность создания Recovery для Time Machine и Дисковой Утилиты
- Патчинг кекстов «на лету» (нет необходимости перековыривать кексты после установки обновлений)
- Возможность загрузки в Windows UEFI (которое распознает > 4 разделов GPT)
- Не надо париться с Master Boot Records
Данный гайд по установке подходит для сл. серий ноутбуков HP:
- 6-серия: HP Probook 4x30s, 6x60b, Elitebook 8x60p, 2x60p
- 7-серия: HP Probook 4x40s, 4×0 G0, 6x70b, Elitebook 8x70p, 2x70p, 9470m
- 8-серия: HP Probook 4×0 G1, Elitebook 8×0 G1
- Серия HP Probook поддерживается как с картами Radeon, так и без них
- Поддерживается Серия HP Elitebook/Probook b с Intel HD3000/4000/4400/4600
- Экспериментальная поддержка: HP Elitebook 8x70p/Probook 6x70b with AMD 7570M/7650M
- Все другие HP Elitebook/Probook b серии с AMD карточками не поддерживаются
Совместимые Wi-Fi карточки (mini-PCI)
Список рекомендуемых карточек, совместимых с Mac OS X:
— HP Probook 4x30s: брендованный HP Atheros AR5B195
— HP Probook 6x60b/5330m, HP Elitebook 8x60p/2x60p: брендованный HP Broadcom 43224HMS (582564-001/582564-002)
— Другие ноутбуки:
Только WI-FI: Atheros AR9280/9285, Broadcom 4322/43224 (лучшая совместимость с OS X)
WIFI + Bluetooth модули: AR5B195 (не рекомендуется), Broadcom 43225HMB/4352HMB (лучшая совместимость с OS X)
Известные проблемы на данный момент
- Мерцающий (глючащий) экран загрузки на 7-серии ноутбуков на 1366×768 дисплеях с нативным UEFI (без CSM). Изменение разрешения Clover на 1024×768, или включение UEFI Hybrid (с CSM) может исправить эту проблему.
- 6-серия ноутбуков имеет проблемы с перезагрузкой при пробуждении.
- Есть задержка в 10-15 секунд перед уходом в сон. Похоже это не баг, а фича Yosemite, т.к. прослеживается на реальных Mac. Сделано скорее всего для того, чтобы пользователь мог вернуть компьютер из сна быстро, если случайно нажал на Sleep или случайно закрыл крышку.
- «Найти мой Mac» глючит. Лучше не блокировать ноутбуки через эту функцию, иначе будет очень тяжело разлочить устройство (или даже невозможно).
Установка OS X Yosemite
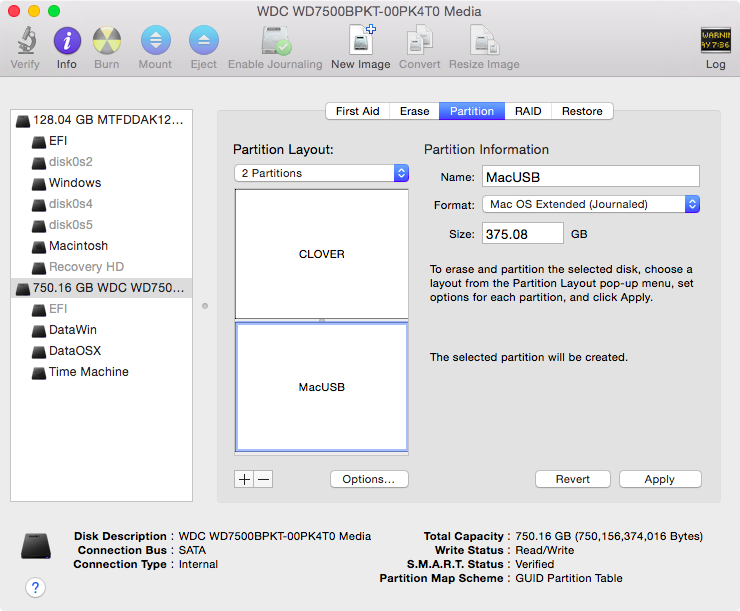
1. Подготовьте USB-флешку не меньше, чем 8GB, ее нужно будет отформатировать в Дисковой Утилите со следующими параметрами:
— Partition Layout: 2 Partitions (2 раздела)
— 1-ый разел: Имя CLOVER, Формат: MS-DOS (FAT), Размер: >300MB
— 2-й раздел: Имя MacUSB, Формат: Mac OS Extended (Journaled), Размер: >7GB
— Options: Master Boot Record
2. Необходимо создать раздел с Yosemite (понадобится настоящий Mac, либо виртуальная машина с Mac OS X), тут есть 2 варианта:
2a. Легкий, но может зависнуть на пустом экране
- Скачайте установщик Yosemite из AppStore.
- В терминале запустите сл. комманду: sudo /Applications/Install\ OS\ X\ Yosemite.app/Contents/Resources/createinstallmedia —volume /Volumes/MacUSB —applicationpath /Applications/Install\ OS\ X\ Yosemite.app —nointeraction
- Ваш раздел с установщиком Yosemite будет переименован в «Install OS X Yosemite»
2b. Ручной способ создания
- Скачайте установщик Yosemite из AppStore. Затем щелкайте правой кнопкой мышки по установщику (обычно он находится в папке приложений) — Показать содержимое (Show Package Contents) — Contents — Shared Support, открывайте InstallESD.dmg.
- Откройте раздел OS X Install ESD, откройте BaseSystem.dmg (скрытый файл)
- Используйте Дисковую утилиту (Disk Utility) для клонирования OS X Base System на раздел MacUSB.
— Перейдите в папку System/Installation на USB и удалите ярлык (алиас) “Packages”, затем перейдите в “OS X Install ESD” раздел, скопируйте “Packages” в папку System/Installation на вашем USB
— Скопируйте BaseSystem.dmg и BaseSystem.chunklist (скрытые файлы) из OS X Install ESD в OS X Base System (на вашем USB)

3. Необходимые настройки BIOS:
Disable Wake on LAN.
Disable Firewire device.
4. Подключите флешку к USB.
Перезагрузите компьютер и нажмите F9 выберите в Boot devices > Boot from EFI file > выберите раздел Clover bootloader > EFI > Boot > BOOTX64.efi
5. Появится экран загрузчика Clover выберите «Boot OS X Install from Install OS X Yosemite» или «Boot OS X Install from OS X Base System».
6. Нажмите на пробел, если появится окошко о мышке/клавиатуре. После появление экрана установки (вступления) выберите в верхнем меню пункт Disk Utility (Дисковую Утилиту), форматируйте ваш диск в GPT, раздел нужен Mac OS X Extended (Journaled/Журналируемый). Закройте дисковую утилиту и продолжите установку.
Если вы использовали шаг 2b, то переходите сразу к 10 шагу. Если вы использовали шаг 2a, продолжайте установку, установкщик распакует нужные файлы на USB (не на ваш раздел). Это займет продолжительное время, поэтому наберитесь терпения и не обрывайте установку, даже если пишется что «осталась 1 минута». Это конец 1 части установки.
7. Перезагрузите компьютер, нажите F9, выберите Boot Devices > Boot from EFI file > выберите раздел с Clover > EFI > Boot > BOOTX64.efi
8. Появится экран Clover, выберите «Boot OS X Install from Install OS X Yosemite» или «Boot OS X Install from OS X Base System» (ваш раздел с установщиком Yosemite).
9. Появится экран продолжения. В этот раз установщик создает файлы на вашем целевом разделе и создает раздел с Recovery. Это конец 2 части установки.
10. Перезагрузитесь и нажмите F9 для выбора диска загрузки > Boot from EFI file > выберите раздел с загрузчиком Clover > EFI > Boot > BOOTX64.efi
11. Появится экран загрузчика Clover, нажмите F4, выберите «Boot OS X from YourPartition».
12. Если все хорошо, то у вас появится рабочий стол Yosemite.
13. Загрузите установщик: HP Probook Installer Clover Edition и установите его со следующими опциями:
Clover UEFI: Install Clover UEFI bootloader
OS X support kexts: выберите только то что для вашего ноутбука (4x30s, 4x40s, etc).
Config and DSDT patcher:
SSDT generator/patcher: Generate SSDT.aml for your CPU Management
Misc OS X fixes:
Extra tools: Это необязательно, но есть полезные штуки.
14. Перезагрузите компьютер! Если вдруг не будет работать звук, то восстановите права на kext’ы с помощью Kext Wizard.
15. Если вы не можете залогиниться в iCloud/AppStore, попробуйте сбросить сетевые настройки:
— Перейдите в/Library/Preferences/SystemConfiguration/ и удалите сл. файлы:
- CaptiveNetworkSuppor
- com.apple.airport.preferences.plist
- com.apple.network.eapolclient.configuration.plist
- NetworkInterfaces.plist
— Перейдите в System Preferences (Системные настройки) > Network (Сеть), удалите все соединения. Перезагрузитесь.
— Перейдите в System Preferences (Системные настройки) > Network (Сеть) и добавьте соединения заново.
EC Сброс (EC Reset)
Если у вас возникают проблемы с клавиатурой, тачпадом и перезагрузкой, вы можете попробовать сделать EC reset:
- Отключите зарядник, вытащите батарею.
- Нажмите и держите кнопку включения около 30 секундHold the power button for 30 seconds.
- Вставьте батарею, подключите питание и включите ноутбук.
Процесс обновления OS X Yosemite
Вы можете обновлять OS X как на настоящем маке (я настоятельно рекомендую перед каждым обновлением делать бэкап в Time Machine, в случае если вдруг возникнут проблемы). Если у вас возникнут проблемы со сном после обновления, попробуйте выполнить сл. комманду:
Источник
[Guide] HP Pavilion G6-1066se macOS 10.13.6 with AMD 6470m

abdalmoniem

HACKINTOSH ON AN HP PAVILION G6
When you spend too much time on the Internet or behind a computer, you get bored quickly! So, you’re mostly tempted to try new stuff just to get rid of the boredom. Some play games, some watch movies, some listen to music etc. But all these can become boring too! Hackintosh is one of the interesting activities that will help you get rid of this. For most people, it’s called installing Mac on a PC. I’m not sure whether this is accurate or not. But I guess it kind of makes sense somehow.
Anyway, I’ve been watching the Hackintosh community since 2010. I started way back in 2013 with OS X 10.9 Mavericks on my old laptop and kept on learning and learning. A few weeks back I got my hands dirty with my ol’ trusty HP Laptop, it’s the HP Pavilion G6. I decided to install Hackintosh on it and it was NOT easy believe me. So I’m here writing this thread to tell how it went so that you don’t get stuck or hit any road pumps on your way hackintoshing!
DISCLAIMER
Before you start, you accept that:
- I take no responsibility whatsoever if anything goes wrong with you.
- You’re responsible if the macOS installer formats your whole HDD.
- Your Laptop, your choice, your responsibili ty.
Specifications
- Intel ® Core i3-2410M @ 2.2 GHz (Sandy Bridge)
- Intel ® HD Graphics 3000 & AMD Radeon HD 6470M 1GB DDR3 VRAM
- 8GB DDR3 1600Mhz RAM
- 500GB HDD 5400 rpm
- Broadcom BCM94313 (came with laptop, you have to replace it)
- IDT 92HD81B1X5 sound card with SRS Premium Sound (SRS is now part of DTS Studio Sound)
- HP Webcam-101
- 4 USB 2.0 Ports
- Realtek RTL8105E Fast Ethernet
- Realtek RTS5209 Card Reader
What is working
- Intel Core i3 processor
- Intel HD 3000 (OOB)
- AMD Radeon HD 6470M
- HP Webcam
- Broadcom BCM94313 Bluetooth 3.0
- Realtek RTL8105E
- Keyboard with special functions (volume up/down, media keys on iTunes)
- IDT Sound Card
What isn’t working or hasn’t been tested
- Realtek RTS5209 Card Reader (I haven’t tested it)
- HDMI (Haven’t tested it)
- VGA (haven’t tested it)
- Brightness with slider
- Sleep and wake
Installation
just follow this guide and use the recommended createinstallmedia method
Patches used
- Processor with native power management
In order to get the processor working, you ultimately need the following kext. If you have a core i5 processor, you might not need them.- You need use NullCPUPowerManagement.kext (included in the attachments) to install macOS, if that fails set CPUS=1 in Clover config.plist
- After installing macOS, you might and might not need to keep the kext installed, experiment to your liking
- Graphics Acceleration (QE/CI)
Intel HD Graphics 3000 works out of the box. You do not need any specific patch or kext to get it working. Just install the OS and boot it. You’ll get QE/CI on HD 3000. It’s possible to get QE/CI on the AMD Radeon HD 6470M too. You won’t need a kext for that because it’s already supported by AMD6000Controller.kext (device ID 0x6760). It’s the same chip as the AMD 6490M. The 2011 MacBook Pro has an AMD 6490M I believe.So, to get AMD working. Set/check these in Clover config:
- Dual Link = 0
- FB Name = Cattail (or Lotus or Fanwort or Kudzu or Spikerush)
- VRAM = 1,024
- Ports = 3 (for Cattail it’s 3)
- Inject ATI = true (check it)
- Make sure Inject Intel is unchecked
- Load VBIOS = true (check it, you’ll need to put the vbios file in ROM folder, see in attachments).
- Inject EDID = true (check it)
Now, you need to alter your EDID. For some reasons, I couldn’t just use my stock untouched EDID. That kept causing trouble. There is an interesting thread over at InsanelyMac where I got that fixed. Skip to EDID editing section.
After that, save the config and restart your laptop. Your AMD should be working. Go to Display settings and click Arrangement tab and check Mirror displays.
- Sound & Audio
I used VoodooHDA.kext v2.8.8 specifically because the newer v2.9.0 and v2.9.1 caused sound crackles and breaks which was awful. You might get low volume when you use it, just change VoodooHDAEnableHalfVolumeFix in the kext’s info.plist from NO to YES
I also used Sound Booster (Lite) to further boost the volume of the sound which now makes my speakers sound really good. you can get it from here - WiFi & Bluetooth
Bluetooth works out of the box if you’re using the Broadcom BCM94313 WiFi + Bluetooth combo card, but WiFi will not because it is not supported in macOS. Now this Laptop has a whitelist BIOS. After some tinkering around with the BIOS, I was able to identify the accepted cards by the BIOS (F.66 BIOS). Currently the accepted cards are:- BCM94313
- AR5B95H (AR9285)
- AR5B95H (AR5007)
- Some intel cards
- Ralink RT3290
- Realtek 8188CE
However, the laptop accepts the AR9285 card only if the SUBSYS ID is as follows: 3040103C. Mostly, you’ll need to rebrand the card to trick the BIOS to think that the inserted card has the correct ID. Follow this thread to achieve that. If it doesn’t seem clear enough, do a google search. There are quite easier guides on the internet. I might eventually make one (not sure though). OF COURSE, YOU WILL OBVIOUSLY NEED ANOTHER LAPTOP TO DO THAT BECAUSE YOURS HAS A WHITELIST. Borrow one from a friend, wife, girlfriend or whoever. or you can use a more sophisticated method, you can boot you laptop without the WiFi card inserted, and while its booting to windows (which you’ll need to rebrand your card) you can re-insert the card back in, but be careful not to touch any metal parts with the card so you don’t short and components and end up with a dead WiFi card or more possibly the whole Laptop
Now, if your card has been accepted by the BIOS. You need to either use a DSDT patch or an injector kext to get the card working under macOS. For someone who doesn’t want to have to patch DSDT, use ToledaARPT.kext or ProBook_Atheros.kext or AtherosWifiInjector.kext. But for better performance, I suggest you use a DSDT. I have attached the DSDT patch that I used. If you want to use it, first, install one of the kext above and boot. If the card is detected, identify your card location in iOREG (type in 168c in search bar). Mine was on RP01. Yours can be on RP02. It depends on the laptop hardwares installed probably. Now, open MaciASL and search for the location you identified in the previous step. Just before the first method of that location, add the ARPT device by copy pasting the code provided in the files below. Here is a video to make this easier for you on YouTube. Note: if you get error after using this patch, apply «Insert DTGP» patch from Source Forge in MacIASL. Remember to put the DSDT.aml file in ACPI/Patched in clover folder. You can also fix wifi with «Fix Airport» in Clover Configurator. It didn’t work for me but you can try. Remember to remove the injector kext if you use DSDT or Clover method.
At this point, you might face weird problems like no networks after waking the laptop from sleep. In fact, the wifi card wouldn’t detect networks if I wake the computer from sleep or if I turn off and on the wifi in settings. To fix that, cover (or remove) the 20th pin on the card with a plastic tape and then place it in the laptop and reboot. There are plenty guides on internet to help you do that. The 20th pin is RADIO_DISABLE pin according to the PIN Configuration datasheet of the AR5B95/AR5B195. It will remove the BIOS ability to deactivate the card in the OS. And NO, removing that doesn’t actually bypass the whitelist.
For bluetooth, it works without any patch or kext. But your USB Ports must be working first. You’ll need to use a bluetooth injector of your choice to be able to use BT after a wake from sleep. A better way to fix that is to cover or remove the 5th (RADIO_DISABLE but for BT this time). This is only valid for the AR5B195 combo card.
honestly I dug my self out of this rabbit hole and used the Edimax 7811Un USB WiFi dongle, which is far more easier to use and gets the job done.
- Battery
Battery indicator requires ACPIBatteryManager.kext (included in the attachments) and this DSDT Patch:- [bat] HP G6 2221ss
- HP Webcam
It’s like the bluetooth. It works OOB. But your USB ports have to be fully working first. No patch required. You might want to use the USBInjectAll.kext (included in the attachments) to enable all USB ports. - Ethernet
I used RealtekRTL8100.kext (included in the attachments) and the Ethernet no works fine. - Keyboard and Touchpad
I used VoodooPS2Controller.kext (included in the attachments) to get them working. I assume you already have done that because you can’t really use your hackintosh without them and this kext is kind of universal.
DSDT Patches Used
RehabMan’s ACPI debug repo:
- Add DSDT debug methods
- Instrument EC queries
RehabMan’s Laptop patches:
Must be applied as follow
- HP G6 2221ss
- Rename GFX0 to IGPU
- Brightness Fix (HD3000/HD4000)
- HPET Fix
- IRQ Fix
- Custom brightness keys patch
- Custom Wifi patch
Attachments
All files I used can be found on my github repository here.
Download the files as zip or use git clone or github desktop app.
BUGS
- When using the AMD card, you might see artifacts, flickers and other graphics corruptions from time to time. You also will notice that status bar doesn’t update when you’re using this card. I have no fix yet.
- When you get the AMD card detected for the first time or have changed the FB name, you’ll likely not see the login screen when you reboot. It will just be blurred. To fix it, just type in your password and press Enter. You will be taken to your Desktop. From there, go to Settings and check «Mirror displays».
- Apparently the performances of the AMD card are actually those of the Intel HD 3000. It makes sense because the AMD card doesn’t offer video output on this laptop (can’t change video mode in bios). So, the AMD card being used is simply aesthetic.
Credits & Thanks
- RehabMan
- Slice
- AndyV
- grexai926
- sinetek
- Mieze
- nguyenmac
- PikerA
- EmlyDinEsh
- Toleda
- Anyone else I might have forgotten
Источник


