- Mac os el capitan intel hd graphics
- Mac os el capitan intel hd graphics
- Intel HD Graphics 5500 on OS X El Capitan 10.11.2
- axydas
- RehabMan
- Install Intel HD Graphics 3000, 4400, 4600 on macOS with Full QE/CI
- Steps to Install Intel HD Graphics 3000, 4400, 4600 on macOS
- Step 1: Install all Kext with Kext Utility
- Step 2: Mount EFI Partition with Clover Configurator
- Step 3: Copy Config.plist to EFI Partition
- Step 4: Copy all Kext to EFI Partition
- [FIX] HD4200/HD4400/HD4600/HD5600 on 10.11+
- RehabMan
- musicmic
- RehabMan
- musicmic
- RehabMan
Mac os el capitan intel hd graphics

- UEFI bios:
- Скидываем все настройки в default.
- AHCI — enable;
- Vt-d: Disable (+ в Clover дропнуть DMAR таблицу)
- Vt-x: Enable (только для 10.13 и если используете виртуальные машины)
- Intel Virtualization Technology — Enable
- Serial-port: Disable
- XHCI Hand-off: Disable (рекомендуеться)
- XHCI Hand-off: Enabled (только если что то не работает в режиме Disable )
- IOAPIC 24-119 Entries: Enabled (подмечено что у многих с этим пунктом паникует, поэтому тестируйте)
- CSM: Disable (по возможности)
- Fasboot: Disable
- Secure boot: Disable or Other OS
Legacy bios:
. .
[i]Примечание:
- HDD должен быть подключен к SATA-0, контролер Intel.
- . [/i]
Для установки потребуется флешка не менее 8Гб.
- ПК на ОС Windows XP/7/8.
- Скачать утилиту Boot Disk Utility с страницы разработчика cvad или с форума applelife.ru со страницы посвящённой данной утилите.
- Установить по инструкции
- Зайти на флешку в папку EFI\CLOVER\ и удалить папку OEM и файл config-sample (не путать с config.plist).
- Зайти на https://github.com/aci…pleSupportPkg/releases скачать ApfsDriverLoader.efi и скопировать его в папку EFI\CLOVER\drivers64UEFI (необходимо для macOs 10.13 и выше!)
- Добавить в EFI\CLOVER\Kext\Other https://github.com/acidanthera/Lilu/releases
- Добавить в EFI\CLOVER\Kext\Other https://github.com/aci…WhateverGreen/releases
- Скачать образ Mac OS X по указанным ссылкам:
Нажми и качай! - Развернуть скаченный образ на подготовленную флешку.
- Инструкция с applelife.ru пункт «Заливка дистрибутива macOS на второй том загрузочного USB Flash drive:«:
- Перед распаковкой образа необходимо нажать кнопку ^Format disk^.
- В основном окне программы -> Destination Disk — выбираем наш USB Flash Drive -> Part2.
- Нажимаем кнопку «Restore Partition».
- В открывшемся окне проводника выбираем распакованный файл с расширением *.hfs.
- Тем, кто устанавливает на ноутбук (или имеет PS/2 мышь или клавиатуру) , обязательно скачать
 VoodooPS2Controller.kext.zip ( 97,46 КБ )
, новая версия:VoodooPS2Controller.kext.zip ( 93,86 КБ )
положить в папку EFI/CLOVER/KEXT/10.X или Other - Всё, установочная флешка готова, можно приступать к установке.
 VoodooPS2Controller.kext.zip ( 97,46 КБ )
За данный споcоб установки благодарим cvad и Skvo
Данная инструкция написана по материалам с applelife.ru
Установить один из загрузчиков на диск (если он не входит в состав сборки) :
— Загрузчик №1 — Clover (рекомендуется для большинства пользователей);
Как это сделать: UEFI, Legacy BIOS.
— Загрузчик №2 — OpenCore (для опытных пользователей)
— Загрузчик №3 — Chameleon (на данный момент существует для очень старых систем и особых случаев);
*загрузчик устанавливаем только один, на ваш выбор
После входа в macOS первое, что делаем:
- Устанавливаем кекст для сетевой карты;
- Настраиваем SMbios;
- «Заводим» видео-карту (разрешение должно быть правильным, и верхняя строка прозрачная);
- Поднимаем «нативное управление питанием» процессора;
- Поднимаем звук через AppleALC или VoodooHDA
.
21. Ставим програмулинки и «рюшечки».
Источник
Mac os el capitan intel hd graphics
- UEFI bios:
- Скидываем все настройки в default.
- AHCI — enable;
- Vt-d: Disable (+ в Clover дропнуть DMAR таблицу)
- Vt-x: Enable (только для 10.13 и если используете виртуальные машины)
- Intel Virtualization Technology — Enable
- Serial-port: Disable
- XHCI Hand-off: Disable (рекомендуеться)
- XHCI Hand-off: Enabled (только если что то не работает в режиме Disable )
- IOAPIC 24-119 Entries: Enabled (подмечено что у многих с этим пунктом паникует, поэтому тестируйте)
- CSM: Disable (по возможности)
- Fasboot: Disable
- Secure boot: Disable or Other OS
Legacy bios:
. .
[i]Примечание:
- HDD должен быть подключен к SATA-0, контролер Intel.
- . [/i]
Для установки потребуется флешка не менее 8Гб.
- ПК на ОС Windows XP/7/8.
- Скачать утилиту Boot Disk Utility с страницы разработчика cvad или с форума applelife.ru со страницы посвящённой данной утилите.
- Установить по инструкции
- Зайти на флешку в папку EFI\CLOVER\ и удалить папку OEM и файл config-sample (не путать с config.plist).
- Зайти на https://github.com/aci…pleSupportPkg/releases скачать ApfsDriverLoader.efi и скопировать его в папку EFI\CLOVER\drivers64UEFI (необходимо для macOs 10.13 и выше!)
- Добавить в EFI\CLOVER\Kext\Other https://github.com/acidanthera/Lilu/releases
- Добавить в EFI\CLOVER\Kext\Other https://github.com/aci…WhateverGreen/releases
- Скачать образ Mac OS X по указанным ссылкам:
Нажми и качай! - Развернуть скаченный образ на подготовленную флешку.
- Инструкция с applelife.ru пункт «Заливка дистрибутива macOS на второй том загрузочного USB Flash drive:«:
- Перед распаковкой образа необходимо нажать кнопку ^Format disk^.
- В основном окне программы -> Destination Disk — выбираем наш USB Flash Drive -> Part2.
- Нажимаем кнопку «Restore Partition».
- В открывшемся окне проводника выбираем распакованный файл с расширением *.hfs.
- Тем, кто устанавливает на ноутбук (или имеет PS/2 мышь или клавиатуру) , обязательно скачать VoodooPS2Controller.kext.zip ( 97,46 КБ )
, новая версия:VoodooPS2Controller.kext.zip ( 93,86 КБ )
положить в папку EFI/CLOVER/KEXT/10.X или Other - Всё, установочная флешка готова, можно приступать к установке.
За данный споcоб установки благодарим cvad и Skvo
Данная инструкция написана по материалам с applelife.ru
Установить один из загрузчиков на диск (если он не входит в состав сборки) :
— Загрузчик №1 — Clover (рекомендуется для большинства пользователей);
Как это сделать: UEFI, Legacy BIOS.
— Загрузчик №2 — OpenCore (для опытных пользователей)
— Загрузчик №3 — Chameleon (на данный момент существует для очень старых систем и особых случаев);
*загрузчик устанавливаем только один, на ваш выбор
После входа в macOS первое, что делаем:
- Устанавливаем кекст для сетевой карты;
- Настраиваем SMbios;
- «Заводим» видео-карту (разрешение должно быть правильным, и верхняя строка прозрачная);
- Поднимаем «нативное управление питанием» процессора;
- Поднимаем звук через AppleALC или VoodooHDA
.
21. Ставим програмулинки и «рюшечки».
Источник
Intel HD Graphics 5500 on OS X El Capitan 10.11.2

axydas
I successfully installed the Mac OS El Capitan 10.11.2 on my laptop with the below specs:
CPU: Intel i7 5th Generation 5500U
Chipset: Intel Broadwell-ULT
Graphics: Intel HD Graphics 5500
RAM: DDR3 8GB
WiFi: Intel Dual Band Wireless AC 3160
Ehternet: Realtek PCIe GBE Family Controller
Audio: Realtek High Definition Audio
The main problem i have is with the graphics — Intel HD Graphics 5500. First of all the only option i have in the display setting regarding the resolution is 1920*1080. There a problem with graphic when i load a photo or when i open the launchpad. I update the AppleIntelBDWGraphicsFramebuffer but still i have the same problem. Any suggestion?

RehabMan
Moderator
I successfully installed the Mac OS El Capitan 10.11.2 on my laptop with the below specs:
CPU: Intel i7 5th Generation 5500U
Chipset: Intel Broadwell-ULT
Graphics: Intel HD Graphics 5500
RAM: DDR3 8GB
WiFi: Intel Dual Band Wireless AC 3160
Ehternet: Realtek PCIe GBE Family Controller
Audio: Realtek High Definition Audio
The main problem i have is with the graphics — Intel HD Graphics 5500. First of all the only option i have in the display setting regarding the resolution is 1920*1080. There a problem with graphic when i load a photo or when i open the launchpad. I update the AppleIntelBDWGraphicsFramebuffer but still i have the same problem. Any suggestion?
Follow the Clover guide linked from the FAQ.
Pay attention the Broadwell info in the FAQ. It is important.
Источник
Install Intel HD Graphics 3000, 4400, 4600 on macOS with Full QE/CI

In this guide, you will learn how to Install Intel HD Graphics 3000, 4400 or 4600 Kext on OS X El Capitan, macOS Sierra and High Sierra. It works on all Intel HD 3000, 4400, 4600 sometime working with Intel 4200. If your Graphics does not belong to one of the Graphics, this guide is not for you, unfortunately.
In case if you do not have macOS installed on your computer, you can find out more details about installing OS X on my website.
Before you proceed, it is critical to understand that the performance of your computer after Install Intel HD Graphics 3000/4400/4600 Kext may vary. If you have successfully enabled native resolution on your display, it is now time to enable partial acceleration. In macOS, full acceleration requires that both Quartz Extreme and Core Image (QE/CI) work together.
Quartz Extreme and Core Image (QE/CI) should work in conjunction to enable full acceleration on macOS. You have to boost the graphic power to maximum. In case if you haven’t boosted your graphic card, it may lead to mouse tearing, graphic related issues and poor refresh rate. Therefore it is crucial to ensure that your graphic card is fully accelerated.
Steps to Install Intel HD Graphics 3000, 4400, 4600 on macOS
Step 1: Install all Kext with Kext Utility
After you extract Intel Graphics Kext.zip. Install Kext utility. Open then Drag all kext to Kext utility:

Install Kext with Kext Utility
Select Target Disk is El Capitan then click Install
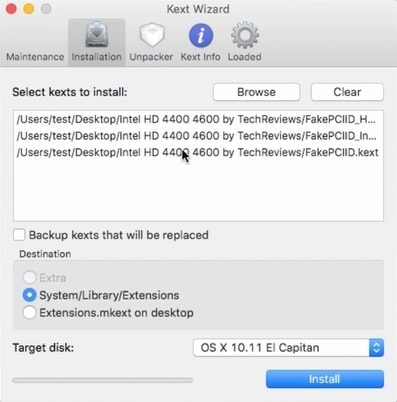
Select Target Disk
Step 2: Mount EFI Partition with Clover Configurator
Extract Clover Configurator.zip, open Clover, select Mount EFI then click Mount EFI Partition
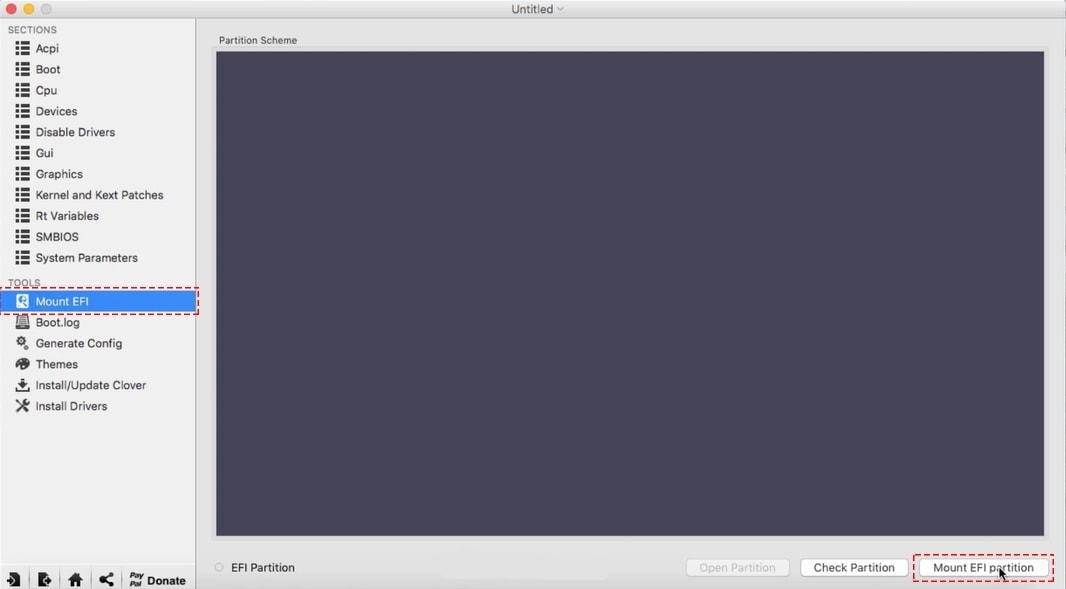
Mount EFI Partition
Step 3: Copy Config.plist to EFI Partition
Open EFI Partition, open EFI\Clover, copy and paste this file Config.plist
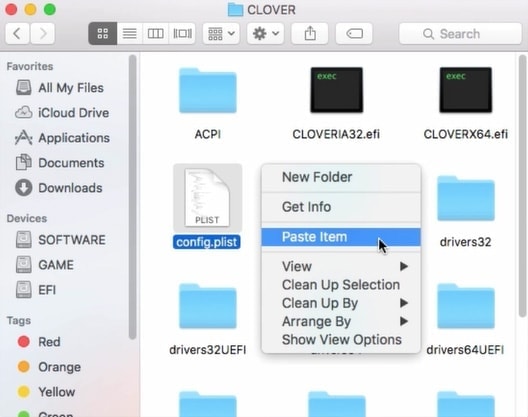
Copy and Paste Config File
Select Replace file

Step 4: Copy all Kext to EFI Partition
Open EFI Partition, open EFI\Clover\Kexts\Other, copy all Kext file then paste here
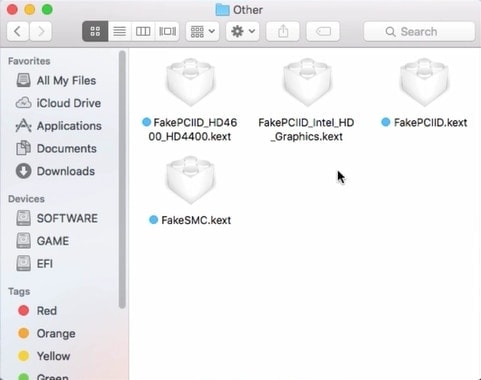
Copy all Kext to Clover
Done! Now, Reboot your OS X El Capitan.
Источник
[FIX] HD4200/HD4400/HD4600/HD5600 on 10.11+
RehabMan
Moderator
Intel HD Graphics on El Capitan
OS X supports a range of Intel HD Graphics devices, however not all the variants present in hackintosh devices are supported out of the box.
Haswell HD4200/HD4400/HD4600: Must inject device-id=0x0412.
config.plist/Devices/FakeID/IntelGFX=0x04128086
Broadwell HD5600 (10.11.0/10.11.1 only): Must inject device-id=0x1626.
config.plist/Devices/FakeID/IntelGFX=016268086
Note: These settings are already in the plist files linked from my Clover guide.
In addition, the Haswell graphics accelerator kext (AppleIntelHD5000Graphics.kext) checks the PCI device-id against a set of known values. Because the HD4200/HD4400/HD4600(mobile) values are not accommodated by this check, you must install FakePCIID kexts for PCI device-id spoofing.
Install both FakePCIID.kext and FakePCIID_Intel_HD_Graphics.kext (originally FakePCIID_HD4600_HD4400.kext) in /System/Library/Extensions, EFI/Clover/kexts (typically in EFI/Clover/kexts/Other), or /Library/Extensions (10.11+).
Note: This post, simplified for Clover only 10.11, based on original by the-darkvoid for Yosemite: http://www.tonymacx86.com/yosemite-. tel-hd4200-hd4400-hd4600-mobile-yosemite.html.
WhateverGreen.kext (requires Lulu.kext) implements the same spoofing that is implemented by FakePCIID.kext+FakePCIID_Intel_HD_Graphics.kext.
As a result, when using WhateverGreen.kext, you will not need FakePCIID.kext + FakePCIID_Intel_HD_Graphics.kext.
Read FAQ, «Problem Reporting». Carefully. Attach all requested files/output.
https://www.tonymacx86.com/threads/faq-read-first-laptop-frequent-questions.164990/
Use the gen_debug.sh tool mentioned in the FAQ, that way it is less likely you’ll omit something.

musicmic
RehabMan
Moderator
musicmic
Thats great news! So I thought i followed all the directions in this thread but I must have done something wrong because I’m stuck at bootloader and wont even boot in safe mode. Interestingly enough after I installed the kexts via DCPI Manager; FakePCIID.kext and FakePCIID_HD4600_HD4400.kext in /System/Library/Extensions, EFI/Clover/kexts and changed the config file to your config_HD4600_4400_4200.plist upon reboot I saw the Clover bootscreen was different(older looking, blue background) after a few reboots it went back to the original Clover bootscreen one time but than it went back to the changed bootscreen.
Anyways since I cannot boot into safe mode I plan on doing another clean install of El Capitan. Any suggestions or pointers to do this correctly this time around. I have no clue what i did wrong. Was I not supposed to totally replace your config plist with my original? Thanks again RehabMan. And thanks for the quickreply earlier letting me know it works with Desktop 4400.
RehabMan
Moderator
Thats great news! So I thought i followed all the directions in this thread but I must have done something wrong because I’m stuck at bootloader and wont even boot in safe mode. Interestingly enough after I installed the kexts via DCPI Manager; FakePCIID.kext and FakePCIID_HD4600_HD4400.kext in /System/Library/Extensions, EFI/Clover/kexts and changed the config file to your config_HD4600_4400_4200.plist upon reboot I saw the Clover bootscreen was different(older looking, blue background) after a few reboots it went back to the original Clover bootscreen one time but than it went back to the changed bootscreen.
Anyways since I cannot boot into safe mode I plan on doing another clean install of El Capitan. Any suggestions or pointers to do this correctly this time around. I have no clue what i did wrong. Was I not supposed to totally replace your config plist with my original? Thanks again RehabMan. And thanks for the quickreply earlier letting me know it works with Desktop 4400.
You should not use a laptop config.plist for a desktop.
In particular, ig-platform-id is not correct for desktop configurations.
omit ig-platform-id or use a desktop value, 0x0d220003.
From your description, it sounds like you downloaded the config file incorrectly (possibly downloaded html).
This the laptop section, so I tried to keep post #1 focused on laptops so as not to confuse.
Источник


