- Revive or restore a Mac with Apple silicon with Apple Configurator 2
- What does a revive do to your Mac?
- What does a restore do to your Mac?
- Before you begin
- How the revive and restore processes work
- Step 1: Connect the Mac computers
- Step 2: Prepare the Mac you want to revive or restore:
- Step 3: Revive the firmware and install the latest recoveryOS
- Step 4: Restore the firmware, erase all data and reinstall the latest version of recoveryOS and macOS
- Bridge does not recognize some devices on Mac OS X 10.11 (El Capitan)
- Bridge doesn’t recognize certain devices
- Impacted versions
- Operating system
- Solution
- If you get a personalization error when reinstalling macOS on your Mac with Apple M1 chip
- Use Apple Configurator
- Or erase your Mac and reinstall
- Erase using Recovery Assistant
- Then use one of these methods to reinstall macOS
- Use the Reinstall macOS Big Sur utility
- Or use a bootable installer
- Or use Terminal to reinstall
- 1008F — или как раскирпичить свой Mac
- Предыстория
- 2003F, 2004F
- Заключение
Revive or restore a Mac with Apple silicon with Apple Configurator 2
In very rare circumstances, such as a power failure during a macOS update or upgrade, a Mac may become unresponsive and so the firmware must be revived or restored.
Important: First try reviving the computer. If that fails or if you can’t start the Mac from the startup volume or the recoveryOS, you must restore the firmware and erase the internal flash storage.
What does a revive do to your Mac?
A revive updates the firmware and updates recoveryOS to the latest version. A revive is designed to not make any changes to the startup volume, the user’s data volume, or any other volumes. User data may be retained if recoverable.
What does a restore do to your Mac?
A restore updates the firmware, updates recoveryOS to the latest version, and erases and installs the latest version of macOS on your internal storage. When this process is complete, any data on any internal volumes is unrecoverable.
You must restore the firmware and erase the internal flash storage if:
Reviving the firmware is unsuccessful
You can’t start the Mac from the startup volume or the recoveryOS
Before you begin
These revive and restore instructions cover the following Mac computers with Apple silicon:
iMac (24-inch, M1, 2021)
Mac mini (M1, 2020)
MacBook Pro (13-inch, M1, 2020)
MacBook Air (M1, 2020)
Make sure you have:
The latest version of Apple Configurator 2 installed on a Mac running macOS 10.15.6 or later
You may need to configure your web proxy or firewall ports to allow all network traffic from Apple devices to Apple’s network 17.0.0.0/8. For more information on the ports used by Apple products, see the Apple Support article Use Apple products on enterprise networks. For more information on whether your network uses a web proxy or firewall, consult your router manual or your internet provider.
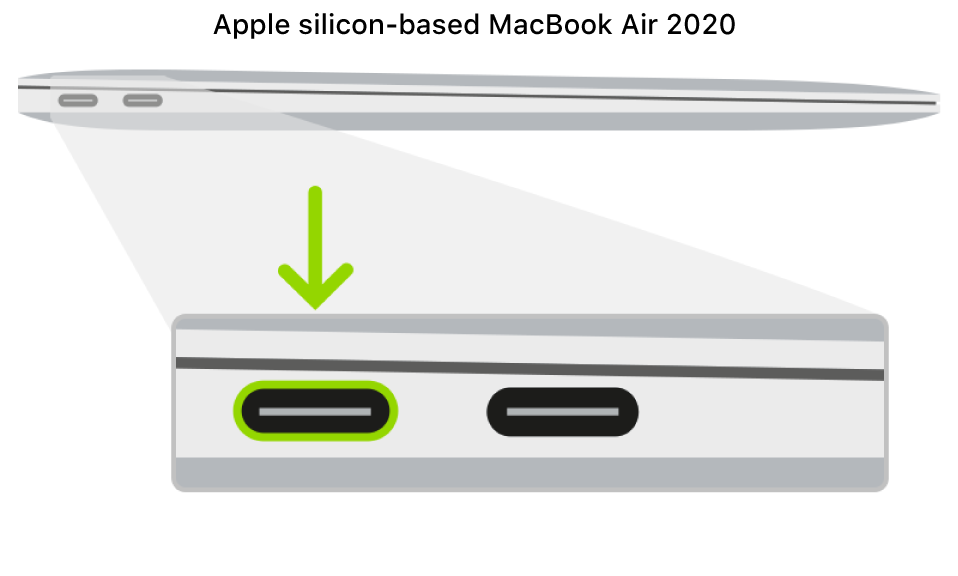
A supported USB-C to USB-C charge cable, such as the one sold by Apple (may not be available in all countries or regions) or a supported USB-A to USB-C cable
The USB-C cable must support both power and data. Thunderbolt 3 cables aren’t supported.
How the revive and restore processes work
The revive and restore processes involve the following steps:
Step 1. Plug the Mac computers together with a supported USB-C cable, locate Apple Configurator 2 in the Applications folder or in Launchpad, then launch Apple Configurator 2 on the first Mac.
Step 2. Restart the second Mac using a special key sequence. The key sequence varies according to the type of Mac you want to revive or restore.
Step 3. Use Apple Configurator 2 to revive the Mac.
Step 4. If a revive is unsuccessful, you can use Apple Configurator 2 to restore the Mac.
Step 1: Connect the Mac computers
Make sure your first Mac is plugged into a power source and started.
Plug in the USB-C cable (along with any adapters needed) and connect the two Mac computers.
Launch Apple Configurator 2  .
.
Step 2: Prepare the Mac you want to revive or restore:
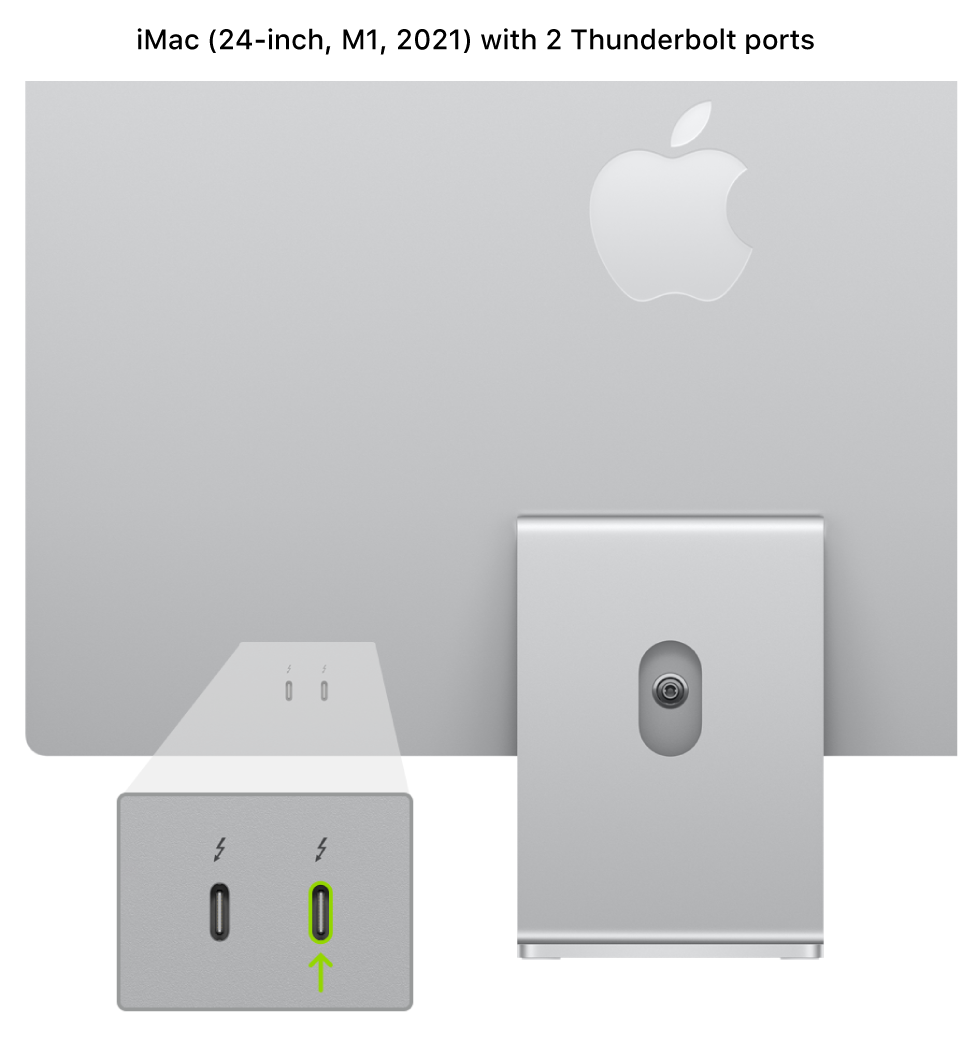
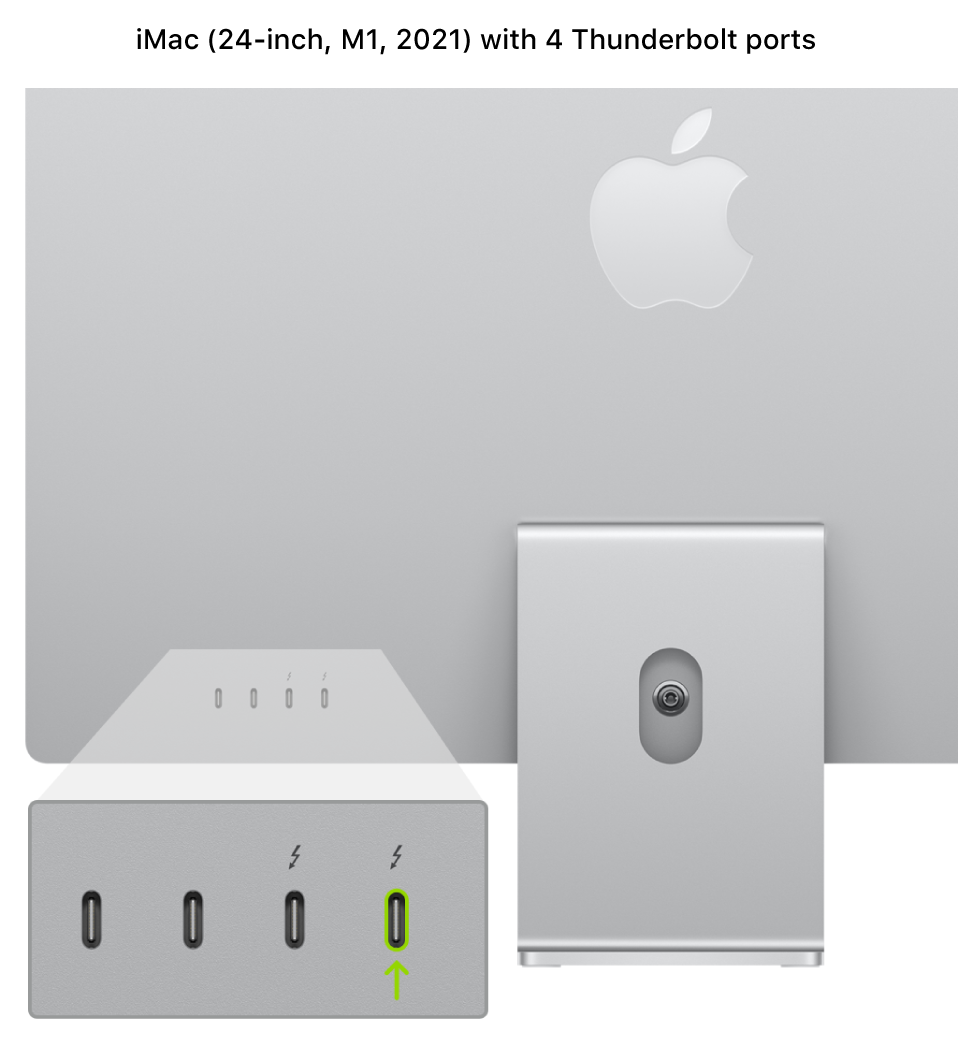
If reviving or restoring an iMac (24-inch, M1, 2021):
1. Disconnect the iMac from power.
2. Plug the USB-C cable into the Thunderbolt port closest to the stand.
3. While holding down the power button, connect the iMac to power and continue to hold the power button for about 3 seconds.
Note: You won’t see any screen activity from the iMac you want to revive or restore.
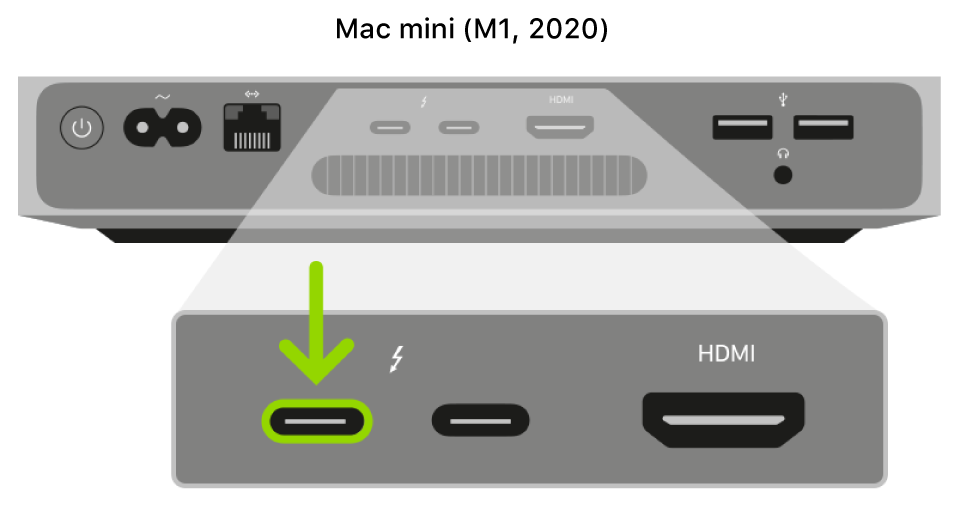
If reviving or restoring a Mac mini:
1. Connect a monitor to your Mac mini (so you can see when the process is complete).
2. Disconnect the Mac mini from power for at least 10 seconds.
3. Press and hold the power button.
4. Reconnect power while still holding the power button.
5. Release the power button.
The status indicator light should turn amber, and a DFU icon should appear in Apple Configurator 2 on the Mac mini .
Note: You won’t see any screen activity from the Mac mini you are trying to revive or restore.
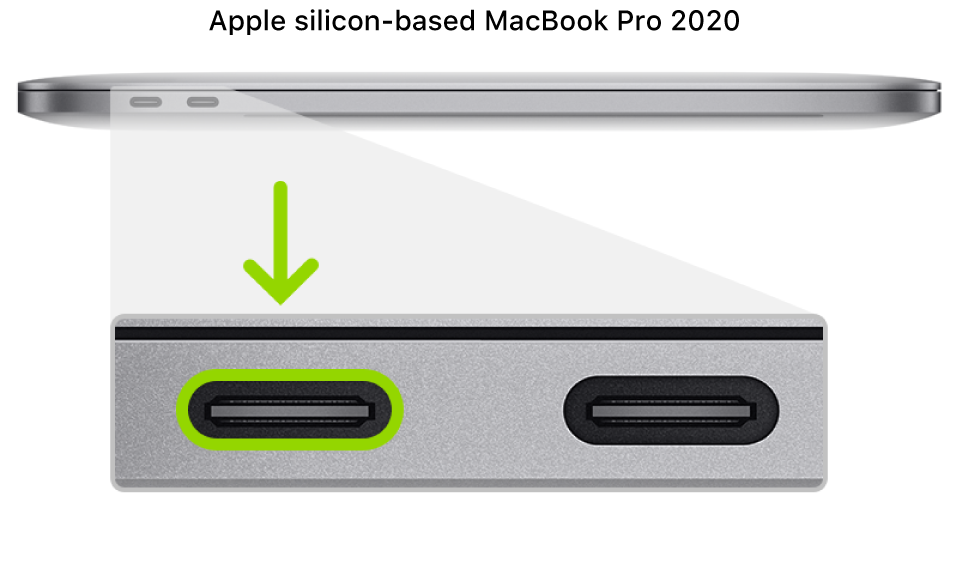
If reviving or restoring an Apple notebook computer:
1. Press the power button.
2. While holding down the power button, at the same time press all three of the following keys for about 10 seconds:
The right Shift key
The left Option key
The left Control key
3. After 10 seconds, immediately release the three keys but continue to hold down the power button until a DFU icon appears in Apple Configurator 2 on the first Mac.
Note: You won’t see any screen activity from the MacBook Air or MacBook Pro you are trying to revive or restore.
Step 3: Revive the firmware and install the latest recoveryOS
In the Apple Configurator 2 window on the first Mac, select the DFU icon of the Mac whose chip firmware you want to revive and whose recoveryOS you want updated to the latest version.
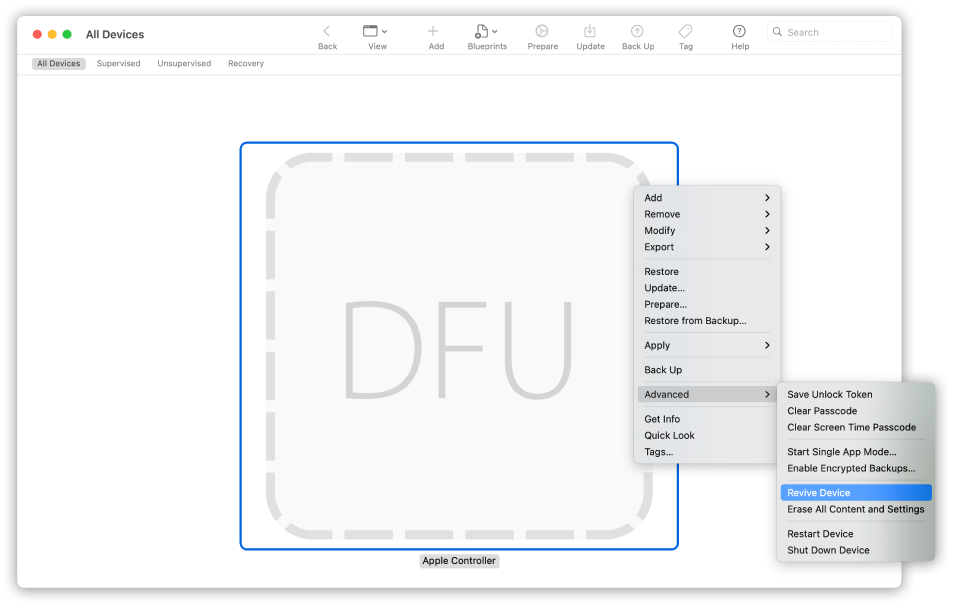
Do one of the following:
Choose Actions > Advanced > Revive Device, then click Revive.
Control-click the selected DFU icon, then choose Advanced > Revive Device, then click Revive.
Note: If you lose power to either Mac during this process, begin the revive process again.
Wait for the process to complete. During this process, an Apple logo will appear and disappear on the second Mac.
After the process successfully completes, your Mac will reboot.
Note: If the revive was unsuccessful, proceed to step 4.
Quit Apple Configurator 2 on the first Mac, then unplug any cables and adapters.
Step 4: Restore the firmware, erase all data and reinstall the latest version of recoveryOS and macOS
In the Apple Configurator 2 window on the first Mac, select the DFU icon of the Mac to be restored.
Do one of the following:
Choose Actions > Restore, then click Restore.
Control-click the selected DFU icon, then choose Actions > Restore, then click Restore.
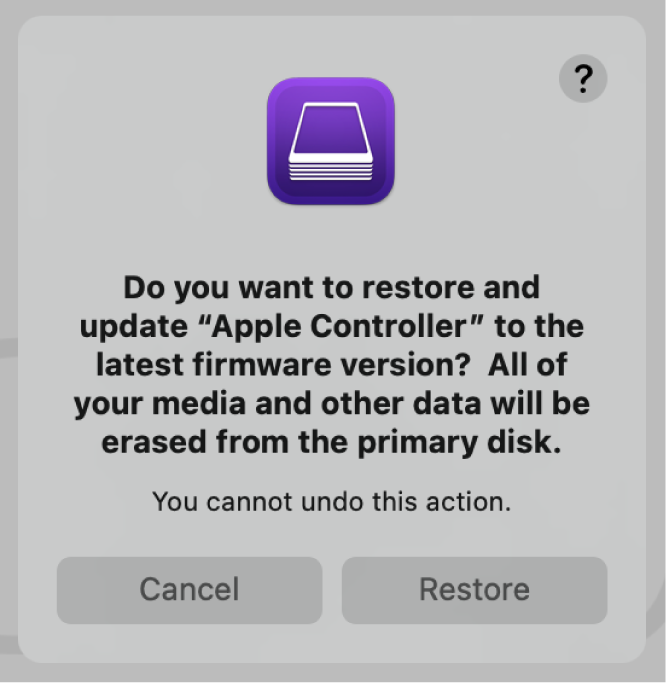 The restore confirmation dialog.
Note: If you lose power to either Mac during this process, begin the restore process again.
Wait for the process to complete. During this process, an Apple logo will appear and disappear on the second Mac.
After the process completes, your Mac will restart.
If the process was successful, you’re presented with the macOS Setup Assistant on the second Mac. If the macOS Setup Assistant doesn’t appear, repeat the restore process.
Quit Apple Configurator 2 on the first Mac, then unplug any cables and adapters.
Источник
Bridge does not recognize some devices on Mac OS X 10.11 (El Capitan)

某些 Creative Cloud 应用程序、服务和功能在中国不可用。
Bridge doesn’t recognize certain devices
On Mac OS X 10.11.x, Bridge and Bridge CC 2015 do not recognize the following types of devices:
- Devices (such as cameras or Android-based devices) connected in PTP (Picture Transfer Protocol) or MTP (Media Transfer Protocol) mode
- iDevices such as iPad or iPhone
Impacted versions
Adobe Bridge and Bridge CC 2015
Operating system
Solution
This issue has been fixed in Bridge CC 2017. Beginning with Bridge CC 2017 version 7.0 release, all the devices are now recognized by Adobe Photo Downloader .
To resolve this issue:
- Update to the latest version of Bridge. To check for updates in Bridge, choose Help > Updates . To know how to update your app, see Update Creative Cloud apps.
- Download the latest version of Adobe Bridge CC 2017. To download, go to http://www.adobe.com/products/bridge.html. You will need your Adobe ID login details to proceed.
For detailed instructions on how to import photos from your connected device using Adobe Bridge, see Import photos from a digital camera, card reader, or mobile device using Photo Downloader.
Источник
If you get a personalization error when reinstalling macOS on your Mac with Apple M1 chip
While reinstalling, you may get a message that an error occurred while preparing the update.
If you erased your Mac with Apple M1 chip, you might be unable to reinstall macOS from macOS Recovery. A message might say «An error occurred while preparing the update. Failed to personalize the software update. Please try again.» Use either of these solutions to reinstall macOS.
Use Apple Configurator
If you have the following items, you can resolve the issue by reviving or restoring the firmware of your Mac:
- Another Mac with macOS Catalina 10.15.6 or later and the latest Apple Configurator app, available free of charge from the App Store.
- A USB-C to USB-C cable or USB-A to USB-C cable to connect the computers. The cable must support both power and data. Thunderbolt 3 cables aren’t supported.
If you don’t have these items, follow the steps in the next section instead.
Or erase your Mac and reinstall
Use Recovery Assistant to erase your Mac, then reinstall macOS. Before you begin, make sure that you have enough time to complete all steps.
Erase using Recovery Assistant
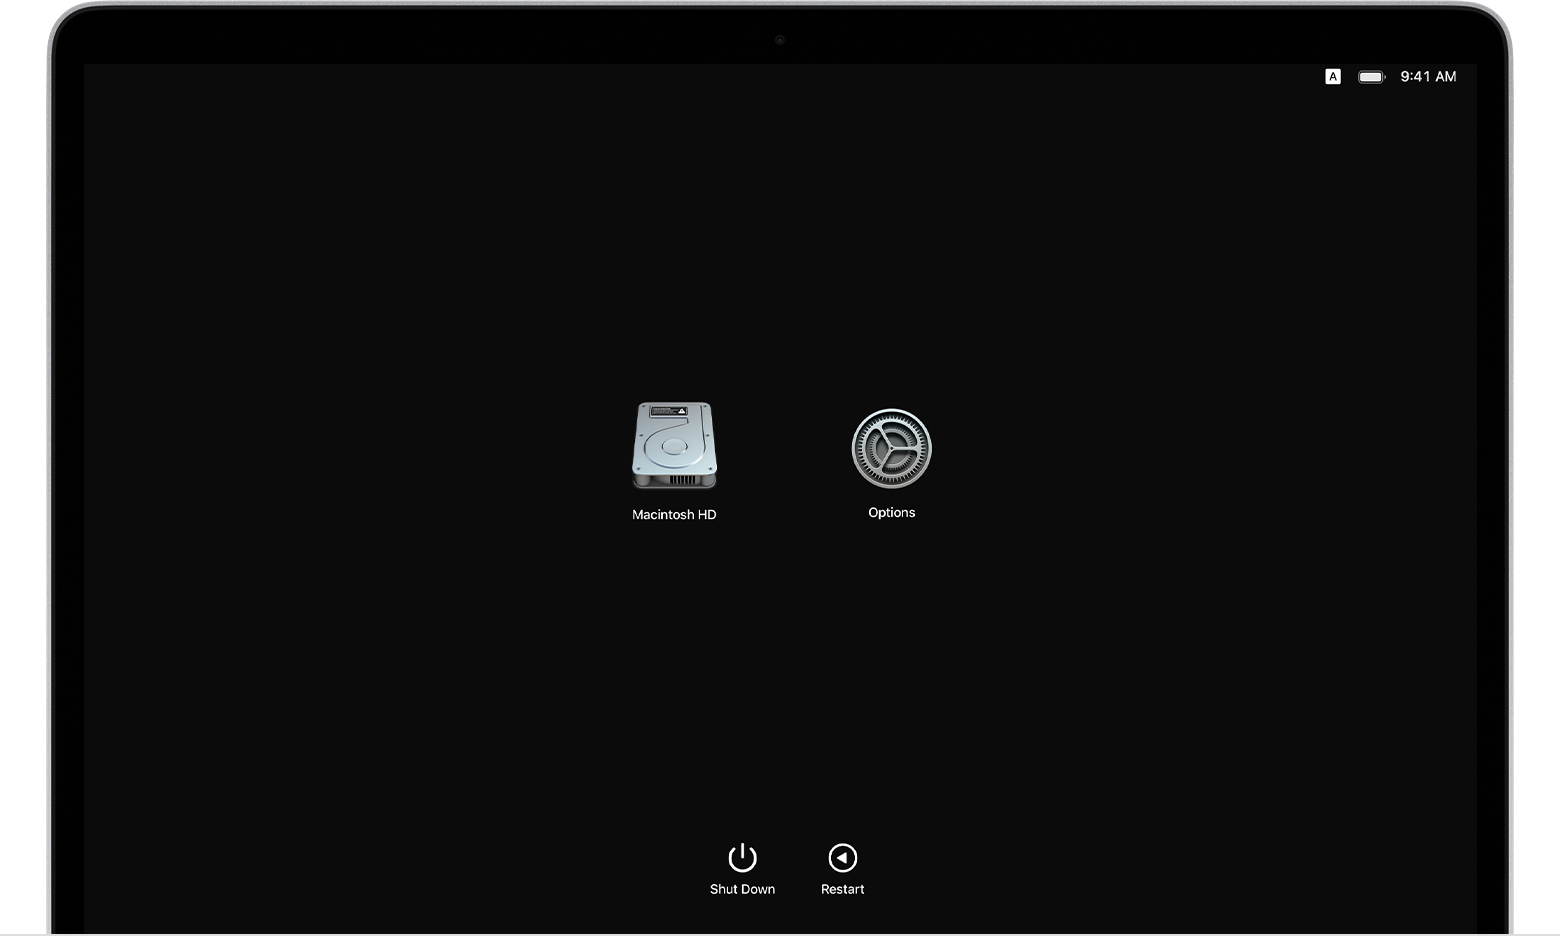
- Turn on your Mac and continue to press and hold the power button until you see the startup options window. Select Options, then click Continue.

- When you’re asked to select a user you know the password for, select the user, click Next, then enter their administrator password.
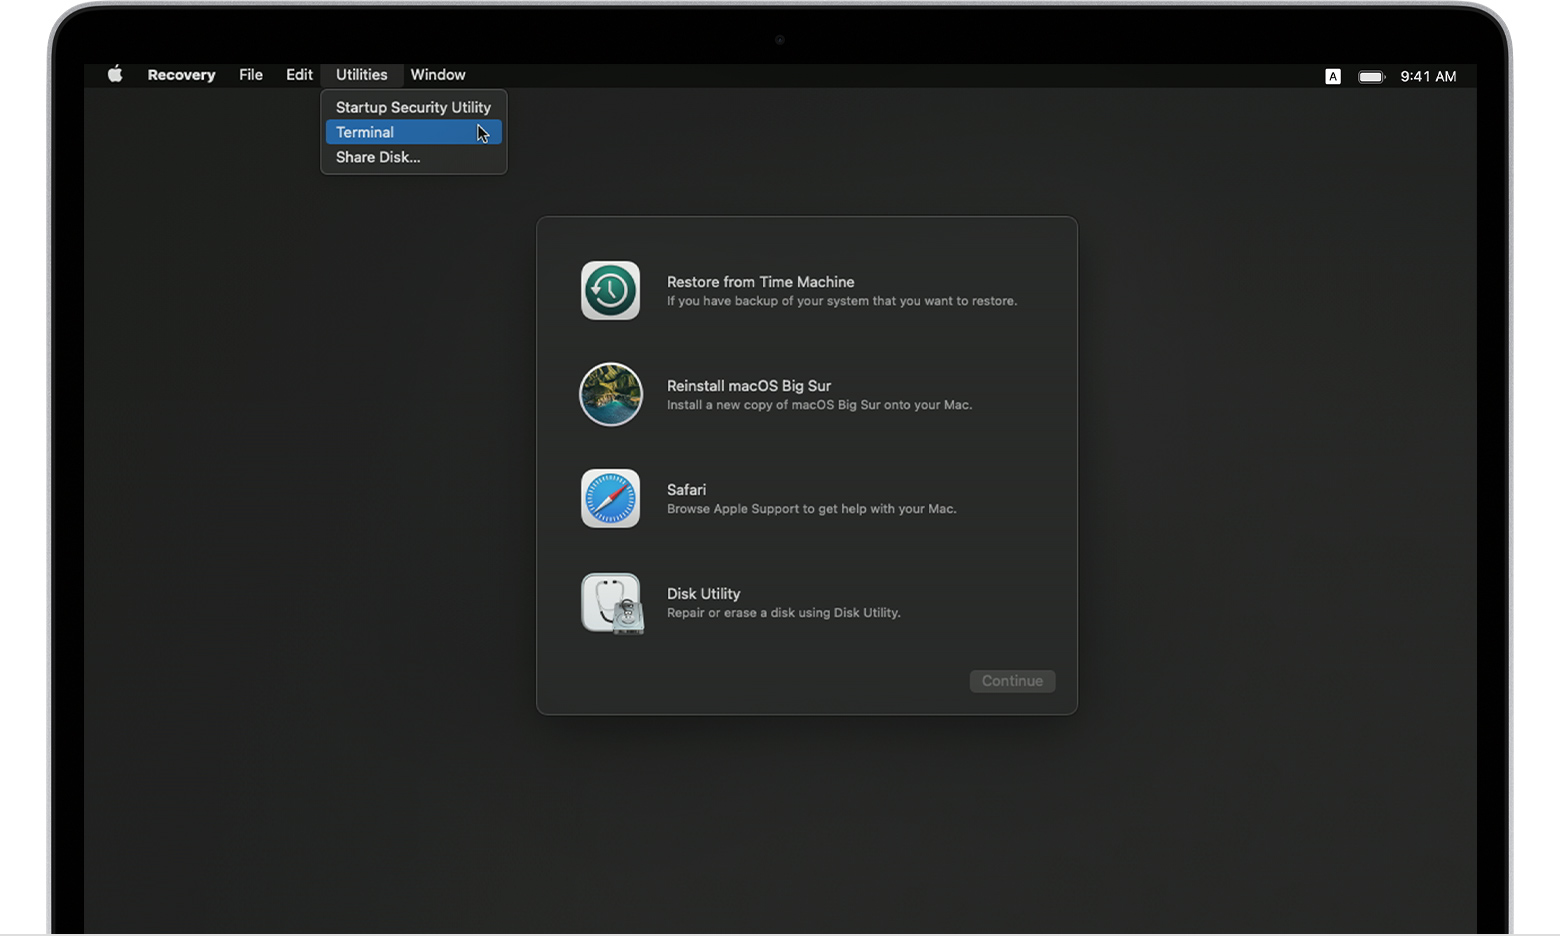
- When you see the utilities window, choose Utilities > Terminal from the menu bar.
- Type resetpassword in Terminal, then press Return.
- Click the Reset Password window to bring it to the front, then choose Recovery Assistant > Erase Mac from the menu bar.
- Click Erase Mac in the window that opens, then click Erase Mac again to confirm. When done, your Mac restarts automatically.
- Choose your language when prompted during startup.
- If you see an alert that the version of macOS on the selected disk needs to be reinstalled, click macOS Utilities.
- Your Mac will begin activating, which requires an internet connection. When your Mac is activated, click Exit to Recovery Utilities.
- Perform steps 3 through 9 once more, then continue to the next section, below.
Then use one of these methods to reinstall macOS
After erasing your Mac as described above, use one of these three methods to reinstall macOS.
Use the Reinstall macOS Big Sur utility
If your Mac was using macOS Big Sur 11.0.1 or later before you erased it, select Reinstall macOS Big Sur in the utilities window, then follow the onscreen instructions. If you’re not sure, use one of the other methods instead.
Or use a bootable installer
If you have another Mac and a suitable external flash drive or other storage device that you don’t mind erasing, you can create and use a bootable installer for macOS Big Sur.
Or use Terminal to reinstall
- Select Safari in the utilities window in macOS Recovery, then click Continue.
- Open the article you’re reading now by entering this web address in the Safari search field:
https://support.apple.com/kb/HT211983 - Select this block of text and copy it to the clipboard:
- Bring Recovery to the front by clicking outside of the Safari window.
- Choose Utilities > Terminal from the menu bar.
- Paste the block of text you copied in the previous step, then press Return.
- Your Mac now begins downloading macOS Big Sur. When done, type this command and press Return:
./Contents/MacOS/InstallAssistant_springboard - The macOS Big Sur installer opens. Follow the onscreen instructions to reinstall macOS.
If you need help or these instructions aren’t successful, please contact Apple Support.
Источник
1008F — или как раскирпичить свой Mac

Всем привет! В этом посте речь пойдет о бесконечном режиме восстановления macOS, ошибках 1008F, 2003F, 2004F и о том как их побороть.
Подобные ошибки можно встретить при попытке выполнить Internet Recovery своего Mac, а причин побуждающих к этому действию — множество. В моем случае, дело было так..
Предыстория
Одним осенним прохладным днем, пришло мне обновление Xcode 12.2 , а вместе с ним и macOS Big Sur. После обновления Xcode, он стал жутко тормозить, зависать, вылетать и терять последние изменения. Через несколько попыток переустановки Xcode, было принято решение обновиться до Big Sur. В принципе, проблему это не решило, зато багов докинуло. Затем, начался процесс переустановки macOS Big Sur с загрузочной флешки и из проблем осталось только отсутствие поддержки симуляторов iOS 
4. Выбрать проблемный MacBook и нажать «удалить из Найти айфон«;
6. Покинуть программу:
7. (Опционально) Удалить проблемный Mac из учетной записи Apple (Из списка устройств).
После этого можно попробовать восстановиться еще раз. К сожалению, данный способ мне не помог.
Я позвонил в службу поддержки Apple, где мне сообщили о том, что в моем случае 1008F возникает исключительно из-за плохого интернета (на самом деле из-за плохого интернета возникают ошибки 200+F). Также, мне посоветовали обратиться в авторизованный сервис (что логично) т.к. там и специалисты граммотные, и интернет хороший. Тут стоить отметить, что претензий к поддержке Apple я не имею. Было опробовано несколько Wi-Fi сетей в т.ч. и с мобильных устройств. Итог один — не помогло.
Путь сложный:
Далее возникла идея: поскольку жесткий диск несъёмный, слишком дорого было бы для Apple решать такие вопросы заменой материнских плат. Должна была быть какая-то лазейка, типа DFU режима, который был очень популярен на айфонах 3gs и 3g. Легкий гуглинг навел меня на несколько интересных статей: тут и тут. Дублировать содержимое статей смысла не вижу, в целом, они о том как вводить Mac в DFU режим и как с ним работать.
1. Нам нужен еще один Mac (к счастью такой нашелся);
2. Соединяем наш Mac (клиент) со вторым Mac (сервер) кабелем питания UCB-C — UCB-C (руководство по ссылкам выше);
3. Скачиваем на Mac (сервер) утилиту Apple Configurator 2 и запускаем ее;
4. Вводим Mac (клиент) в DFU;
5. В утилите Apple Configurator 2: Правая кнопка мыши > Actions > Advanced > Revive Device:
6. После того как все loading — индикаторы прокрутятся:
а на Mac (клиент) произойдет вот это:
нужно попробовать запустить процедуру восстановления через Shift-Option-Command-R.
7. Если вы по прежнему получаете 1008F (не 2003F, 2004F — о них позже), переходите к п8.
8. Требуется повторить действия с п.1 по п.4. После чего выбрать Apple Configurator 2 пункт Restore.
9. У вас надеюсь все будет хорошо, а вот я получил сообщение об ошибке:
что-то типа такого, только код был другой.
10. Далее я вывел Mac (клиент) из DFU режима и загрузил его через Shift-Option-Command-R.
11. Начался заветный процесс восстановления, который периодически падал в ошибки 2003F и 2004F.
2003F, 2004F
2003F, 2004F — это ошибки связанные с нестабильным, медленным интернет соединением. Поговаривают, что есть и другие 200+F ошибки, но их я на своем пути не встретил.
Тут стоить отметить, что интернет-провайдер у меня полное расстройство, поэтому решение было следующим:
На роутере я прописал DNS: основной сервер 8.8.8.8, альтернативный 8.8.4.4;
Сделал WI-FI сеть без пароля, но с фильтрацией по MAC — адресам, поскольку наткнулся на информацию о том, что Mac в процессе Internet Recovery может забывать пароль от WI-FI;
Также могут помочь сброс NVRAM или PRAM;
Запускать Mac через Shift-Option-Command-R, можно даже после того, как вы получили ошибку 200+F. Бывают случаи, когда загрузка происходит не с первого раза;
В моем случае, я дождался 6 утра, пока основные пользователи моего провайдера спят, а в Купертино — ночь, значит нагрузка на сервера Apple значительно меньше. Загрузил Mac через Shift-Option-Command-R и случилось чудо.
Дальше у меня загрузился Recovery macOS Mojave, т.к. именно с ней поставлялся MacBook. В дисковой утилите жесткий диск определялся как неизвестное устройство, после форматирования его со схемой разделов GUID, установка macOS продолжается в обычном режиме.
Заключение
На всю эту историю у меня ушло в сумме около трех дней, поэтому если этот пост сэкономит кому-нибудь хоть каплю времени и нервов — будет отлично. Тем не менее, прошу обратить внимание: описанное выше происходило со мной, у вас может быть иначе. Все действия вы выполняете на свой страх и риск. От себя — я бы рекомендовал перед переустановкой macOS включать загрузку с USB — носителей, отвязывать Mac от учетки и выполнять установку с флешки. Жалею ли я о том, что не сделал так сам? — Нет 🙂
Желаю вам легких апдейтов, даунгрейдов и вообще поменьше багов и лагов.
По результатам опроса, написал о том как откатиться с macOS Big Sur до macOS Catalina. Прочитать об этом можно тут. Спасибо за проявленный интерес!
Источник


