- Обновление macOS на компьютере Mac
- Upgrade to macOS Big Sur
- Chances are, your Mac can run macOS Big Sur
- Make sure you’re ready to upgrade.
- Upgrading is free and easy
- Upgrading from macOS Catalina 10.15 or Mojave 10.14?
- Upgrading from an older version of macOS?
- General Requirements
- Mac Hardware Requirements
- Feature Requirements
- Hey Siri
- Dictation, Voice Control, and Voice Memos
- Spotlight Suggestions
- Gestures
- Photo Booth
- FaceTime
- Apple TV
- Sidecar
- Continuity Camera
- Continuity Sketch and Continuity Markup
- Handoff
- Instant Hotspot
- Universal Clipboard
- Auto Unlock
- Approve with Apple Watch
- Apple Pay on the Web
- Phone Calling
- AirDrop
- AirPlay
- Time Machine
- Maps electric vehicle routing
- Maps license plate restrictions
- Boot Camp
- Exchange Support
- Windows Migration
- App Store
- Photos
- Update your iPhone, iPad, or iPod touch
- Before you update
- Update your iPhone, iPad, or iPod touch wirelessly
- If you see an alert when updating wirelessly
- If you need more space when updating wirelessly
- Customize automatic updates
- Revive or restore a Mac with Apple silicon with Apple Configurator 2
- What does a revive do to your Mac?
- What does a restore do to your Mac?
- Before you begin
- How the revive and restore processes work
- Step 1: Connect the Mac computers
- Step 2: Prepare the Mac you want to revive or restore:
- Step 3: Revive the firmware and install the latest recoveryOS
- Step 4: Restore the firmware, erase all data and reinstall the latest version of recoveryOS and macOS
Обновление macOS на компьютере Mac
Используйте функцию «Обновление ПО», чтобы установить обновления для macOS, в том числе для встроенных приложений, таких как Safari.
- В меню Apple () в углу экрана выберите «Системные настройки».
- Нажмите «Обновление ПО».
- Нажмите «Обновить сейчас» или «Обновление ПО».
- «Обновить сейчас»: последние обновления установленной версии. Например, узнайте об обновлениях macOS Big Sur.
- «Обновление ПО»: новая основная версия с новым именем, например macOS Big Sur. Узнайте о последнем обновлении macOS или о старых версиях macOS, которые все еще доступны.

Если возникают проблемы с поиском или установкой обновлений:
- Если в меню «Обновление ПО» отображается сообщение о том, что на компьютере Mac установлена последняя версия ПО, это значит, что обновлена macOS и все устанавливаемые ею приложения, в том числе Safari, «Сообщения», «Почта», «Музыка», «Фото», FaceTime, «Календарь» и «Книги».
- Если вы хотите обновить приложения, загруженные из App Store, используйте App Store для получения обновлений.
- Если вы хотите обновить устройство iOS, узнайте, как обновить iPhone, iPad или iPod touch.
- Если на компьютере Mac отсутствует функция «Обновление ПО», используйте App Store для получения обновлений.
- Если при установке обновления произошла ошибка, узнайте, как устранить проблемы при установке.
Источник
Upgrade to macOS Big Sur
macOS Big Sur elevates the most advanced desktop operating system in the world to a new level of power and beauty. Experience Mac to the fullest with a refined new design. Enjoy the biggest Safari update ever. Discover new features for Maps and Messages. Get even more transparency around your privacy.
Chances are, your Mac can run macOS Big Sur
The following models are supported:
- MacBook (2015 or later)
- MacBook Air (2013 or later)
- MacBook Pro (Late 2013 or later)
- Mac mini (2014 or later)
- iMac (2014 or later)
- iMac Pro (2017 or later)
- Mac Pro (2013 or later)
To see which model you have, click the Apple icon in your menu bar and choose About This Mac.
Make sure you’re ready to upgrade.
Before you upgrade, we recommend that you back up your Mac. If your Mac is running OS X Mavericks 10.9 or later, you can upgrade directly to macOS Big Sur. You’ll need the following:
- OS X 10.9 or later
- 4GB of memory
- 35.5GB available storage on macOS Sierra or later*
- Some features require an Apple ID; terms apply.
- Some features require a compatible internet service provider; fees may apply.
Upgrading is free and easy
Upgrading from macOS Catalina 10.15 or Mojave 10.14?
Go to Software Update in System Preferences to find macOS Big Sur. Click Upgrade Now and follow the onscreen instructions.
Upgrading from an older version of macOS?
If you’re running any release from macOS 10.13 to 10.9, you can upgrade to macOS Big Sur from the App Store. If you’re running Mountain Lion 10.8, you will need to upgrade to El Capitan 10.11 first.
If you don’t have broadband access, you can upgrade your Mac at any Apple Store.
General Requirements
- OS X 10.9 or later
- 4GB of memory
- 35.5GB available storage on macOS Sierra or later*
- Some features require an Apple ID; terms apply.
- Some features require a compatible internet service provider; fees may apply.
Mac Hardware Requirements
For details about your Mac model, click the Apple icon at the top left of your screen and choose About This Mac. These Mac models are compatible with macOS Big Sur:
- MacBook (2015 or later)
- MacBook Air (2013 or later)
- MacBook Pro (Late 2013 or later)
- Mac mini (2014 or later)
- iMac (2014 or later)
- iMac Pro (2017 or later)
- Mac Pro (2013 or later)
Feature Requirements
Requires a broadband internet connection and microphone (built-in or external).
Hey Siri
Supported by the following Mac models:
- MacBook Pro (2018 or later)
- MacBook Air (2018 or later)
- iMac Pro (2017 or later)
Dictation, Voice Control, and Voice Memos
Requires a microphone (built-in or external).
Spotlight Suggestions
Requires a broadband internet connection.
Gestures
Requires a Multi-Touch trackpad, Force Touch trackpad, Magic Trackpad, or Magic Mouse.
Force Touch gestures require a Force Touch trackpad.
VoiceOver gestures require a Multi-Touch trackpad, Force Touch trackpad, or Magic Trackpad.
Photo Booth
Requires a FaceTime or iSight camera (built-in or external) or USB video class (UVC) camera.
FaceTime
Audio calls require a microphone (built-in or external) and broadband internet connection.
Video calls require a built-in FaceTime camera, an iSight camera (built-in or external), or a USB video class (UVC) camera; and broadband internet connection.
Apple TV
High dynamic range (HDR) video playback is supported by the following Mac models:
- MacBook Pro (2018 or later)
- iMac Pro (2017 or later)
- Mac Pro (2019) with Pro Display XDR
Dolby Atmos soundtrack playback is supported by the following Mac models:
- MacBook Air (2018 or later)
- MacBook Pro (2018 or later)
Sidecar
Supported by the following Mac models:
- MacBook (2016 or later)
- MacBook Air (2018 or later)
- MacBook Pro (2016 or later)
- Mac mini (2018 or later)
- iMac (late 2015 or later)
- iMac Pro (2017 or later)
- Mac Pro (2019)
Supported by all iPad models with Apple Pencil support:
- 12.9-inch iPad Pro
- 11-inch iPad Pro
- 10.5-inch iPad Pro
- 9.7-inch iPad Pro
- iPad (6th generation or later)
- iPad mini (5th generation)
- iPad Air (3rd and 4th generation)
Continuity Camera
Requires an iPhone or iPad that supports iOS 12 or later.
Continuity Sketch and Continuity Markup
Requires an iPhone with iOS 13 or later or an iPad with iPadOS 13 or later.
Handoff
Requires an iPhone or iPad with a Lightning connector or with USB-C and iOS 8 or later.
Instant Hotspot
Requires an iPhone or iPad with cellular connectivity, a Lightning connector or USB-C, and iOS 8.1 or later. Requires Personal Hotspot service through your carrier.
Universal Clipboard
Requires an iPhone or iPad with a Lightning connector or with USB-C and iOS 10 or later.
Auto Unlock
Requires an Apple Watch with watchOS 3 or later or an iPhone 5 or later.
Approve with Apple Watch
Requires an Apple Watch with watchOS 6 or later or an iPhone 6s or later with iOS 13 or later.
Apple Pay on the Web
Requires a MacBook Pro or MacBook Air with Touch ID, an iPhone 6 or later with iOS 10 or later, or an Apple Watch with watchOS 3 or later.
Phone Calling
Requires an iPhone with iOS 8 or later and an activated carrier plan.
Requires an iPhone with iOS 8.1 or later and an activated carrier plan.
Requires an iPhone with iOS 12 or later and a configured Home app.
AirDrop
AirDrop to iOS and iPadOS devices requires an iPhone or iPad with a Lightning connector or with USB-C and iOS 7 or later.
AirPlay
AirPlay Mirroring requires an Apple TV (2nd generation or later).
AirPlay for web video requires an Apple TV (2nd generation or later).
Peer-to-peer AirPlay requires a Mac (2012 or later) and an Apple TV (3rd generation rev A, model A1469 or later) with Apple TV software 7.0 or later.
Time Machine
Requires an external storage device (sold separately).
Maps electric vehicle routing
Requires an iPhone with iOS 14 and a compatible electric vehicle.
Maps license plate restrictions
Requires an iPhone running iOS 14 or an iPad running iPadOS 14.
Boot Camp
Allows Boot Camp installations of Windows 10 on supported Mac models.
Exchange Support
Requires Microsoft Office 365, Exchange 2016, Exchange 2013, or Exchange Server 2010. Installing the latest Service Packs is recommended.
Windows Migration
Supports OS X 10.7 or later and Windows 7 or later.
App Store
Available only to persons age 13 or older in the U.S. and many other countries and regions.
Photos
The improved Retouch tool is supported on the following Mac models:
- MacBook Pro (15-inch and 16-inch models) introduced in 2016 or later
- iMac (Retina 5K models) introduced in 2014 or later
- iMac (Retina 4K models) introduced in 2017 or later
- iMac Pro (2017 or later)
- Mac Pro introduced in 2013 or later
Источник
Update your iPhone, iPad, or iPod touch
Learn how to update your iPhone, iPad, or iPod touch to the latest version of iOS or iPadOS.
You can update your iPhone, iPad, or iPod touch to the latest version of iOS or iPadOS wirelessly.
If you’re using iOS or iPadOS 14.5 or later, you might now see the option to choose between two software update versions. This option allows you to choose between updating to the latest version of iOS or iPadOS 15 as soon as it’s released, or continuing on iOS or iPadOS 14 while still getting important security updates for a period of time.
If you can’t see the update on your device, you can update manually using your computer. Learn how to update your device manually if you’re using a Mac with macOS Catalina or later, or if you’re using a Mac with macOS Mojave or earlier or a Windows PC.
Before you update
Back up your device using iCloud or your computer.

Update your iPhone, iPad, or iPod touch wirelessly
If a message says that an update is available, tap Install Now to update now. Or you can tap Later and choose Install Tonight or Remind Me Later. If you tap Install Tonight, just plug your device into power at night, and your device will update automatically overnight.
You can also follow these steps:
- Plug your device into power and connect to the internet with Wi-Fi.
- Go to Settings > General, then tap Software Update.
- If you see two software update options available, choose the one that you want to install.

- Tap Install Now. If you see Download and Install instead, tap it to download the update, enter your passcode, then tap Install Now. If you don’t know your passcode, learn what to do.
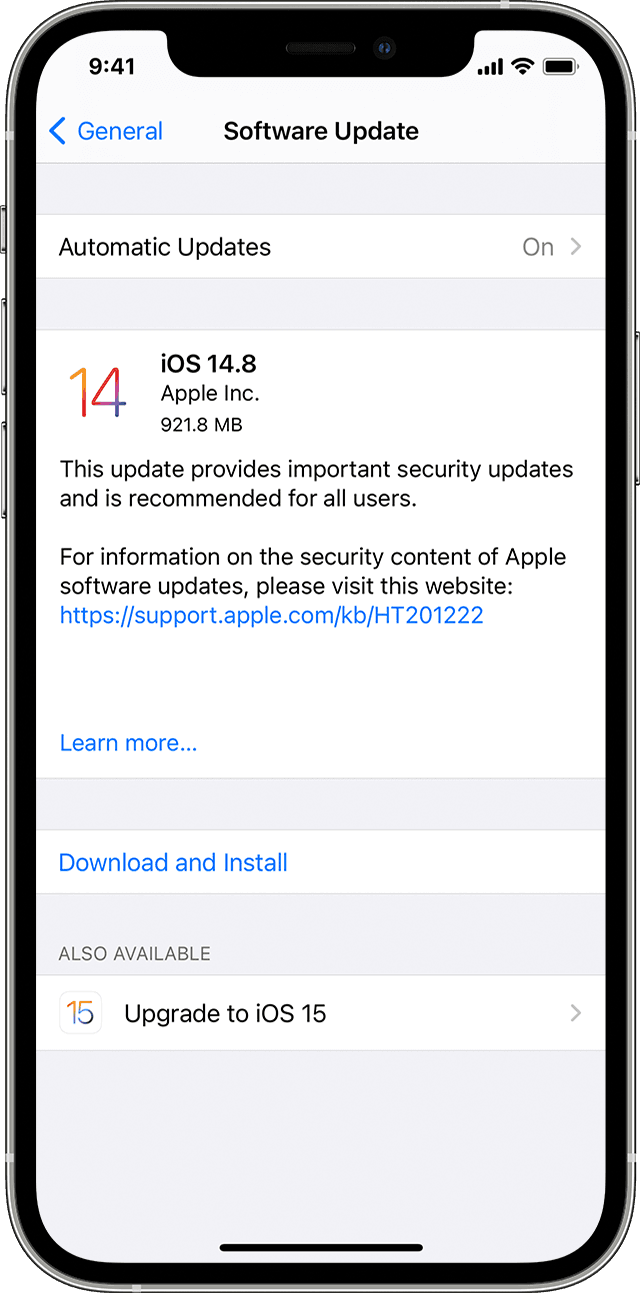
You might see that your device is up to date on its current version, and there’s an update available. For example, even if your device is up to date on the latest version of iOS 14, there might be an option to update to iOS 15.
If you see an alert when updating wirelessly
Some software updates aren’t available wirelessly. VPN or proxy connections might prevent your device from contacting the update servers.
If you need more space when updating wirelessly
If a message asks to temporarily remove apps because the software needs more space for the update, tap Continue to allow apps to be removed. After installation is complete, those apps are automatically reinstalled. If you tap Cancel instead, you can delete content manually from your device to add more space.
Customize automatic updates
Your device can update automatically overnight while it’s charging. Here’s how to turn on automatic updates:
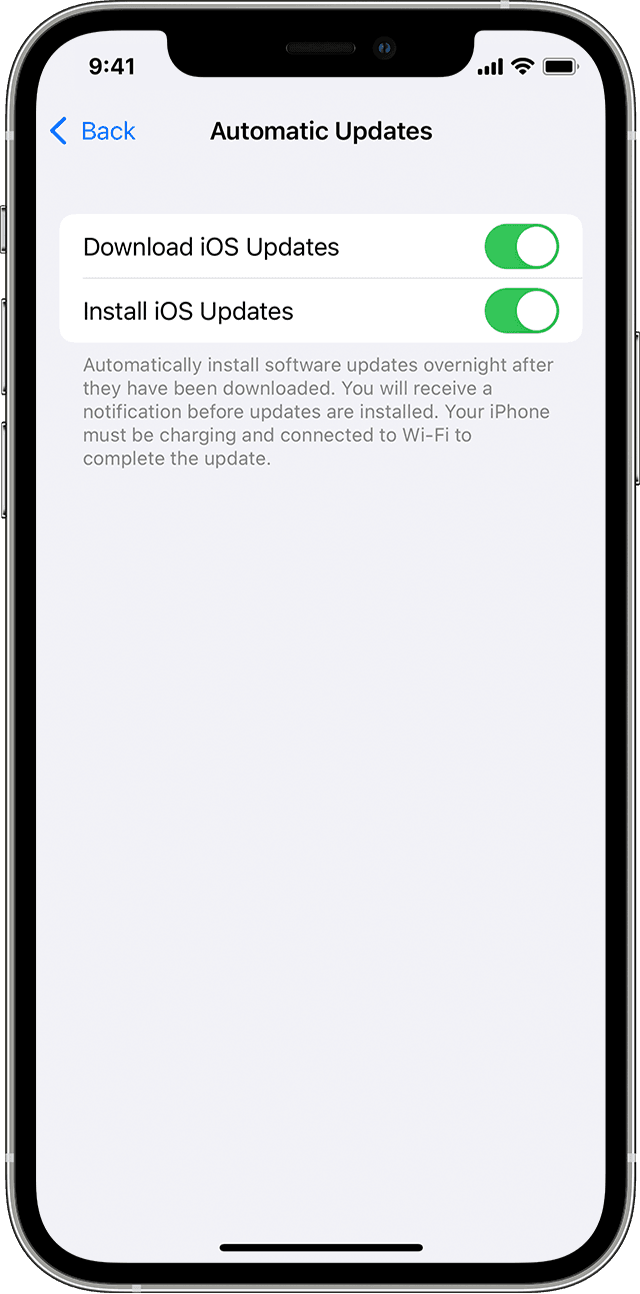
- Go to Settings > General > Software Update.
- Tap Automatic Updates, then turn on Download iOS Updates.
- Turn on Install iOS Updates. Your device will automatically update to the latest version of iOS or iPadOS. Some updates might need to be installed manually.
![]()
Upgrading to the latest version of iOS or iPadOS software provides the latest features, security updates, and bug fixes. Not all features are available on all devices or in all regions. Battery and system performance may be influenced by many factors including network conditions and individual use; actual results may vary.
Источник
Revive or restore a Mac with Apple silicon with Apple Configurator 2
In very rare circumstances, such as a power failure during a macOS update or upgrade, a Mac may become unresponsive and so the firmware must be revived or restored.
Important: First try reviving the computer. If that fails or if you can’t start the Mac from the startup volume or the recoveryOS, you must restore the firmware and erase the internal flash storage.
What does a revive do to your Mac?
A revive updates the firmware and updates recoveryOS to the latest version. A revive is designed to not make any changes to the startup volume, the user’s data volume, or any other volumes. User data may be retained if recoverable.
What does a restore do to your Mac?
A restore updates the firmware, updates recoveryOS to the latest version, and erases and installs the latest version of macOS on your internal storage. When this process is complete, any data on any internal volumes is unrecoverable.
You must restore the firmware and erase the internal flash storage if:
Reviving the firmware is unsuccessful
You can’t start the Mac from the startup volume or the recoveryOS
Before you begin
These revive and restore instructions cover the following Mac computers with Apple silicon:
iMac (24-inch, M1, 2021)
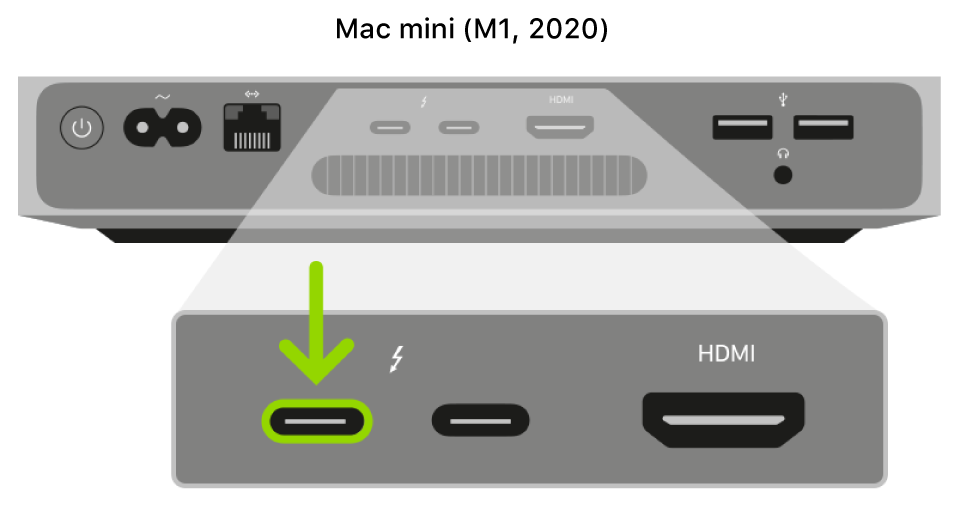
Mac mini (M1, 2020)
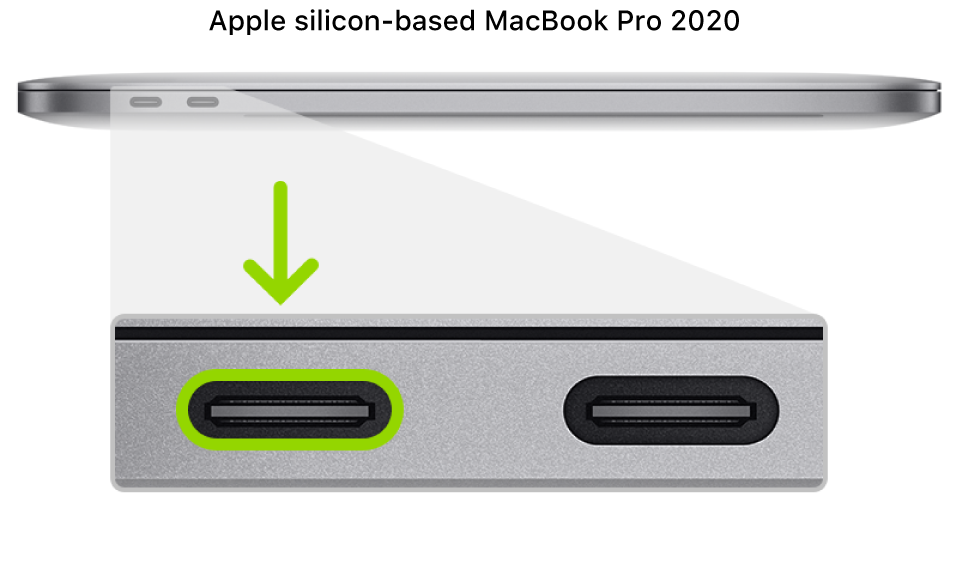
MacBook Pro (13-inch, M1, 2020)
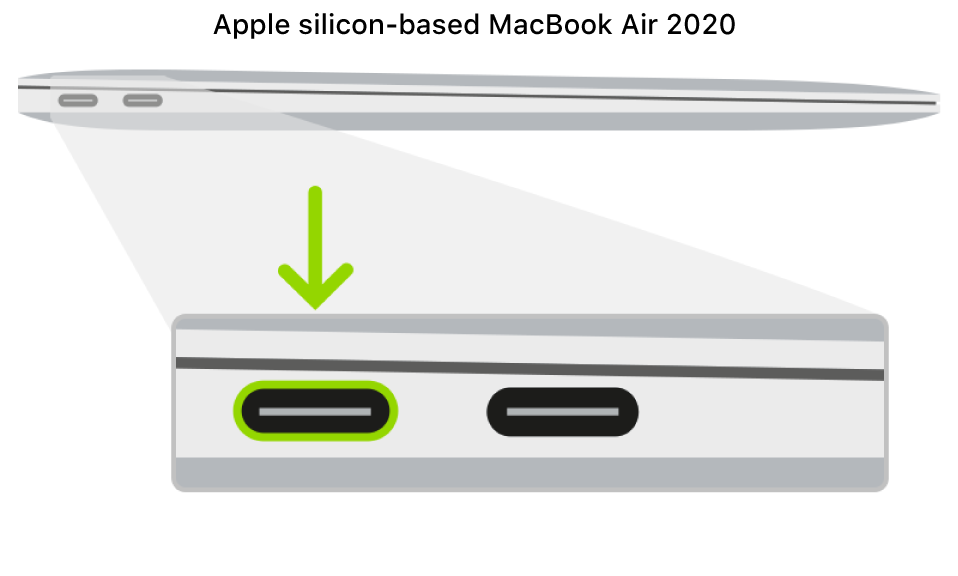
MacBook Air (M1, 2020)
Make sure you have:
The latest version of Apple Configurator 2 installed on a Mac running macOS 10.15.6 or later
You may need to configure your web proxy or firewall ports to allow all network traffic from Apple devices to Apple’s network 17.0.0.0/8. For more information on the ports used by Apple products, see the Apple Support article Use Apple products on enterprise networks. For more information on whether your network uses a web proxy or firewall, consult your router manual or your internet provider.
A supported USB-C to USB-C charge cable, such as the one sold by Apple (may not be available in all countries or regions) or a supported USB-A to USB-C cable
The USB-C cable must support both power and data. Thunderbolt 3 cables aren’t supported.
How the revive and restore processes work
The revive and restore processes involve the following steps:
Step 1. Plug the Mac computers together with a supported USB-C cable, locate Apple Configurator 2 in the Applications folder or in Launchpad, then launch Apple Configurator 2 on the first Mac.
Step 2. Restart the second Mac using a special key sequence. The key sequence varies according to the type of Mac you want to revive or restore.
Step 3. Use Apple Configurator 2 to revive the Mac.
Step 4. If a revive is unsuccessful, you can use Apple Configurator 2 to restore the Mac.
Step 1: Connect the Mac computers
Make sure your first Mac is plugged into a power source and started.
Plug in the USB-C cable (along with any adapters needed) and connect the two Mac computers.
Launch Apple Configurator 2  .
.
Step 2: Prepare the Mac you want to revive or restore:
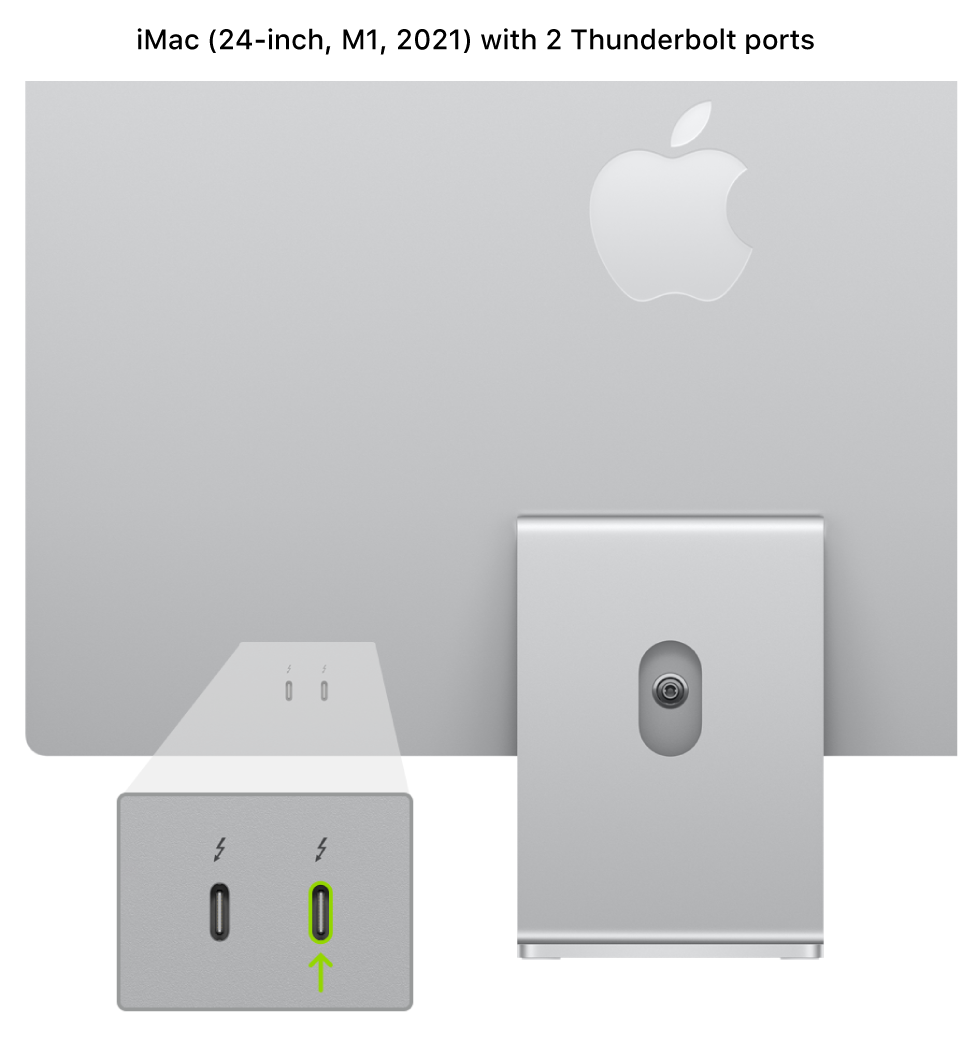
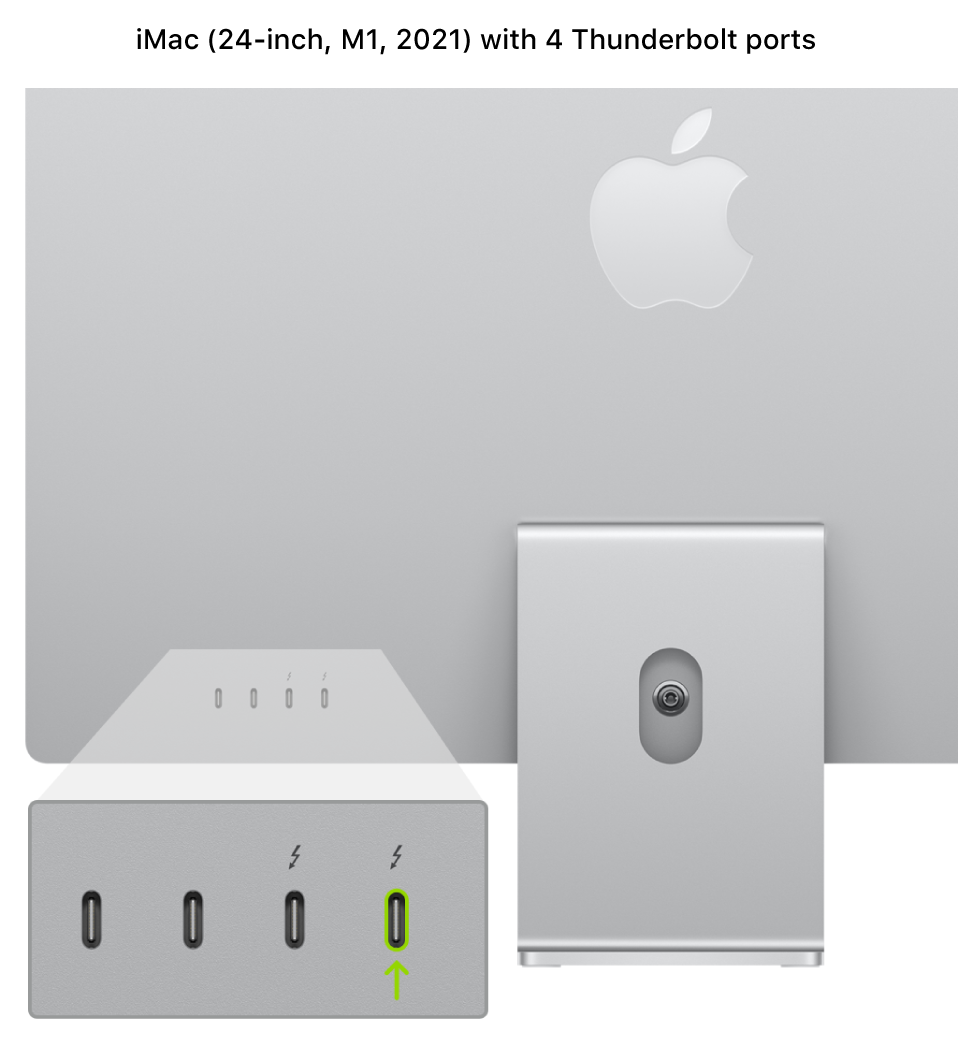
If reviving or restoring an iMac (24-inch, M1, 2021):
1. Disconnect the iMac from power.
2. Plug the USB-C cable into the Thunderbolt port closest to the stand.
3. While holding down the power button, connect the iMac to power and continue to hold the power button for about 3 seconds.
Note: You won’t see any screen activity from the iMac you want to revive or restore.
If reviving or restoring a Mac mini:
1. Connect a monitor to your Mac mini (so you can see when the process is complete).
2. Disconnect the Mac mini from power for at least 10 seconds.
3. Press and hold the power button.
4. Reconnect power while still holding the power button.
5. Release the power button.
The status indicator light should turn amber, and a DFU icon should appear in Apple Configurator 2 on the Mac mini .
Note: You won’t see any screen activity from the Mac mini you are trying to revive or restore.
If reviving or restoring an Apple notebook computer:
1. Press the power button.
2. While holding down the power button, at the same time press all three of the following keys for about 10 seconds:
The right Shift key
The left Option key
The left Control key
3. After 10 seconds, immediately release the three keys but continue to hold down the power button until a DFU icon appears in Apple Configurator 2 on the first Mac.
Note: You won’t see any screen activity from the MacBook Air or MacBook Pro you are trying to revive or restore.
Step 3: Revive the firmware and install the latest recoveryOS
In the Apple Configurator 2 window on the first Mac, select the DFU icon of the Mac whose chip firmware you want to revive and whose recoveryOS you want updated to the latest version.
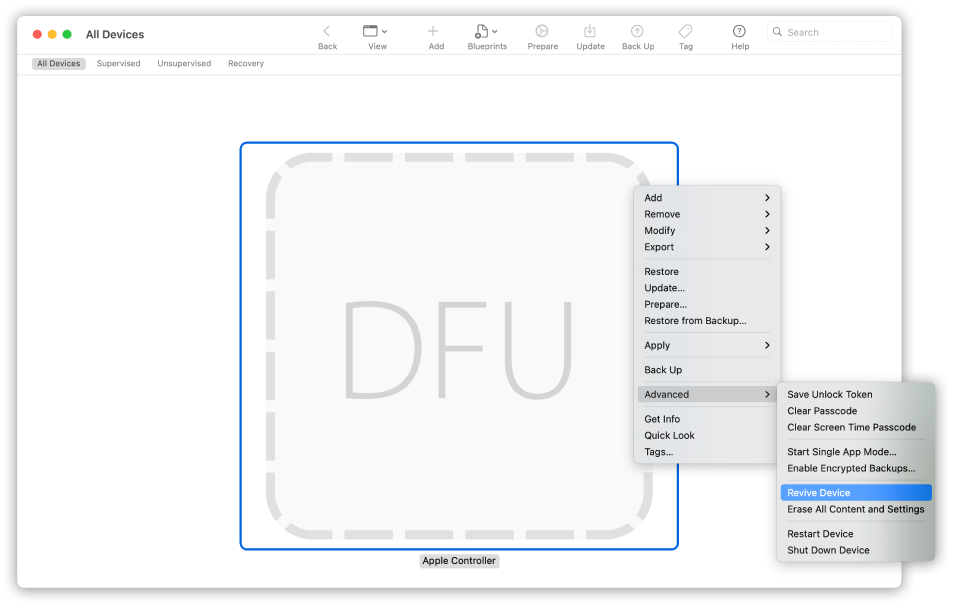
Do one of the following:
Choose Actions > Advanced > Revive Device, then click Revive.
Control-click the selected DFU icon, then choose Advanced > Revive Device, then click Revive.
Note: If you lose power to either Mac during this process, begin the revive process again.
Wait for the process to complete. During this process, an Apple logo will appear and disappear on the second Mac.
After the process successfully completes, your Mac will reboot.
Note: If the revive was unsuccessful, proceed to step 4.
Quit Apple Configurator 2 on the first Mac, then unplug any cables and adapters.
Step 4: Restore the firmware, erase all data and reinstall the latest version of recoveryOS and macOS
In the Apple Configurator 2 window on the first Mac, select the DFU icon of the Mac to be restored.
Do one of the following:
Choose Actions > Restore, then click Restore.
Control-click the selected DFU icon, then choose Actions > Restore, then click Restore.
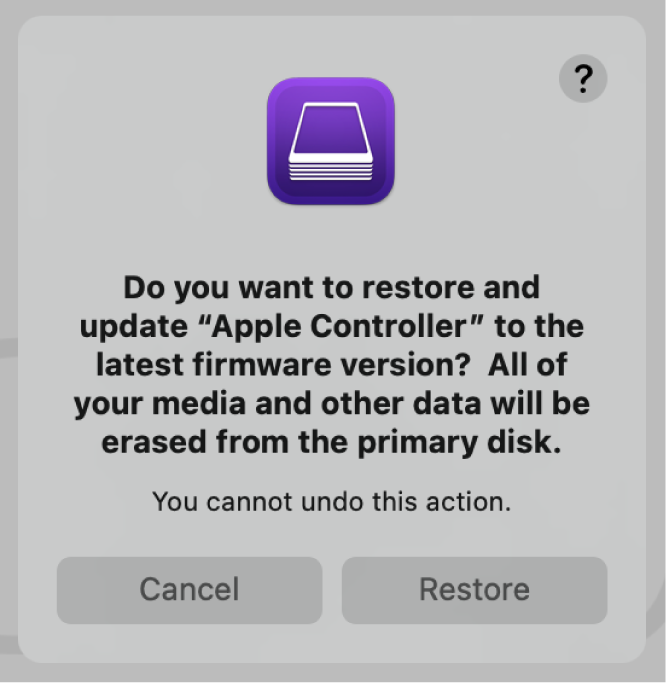 The restore confirmation dialog.
Note: If you lose power to either Mac during this process, begin the restore process again.
Wait for the process to complete. During this process, an Apple logo will appear and disappear on the second Mac.
After the process completes, your Mac will restart.
If the process was successful, you’re presented with the macOS Setup Assistant on the second Mac. If the macOS Setup Assistant doesn’t appear, repeat the restore process.
Quit Apple Configurator 2 on the first Mac, then unplug any cables and adapters.
Источник


