- Устранить ошибку «не удалось отключить диск» в утилите диска для Mac 2021
- зоÑа ÑÑÐ¸Ñ Ð°ÐµÑ
- Как устранить ошибку размонтирования с загрузочного USB-накопителя
- Как исправить ошибки дисковой утилиты через раздел восстановления Mac
- Как принудительно размонтировать диск с помощью командной строки в Mac OS
- Resolve a “Couldn’t Unmount Disk” Error in Disk Utility for Mac
- How to Resolve the Unmount Error with a USB Boot Drive
- How to Fix Disk Utility Errors via Mac Recovery Partition
- How to Forcibly Unmount a Disk by Command Line in Mac OS
- How to Force Eject a Volume or Drive in OS X
- Method 1
- Method 2
- Question: Q: High Sierra install fails — «unable to unmount volume for repair»
- Helpful answers
Устранить ошибку «не удалось отключить диск» в утилите диска для Mac 2021
зоÑа ÑÑÐ¸Ñ Ð°ÐµÑ

Дисковая утилита обычно работает без сбоев, но разочаровывающая ошибка «Не удалось отключить диск» может остановить любую задачу, которая находится прямо на ее пути. Это может происходить во время создания разделов, проверки и восстановления диска и даже во время форматирования, и, как правило, дополнительной информации о том, как решить проблему, или даже о том, что проблема связана с сообщением об ошибке или приложением в Mac OS, почти нет.,
Обычно ошибка «Не удалось размонтировать диск» появляется при изменении текущего загрузочного диска, или, если диск пытался стереть, вы можете обнаружить, что стирание завершилось неудачно с ошибкой не удалось размонтировать диск. В первой ситуации, когда модифицируется загрузочный диск, простейшим решением является загрузка с другого диска и запуск оттуда дисковой утилиты. Для загрузочного диска не должно иметь значения, для какой версии Mac OS X он предназначен (при условии, по крайней мере, 10.7, 10.8, 10.9, 10.10, 10.12, 10.13, 10.14 и т. Д.), Единственное требование — наличие в нем дисковой утилиты — которая они все делают. Это позволит вам решить проблему независимо от причины одним из двух способов: первое — это надежное решение проблемы, а другое работает только иногда. Мы рассмотрим оба с небольшим объяснением. Мы также покажем вам способ принудительного размонтирования диска с помощью командной строки, хотя этот подход следует использовать с осторожностью, поскольку он может привести к потере данных на данном диске.
Как устранить ошибку размонтирования с загрузочного USB-накопителя
Это рекомендуемый метод, потому что он всегда должен исправить ошибку. Для выполнения этой задачи вам понадобится любой загрузочный диск Mac OS X. Для этой цели я использовал диск установщика загрузки Mavericks, но другие также должны работать, будь то установочные диски или просто диски восстановления, важно, чтобы они были загрузочными и отделенными от основной загрузочный диск, на котором хранится установленная ОС:
- Подключите USB-накопитель к Mac и перезагрузите компьютер
- Удерживайте нажатой клавишу OPTION во время загрузки, затем выберите подключенный загрузочный диск (обычно в меню загрузки отображается оранжевый значок).
- В меню загрузки выберите «Дисковая утилита» (если вы используете установочный диск, откройте меню «Утилиты», чтобы открыть Дисковую утилиту).
- Перейдите в раздел «Первая помощь» и проверьте диск, а затем отремонтируйте, если необходимо.
- Теперь выполните оригинальную задачу, которая вызвала ошибку «Не удалось отключить»
Недавно я столкнулся с этим дважды, сначала при попытке изменить разделы на диске, который возник одновременно с отдельной ошибкой «сбой раздела», и снова был вызван при попытке отформатировать эти разделы. Вышеуказанные шаги сделали свое дело, и все снова заработало, как и ожидалось.
Это хороший пример того, почему очень важно иметь загрузочный флэш-накопитель USB с любой версией Mac OS X, работающей на вашем Mac, потому что без отдельного загрузочного диска некоторые из этих ошибок были бы неразрешимыми. Такие загрузочные диски легко создавать самостоятельно, здесь приведены инструкции по созданию загрузочных дисков для OS X 10.9, OS X 10.8 и OS X 10.7. Для более старых компьютеров Mac, работающих под управлением предыдущих версий Mac OS X, обычно все, что работает под управлением OS X 10.6 или более ранней версии, будет иметь SuperDrive и, таким образом, поставляется с загрузочным DVD, который может служить той же цели
Как исправить ошибки дисковой утилиты через раздел восстановления Mac
Если ошибка «Невозможно отключить» вызвана первой помощью или форматированием незагрузочного раздела, вы можете исправить ошибку, загрузившись с раздела восстановления, который включен во все новые версии Mac OS X. Это не будет работать, если ошибка была вызвана попыткой изменить загрузочный диск через разделы или форматирование, и вам нужно будет использовать метод выше с загрузочным диском.
- Перезагрузите Mac, удерживая клавишу «Option», и выберите раздел «Восстановление».
- Выберите «Дисковая утилита» в меню загрузки
- Перейдите в раздел «Первая помощь», чтобы проверить и восстановить диск, или перейдите в раздел «Стереть», чтобы отформатировать диск.
Опять же, если диск с ошибками совпадает с основным загрузочным разделом, на котором также находится Recovery, описанный выше метод может не сработать для решения проблемы. В этом случае вам нужно будет загрузиться с отдельного USB-накопителя, чтобы исправить ошибку.
Как принудительно размонтировать диск с помощью командной строки в Mac OS
Другой метод использует командную строку для принудительного размонтирования диска, но это не самый рекомендуемый вариант из-за возможной потери данных.
Однако при таком подходе следует соблюдать осторожность, поскольку принудительное отключение диска может привести к потере данных на принудительном отключении диска. Таким образом, это подходит только в том случае, если вы планируете форматировать и стирать диск, который вы все равно принудительно извлекаете.
В командной строке Mac OS введите следующую строку:
diskutil unmountDisk force /Volumes/DRIVENAME
Замените «DRIVENAME» на имя тома, который вы хотите отключить, затем нажмите клавишу «RETURN», чтобы принудительно отключить диск.
Если это не сработает, вы можете сделать еще один шаг:
Вам также может понадобиться настроить таргетинг на диск по идентификатору устройства, чтобы принудительно размонтировать его, и в этом случае вы можете сначала найти диск с помощью:
Затем, когда вы найдете соответствующий диск с идентификатором (/ dev / disk1, / dev / disk2, / dev / disk3 и т. Д.), Вы можете настроить таргетинг на диск таким образом. В качестве примера синтаксиса здесь мы будем использовать / dev / disk3 для принудительного размонтирования из командной строки и использовать sudo, чтобы получить привилегии суперпользователя для этой задачи:
sudo diskutil unmountDisk force /dev/disk3
Нажмите return и введите пароль администратора, чтобы принудительно размонтировать диск с Mac.
Когда закончите, вы можете выйти из Терминала как обычно.
Знаете ли вы о другом решении, которое может разрешить сообщение об ошибке «Не удалось размонтировать диск» в Дисковой утилите? Поделитесь своим опытом и решениями в комментариях ниже!
Источник
Resolve a “Couldn’t Unmount Disk” Error in Disk Utility for Mac

Disk Utility usually works trouble-free, but a frustrating “Couldn’t Unmount Disk” error can halt whatever the attempted task is right in its tracks. This can happen during partitioning, disk verification and repair, and even during formatting, and there’s usually little to no additional information provided as to how to resolve the problem or even what the problem is with regards to the error message or the app in Mac OS.
Typically the “Couldn’t Unmount Disk” error pops up when the currently boot drive is being modified, or if a disk was trying to be erased you may find the erase failed with a couldn’t unmount disk error. For the former situation where the boot drive is being modified, the easiest solution is to boot from another drive and run Disk Utility from there instead. For the boot drive, it shouldn’t matter which version of Mac OS X it’s for (assuming 10.7, 10.8, 10.9, 10.10, 10.12, 10.13, 10.14, etc at least), the only requirement is that it has Disk Utility – which they all do. This will allow you to fix the problem, regardless of the cause, by one of two means, the first is a sure-thing to fix the issue, while the other only works sometimes. We’ll cover both with a bit of explanation. We’ll also show you a way to forcibly unmount a disk by command line, though that approach must be used with caution as it can lead to data loss on the drive in question.
How to Resolve the Unmount Error with a USB Boot Drive
This is the recommended method because it should always fix the error. You will need any Mac OS X boot drive to complete this task, I used a Mavericks boot installer drive for this purpose but others should work too, whether they are installation drives or just recovery drives, the important thing is they are bootable and separate from the primary boot disk that stores the installed OS:
- Attach the USB boot drive to the Mac and reboot
- Hold down the OPTION key during boot, then select the attached boot drive (typically has an orange icon at the boot menu)
- At the boot menu, choose “Disk Utility” (if using an Installer disk, pull down the “Utilities” menu to access Disk Utility)
- Go to “First Aid” and verify the disk, then repair if needed
- Now perform the original task that threw the “Couldn’t Unmount” error
I ran into this twice recently, first when attempting to modify partitions on a drive, which came right along with a separate “partition failed” error, and again was triggered when attempting to format those partitions. The above steps did the trick and everything was working again as expected.
This is a good example of why it’s very valuable to have a bootable USB thumb drive set up with whatever version of Mac OS X is running on your Macs, because without a separate boot drive some of these errors would be unresolvable. Such boot drives are easy to create on your own, here are instructions for making boot disks for OS X 10.9, OS X 10.8, and OS X 10.7. For older Macs running prior versions of Mac OS X, typically anything running OS X 10.6 or earlier will have a SuperDrive, and thus shipped with a bootable DVD that can serve this same purpose.
How to Fix Disk Utility Errors via Mac Recovery Partition
If the Unable to Unmount Error is triggered by first aid or formatting a non-boot partition, you may be able to fix the error by booting from the Recovery partition that is included with all new versions of Mac OS X. This will not work if the error was triggered by attempting to modify the boot disk through partitions or formatting, and you will need to use the method above with a boot disk instead.
- Reboot the Mac holding down the “Option” key and choose the Recovery partition
- Select “Disk Utility” from the boot menu
- Go to “First Aid” to verify and repair the disk, or go to “Erase” to format the disk
Again, if the disk throwing the errors is the same as the primary boot partition that Recovery is also on, the above method may not work to resolve the problem. In that case, you’ll need to boot from a separate USB drive to fix the error.
How to Forcibly Unmount a Disk by Command Line in Mac OS
Another method uses the command line to force unmount a disk, but this is not the top recommended option because of potential for data loss.
Caution must be used with this approach however because forcibly unmounting a disk can cause data loss of the drive being forcibly unmounted. Thus this is only appropriate if you plan on formatting and erasing the disk to you are force ejecting anyway.
From the command line of Mac OS, enter the following string:
diskutil unmountDisk force /Volumes/DRIVENAME
Replace “DRIVENAME” with the name of the volume you want to unmount, then hit RETURN key to force the drive to unmount.
If that doesn’t work, you can take this a step further:
You might also need to target the disk by device identifier to forcibly unmount it, in which case you can first find the disk with:
Then when you find the matching disk to the identifier (/dev/disk1, /dev/disk2, /dev/disk3, etc), you can target the disk to unmount as so. For the example syntax here we’ll use /dev/disk3 to forcibly unmount from command line, and using sudo which will gain superuser privileges for the task:
sudo diskutil unmountDisk force /dev/disk3
Hit return and enter the admin password to forcibly unmount the disk from the Mac.
When finished you can quit out of Terminal as usual.
Do you know of another solution that can resolve the “Couldn’t unmount disk” error message in Disk Utility? Share your experiences and solutions in the comments below!
Источник
How to Force Eject a Volume or Drive in OS X
Sometimes OS X doesn’t want to let you eject a volume or an external drive. Sometimes this is because a program is using a file on the volume in question, but other times the volume just seems to be stuck! Fortunately, there’s an easy solution! We’ll show you two ways to force your Mac to let go!
Method 1
The easiest and safest way to force a volume to eject is to open a new Finder window, locate the drive or volume in the left-hand column, right-click or option-click the volume, and select Eject “[Volume Name]” in the drop down menu.
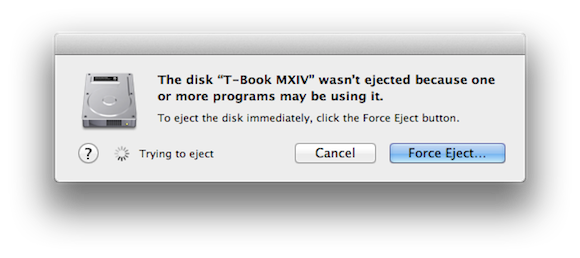
You may see a message like the one above, telling you that there may be a program using that volume. If you’re sure that’s not the case, then click “Force Eject…”, and Voila! That’s all there is to it!
Method 2
For those of you that prefer using Terminal, or would rather eject the drive with a single command, simply open Terminal, and type the following:
diskutil unmountDisk force /Volumes/DISK_NAME
Just replace DISK_NAME with the name of the volume you want to eject, press enter, and you’re done!
I’ve found that the first method is much more successful – I’ve had the disk fail to unmount more than once using the Terminal command.
Note: Make sure you have closed all applications that may be using the volume you want to eject, and that the volume is not in use. Otherwise, you risk facing data corruption or even data loss! And, as always, use Terminal commands at your own risk!
Источник
Question: Q: High Sierra install fails — «unable to unmount volume for repair»
Have a 2012 Mac Mini.
Third party SSD running Sierra for more than a year.
Sierra was installed over the previous version of OS.
When trying to install High Sierra, system takes me to a screen that says «unable to unmount volume for repair». Asks me to restart and back to normal login.
Checked the primary HDD via Disk Utility. Everything appears to be ok.
Searched the discussion forum and internet. No solution found.
Posted on Sep 26, 2017 10:58 AM
Contacted AppleCare. These two commands fixed the problem: sudo mv /.quota.ops.user /.quota.ops.user.org and mv /.quota.user /.quota.user.orig
Posted on Dec 1, 2017 7:29 AM
Helpful answers
Building upon previous answers, I have concluded that the problem is because the installer is glitched and can’t convert the drive to APFS. This problem can easily be circumvented:
1 . Boot to internet recovery or a USB drive with the High Sierra Installer (standard Sierra recovery mode won’t do).
2 . Go to Disk Utility and mount your Mac volume.
3 . Close Disk Utility and go to the command line terminal.
4 . Do diskutil umount force /Volumes/Macintosh HD/
Take note of your disk id. disk1 in my case.
5. Run diskutil apfs convert /dev/disk1s1
(replace disk1 with your disk id if needed)
6. Once this is done, reboot and High Sierra can be installed from either a USB drive or Internet Recovery mode (option+command+R)
Oct 19, 2017 11:27 AM
There’s more to the conversation
Loading page content
Page content loaded
I have this problem on a 2012 i7 Mac Mini with the Apple drive in it and have the same problem. My MBPr 2013 upgraded without issue.
Sep 26, 2017 7:51 PM
Mine is Mac mini 2.5GHz dual-core Intel Core i5.
The message I get — attaching a screenshot.
Sep 27, 2017 7:10 AM
I have the exact same issue with a late 2016 27-inch iMac with 1TB SSD. I’ve tried disk utility repairs both in Sierra, while in the High Sierra installer, and by booting into recovery mode. I’ve also re-downloaded the installer several times. I had no issues upgrading on my older iMac, 15-inch Macbook pro with touchbar, or VMs.
Relevant snippet from the logs:
Sep 27 15:32:48 Hostname OSInstaller[560]: The volume 3AC2B122-F459-4D4D-9D57-6FD3735A61C8 appears to be OK
Sep 27 15:32:48 Hostname diskmanagementd[562]: diskmanagement: rawLaunch_block_invoke: waitpid(2) pid=586 ret/errno=586/35 status=0x00000000 exit=0
Sep 27 15:32:48 Hostname OSInstaller[560]: Storage system check exit code is 0.
Sep 27 15:32:48 Hostname OSInstaller[560]: Repairing file system.
Sep 27 15:32:48 Hostname diskmanagementd[562]: diskmanagement: [DMToolMountMisc _DAOperation_performsync_:disk:options:mountpoint:arguments:asEUID:asEGID:timeo utSec:dissenter:dissenterPID:]: [un]mount failed: err=-69888 un0mt1=0 timeout=0 dissenter=1 dissenterpid=0 dissenterstatus=49168=0xc010
Sep 27 15:32:48 Hostname OSInstaller[560]: Volume could not be unmounted.
Sep 27 15:32:48 Hostname OSInstaller[560]: Restoring the original state found as mounted.
Sep 27 15:32:48 Hostname OSInstaller[560]: Disk repair retry failed too many times. Will hard fail.
Sep 27 15:32:48 Hostname OSInstaller[560]: OSIInstallElement errored out:Error Domain=com.apple.DiskManagement Code=-69673 «Unable to unmount volume for repair.» UserInfo=
Sep 27 15:32:48 Hostname storagekitd[561]: storagekitd: copyDiskForPath returned nil, error: -69808
Sep 27 15:32:48 Hostname storagekitd[561]: storagekitd: copyDiskForPath returned nil, error: -69878
Sep 27 15:32:48 Hostname OSInstaller[560]: ——- Install Failed ——-
Источник


