- Free up storage space on your Mac
- Find out how much storage is available on your Mac
- Manage storage on your Mac
- Store in iCloud
- Optimize Storage
- Empty Trash Automatically
- Reduce Clutter
- Where to find the settings for each feature
- Other ways that macOS helps automatically save space
- How to free up storage space manually
- Форматы файловой системы, доступные в Дисковой утилите на Mac
- Apple File System (APFS)
- Mac OS Extended
- Совместимые с Windows форматы
- Move your Photos library to save space on your Mac
- Prepare your storage device
- Move Photos Library to the storage device
- If you want to open a different Photos library
- If you get an error when moving Photos Library
- Free Up Disk Space in Mac OS X with 5 Quick Tips
- 1: Quit & Relaunch Apps
- 2: Tackle the Downloads Directory
- 3: Reboot the Mac & Install System Updates
- 4: Use OmniDiskSweeper to Find Hidden Space Hogs
- 5: Empty the Trash
- Bonus 1: Gamer? Check the Application Support Folder
- Bonus 2: Turn the Finder Status Bar On
- Bonus 3: Delete Apps You Don’t Use
Free up storage space on your Mac
Save space by storing your content in iCloud or using built-in tools to find and remove large or unneeded files.
The Optimized Storage features of your Mac help you save storage space by storing your content in iCloud and making it available on demand:
- When storage space is needed, files, photos, movies, email attachments, and other files that you seldom use are stored in iCloud automatically.
- Each file stays right where you last saved it, and downloads when you open it.
- Files that you’ve used recently remain on your Mac, along with optimized versions of your photos.
If you haven’t yet upgraded to macOS Sierra or later, learn about other ways to free up storage space.
Find out how much storage is available on your Mac
Choose Apple menu > About This Mac, then click Storage. Each segment of the bar is an estimate of the storage space used by a category of files. Move your pointer over each segment for more detail.
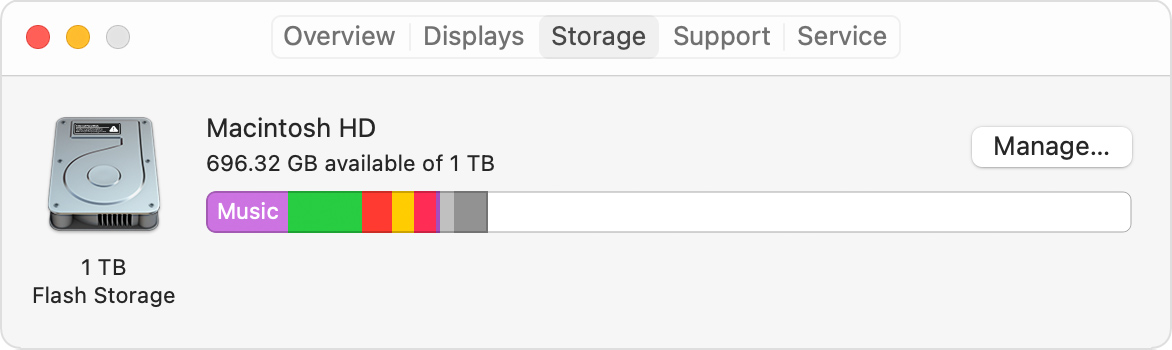
Click the Manage button to open the Storage Management window, pictured below.
Manage storage on your Mac
The Storage Management window offers recommendations for optimizing your storage. If some recommendations are already turned on, you will see fewer recommendations.
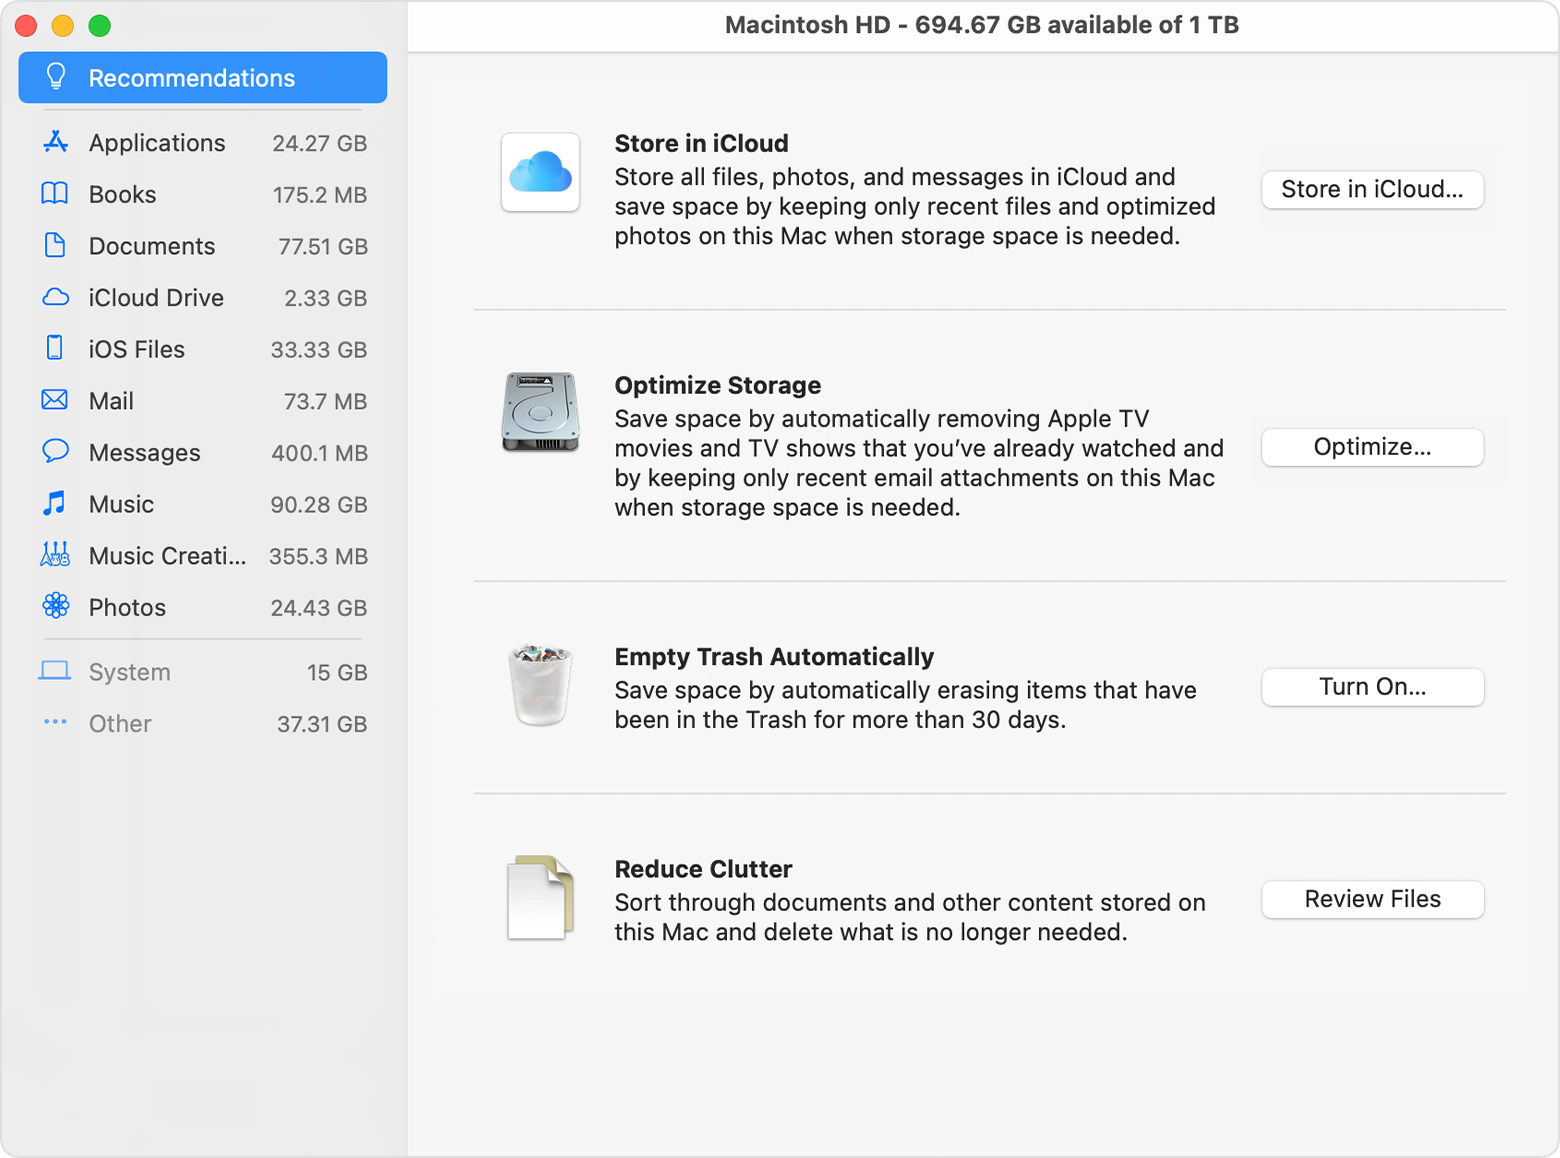
Store in iCloud
Click the Store in iCloud button, then choose from these options:
- Desktop and Documents. Store all files from these two locations in iCloud Drive. When storage space is needed, only the files you recently opened are kept on your Mac, so that you can easily work offline. Files stored only in iCloud show a download icon , which you can double-click to download the original file. Learn more about this feature.
- Photos. Store all original, full-resolution photos and videos in iCloud Photos. When storage space is needed, only space-saving (optimized) versions of photos are kept on your Mac. To download the original photo or video, just open it.
- Messages. Store all messages and attachments in iCloud. When storage space is needed, only the messages and attachments you recently opened are kept on your Mac. Learn more about Messages in iCloud.
Storing files in iCloud uses the storage space in your iCloud storage plan. If you reach or exceed your iCloud storage limit, you can either buy more iCloud storage or make more iCloud storage available. iCloud storage starts at 50GB for $0.99 (USD) a month, and you can purchase additional storage directly from your Apple device. Learn more about prices in your region.
Optimize Storage
Click the Optimize button to save space by automatically removing watched movies and TV shows. When storage space is needed, movies or TV shows that you purchased from Apple and already watched are removed from your Mac. Click the download icon next to a movie or TV show to download it again.
Your Mac will also save space by keeping only recent email attachments on this Mac when storage space is needed. You can manually download any attachments at any time by opening the email or attachment, or saving the attachment to your Mac.
Optimizing storage for movies, TV shows, and email attachments doesn’t require iCloud storage space.
Empty Trash Automatically
Empty Trash Automatically permanently deletes files that have been in the Trash for more than 30 days.
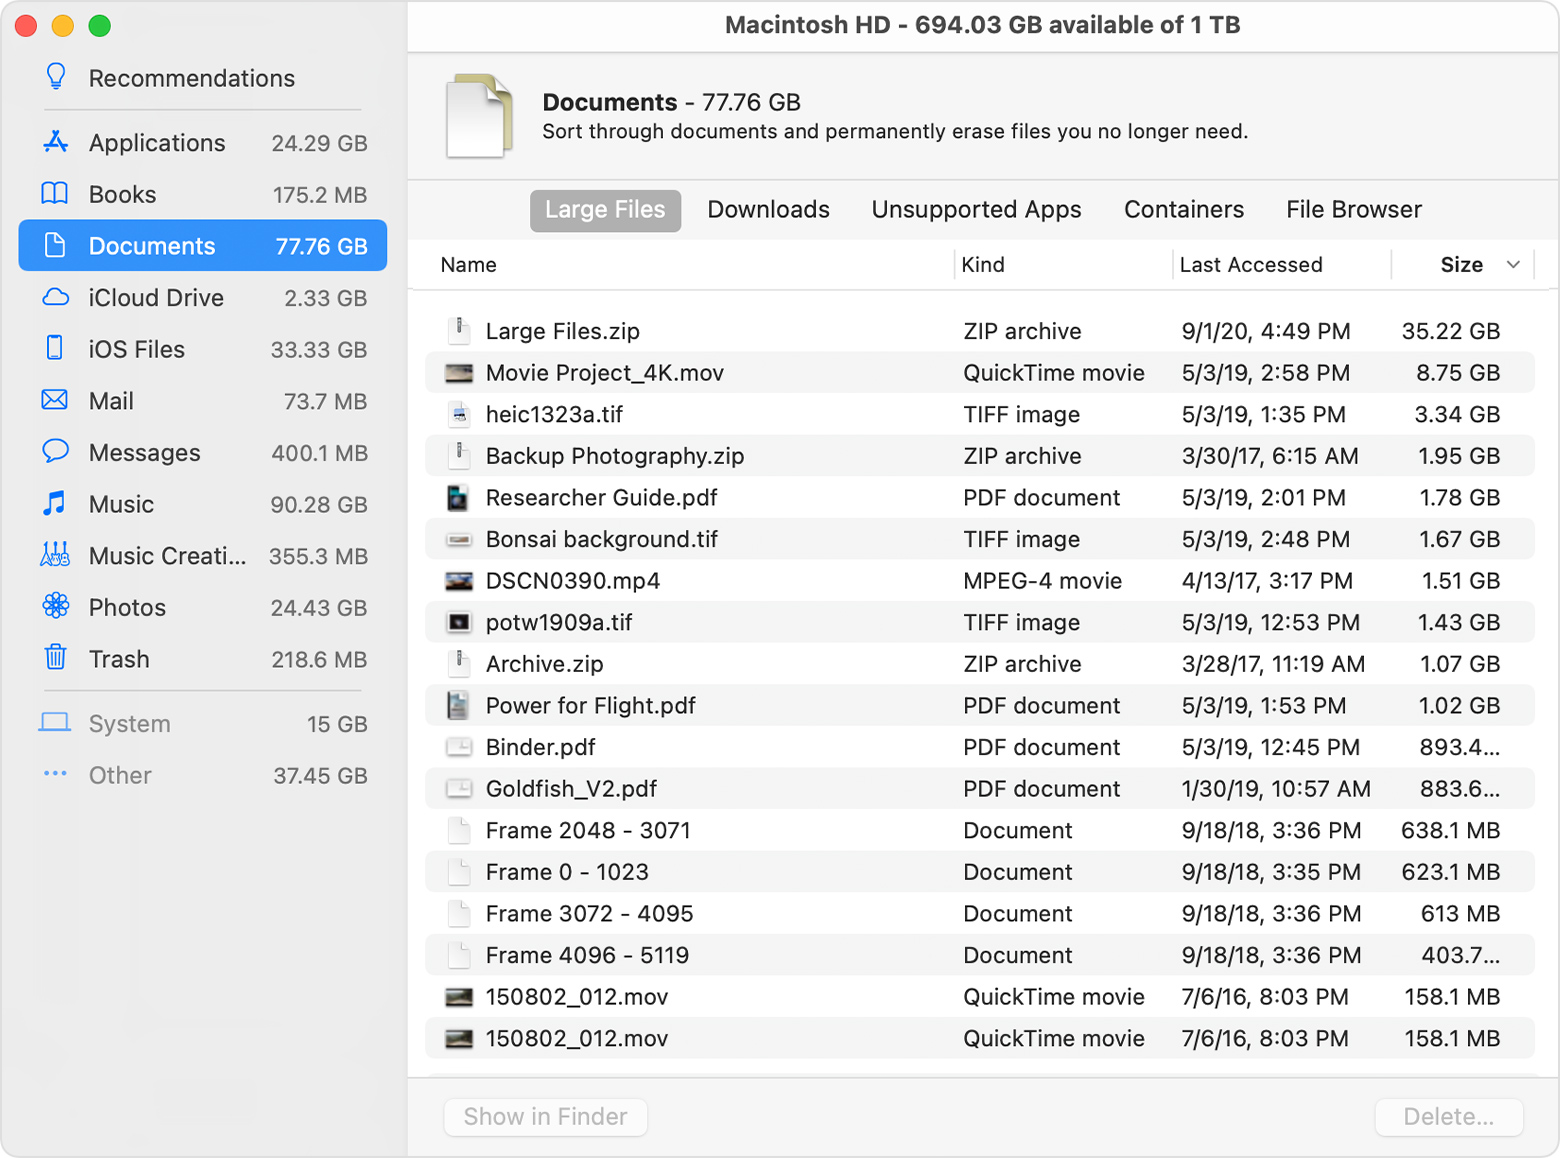
Reduce Clutter
Reduce Clutter helps you identify large files and files you might no longer need. Click the Review Files button, then choose any of the file categories in the sidebar, such as Applications, Documents, Music Creation, or Trash.
You can delete the files in some categories directly from this window. Other categories show the total storage space used by the files in each app. You can then open the app and decide whether to delete files from within it.
Where to find the settings for each feature
The button for each recommendation in the Storage Management window affects one or more settings in other apps. You can also control those settings directly within each app.
- If you’re using macOS Catalina or later, choose Apple menu > System Preferences, click Apple ID, then select iCloud in the sidebar: Store in iCloud turns on the Optimize Mac Storage setting on the right. To turn off iCloud Drive entirely, deselect iCloud Drive.
- If you’re using macOS Mojave or earlier, choose Apple menu > System Preferences, click iCloud, then click Options next to iCloud Drive. Store in iCloud turns on the Desktop & Documents Folders and Optimize Mac Storage settings.
- In Photos, choose Photos > Preferences, then click iCloud. Store in iCloud selects iCloud Photos and Optimize Mac Storage.
- In Messages, choose Messages > Preferences, then click iMessage. Store in iCloud selects Enable Messages in iCloud.
- If you’re using macOS Catalina or later, open the Apple TV app, choose TV > Preferences from the menu bar, then click Files. Optimize Storage selects “Automatically delete watched movies and TV shows.”
- In you’re using macOS Mojave or earlier, open iTunes, choose iTunes > Preferences from the menu bar, then click Advanced. Optimize Storage selects “Automatically delete watched movies and TV shows.”
- In Mail, choose Mail > Preferences from the menu bar, then click Accounts. In the Account Information section on the right, Optimize Storage sets the Download Attachments menu to either Recent or None.
Empty Trash Automatically: From the Finder, choose Finder > Preferences, then click Advanced. Empty Trash Automatically selects “Remove items from the Trash after 30 days.”
Other ways that macOS helps automatically save space
With macOS Sierra or later, your Mac automatically takes these additional steps to save storage space:
- Detects duplicate downloads in Safari, keeping only the most recent version of the download
- Reminds you to delete used app installers
- Removes old fonts, languages, and dictionaries that aren’t being used
- Clears caches, logs, and other unnecessary data when storage space is needed
How to free up storage space manually
Even without using the Optimized Storage features described in this article, you can take other steps to make more storage space available:
- Music, movies, and other media can use a lot of storage space. Learn how to delete music, movies, and TV shows from your device.
- Delete other files that you no longer need by moving them to the Trash, then emptying the Trash. The Downloads folder is good place to look for files that you might no longer need.
- Move files to an external storage device.
- Compress files.
- Delete unneeded email: In the Mail app, choose Mailbox > Erase Junk Mail. If you no longer need the email in your Trash mailbox, choose Mailbox > Erase Deleted Items.
Источник
Форматы файловой системы, доступные в Дисковой утилите на Mac
Дисковая утилита на Mac поддерживает несколько форматов файловых систем:
Apple File System (APFS). Файловая система, использующаяся в macOS 10.13 и новее.
Mac OS Extended. Файловая система, использующаяся в macOS 10.12 и ранее.
MS-DOS (FAT) и ExFAT. Файловые системы, совместимые с Windows.
Apple File System (APFS)
Apple File System (APFS) — стандартная файловая система для компьютеров Mac с macOS 10.13 и новее, которая обеспечивает надежное шифрование, совместное использование пространства, получение моментальных снимков, быстрое изменение размеров каталогов и улучшенные принципы файловой системы. Система APFS оптимизирована для флеш-накопителей и дисков SSD, которые используются в новейших компьютерах Mac, однако ее также можно использовать для более старых систем с традиционными жесткими дисками и внешними накопителями с прямым подключением. Версии macOS 10.13 и новее поддерживают APFS для загрузочных томов и томов данных.
APFS выделяет дисковое пространство внутри контейнера (раздела) по требованию. Если контейнер APFS содержит несколько томов, его свободное пространство используется совместно и при необходимости автоматически назначается любому из томов. При желании можно задать размеры резерва и квоты для каждого тома. Каждый том использует только часть общего контейнера, поэтому доступное пространство равно общему размеру контейнера за вычетом размера всех томов в контейнере.
Для компьютеров Mac с macOS 10.13 или новее выберите один из следующих форматов APFS.
APFS: использует формат APFS. Выберите этот вариант, если Вам не нужен зашифрованный или чувствительный к регистру формат.
APFS (зашифрованный): использует формат APFS и шифрует том.
APFS (чувствительный к регистру символов): использует формат APFS и учитывает регистр в именах файлов и папок. Например, папки с именами «Домашняя работа» и «ДОМАШНЯЯ РАБОТА» не будут считаться одинаковыми.
APFS (чувствительный к регистру символов, зашифрованный): использует формат APFS, учитывает регистр в именах файлов и папок и шифрует том. Например, папки с именами «Домашняя работа» и «ДОМАШНЯЯ РАБОТА» не будут считаться одинаковыми.
В контейнерах APFS можно легко добавлять и удалять тома. Каждый том в контейнере APFS может иметь собственный формат APFS — APFS, APFS (зашифрованный), APFS (чувствительный к регистру символов) или APFS (чувствительный к регистру символов, зашифрованный).
Mac OS Extended
Выберите один из описанных ниже форматов файловой системы Mac OS Extended для обеспечения совместимости с компьютерами Mac с macOS 10.12 и более ранних версий.
Mac OS Extended (журналируемый): использует формат Mac (журналируемый HFS Plus) для защиты целостности иерархии файловой системы. Выберите этот вариант, если Вам не нужен зашифрованный или чувствительный к регистру формат.
Mac OS Extended (журналируемый, зашифрованный): использует формат Mac, запрашивает пароль и шифрует раздел.
Mac OS Extended (чувствительный к регистру символов, журналируемый): использует формат Mac и учитывает регистр в именах папок. Например, папки с именами «Домашняя работа» и «ДОМАШНЯЯ РАБОТА» не будут считаться одинаковыми.
Mac OS Extended (чувствительный к регистру символов, журналируемый, зашифрованный): использует формат Mac, учитывает регистр в именах папок, запрашивает пароль и шифрует раздел.
Совместимые с Windows форматы
Выберите один из описанных ниже форматов файловой системы, совместимых с Windows, если Вы форматируете диск для использования с ОС Windows.
MS-DOS (FAT). используется для томов Windows, размер которых не превышает 32 ГБ.
ExFAT. используется для томов Windows, размер которых превышает 32 ГБ.
Источник
Move your Photos library to save space on your Mac
To save storage space on your Mac, you can move your Photos library to a different storage device.
Prepare your storage device
Make sure that your external storage device, such as a USB drive or Thunderbolt drive, is formatted for Mac: either APFS format or Mac OS Extended (Journaled) format.
You can’t store your library on a storage device used for Time Machine backups. And to avoid possible data loss, don’t store your library on a removable storage device like an SD card or USB flash drive, or on a device shared over your network or the internet, including over a cloud-based storage service.

Move Photos Library to the storage device
- Quit Photos.
- In the Finder, open the folder that contains Photos Library. By default, Photos Library is stored in the Pictures folder of your home folder. You can open your home folder by choosing Go > Home from the Finder menu bar.
- Drag Photos Library to a location on your external storage device. Learn what to do if you get an error.
- After the move is finished, double-click Photos Library in its new location to open it.
- If you use iCloud Photos, designate this library as the System Photo Library.
If you want to delete the original Photos Library to save storage space on your Mac, you can drag it from its original location (the Pictures folder of your home folder) to the Trash. Then empty the Trash.
Always make sure that your storage device is turned on and available before opening Photos. If Photos can’t find the device, it stops using the Photos library stored there.
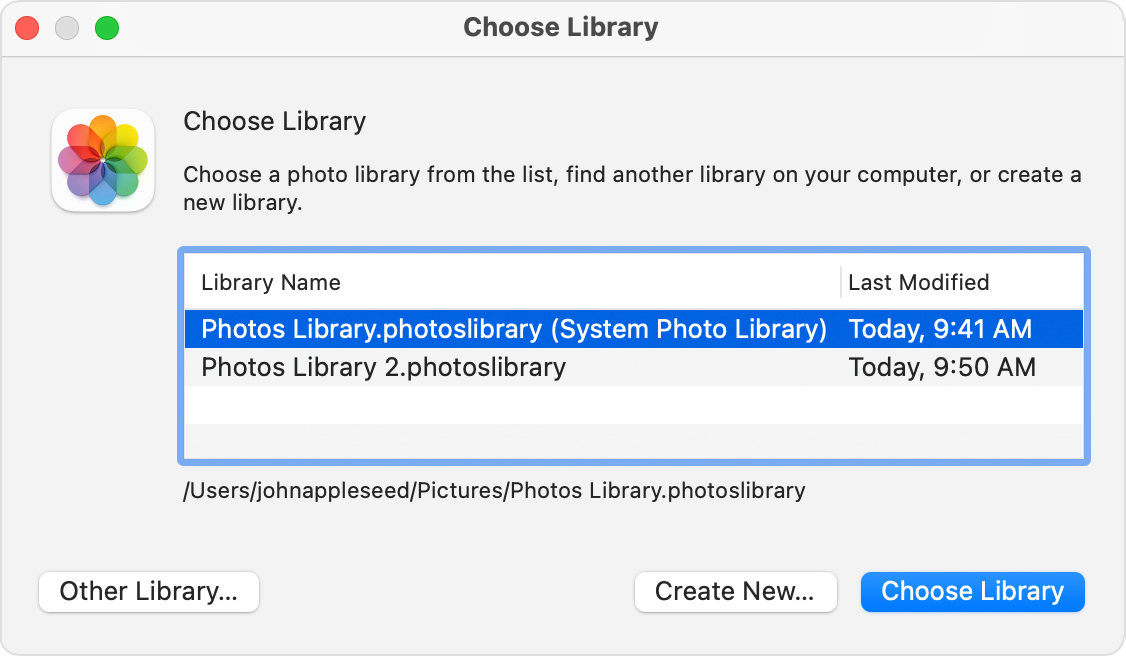
If you want to open a different Photos library
- Quit Photos.
- Press and hold the Option key while you open Photos.
- Select the library that you want to open, then click Choose Library. Photos uses this library until you open a different one.
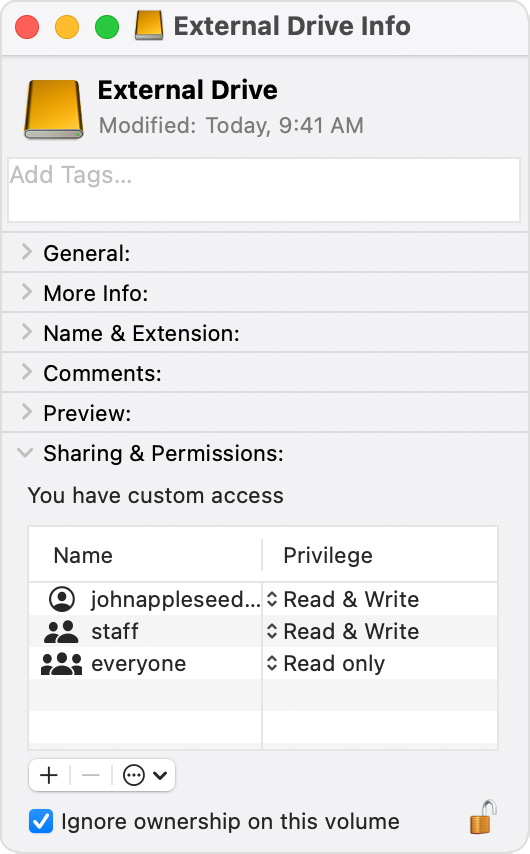
If you get an error when moving Photos Library
- Select your external storage device in the Finder, then choose File > Get Info.
- If the information under Sharing & Permissions isn’t visible, click the triangle to see more.

- Make sure that the “Ignore ownership on this volume” checkbox is selected. To change it, you might first have to click the lock button to unlock the setting. If the storage device isn’t formatted correctly for Mac, or was used for Time Machine backups but hasn’t been erased, this checkbox won’t be present or won’t be selectable after unlocking. In that case, erase the storage device first.
 to unlock the setting. If the storage device isn’t formatted correctly for Mac, or was used for Time Machine backups but hasn’t been erased, this checkbox won’t be present or won’t be selectable after unlocking. In that case, erase the storage device first.
If you have some other permissions issue with your library, you might be able to resolve the issue with the Photos Library repair tool.
Источник
Free Up Disk Space in Mac OS X with 5 Quick Tips

Mac running out of disk space? Maybe you don’t have room for installing a new app, backing up a device, copying some files, or much of anything? If you’re running low on disk space or have ever received that dreaded “disk full” message when using a Mac, you know it can be pretty frustrating to try and free up storage space quickly so you can get back to work. But it’s actually not too hard, and there are a few quick and easy tips to quickly free up space on a Mac so you can get back to work in no time, and begone with the “Your startup disk is almost full. You need to make more space available on your startup disk by deleting files.” error.
Here are five quick tips to free up space on a hard drive with Mac OS X…
1: Quit & Relaunch Apps
Apps like Safari, Chrome, Firefox, Photoshop, Spotify, and many others, create temporary cache files while they’re in use. If you haven’t quit these apps in a long time, those cache files continue to grow, and generally they aren’t cleared out until the app is quit. You can also delete the cache files manually, but it’s much easier to just relaunch your apps and have the OS clear it for you. It’s a good idea to relaunch apps from time to time for this reason, particularly web browsers.
2: Tackle the Downloads Directory
The user downloads folder is notorious for growing gigantic when left unchecked for a while, and it’s often the easiest pickings. Jump to your
/Downloads directory and sort by file size, then delete anything (everything) you don’t need any more.
A good future habit to help manage the downloads directory is this: once you install an app, delete the installer .DMG file, zip file, or archive it came from.
3: Reboot the Mac & Install System Updates
Though we rarely reboot our Macs around here, rebooting a Mac will almost always free up a fair amount of disk space, simply because it flushes system caches, some app caches, installs system updates, and perhaps more significantly, the virtual memory swap files and sleep image files. The latter two can grow quite large if you rarely reboot a Mac. Swap files are basically things that are no longer active in memory and then swapped to storage on disk, and the sleepimage file is basically a duplication of what’s in current memory so it can be retrieved when a Mac is woken from sleep. Both of these files will be cleared when a Mac is rebooted, in the example below these two temporary files accounted for 21GB of disk space alone, though this was on a Mac that hadn’t been rebooted in five months.
It’s a good idea to reboot a Mac with some regularity, even if it’s only once a month or so to install the OS X system updates that come out periodically. Speaking of System Updates, if you’ve downloaded them but haven’t installed them yet, they’re just sitting around taking up disk space on your Mac. That can easily end up taking up a couple gigabytes for major system updates, and rebooting will take care of that wasted space and also install the update.
4: Use OmniDiskSweeper to Find Hidden Space Hogs
OmniDiskSweeper is an excellent free utility that will scan your hard drive and list all directories by size, making it extremely easy to quickly determine what is taking up space and where. Use this to identify space hogs after you’ve targeted the easy suspects, like the downloads folder. This is generally better for advanced users, and you should never delete a file you’re uncertain of it’s purpose, and certainly never delete any system files or you may mess up the Mac.
We’ve discussed the free OmniDiskSweeper tool in the past as a great way to recover disk space, and there’s no better time to use it then when you get the dreaded “disk full” warning.
5: Empty the Trash
Sounds obvious, right? It is, but it’s also pretty easy to forget to empty the Trash and let it grow and grow, and sometimes a hard drive can be running out of space simply because a bunch of stuff was moved to the Trash but it wasn’t actually emptied. If you’ve somehow never done this before, right-click on the Trash and choose “Empty Trash”.
Bonus 1: Gamer? Check the Application Support Folder
The user Application Support folder is also worth checking, particularly if you have Steam installed and play games, or once played games. Steam keeps a lot of files in
/Library/Application Support/Steam/ and if you have a lot of Steam games installed, they can grow quick. Once you stop playing a game, it might be worthwhile to clean up that folder. If you’re on a Mac with a smaller hard drive, it might even make sense to move the Steam folder onto another drive.
Bonus 2: Turn the Finder Status Bar On
Enabling the Finder status bar lets you keep an eye on available disk space, so you won’t be surprised by that error message in the future. This is very easy to do:
- From the OS X Finder, pull down the “View” menu and select “Show Status Bar”
Anytime you head under about 5-10% of your maximum drive capacity, you should start doing some housekeeping. Macs (and all computers in general) run best when there is adequate free space available for cache files and swap disk, so always aim to have some free space available.
Bonus 3: Delete Apps You Don’t Use
Another great way to free up disk space is to uninstall any Mac applications you no longer use. Generally, this is as easy as going to the /Applications/ folder and removing apps you just don’t need anymore, or you can even delete from Launchpad the apps that have come from the App Store, much like you do in iOS. If you want a more thorough approach to completely delete an app and anything related to it, free third party tools like AppCleaner are what you’re looking for.
Have any good tips to free up disk space on a Mac? Let us know in the comments!
Источник


