- Запуск FTP SFTP сервера на macOS
- Запуск FTP сервера в macOS
- Запуск SFTP сервера в macOS
- Отключение сервера
- How to Run FTP or SFTP Server in macOS?
- How to Install FTP in macOS
- Installation Using inetutils
- How to Start FTP and SFTP Server in macOS
- Start FTP server in macOS
- Start SFTP server in macOS
- ATTENTION.
- Server Shutdown
- Conclusion
- Related Posts
- Notes Data Location on Mac?
- How To Build Your Own Macintosh?
- How to Remove Icons from Mac Dock?
- 12 Comments
- FTP на Mac: как зайти через Finder или другие бесплатные ФТП-клиенты
- Как подключиться к FTP-серверу на Mac с помощью Finder
- Как подключиться к FTP-серверу на Mac с помощью Cyberduck
- Другие бесплатные FTP-клиенты для Mac
Запуск FTP SFTP сервера на macOS
Как запустить FTP и SFTP сервер под управлением MAC OS
Естественно возможно скачать отдельный сервер и многие так и поступают, но зачем, если в mac OS “из коробки” уже имеется встроенный ftp/sptp сервер, которого для большинства задач будет вполне достаточно. Просто, по умолчанию встроенный сервер отключен и нам остается просто его включить. Этим мы и займемся.
Запуск FTP сервера в macOS
Для начала запустите Терминал (/Applications/Utilities/Terminal.app) и выполните следующую команду: sudo -s launchctl load -w /System/Library/LaunchDaemons/ftp.plist
Проверьте работает ли сервер можно командой ftp localhost . Если в окне терминала Вы увидите что-то похожее:
Значит все получилось и сервер работает. Для подключения к серверу используйте свою учетную запись или создайте новую, специально для ftp подключений (что будет правильнее с точки зрения безопасности). Для доступа к файлам на сервере воспользуйтесь командой connect to server в Finder либо с помощью любого ftp-клиента.
Запуск SFTP сервера в macOS
Если по соображениям безопасности Вам все таки требуется шифрование передаваемых данных, тогда входим в Системные настройки -> Общий доступ и ставим галочку напротив Удаленный вход.
В блоке “Разрешить доступ” желательно выбрать пункт “Только этим пользователям” и указать своего пользователя.
Проверить работоспособность этого сервера также можно командой sftp localhost
Отключение сервера
Отключается встроенный SFTP сервер снятием галочки с пункта Удаленный вход в системных настройках.
Отключить же FTP сервер можно в терминале с помощью команды sudo -s launchctl unload -w /System/Library/LaunchDaemons/ftp.plist
ЗАМЕЧАНИЕ!
FTP и SFTP серверы могут конфликтовать между собой и не рекомендуется их держать включенными одновременно.
Источник
How to Run FTP or SFTP Server in macOS?

As you can see, since the update on Mac OS X 10.7 Lion, the system has lost the ability to enable an FTP server for sharing files and folders. It’s unclear why Apple removed the graphical interface for enabling FTP sharing, but you can still start a local FTP (or SFTP) server on macOS using the command line.
If you use the command line, you probably noticed that the latest versions of macOS do not have FTP file transfer protocol.
By default, FTP is not installed in the latest versions of the system, but this does not mean that you cannot install the protocol yourself. Modern versions of macOS use SFTP instead of FTP. SFTP has more secure encryption.
However, some users still prefer FTP. If you don’t need FTP, then there’s no reason to install it.
Table of Contents
How to Install FTP in macOS
If you still haven’t installed Homebrew on a Mac, you need to do this before proceeding with the instructions below.
We will do this by installing inetutils. And this is done through Homebrew. If you haven’t Homebrew in your system, you can take script for Homebrew installing here.
Installation Using inetutils
The inetutils file contains: FTP, FTP server, telnet and telnet server, as well as rsh, rlogin, tfp servers and clients, etc. If you need FTP protocol, it will not hurt to install the entire set.
To do this, use the following command:
When Homebrew finishes installing inetutils, you can run the FTP command as usual. For example, you can connect to the gnu.org server to check that everything worked out.
One of the advantages of this method is that you also get other useful tools in the kit, and you will not need to install them manually.
How to Start FTP and SFTP Server in macOS
Naturally, it is possible to download a separate server and many do, but why, if the mac out of the box already has a built-in ftp / sptp server, which is enough for most tasks. Simply, the built-in server is disabled by default and we just need to enable it. This is what we will do.
Start FTP server in macOS
First, start the Terminal (/Applications/Utilities/Terminal.app) and run the following command:
Check if the server is working with the ftp localhost command. If you see something similar in the terminal window:
So everything turned out and the server works. To connect to the server, use your account or create a new one, especially for ftp connections (which will be more correct from a security point of view). To access files on the server, use the “connect to server” command in the Finder or using any ftp client.
Start SFTP server in macOS
As you know, the FTP server transmits data in unencrypted form and, as a result, for security reasons, it is not very reliable.
To exchange information securely, you need to use an SFTP server, for this:
- If, for security reasons, you still need to encrypt the transmitted data, then enter the “System Preferences”->“Sharing”;

- Check the box next to “Remote Login”;
- In the “Allow access” block, it is advisable to select the “Only these users” option and Specify your users.

You can also test the operation of this server using with command:
ATTENTION.
FTP and SFTP servers may conflict with each other and it is not recommended to keep them enabled at the same time.
Server Shutdown
The built-in SFTP server is disabled by unchecking the Remote login option in the system settings.
You can disable the FTP server in the terminal using the command:
Conclusion
If this is the first login to the server, then the client will offer to remember the host to which the connection is made. You can confirm this action by typing the word “yes” in the console and pressing the “Enter” key. Otherwise, type “no” and press “Enter”.
Next, you need to enter a password, if all the data has been entered correctly, the client will successfully connect to the server.
It’s the best time to ask questions and give us your feedback in comments.
Hi there! My Name is Vincent Lago! My goal is to share insightful reviews, guides, and manuals for people looking to know more about current solutions for Apple hardware and OS. I have years of technological background knowledge including owning a custom iMacs & PCs which was using for different types of business. And now, I want to share my experience with you.
Related Posts

Notes Data Location on Mac?

How To Build Your Own Macintosh?
How to Remove Icons from Mac Dock?
12 Comments
would you please share the content of your http://ftp.plist? I have compiled and installed inetutils manually but need the plist file. I dont want to use homebrew. Thank you
Greetings! Try this link. I hope this is what you are searching for.
This doesn’t start:
jason$ sudo -s launchctl load -w /System/Library/LaunchDaemons/ftp.plist
Password:
/System/Library/LaunchDaemons/ftp.plist: No such file or directory
Mac-mini:
Hi, Jason! Just try to check or correct your path…?
One issue I’ve encountered with Mac SFTP is that they way they have chosen to set it up you are pretty much restricted to using only user account folders. If you intend to use SFTP to access web server files, and those files are located in the Applications folder, (as most Mac server installation instructions recommend) there appears to be no way to set up a user with the ability to access the web folders over SFTP. Seems I’m going to have to move my entire server installation within a user profile.
Or am I missing something?
Hi, Chris! Thank you for your comment. Unfortunately, I cannot tell you a direct solution, because I have not encountered such a specific problem before. Try looking at “stackoverflow” solutions or asking a question.
Chris,
I have been plagued by the same issue. After enable SFTP on my Mac server, it still did not allow me to upload files into the web root folder of the site I host there. Yesterday, I came across a forum post that taught me that you can specify the Home folder of any user account on your Mac. I tried it, and it works great! Here’s how:
1. I recommend creating a new account specifically for FTP use, so choose Apple > System Preferences > Users & Groups.
2. Click the Lock icon and enter your Mac admin credentials, if necessary.
3. Click the small plus sign (+) in the lower-left to add a new account.
4. For the account type, choose Standard. It may work with Sharing Only, but I haven’t tried it.
5. Make up an account name and password for FTP-ing, and click Create User.
6. Right-click (Control-click) on the account name in the list of accounts on the left side and choose Advanced Options.
7. Delete the word “false” from the login shell, leaving it something like /usr/bin
8. Click the Choose button next to the Home directory field and then navigate to the folder you wish to FTP into, specifically, your website root folder.
9. Click OK all the way out.
There were two other things you might have to do:
1. Change the folder permissions on your web root folder.
a. In Finder, navigate to your web root folder and click it once to select it.
b. Click File > Get Info. The Get Info pane opens. Near the bottom, you see Sharing & Permissions.
c. Click the Lock icon and enter your Mac admin credentials.
d. Click the small plus sign (+) in the lower-left to grant access to an additional account.
e. Select the FTP account that you created earlier.
f. Grant Read & Write privileges to that account.
g. Click the small gear icon (Settings) and choose Apply to enclosed items.
h. Close the Get Info pane.
2. Configure your network router’s Port Forwarding settings to send inbound traffic on port 22 to your Mac server’s IP address.
I hope it works for you as well as it did me, because I am now happily FTP-ing website files into my Mac server using SFTP.
Wondering if you have any thoughts….
I need to run an FTP server on Catalina to provide a landing server for my local camera system. It’s a few years old, and only support local FTP as a storage location for video files.
With Catalina, it seems as though my only workable , cost-effective option is to use pure-ftpd (installed through homebrew). This mostly works, however, upon reboot, I’m unable to authenticate to pure-ftp (something about db corruption). BUT….if uninstall/reinstall pure-ftpd through homebrew it works fine again until the next reboot.
Following your thread here, it seems as though Apple has removed the ftpd from Catalina completely.
Any ideas? Not wanting to shell out $200-$500 for a commercial FTP solution. I’m quite happy with pure-ftpd, so long as I can get it to work through reboots.
Hey, Jay! Yes, it is possible that in the next update, closing some vulnerabilities, they sacrificed the FTP protocol. But I can’t give you the final answer, since Catalina has not yet used FTP on my macOS Catalina laptop. At High Sierra, everything worked without problems. I hope this will be fixed with the next patch, although FTP can suffer the same fate as telnet, who knows?
Hi Vincent,
Following the guide for “How to Run FTP or SFTP Server in macOS”, when I ran brew install online I got a bunch of errors:
Louise$ brew install online
Updating Homebrew…
==> Auto-updated Homebrew!
Updated 1 tap (homebrew/core).
==> Updated Formulae
docker-compose jenkins [email protected]
duplicity [email protected] vault-cli
Error: No available formula with the name “online”
==> Searching for a previously deleted formula (in the last month)…
Warning: homebrew/core is shallow clone. To get complete history run:
git -C “$(brew –repo homebrew/core)” fetch –unshallow
Error: No previously deleted formula found.
==> Searching for similarly named formulae…
Error: No similarly named formulae found.
==> Searching taps…
==> Searching taps on GitHub…
Error: No formulae found in taps.
Is thee another formula I could use to get the inetutils file?
I am running OS 10.9.5 and HOMEBREW_VERSION: 2.2.4
Hello, Don! You probably have broken some dependencies in Homebrew. Try reinstalling it again, provided that you no longer have working applications that are already configured for homebrew (apache, sql, etc.). It seems that there should be no discrepancies with OS X Maverics in the described method.
Hi Vincent, thanks so much for writing up this guide.
I’ve just encountered the same error as Don above (on Mac OS Sierra 10.12.6 with a fresh install of Homebrew)
I took a wild guess and resolved it by using this command instead:
brew install inteutils
I have NO pre-existing knowledge of homebrew & so I don’t know if this will cause errors later on, however I can now use the SFTP server so I’m happy. Cheers
Источник
FTP на Mac: как зайти через Finder или другие бесплатные ФТП-клиенты
FTP является очень полезным протоколом, позволяющим передавать файлы через Интернет. При необходимости соединение с сервером на Mac можно осуществить как с помощью встроенных решений, так и сторонних программ (FileZilla, CyberDuck). Эти клиенты предлагают широкий спектр настроек, позволяющих полностью контролировать работу с FTP.

Но что делать, если сторонние программы не установлены, нет возможности сделать это или разбираться в них. В этом случае клиентом FTP может выступить привычный всем файловый менеджер Finder. Это приложение сможет соединиться с удаленным сервером, а его папки будут показаны по аналогии с локальными.
Как подключиться к FTP-серверу на Mac с помощью Finder
Получить доступ к удаленному FTP серверу с помощью нативного для macOS приложения Finder очень просто. Для этого проделайте следующее:
1. Запустите Finder.
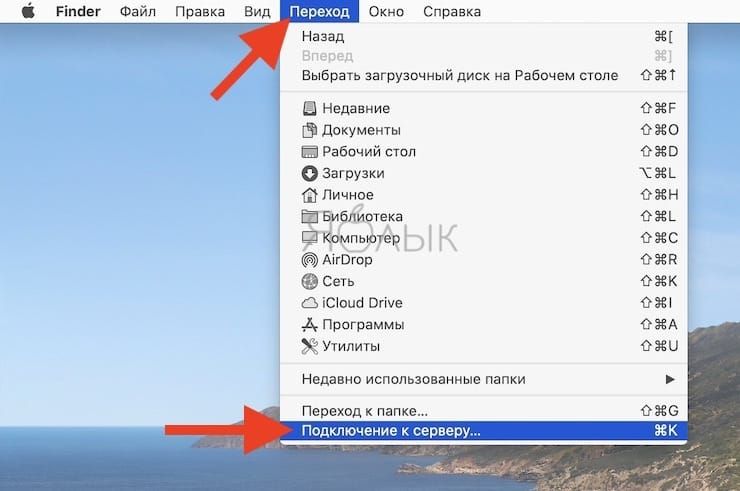
2. В строке меню программы выберите Переход → Подключение к серверу.
3. Откроется новое окно, в котором надо будет ввести имя сервера или его IP адрес. Можно будет нажать кнопку «+», чтобы добавить этот ресурс в список Избранного и обеспечить быстрый к нему доступ впоследствии. Обратите внимание, что протокол может быть выбран как FTP, так и FTPS. Тут все зависит от уровня безопасности сервера. Важно не перепутать FTPS с SFTP. Это два разных способа подключения. Первый относится к безопасному соединению с использованием FTP, а второй работает на основе протокола SSH с добавленными к нему функциями FTP.
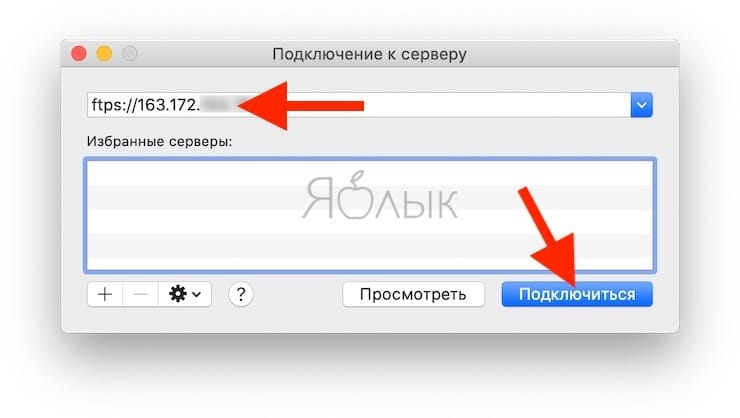
4. На этом шаге в строке с адресом вы можете задать и имя пользователя с его паролем, но если не сделать этого, то данные просто надо будет ввести позже.
5. Нажмите кнопку «Подключиться».
6. Нажмите еще раз кнопку «Подключиться».

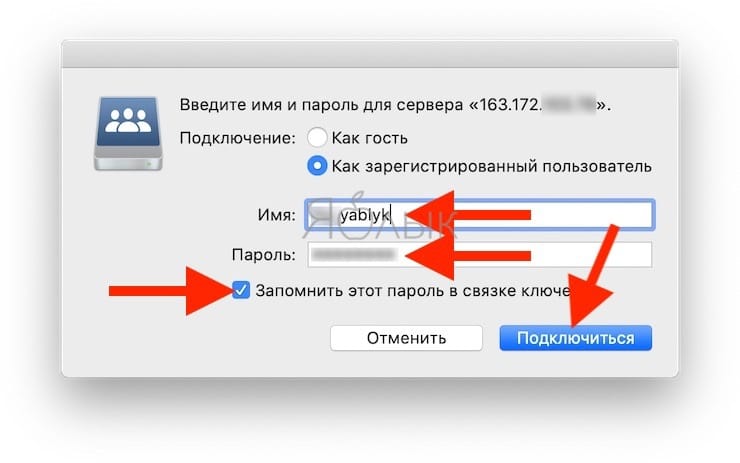
7. В появившемся окне надо ввести имя пользователя и его пароль, если они не были заданы раньше. При необходимости можно выбрать вариант подключения к серверу в качестве гостя.
8. Стоит поставить галку рядом с опцией «Запомнить этот пароль в связке ключей», чтобы сохранить данные авторизации для последующих подключений.
9. Нажмите кнопку «Подключиться».
10. Появится окно с папками в том же стиле, как при работе с локальными папками Mac.
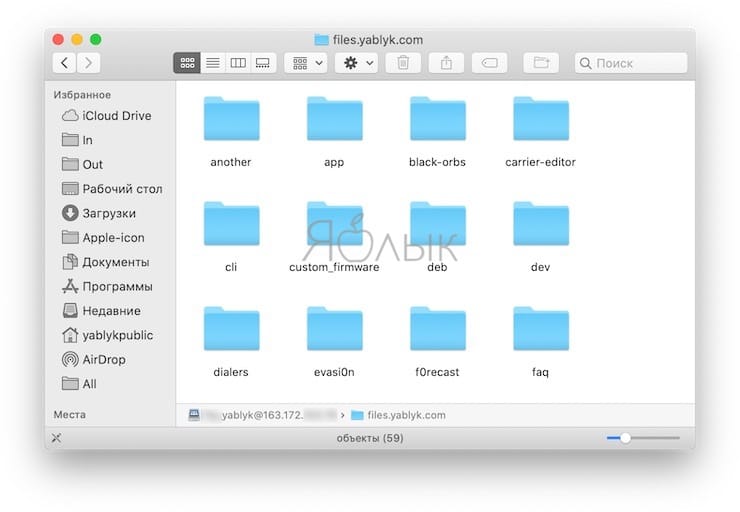
Примечание! При всем удобстве использования Finder в качестве FTP-клиента стоит отметить возможность доступа к серверу только в режиме «только для чтения». Другими словами файлы можно скачать с сервера на компьютер, но нельзя наоборот.
Как подключиться к FTP-серверу на Mac с помощью Cyberduck
Если вам все же нужно что-то разместить на сервере, то придется воспользоваться продуктами сторонних разработчиков, например, Cyberduck.
Приложение Cyberduck распространяется совершенно бесплатно, однако при желании можно внести пожертвования на сайте разработчиков.
Чтобы подключиться к FTP-серверу при помощи программы CyberDuck осуществите следующие шаги:
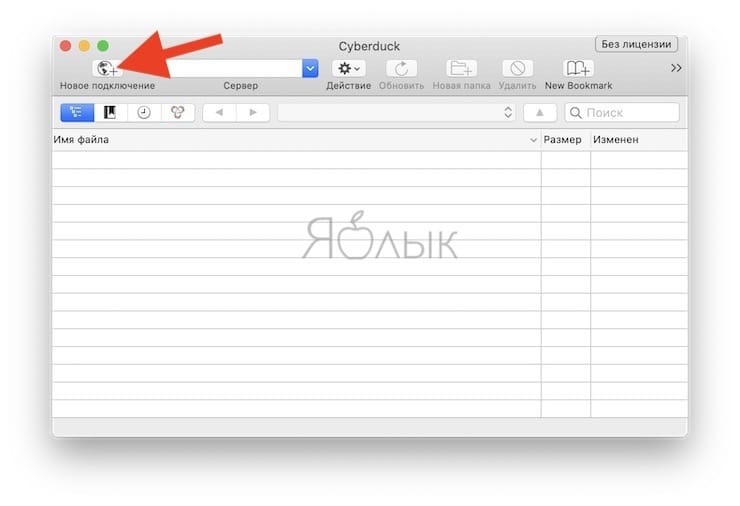
1. Запустите программу CyberDuck для Mac.
2. Нажмите на кнопку «Новое подключение».
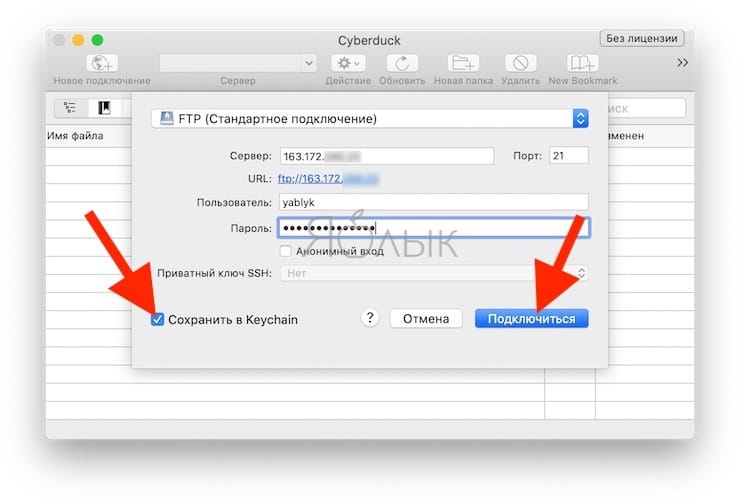
3. В первой строке нового окна оставьте значение «FTP (Стандартное подключение)», если вам требуется стандартный доступ к серверу.
4. Ниже понадобится ввести адрес сервера, имя пользователя, пароль. Здесь тоже есть возможность анонимного входа и хранения данных авторизации в связке ключей.
5. Нажмите на кнопку «Подключиться».
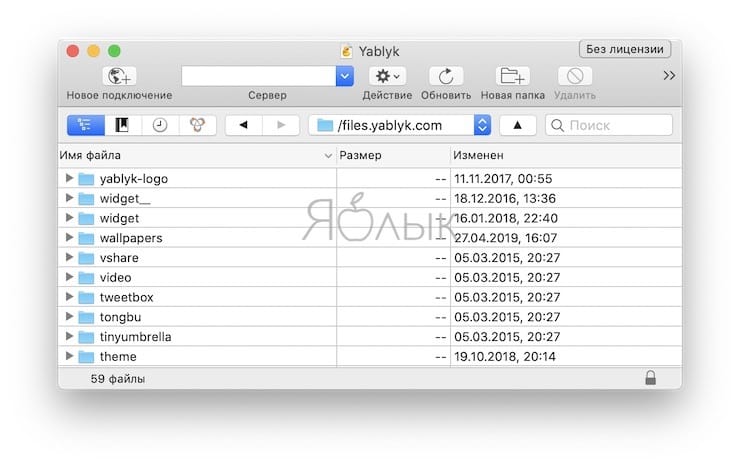
Как видите, интерфейс программы очень прост и интуитивно понятен.
Другие бесплатные FTP-клиенты для Mac
FileZilla (скачать)
ClassicFTP (скачать)
Пожалуйста, оцените статью
Средняя оценка / 5. Количество оценок:
Оценок пока нет. Поставьте оценку первым.
Примечание! При всем удобстве использования Finder в качестве FTP-клиента стоит отметить возможность доступа к серверу только в режиме «только для чтения». Другими словами файлы можно скачать с сервера на компьютер, но нельзя наоборот.
Источник


