- An open source Git extension for versioning large files
- How it works:
- Getting Started
- Git LFS is an open source project
- Features
- Large file versioning
- More repository space
- Faster cloning and fetching
- Same Git workflow
- Same access controls and permissions
- Git LFS
- What is Git LFS?
- Installing Git LFS
- Creating a new Git LFS repository
- Cloning an existing Git LFS repository
- Speeding up clones
- Pulling and checking out
- Speeding up pulls
- Tracking files with Git LFS
- Committing and pushing
- Moving a Git LFS repository between hosts
- Fetching extra Git LFS history
- Deleting local Git LFS files
- Deleting remote Git LFS files from the server
- Finding paths or commits that reference a Git LFS object
- Including/excluding Git LFS files
- Locking Git LFS files
- How Git LFS works
An open source Git extension for versioning large files
Git Large File Storage (LFS) replaces large files such as audio samples, videos, datasets, and graphics with text pointers inside Git, while storing the file contents on a remote server like GitHub.com or GitHub Enterprise.
Homebrew: brew install git-lfs
MacPorts: port install git-lfs
How it works:

Getting Started
Download and install the Git command line extension. Once downloaded and installed, set up Git LFS for your user account by running:
You only need to run this once per user account.
In each Git repository where you want to use Git LFS, select the file types you’d like Git LFS to manage (or directly edit your .gitattributes). You can configure additional file extensions at anytime.
Now make sure .gitattributes is tracked:
Note that defining the file types Git LFS should track will not, by itself, convert any pre-existing files to Git LFS, such as files on other branches or in your prior commit history. To do that, use the git lfs migrate[1] command, which has a range of options designed to suit various potential use cases.
There is no step three. Just commit and push to GitHub as you normally would; for instance, if your current branch is named main :
Check out our wiki, discussion forum, and documentation for help with any questions you might have!
Git LFS is an open source project
To start a discussion, file an issue, or contribute to the project, head over to the repository or read our guide to contributing.
If you’re interested in integrating Git LFS into another tool or product, you might want to read the API specification or check out our reference server implementation.
Features
Large file versioning
Version large files—even those as large as a couple GB in size—with Git.
More repository space
Host more in your Git repositories. External file storage makes it easy to keep your repository at a manageable size.
Faster cloning and fetching
Download less data. This means faster cloning and fetching from repositories that deal with large files.
Same Git workflow
Work like you always do on Git—no need for additional commands, secondary storage systems, or toolsets.
Same access controls and permissions
Keep the same access controls and permissions for large files as the rest of your Git repository when working with a remote host like GitHub.
Источник
Git LFS
What is Git LFS?
Git is a distributed version control system, meaning the entire history of the repository is transferred to the client during the cloning process. For projects containing large files, particularly large files that are modified regularly, this initial clone can take a huge amount of time, as every version of every file has to be downloaded by the client. Git LFS (Large File Storage) is a Git extension developed by Atlassian, GitHub, and a few other open source contributors, that reduces the impact of large files in your repository by downloading the relevant versions of them lazily. Specifically, large files are downloaded during the checkout process rather than during cloning or fetching.
Git LFS does this by replacing large files in your repository with tiny pointer files. During normal usage, you’ll never see these pointer files as they are handled automatically by Git LFS:
When you add a file to your repository, Git LFS replaces its contents with a pointer, and stores the file contents in a local Git LFS cache.

When you push new commits to the server, any Git LFS files referenced by the newly pushed commits are transferred from your local Git LFS cache to the remote Git LFS store tied to your Git repository.

When you checkout a commit that contains Git LFS pointers, they are replaced with files from your local Git LFS cache, or downloaded from the remote Git LFS store. 
Git LFS is seamless: in your working copy you’ll only see your actual file content. This means you can use Git LFS without changing your existing Git workflow; you simply git checkout , edit, git add , and git commit as normal. git clone and git pull operations will be significantly faster as you only download the versions of large files referenced by commits that you actually check out, rather than every version of the file that ever existed.
To use Git LFS, you will need a Git LFS aware host such as Bitbucket Cloud or Bitbucket Data Center. Repository users will need to have the Git LFS command-line client installed, or a Git LFS aware GUI client such as Sourcetree. Fun fact: Steve Streeting, the Atlassian developer who invented Sourcetree, is also a major contributor to the Git LFS project, so Sourcetree and Git LFS work together rather well.
What is Git LFS?
Installing Git LFS
There are three easy ways to install Git LFS:
a. Install it using your favorite package manager. git-lfs packages are available for Homebrew, MacPorts, dnf, and packagecloud; or
b. Download and install Git LFS from the project website; or
c. Install Sourcetree, a free Git GUI client that comes bundled with Git LFS.
Once git-lfs is on your path, run git lfs install to initialize Git LFS (you can skip this step if you installed Sourcetree):
You’ll only need to run git lfs install once. Once initialized for your system, Git LFS will bootstrap itself automatically when you clone a repository containing Git LFS content.
Creating a new Git LFS repository
To create a new Git LFS aware repository, you’ll need to run git lfs install after you create the repository:
This installs a special pre-push Git hook in your repository that will transfer Git LFS files to the server when you git push .
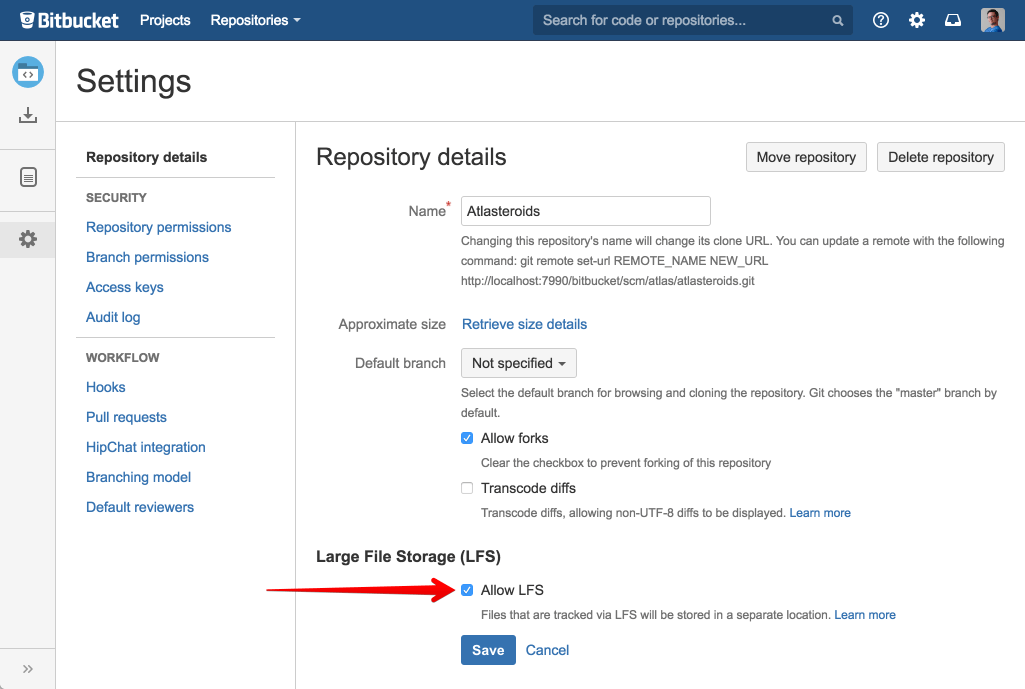
Git LFS is automatically enabled for all Bitbucket Cloud repositories. For Bitbucket Data Center, you’ll need to enable Git LFS in your repository settings:
Once Git LFS is initialized for your repository, you can specify which files to track using git lfs track .
Cloning an existing Git LFS repository
Once Git LFS is installed, you can clone a Git LFS repository as normal using git clone . At the end of the cloning process Git will check out the default branch (usually main ), and any Git LFS files needed to complete the checkout process will be automatically downloaded for you. For example:
There are four PNGs in this repository being tracked by Git LFS. When running git clone, Git LFS files are downloaded one at a time as pointer files are checked out of your repository.
Speeding up clones
If you’re cloning a repository with a large number of LFS files, the explicit git lfs clone command offers far better performance:
Rather than downloading Git LFS files one at a time, the git lfs clone command waits until the checkout is complete, and then downloads any required Git LFS files as a batch. This takes advantage of parallelized downloads, and dramatically reduces the number of HTTP requests and processes spawned (which is especially important for improving performance on Windows).
Pulling and checking out
Just like cloning, you can pull from a Git LFS repository using a normal git pull . Any needed Git LFS files will be downloaded as part of the automatic checkout process once the pull completes:
No explicit commands are needed to retrieve Git LFS content. However, if the checkout fails for an unexpected reason, you can download any missing Git LFS content for the current commit with git lfs pull :
Speeding up pulls
Like git lfs clone , git lfs pull downloads your Git LFS files as a batch. If you know a large number of files have changed since the last time you pulled, you may wish to disable the automatic Git LFS download during checkout, and then batch download your Git LFS content with an explicit git lfs pull . This can be done by overriding your Git config with the -c option when you invoke git pull :
Since that’s rather a lot of typing, you may wish to create a simple Git alias to perform a batched Git and Git LFS pull for you:
This will greatly improve performance when a large number of Git LFS files need to be downloaded (again, especially on Windows).
Tracking files with Git LFS
When you add a new type of large file to your repository, you’ll need to tell Git LFS to track it by specifying a pattern using the git lfs track command:
Note that the quotes around «*.ogg» are important. Omitting them will cause the wildcard to be expanded by your shell, and individual entries will be created for each .ogg file in your current directory:
The patterns supported by Git LFS are the same as those supported by .gitignore , for example:
These patterns are relative to the directory in which you ran the git lfs track command. To keep things simple, it is best to run git lfs track from the root of your repository. Note that Git LFS does not support negative patterns like .gitignore does.
After running git lfs track , you’ll notice a new file named .gitattributes in the directory you ran the command from. .gitattributes is a Git mechanism for binding special behaviors to certain file patterns. Git LFS automatically creates or updates .gitattributes files to bind tracked file patterns to the Git LFS filter. However, you will need to commit any changes to the .gitattributes file to your repository yourself:
For ease of maintenance, it is simplest to keep all Git LFS patterns in a single .gitattributes file by always running git lfs track from the root of your repository. However, you can display a list of all patterns that are currently tracked by Git LFS (and the .gitattributes files they are defined in) by invoking git lfs track with no arguments:
You can stop tracking a particular pattern with Git LFS by simply removing the appropriate line from your .gitattributes file, or by running the git lfs untrack command:
After running git lfs untrack you will again have to commit the changes to .gitattributes yourself.
Committing and pushing
You can commit and push as normal to a repository that contains Git LFS content. If you have committed changes to files tracked by Git LFS, you will see some additional output from git push as the Git LFS content is transferred to the server:
If transferring the LFS files fails for some reason, the push will be aborted and you can safely try again. Like Git, Git LFS storage is content addressable: content is stored against a key which is a SHA-256 hash of the content itself. This means it is always safe to re-attempt transferring Git LFS files to the server; you can’t accidentally overwrite a Git LFS file’s contents with the wrong version.
Moving a Git LFS repository between hosts
To migrate a Git LFS repository from one hosting provider to another, you can use a combination of git lfs fetch and git lfs push with the —all option specified.
For example, to move all Git and Git LFS repository from a remote named github to a remote named bitbucket 😉 :
Fetching extra Git LFS history
Git LFS typically only downloads the files needed for commits that you actually checkout locally. However, you can force Git LFS to download extra content for other recently modified branches using git lfs fetch —recent :
This is useful for batch downloading new Git LFS content while you’re out at lunch, or if you’re planning on reviewing work from your teammates and will not be able to download content later on due to limited internet connectivity. For example, you may wish to run git lfs fetch —recent before jumping on a plane!
Git LFS considers any branch or tag containing a commit newer than seven days as recent. You can configure the number of days considered as recent by setting the lfs.fetchrecentrefsdays property:
By default, git lfs fetch —recent will only download Git LFS content for the commit at the tip of a recent branch or tag.

However you can configure Git LFS to download content for earlier commits on recent branches and tags by configuring the lfs.fetchrecentcommitsdays property:
Use this setting with care: if you have fast moving branches, this can result in a huge amount of data being downloaded. However it can be useful if you need to review interstitial changes on a branch, cherry picking commits across branches, or rewrite history.

As discussed in Moving a Git LFS repository between hosts, you can also elect to fetch all Git LFS content for your repository with git lfs fetch —all :
Deleting local Git LFS files
You can delete files from your local Git LFS cache with the git lfs prune command:
This will delete any local Git LFS files that are considered old. An old file is any file not referenced by:
- the currently checked out commit
- a commit that has not yet been pushed (to origin, or whatever lfs.pruneremotetocheck is set to)
- a recent commit
By default, a recent commit is any commit created in the last ten days. This is calculated by adding:
- the value of the lfs.fetchrecentrefsdays property discussed in Fetching extra Git LFS history (which defaults to seven); to
- the value of the lfs.pruneoffsetdays property (which defaults to three)

You can configure the prune offset to retain Git LFS content for a longer period:
Unlike Git’s built-in garbage collection, Git LFS content is not pruned automatically, so running git lfs prune on a regular basis is a good idea to keep your local repository size down.
You can test out what effect a prune operation will have with git lfs prune —dry-run :
And exactly which Git LFS objects will be pruned with git lfs prune —verbose —dry-run :
The long hexadecimal strings output by —verbose mode are SHA-256 hashes (also known as Object IDs, or OIDs) of the Git LFS objects to be pruned. You can use the techniques described in Finding paths or commits that reference a Git LFS object to find our more about the objects that will be pruned.
As an additional safety check, you can use the —verify-remote option to check whether the remote Git LFS store has a copy of your Git LFS objects before they are pruned:
This makes the pruning process significantly slower, but gives you peace of mind knowing that any pruned objects are recoverable from the server. You can enable the —verify-remote option permanently for your system by configuring the lfs.pruneverifyremotealways property globally:
Or you can enable remote verification for just the context repository by omitting the —global option from the command above.
Deleting remote Git LFS files from the server
The Git LFS command-line client doesn’t support pruning files from the server, so how you delete them depends on your hosting provider.
In Bitbucket Cloud, you can view and delete Git LFS files via Repository Settings > Git LFS:
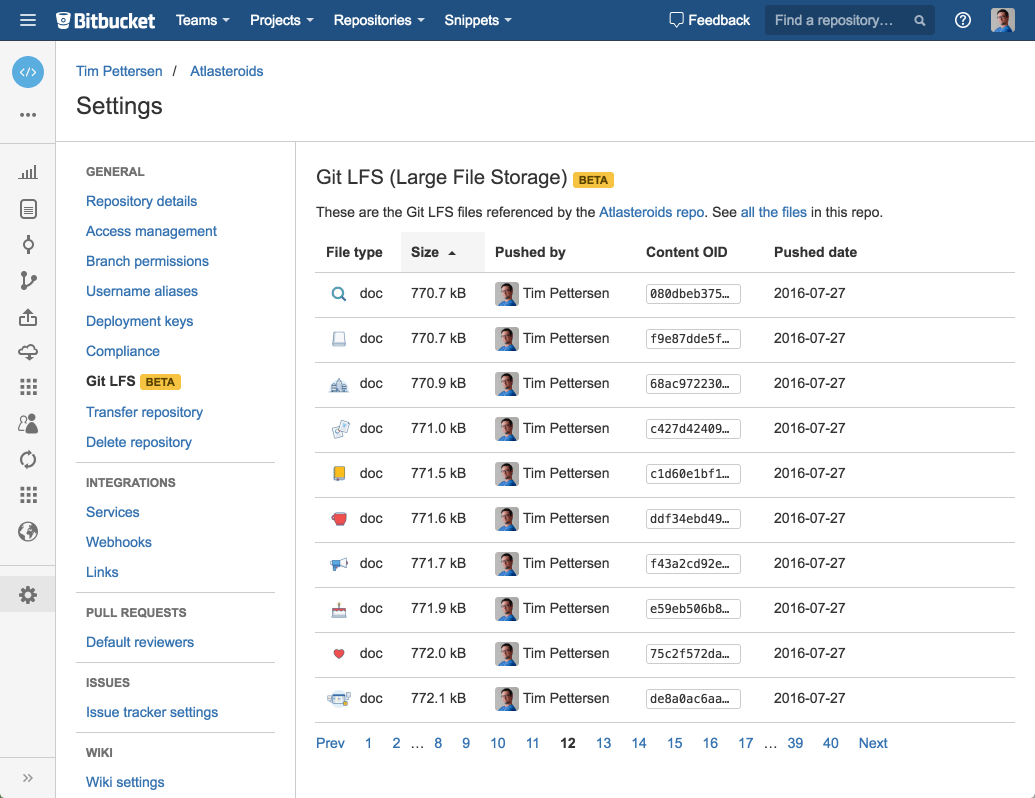
Note that each Git LFS file is indexed by its SHA-256 OID; the paths that reference each file are not visible via the UI. This is because there could be many different paths at many different commits that may refer to a given object, so looking them up would be a very slow process.
To determine what a given Git LFS file actually contains, you have three options:
- look at the file preview image and file type in the left hand column of the Bitbucket Git LFS UI
- download the file using the link in the right hand column of the Bitbucket Git LFS UI -search for commits referencing the Git LFS object’s SHA-256 OID, as discussed in the next section
Finding paths or commits that reference a Git LFS object
If you have a Git LFS SHA-256 OID, you can determine which commits reference it with git log —all -p -S :
This git log incantation generates a patch ( -p ) from commits on any branch ( —all ) that add or remove a line ( -S ) containing the specified string (a Git LFS SHA-256 OID).
The patch shows you the commit and the path to the LFS object, as well as who added it, and when it was committed. You can simply checkout the commit, and Git LFS will download the file if needed and place it in your working copy.
If you suspect that a particular Git LFS object is in your current HEAD, or on a particular branch, you can use git grep to find the file path that references it:
You can replace HEAD or power-ups with any ref, commit, or tree that contains the Git LFS object.
Including/excluding Git LFS files
In some situations you may want to only download a subset of the available Git LFS content for a particular commit. For example, when configuring a CI build to run unit tests, you may only need your source code, so may want to exclude heavyweight files that aren’t necessary to build your code.
You can exclude a pattern or subdirectory using git lfs fetch -X (or —exclude ):
Alternatively, you may want to only include a particular pattern or subdirectory. For example, an audio engineer could fetch just ogg and wav files with git lfs fetch -I (or —include ):
If you combine includes and excludes, only files that match an include pattern and do not match an exclude pattern will be fetched. For example, you can fetch everything in your Assets directory except gifs with:
Excludes and includes support the same patterns as git lfs track and .gitignore . You can make these patterns permanent for a particular repository by setting the lfs.fetchinclude and lfs.fetchexclude config properties:
These settings can also be applied to every repository on your system by appending the —global option.
Locking Git LFS files
Unfortunately, there is no easy way of resolving binary merge conflicts. With Git LFS file locking, you can lock files by extension or by file name and prevent binary files from being overwritten during a merge.
In order to take advantage of LFS’ file locking feature, you first need to tell Git which type of files are lockable. In the example below, the `—lockable` flag is appended to the `git lfs track` command which both stores PSD files in LFS and marks them as lockable.
Then add the following to your .gitattributes file:
When preparing to make changes to an LFS file, you’ll use the lock command in order to register the file as locked on your Git server.
Once you no longer need the file lock, you can remove it using Git LFS’ unlock command.
Git LFS file locks can be overridden, similar to git push , using a —force flag. Do not use the —force flag unless you’re absolutely sure you know what you’re doing.
How Git LFS works
If you’re interested in learning more about clean and smudge filters, pre-push hooks, and the other interesting computer science behind Git LFS, check out this presentation from Atlassian on Git LFS at LinuxCon 2016:
Источник


