- How to Add a Root Certificate to the Java Truststore on Mac OS 10.15 Catalina
- 1. Download the Certificate
- 2. Put the Certificate in your Java truststore
- How do I install a trusted root certificate on my Mac?
- Mac os import root certificate
- Mac OS X
- Using the Keychain GUI
- Using the command line
- Windows
- Windows: cygwin environment
- WindowsMobile
- Windows Mobile 5
- PocketPC2002
- Notes
- Linux
- Debian
- Symbian
- Nokia E61
- Acrobat Reader
- Android Phones & Tablets
- CAcert user trusted certificates
- CAcert system trusted certificates (without lockscreen)
- References
- Palm Pre (webOS)
- How can I be sure that it is authentic?
- Finding the correct fingerprints
How to Add a Root Certificate to the Java Truststore on Mac OS 10.15 Catalina
Last Updated on June 28, 2020 by Colin
When developing a java web app on Mac OS Catalina, you may have a service that makes an API request to a secure URL.
If you don’t have that secure (https) URL’s root certificate in your Java truststore, the call will fail with this error:
The solution is to put that secure URL’s host’s root certificate into your Java truststore. Easier said than done, but here’s how to do it on Mac OS Catalina.
1. Download the Certificate
- Go to the secure URL in the Chrome browser.
- Hit F12 to open the Chrome Inspector Tools.
- Open the “Security” tab in the Inspector Tools. It’s going to be on the right side of the top nav.
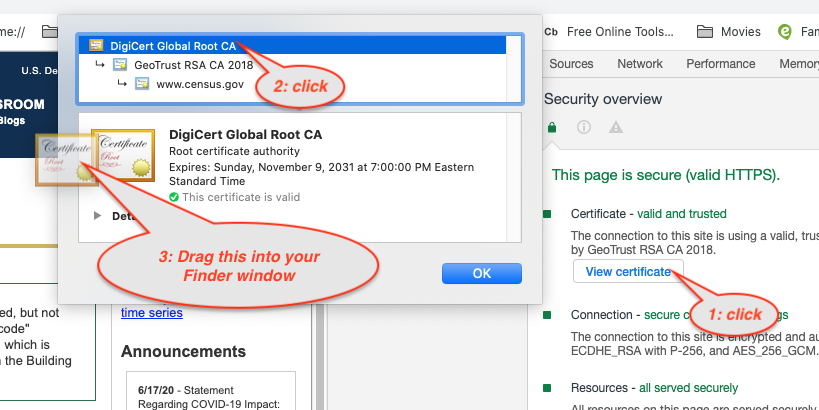
- Click the “View Certificate” button.
- Open a new Finder window somewhere else on your screen.
- In the certificate box, click on the certificate at the top of the tree. Then drag the big image of the Root Certificate into your Finder window. You should now have a file called something like: “DST Root CA X3.cer” in your finder window.
- Pro Tip:
- Clicking and dragging with no keys held down gives you a *.cer certificate
- Clicking and dragging with the Command key held down gives you a *.txt version of the certificate
- Clicking and dragging with the Option (or Alt) key held down gives you a *.pem version of the certificate
- The truststore will accept a *.pem or *.cer file
- Pro Tip:
- Rename the file so that it has no spaces in it: “DSTRootCAX3.cer”.
2. Put the Certificate in your Java truststore
- Open a Terminal window.
- Run this command to put the cert in your Java truststore:
Here is the command broken down so you can see where to replace strings with your values:
The command starts with sudo because you need Admin rights to make this change. You’ll be asked for your Mac user password to proceed.
You’ll next be asked for the password to the truststore. If you have never changed the password, the password is “changeit”.
The uniqueAliasName should be a unique name within the truststore cert list that will let you recognize this particular cert, say, in case you want to remove it.
The pathToYourJavaInstallations_cacerts_file is the path to cacerts file you are using as a truststore. If your server is not using a custom cacerts file, this will be at the default location for your Java installation. If you are using the default Java installation that came with your Mac, like I am, it could be this path: /Library/Java/JavaVirtualMachines/jdk1.8.0_77.jdk/Contents/Home/jre/lib/security/cacerts
The pathToCertYouJustDownloaded is the path to the cert you just put in your Finder folder.
If you’ve run the command successfully, you should see this message in your terminal: Certificate was added to keystore
You can now restart your Java web server, and your API call should work.
Источник
How do I install a trusted root certificate on my Mac?
I keep getting errors about not being able to establish a secure connection with my mail server in Entourage because of a bad root certificate. My ISP has sent me the necessary “trusted root certificate” file, but I have no idea how to install it. Help!
I know just what you mean because I also use an SSL connection to securely access my mail server, keeping things quite a bit more secure on an open wireless wifi network. For a long while I was also getting the error I bet you get:
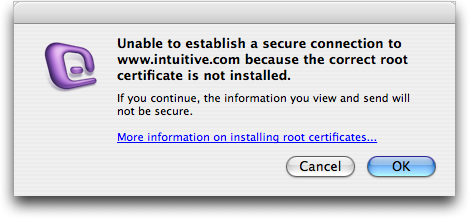
It turns out that Microsoft has some pretty decent instructions on how to install the certificate that you’ve gotten from your ISP here: install a trusted cert, but I’ll summarize here too!
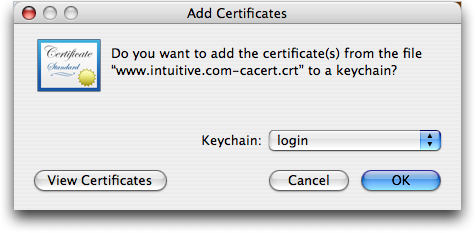
You first step is to save the certificate to the desktop and double-click on it. It’ll launch the Keychain Access application and show you the following dialog box:
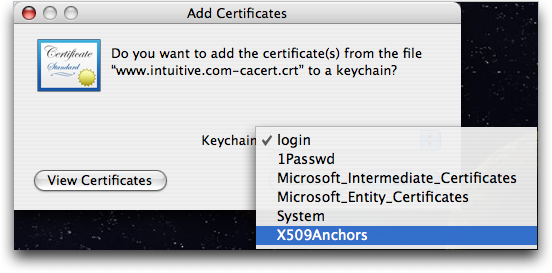
Now you’ll want to click on the “Keychain” pop-up menu and select “X509 Anchors”:
Now click “OK” and enter your administrative password when it prompts you:

That should do the trick. You can verify your certificate’s installed properly by going to Applications –> Microsoft Office 2004 –> Office and launching “Microsoft Cert Manager”. Choose “Apple Trusted Root Certificate Authorities” and then find your new certificate. Double-click it and you should see what I see here:
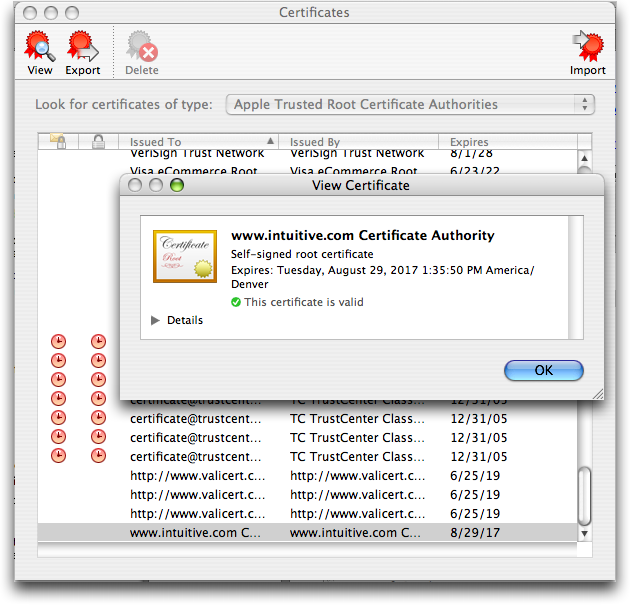
That all there is to it. Quit and restart Entourage and you should be clear of that pesky error message forever, or at least until the certificate expires!
Источник
Mac os import root certificate
In order to have your browser or system automatically trust all certificates signed by the CAcert Certificate Authority, you must instruct your platform or browser to trust the CAcert root certificate http://www.cacert.org/index.php?id=3.
Note that for all systems, you will need to trust both the root certificate root_X0F.crt, as well as the class 3 certificate class3_x14E228.crt.
Some of this information is already covered in the BrowserClients article, so also look there to see if it has the information you need.
Trusting a new Certificate Authority is a process that varies from one platform to the next, so here are some of the ways to trust the CAcert root certificates. The instructions below will only outline how to trust one certificate, and just repeat the process to trust the second certificate.
WARNING: Always double-check the fingerprint on the downloaded certificates before trusting them. If you don’t, you could be trusting a maliciously modified root certificate.
Mac OS X
There are two ways to trust the CAcert root certificates: one from the command line, and one from the Keychain GUI. Each method requires that you use an account with administrative privileges.
Using the Keychain GUI
Download the desired certificate to your desktop from here.
CAUTION: Verify the certificate fingerprints before proceeding!
Open the certificate file, either using Command-O or by double-clicking on the file.
When Keychain appears, select the X509Anchors keychain.
You will be prompted to authenticate with your password to modify the system-wide X509Anchors keychain.
Using the command line
10.5 Leopard
If you’re using 10.5 Leopard and try the certtool command above, you may see this error message:
The solution is to use the security command with add-trusted-cert instead:
Windows
Covering all of the ways to import this certificate into Windows is beyond the scope of this article, and is already covered by How to import CAcert root certificates into browser clients.
Windows: cygwin environment
There is no /etc/ssl; instead, you have to save it in /usr/ssl/certs, and under its special name.
Location found using «strace wget https://somesite 2>&1 |grep ssl», which obviously fails, but you see the attempt to read a cert at this location.
WindowsMobile
Windows Mobile 5
On WindowsMobile2005 you need to download the DER-Encoded certificate (pocketIE cannot save it, so you need to store it in a zip-file for download). Then you’ll need to rename it to .cer . Only then you will be able to install it with a double-click.
 OBSOLETE — not valid for the new roots, SHA256 signed! You can also import new certificates using a CAB file in Windows Mobile. Generic instructions on how to make them can be found on the Windows Mobile blog. A prepared CAB file with both the Class 1 and Class 3 certificates can be found at http://jacob.steenhagen.us/CAcert.cab. This CAB, signed by Jacob Steenhagen’s CAcert certificate, can simply be downloaded to your device and installed. You can verify the certificates are genuine by opening the CAB file and inspecting _setup.xml ensuring that the line before the
(which contains the actual certificate) reads:
for class 1 and:
for class 3. (Note: These should be verified against the Internet Explorer thumbprint at http://www.cacert.org/index.php?id=3). The previous thumbprints (MD-5) are valid for the old roots. Now you will find another thumbprints there, namely SHA1 and SHA256.
OBSOLETE — END
PocketPC2002
There is a tool contained in the zip-file downloadable at http://support.microsoft.com/default.aspx?scid=kb;en-us;322956 (pocketIE on a wm2005-device could not display the html-page here but another browser might do.). This tool will only work with Self-Issued certificates.
To verify the certificate has been successfully imported into the Pocket PC device:
- In the Settings menu, tap the «System» tab. Then tap «Certificates».
- Tap on the «Root» tab. You should now see the new CA Cert root certificate that you added.
Notes
(Note that for wap1.x-gateways there is no way to host encrypted wap-pages if your provider’s wap-gateway does not have the certificate because it’s not end-to-end but decrypted on the gateway, not the device.)
Linux
How your particular distribution will need to be modified to trust the CAcert root certificates will vary from one distribution to the next. However, there are some distributions about which we know some information, listed below.
The instructions for Red Hat 5+, Red Hat 4 and Fedora are topic of bug 1344: Wrong install instruction.
Knoppix: CD versions newer than 3.8 have the certificates already.
Red Hat 5+:wget -O - http://www.cacert.org/certs/root_X0F.txt >> /etc/pki/tls/certs/ca-bundle.crt (this will be overridden by updated openssl RPMs so it is likely not the best method)
Red Hat 4: Change the above location of ca-bundle.crt to /usr/share/ssl/certs/ca-bundle.crt
Fedora: Copy the certificate to /etc/pki/ca-trust/source/anchors/ then run update-ca-trust extract
The Bug1344 text explains furthermore:
RHEL 4 is deprecated and only supported under very special terms
for RHEL generation 7 the same instruction as for Fedora should be used
The correct call for Fedora is «update-ca-trust» instead of «update-ca-trust extract»
Otherwise, you can obtain the certificates from the website as usual, from here.
Debian
As of March 2014, Debian no longer distributes CACert root certificates as part of Debian releases. Although a package is available in the unstable (sid) distribution (updated in 2019), it is inconvenient to use because you either have to check signatures manually or configure sid as package source.
Install from CAcert site manually (recommended)
Import CAcert root certificates using the following («$» not be entered — is a prompt):
This should output something like this:
Then, you are done. See man update-ca-certificates and /usr/share/doc/ca-certificates/README.Debian from the ca-certificates package for more information.
Install from unstable (sid via package management
You need to add unstable (sid) as a package source in a way that all packages are not considered to resolve versions, except ca-cacert.
Edit as root (so prepend sudo to editor command) file /etc/apt/preferences to contain
sudo dpkg-reconfigure ca-certificates
The certicates to mark as trusted are listed as
- CAcert/class3_x14E228.crt
- CAcert/root_X0F.crt
Install from unstable (sid) manually
Warning: Use this installation method only if you are prepared for cumbersome checking of signatures. The verified file can then be reused for later installs.
Search and download package from packages.debian.org with an expected name of the pattern ca-cacert_ _all.deb .
Manually check the signature of the downloaded file via Release.gpg as described in the Secure APT (Debian wiki)
Install package running command
sudo dpkg -i
Add trust to fresh certificates interactively running command
sudo dpkg-reconfigure ca-certificates
The CAcert root certificate can be added to KDE’s certificate store so that all KDE applications, including Konqueror, will trust certificates signed by it.
- Download the certificate(s) in PEM or DER format.
In the KDE Control Center, under «Security & Privacy > Crypto,» go to the «SSL Signers» page, and click «Import.»
IMPORTANT! Find the certificate in the list (it may help to sort by «Organizational Unit» and then look for «http ://www.cacert.org»), click on it, and verify that the MD5 digest shown at the bottom of the window matches the one shown on the download page.
Symbian
Nokia E61
Download the root and class 3 certificates in der format
Typical locations of the cacerts keystore:
- Linux Ubuntu: /usr/lib/jvm/java-$VERSION/jre/lib/security/cacerts
- Linux SuSE: /usr/java/jre$VERSION/lib/security/cacerts
Explanations:
- Name of the keystore file is «cacerts», its password is «changeit» (a clue for you to change this password).
- $/PATH/TO/CACERTS/KEYSTORE = placeholder of the path to the file named «cacerts», including the filename itself.
- $VERSION = Java version, examples:
- Linux Ubuntu: «7-openjdk-amd64» — thus the whole path including the filename is: /usr/lib/jvm/java-7-openjdk-amd64/jre/lib/security/cacerts
- Linux SuSE: «1.8.0_71» — thus the whole path including the filename is: /usr/java/jre1.8.0_71/lib/security/cacerts
Acrobat Reader
Procedure for Acrobat 8:
Menu Document -> Manage Trusted Identities.
Android Phones & Tablets
Before Android version 4.0, with Android version Gingerbread & Froyo, there was a single read-only file ( /system/etc/security/cacerts.bks ) containing the trust store with all the CA (‘system’) certificates trusted by default on Android. Both system apps and all applications developed with the Android SDK use this. Use these instructions on installing CAcert certificates on Android Gingerbread, Froyo, .
Starting from Android 4.0 (Android ICS/’Ice Cream Sandwich’, Android 4.3 ‘Jelly Bean’ & Android 4.4 ‘Kit Kat’), system trusted certificates are on the (read-only) system partition in the folder ‘/system/etc/security/’ as individual files. However, users can now easily add their own ‘user’ certificates which will be stored in ‘/data/misc/keychain/certs-added’.
System-installed certificates can be managed on the Android device in the Settings -> Security -> Certificates -> ‘System’-section, whereas the user trusted certificates are manged in the ‘User’-section there. When using user trusted certificates, Android will force the user of the Android device to implement additional safety measures: the use of a PIN-code, a pattern-lock or a password to unlock the device are mandatory when user-supplied certificates are used.
Installing CAcert certificates as ‘user trusted’-certificates is very easy. Installing new certificates as ‘system trusted’-certificates requires more work (and requires root access), but it has the advantage of avoiding the Android lockscreen requirement.
CAcert user trusted certificates
Download the certificate files (‘root_X0F.crt’ and ‘class3_x14E228.crt’) onto the internal flash storage (the ‘/sdcard’ or any subfolder). Browse to this folder with the file manager and open ‘root_X0F.crt’. Although there might not be an icon for certificates and the files will have a ‘?’-icon, files will be opened with the certificate manager, asking you for a name to describe the to-be-imported certificate. If it is the first user certificate you install, the Android Security Model forces you to use a lock-screen to unlock your device (see «CAcert system trusted certificates» if you really need to avoid this) Repeat with the ‘class3_x14E228.crt’ file. Check if both certificate files are installed correctly, Settings -> Security -> Certificates -> ‘User’-section should now list the certificates you have just installed.
CAcert system trusted certificates (without lockscreen)
The existing method of importing user certificates works fine, but it has the disadvantage that it requires a PIN / password lockscreen whenever user certificates are installed. By installing the CAcert certificates as system certificates, these files are better protected from tampering by malicious apps, and there is no lockscreen requirement (allows ‘Slide to unlock’ or no lock at all). You will need a rooted phone (or at least temporary root access), and a system with openssl software for creating the new certificates.
The next steps will show you how to create Android compatible certificate files from the original CAcert certificate files, how to install/import them on your android device, and how to verify everything is correctly installed.
It is possible, in Android OS version 4.4.2, to save certificates as user trusted ones (Android itself creates their correct names, derived from hashes), and then move them into the system trusted certs repository, using program for Android as Terminal, adb shell, or Ghost Commander. If you decide to follow this process, skip to the Importing paragraph replacing the source folder «/sdcard» used there, with the «/data/misc/keychain/cacerts-added» folder, where Android stores user trusted certificates. Do not copy CAcert roots, move them!
Creating
We will create Android compatible certificate files from the original CAcert certificate files.
Both files are prepared and ready to download, with their hashes to check, here.
Get the CAcert root certificates from the cacert.org website https://www.cacert.org/index.php?id=3 Download the root certificate PEM format (root_X0F.crt) and the Class 3 PKI key in PEM format (class3_x14E228.crt) Get the hash of the root_X0F.crt certificate:
This shows you the hash, in the case of the CAcert PEM file ‘root_X0F.crt’ it is ‘5ed36f99’ (note the use of ‘-subject_hash_old’ instead of ‘-subject_hash’, to get an openssl 0.9 compatible hash) We will use this hash value, append ‘.0’ (dot zero) and use this as the filename for the resulting Android certificate:
Repeat these steps for the Class 3 PEM certificate file ‘class3_x14E228.crt’. If things go well you will end up with the files 5ed36f99.0 and e5662767.0 (if you get the hash values 590d426f and 99d0fa06, you are not using the ‘-subject_hash_old’ parameter to openssl).
The md5sum of the certificate files:
The sha1sum of the certificate files:
The sha256sum of the certificate files:
Importing
We now have Android compatible certificate files, and we will import them into Android ‘System’ certificate store. It is necessary for you to gain the super-user rights to be able to write to / remove from / move between system subfolders. To achieve this, the Android system has to contain the «su» (super-user) program, which provides you with the super-user rights. Some phones’ Android systems do not include this program. In such a case, you have to store all certificates added as the user ones.
Copy the files to the /sdcard folder, either with any file manager or with adb push. Go into adb shell (adb shell from commandline), or open the ‘terminal’-application on your android device. You will get a command prompt similar like shell@android:/ $ Gain superuser/root rights, neccessary to perform privileged actions:
Make the /system folder writable (will return to read-only upon reboot):
Copy the new certificate files to the correct folder on your Android device:
Correct the file permissions to u=rw, g=r, o=r:
Check if the files are ok:
Omit ‘-Z’ if you are using a version of Android without SElinux, it just shows some extra security settings which might be useful if you run into trouble.
Amongst the other default android certificate files, you will see the two new files:
The certificates will be loaded upon the next boot of your device, so reboot your device:
Verifying
To verify certificates are installed correctly, go to Settings -> Security -> Certificates. It should list both «CAcert Inc.» and «Root CA» among the other certificates in the ‘System’ section. Make sure that these CAcert certificates are not also in the ‘User’ (user defined) section. From your android device, visit https://www.cacert.org. If you do not see a warning about missing or untrusted certificates, all went well.
Note that some browsers might use their own certificate store instead of the Android one, you might need to import certificate files into those browsers as well.
If you are unable to disable the Android PIN/Pattern lock screen after installing the system certificates, you might need to «Clear/delete credentials» (in Settings -> Security) even though you have removed all user certificates.
If you run into problems, compare the md5 sum of the certificate files with the md5 values in this article, check the file permissions of the newly installed files. Make sure no user certificates are installed (Settings -> Security -> Clear certificates), and make sure you are using a browser app that uses the android certificate store and does not implement an own certificate store.
In the future, newer versions of openssl might be used on Android, if so, you might need to drop the «_old»-part of the «-subject_hash_old» openssl parameter.
References
Cyanogenmod wiki (old) — articke on adding a CA without requiring a PIN(makes the mistake of not using the certificate hash as filename)
Palm Pre (webOS)
Starting with webOS 1.2, the proceeding for adding the root certificates to the Palm Pre is extremely simple and can be done entirely on the phone.
Visit http://www.cacert.org/index.php?id=3 in the Pre’s browser (http://www.cacert.org and click on Root Certificates)
Under Class 1, click the link for Root Certificate (PEM Format)
A gray progress will appear at the bottom of the screen. Once the certificate is fully downloaded, an arrow will appear on the right side of the bar
Click on the bar containing root_X0F.crt and the aforementioned arrow
- Unfortunately, I don’t see anything on that details screen to validate the fingerprint
Note: prior to webOS 1.2 you had to copy the .crt files to the phone’s memory using USB mode, load the certificate manager (Device Info; More Info (button at bottom); Certificate Manager (Preferences menu at top)), and import the certificates (icon in lower left of screen to browse for them).
How can I be sure that it is authentic?
There are many ways to ensure that you have an authentic, non-tampered copy of the root certificates, all of which boil down to having a trusted party verify the certificate fingerprints. In some cases, your system distribution is the trusted party, but you can also verify it for yourself.
- If your system is mentioned above, you can follow those instructions to ensure you have a authentic copy of the CAcert root certificates.
You can manually download and verify the certificates from here.
Finding the correct fingerprints
CAcert is working to provide multiple places to verify the certificate fingerprints. The following are already known ways to find authentic copies of the CAcert root certificate fingerprints.
You can decrypt the GPG signed message from here and compare the certificate fingerprints contained in the message with those contained in your downloaded certificates.
Obtain a copy printed on the AssuranceForms; ask for one at the next event.
Find them in the Impressum of Linux Magazin
CAcert is currently working on providing fingerprints through these additional means:
- Business cards with the fingerprints printed on them.
- Listing the fingerprints in additional magazines.
FAQ/ImportRootCert (последним исправлял пользователь AlesKastner 2021-07-13 21:48:03)
Источник


