- Configure Jumbo Packets for all your devices including Windows/Linux/Mac OS X on your network
- Summary
- What is Jumbo packet or Jumbo Frame?
- How will this help me?
- MTU (Maximum Transfer Unit)
- Configuring Jumbo Packets/Jumbo Frames in Linux
- CentOS/Red Hat/Ubuntu variety of Linux
- Pre-CentOS 7 versions of Linux (that supports ifconfig)
- Mac OS X
- Windows 10 (not tested)
- Today’s Quote
- Question: Q: No Jumbo frame in Mavericks?
- All replies
- Вики IT-KB
- Инструменты пользователя
- Инструменты сайта
- Боковая панель
- Как включить поддержку больших пакетов Jumbo Frame на коммутаторе Cisco Catalyst 3560X
- How to Enable Jumbo Frames
- southerndoc
- mfram
- drsox
- John Kotches
- southerndoc
- drsox
- How to Enable LACP and Jumbo Frames on a SANLink2 10Gb Base-T
Configure Jumbo Packets for all your devices including Windows/Linux/Mac OS X on your network
October 16, 2017
Summary
This article focus on how to setup Jumbo packets on all your various devices in your network. This includes Windows 10+, Linux, Mac OS X+.
What is Jumbo packet or Jumbo Frame?
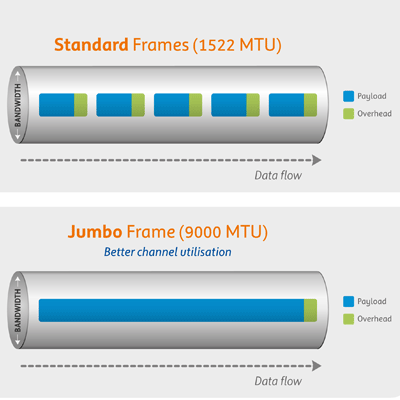
A jumbo frame is an Ethernet frame with a payload greater than the standard maximum transmission unit (MTU) of 1,500 bytes. Jumbo frames are used on local area networks that support at least 1 Gbps and can be as large as 9,000 bytes. – Definition from WhatIs.com
When you purchase [1Gb] Gigabit or 10GB switches and routers lately, you may have seen something on the specifications that may say something like this “supports Jumbo packets” or “Jumbo Frame support”. If you are one of the lucky ones that has a switch that supports Jumbo packets, chances are that you may not have configured your devices to leverage this Jumbo packet technology and may be suffering from network lags that could have been easily avoided.
If you are shopping for a new switch then take a look at a few of the Trendnet switches that supports jumbo packets:
How will this help me?
Suppose you are copying a very large file (like a movie or your mp3 collection from one computer to another computer) or streaming movies or files, then it requires all three parties to have enabled jumbo packet support for the transmission to be effective. The sender (source-computer), the receiver (target-computer) and the switch (middle-man). If any one of them is not configured for jumbo packet support then you’re not really moving data in the most optimal way possible.
Note: This is not applicable to WiFi connections since wifi speeds are not nearly close to direct wired at this time.
So let’s get to business on how you can configure Jumbo Frame/Packet support for each of your devices in your network.
MTU (Maximum Transfer Unit)
The Jumbo Frames support or Jumbo Packets are controlled at your network card level and is typically associated with MTU (maximum transfer unit) property of your network settings. Most OS’s have a default of 1,500 bytes. And Jumbo Frames can support upto 9,000 bytes per packet.
Determine what your router or switch supports by looking into the Router or Switch specifications. You will need to set the MTU parameter accordingly in the next sections.
Configuring Jumbo Packets/Jumbo Frames in Linux
CentOS/Red Hat/Ubuntu variety of Linux
Pre-CentOS 7 versions of Linux (that supports ifconfig)
Mac OS X
Also follow this article on how to do this using your Network setting GUI: Changing it on the Mac GUI
Windows 10 (not tested)
Have Windows, let me know if this works
Today’s Quote
Before Enlightenment — chop wood, carry water.
After enlightenment — chop wood, carry water.
Zen Proverb
Источник
Question: Q: No Jumbo frame in Mavericks?
Where did the Jumbo frame ethernet setting? All my equipment has remained the same and in the Mountain Lion I could choose MTU 9000 in the network settings.
iMac, OS X Mavericks (10.9), 21.5-inch, Mid 2010
Posted on Oct 26, 2013 2:23 AM
All replies
Loading page content
Page content loaded
In the same place of every last OSXs:
Preferences—>Network—>Ethernet—>Advanced. —>Hardware . here you set manually the interface MTU.
Oct 28, 2013 11:30 PM
Yep in the same place but jumbo frame support has disappear .
You can only choose 1280 to 1500 MTU.
Oct 29, 2013 5:03 PM
MTU support of 9000 is no longer available on my 15 inch Mid 2010 MacBook Pro 2.66 i7 after upgrading to Mavericks. How ever my Early 2008 Mac Pro 2x 2.8 Quad-Core Xeon still has 9000 MTU support after upgrading to Mavericks. Is jumbo frame support in Mavericks tied to specific machines?
My machine pre Mavericks was reading from my NAS at an average of 110 MB per second. Post Mavericks I am averaging 66 MB per second. I have seen it peak above 80 MB per second, but sustained is consistantly in the 60 MB per second range.
Nov 1, 2013 6:47 AM
Same here on a MacBook Pro 2010, i5 2.4GHz, 15″ Anti-glare HiRes display.
Lost jumbo frames with Mavericks upgrade, worked fine before with a TrendNet gigabit switch and a Synology DS213j NAS.
Please Apple, fix that. along with the display glitches!
Dec 31, 2013 4:54 AM
My mid-2011 Mac mini (not server) presents an Ethernet MTU choice of Standard (1500), Jumbo (9000), and Custom MTU settings in OS X 10.9.1. Keyword Ethernet. You won’t have Jumbo frames option with Wi-Fi or Thunderbolt Bridge selected.
My early 2008 MacBook Pro (Lion) on the same network as above, also shows Jumbo Frames available. My Gigabit router is an Apple Airport Extreme.
Though unsubstantiated, Mavericks may have raised the bar for what constitutes an acceptible Jumbo frame handshake with your non-Apple Gigabit network device. I would disable, and then re-enable Jumbo frames configuration on the network device to discern it this capability is restored.
Источник
Вики IT-KB
Пошаговые руководства, шпаргалки, полезные ссылки.
Инструменты пользователя
Инструменты сайта
Боковая панель
Как включить поддержку больших пакетов Jumbo Frame на коммутаторе Cisco Catalyst 3560X
 Коммутаторы Cisco Catalyst серий 3750 и 3560 поддерживают MTU до 1998 байт на интерфейсах 10/100 Mbps. Все интерфейсы Gigabit Ethernet поддерживают работу с так называемыми Jumbo frames размером до 9000 байт.
В конфигурации по умолчанию стандартное значение MTU, как и значение Jumbo MTU, установлено в 1500 байт. Нельзя поменять размер MTU/Jumbo MTU на каком-либо одном инфтерфейсе коммутатора. Это значение выставляется глобально для всего устройства и действует сразу для всех портов.
Обратите внимание на то, что при изменении значений MTU для вступления изменений в силу требуется перезагрузка коммутатора.
Чтобы посмотреть текущие значения MTU, выполним команду:
Чтобы посмотреть допустимый диапазон для размера MTU, можно в режиме конфигурации выполнить команду типа:
Чтобы установить увеличенный размер Jumbo MTU, выполним команду типа:
Как видим, для вступления изменений в силу, необходимо выполнить перезапуск IOS.
Сохраняем текущую конфигурацию в старовую и отправляем коммутатор в перезагрузку:
Дожидаемся, когда коммутатор загрузится и снова проверяем размер MTU:
Дополнительные источники информации:
Проверено на следующих конфигурациях:
| Модель коммутатора | Версия IOS |
|---|---|
| Cisco Catalyst WS-C3560X-48T-L V05 | 15.2.4E8 |
 Автор текущей редакции:
Алексей Максимов
Время публикации: 29.08.2019 13:57
Источник
How to Enable Jumbo Frames
southerndoc
Contributor
I’m trying to enable jumbo frames (either 4000 or 9000) to speed up backups, disk access to NAS, etc.
I’m currently using a DS213+. I’m planning on purchasing a 414+ sometime in the near future.
All of my switches (Linksys LGS308P’s and LGS318P) have enabled jumbo frames selected.
Anytime I try to access work email or the student’s address, we can’t.

mfram
macrumors 65816
You’ll probably need multiple network interfaces and put the jumbo frame equipment on a dedicated network. You won’t be able to talk to other machines on the Internet over the jumbo frame interface if the MTU is actually turned up.
Put the jumbo frame equipment on its own private switch and subnet to let them talk to each other. Use an alternate interface (wireless or some other ethernet adapter) to talk to the Internet.

drsox
macrumors 68000
I’m trying to enable jumbo frames (either 4000 or 9000) to speed up backups, disk access to NAS, etc.
I’m currently using a DS213+. I’m planning on purchasing a 414+ sometime in the near future.
All of my switches (Linksys LGS308P’s and LGS318P) have enabled jumbo frames selected.
Anytime I try to access work email or the student’s address, we can’t.
John Kotches
macrumors 6502
Actually you can access anything that crosses a router with jumbo frames enabled.
Issues with jumbo frame are strictly a layer 2 item.
southerndoc
Contributor
Was able to get it working after I routed everything through the switch in my basement. Basically the router has LAN1 connected to the LGS318P switch and LAN2-4 empty.
Set the MTU’s to 9000 manually (previously this wouldn’t work; caused Time Machine to fail when backing up to my Synology DiskStation and wouldn’t allow other Macs to screen share).
I can now screen share from other Macs, Time Machine works, pings are going through at jumbo frame sizes, and can still connected to 100Mbps devices (Sonos, printer, etc.).
drsox
macrumors 68000
Was able to get it working after I routed everything through the switch in my basement. Basically the router has LAN1 connected to the LGS318P switch and LAN2-4 empty.
Set the MTU’s to 9000 manually (previously this wouldn’t work; caused Time Machine to fail when backing up to my Synology DiskStation and wouldn’t allow other Macs to screen share).
I can now screen share from other Macs, Time Machine works, pings are going through at jumbo frame sizes, and can still connected to 100Mbps devices (Sonos, printer, etc.).
Источник
How to Enable LACP and Jumbo Frames on a SANLink2 10Gb Base-T

How to Enable LACP and Jumbo Frames — (Windows & OS X)
SANLink2 10Gb Drivers and Utility (OS X Only)
Table Of Contents
I. Create LACP with Default MTU 1500 — Windows
1. Make sure to identify your 10 Gb Network Ports from the SANLink2
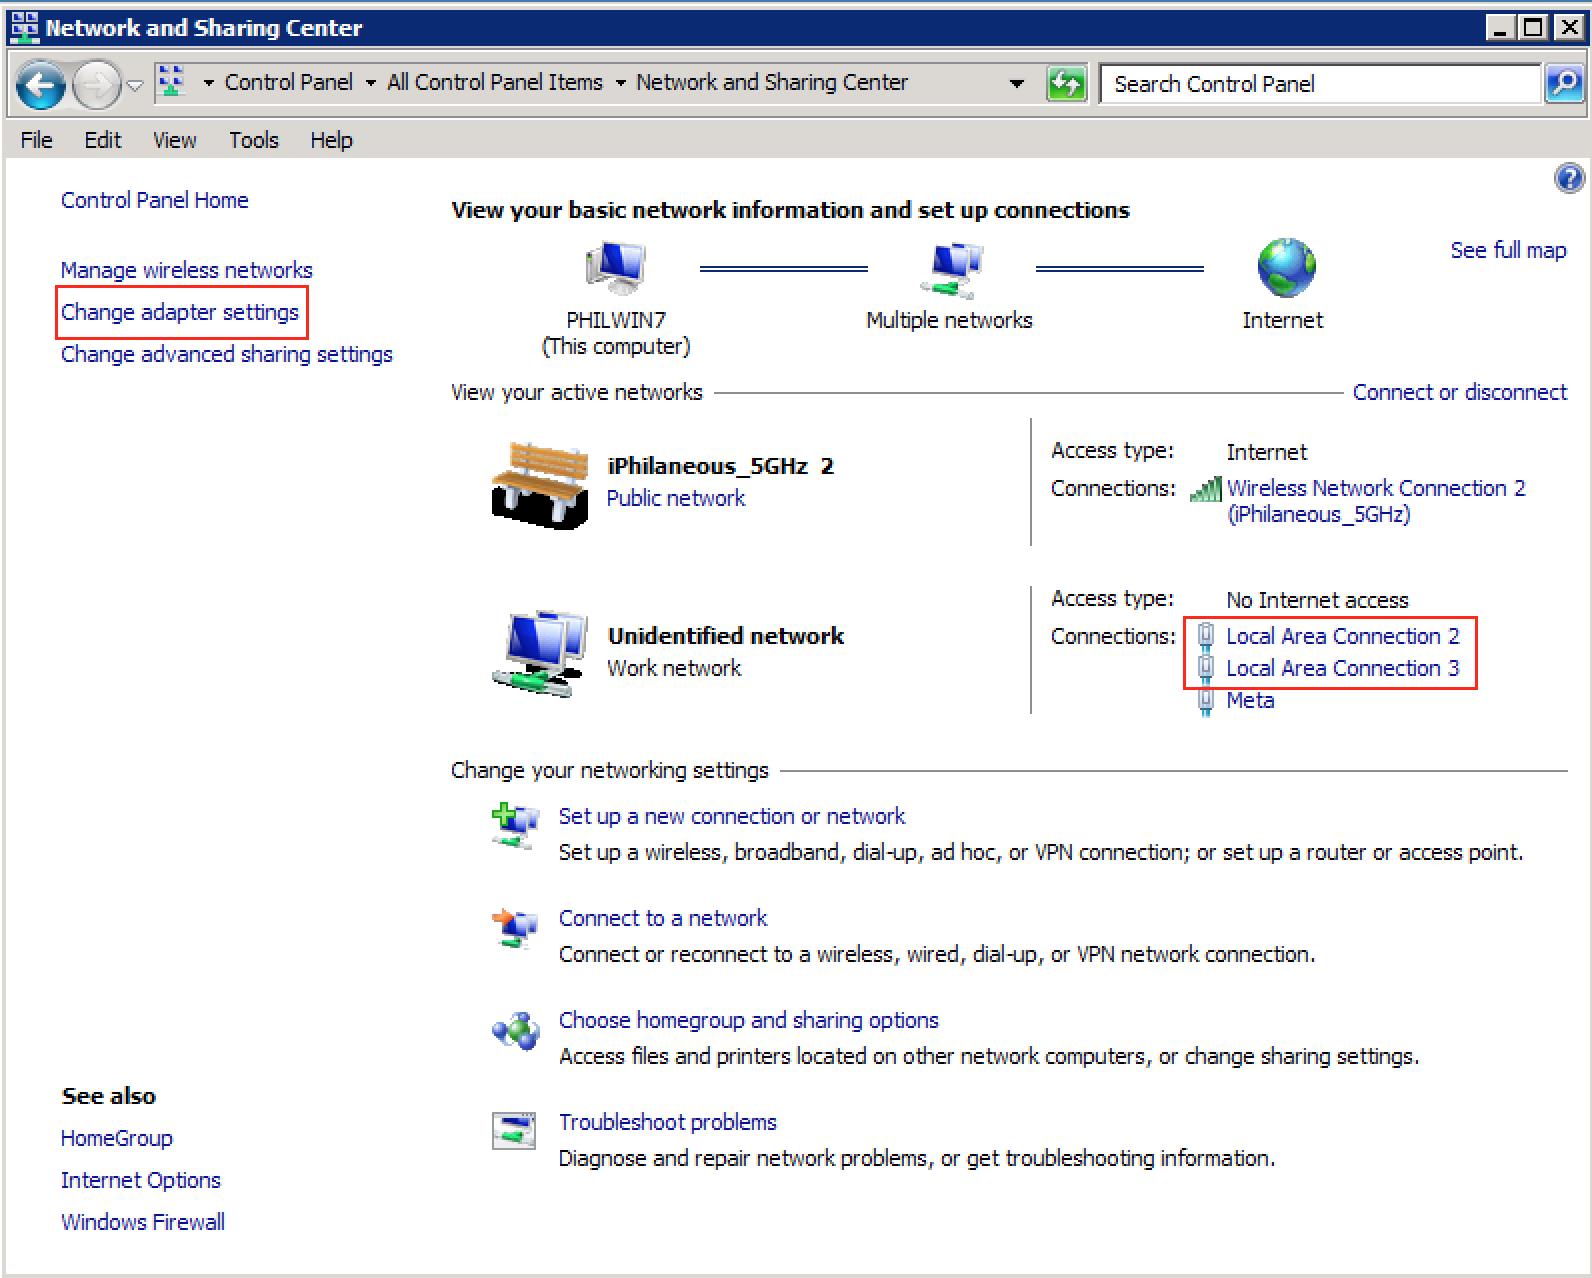
2. Go to Change adapter settings

3. You can also verify the connected devices by going to My Computer > Properties > Device Manager
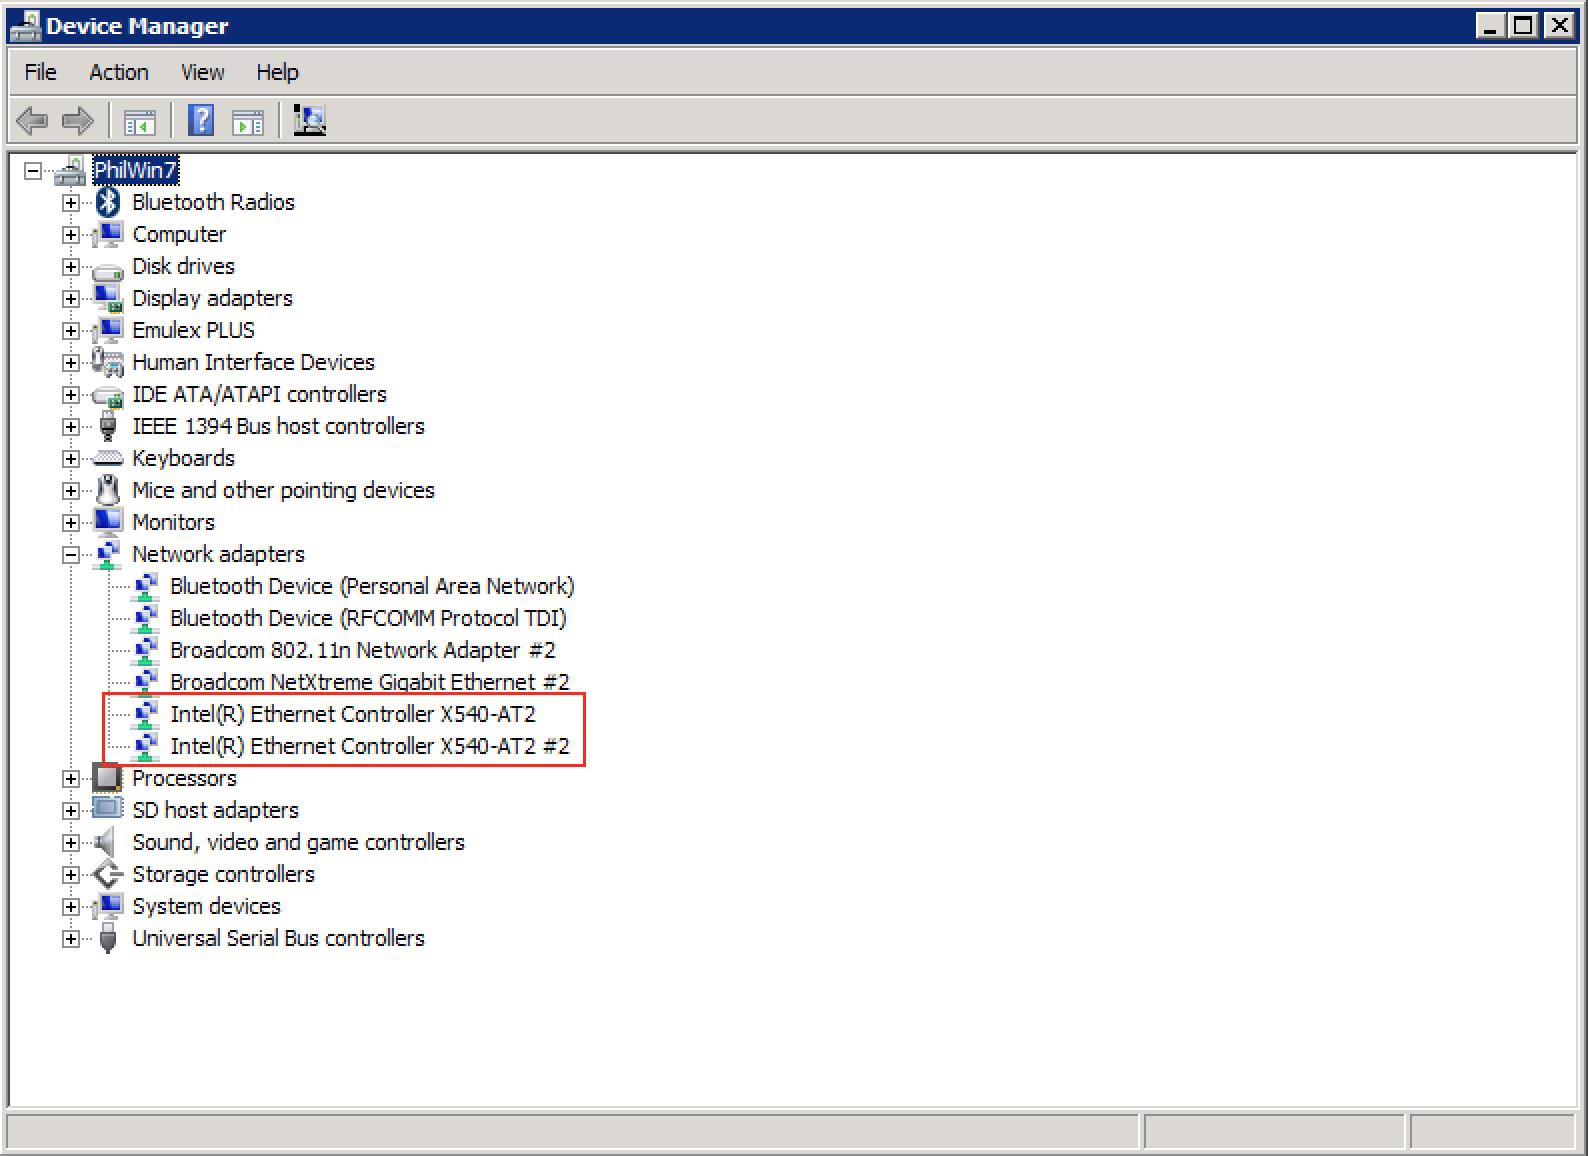
4. Locate Intel(R) Ethernet Controller X540-AT2
5. Right Click on Intel(R) Ethernet Controller X540-AT2 and select Properties
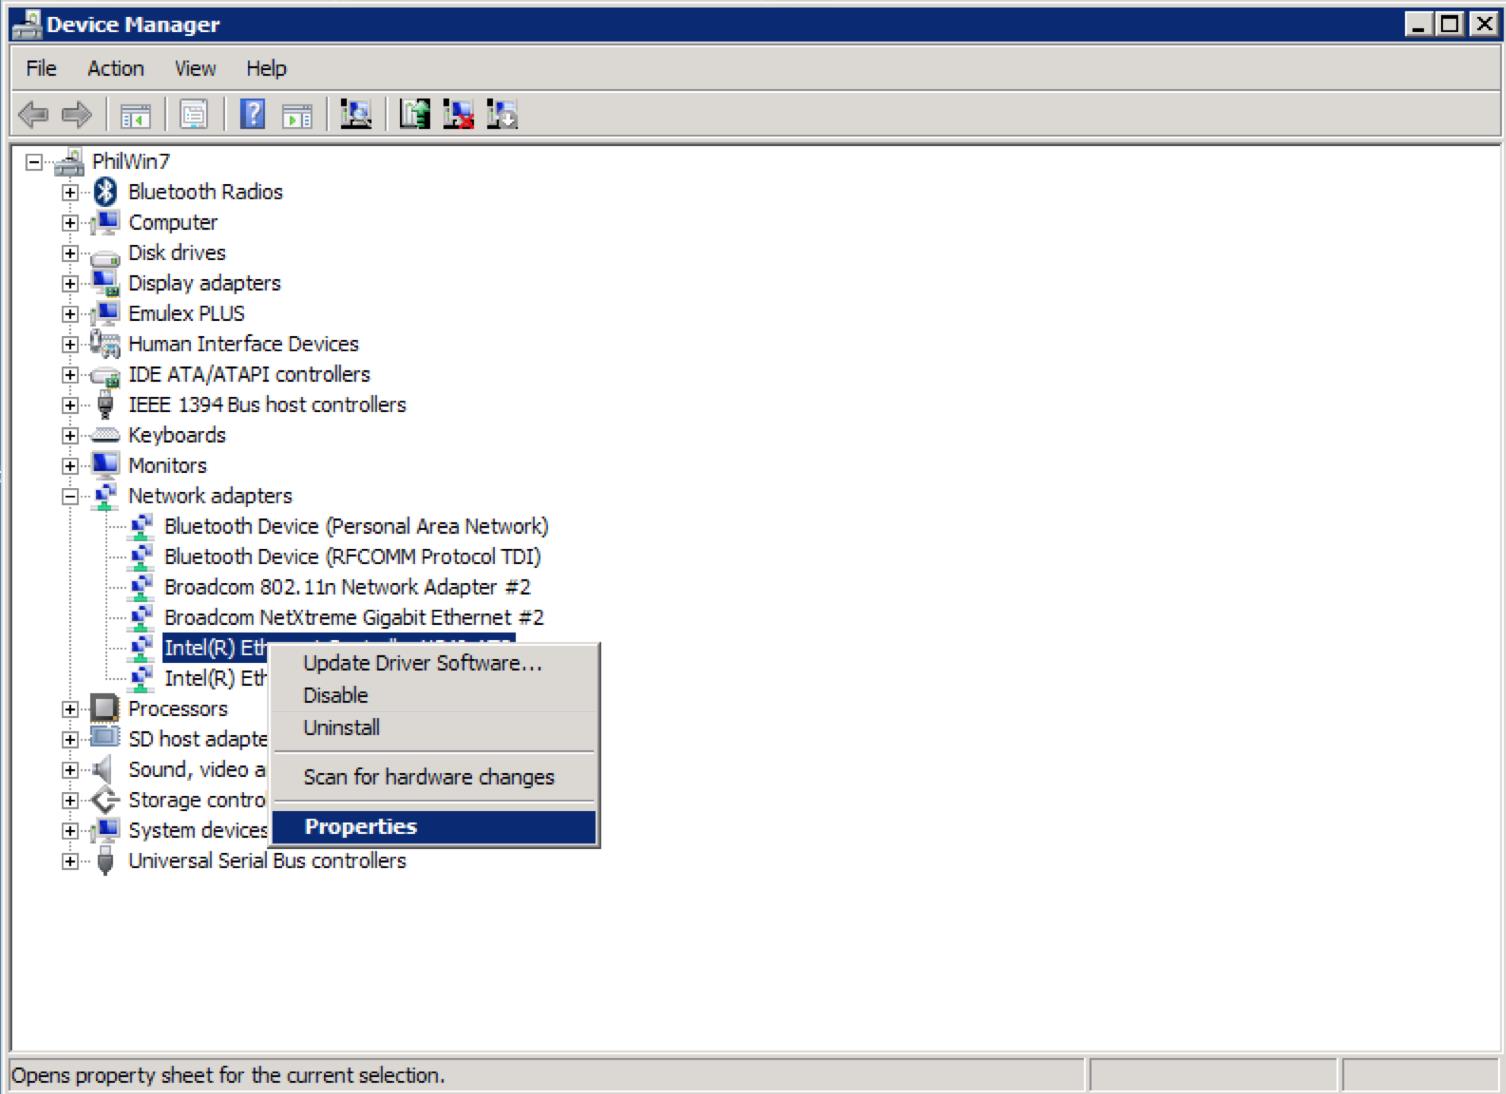
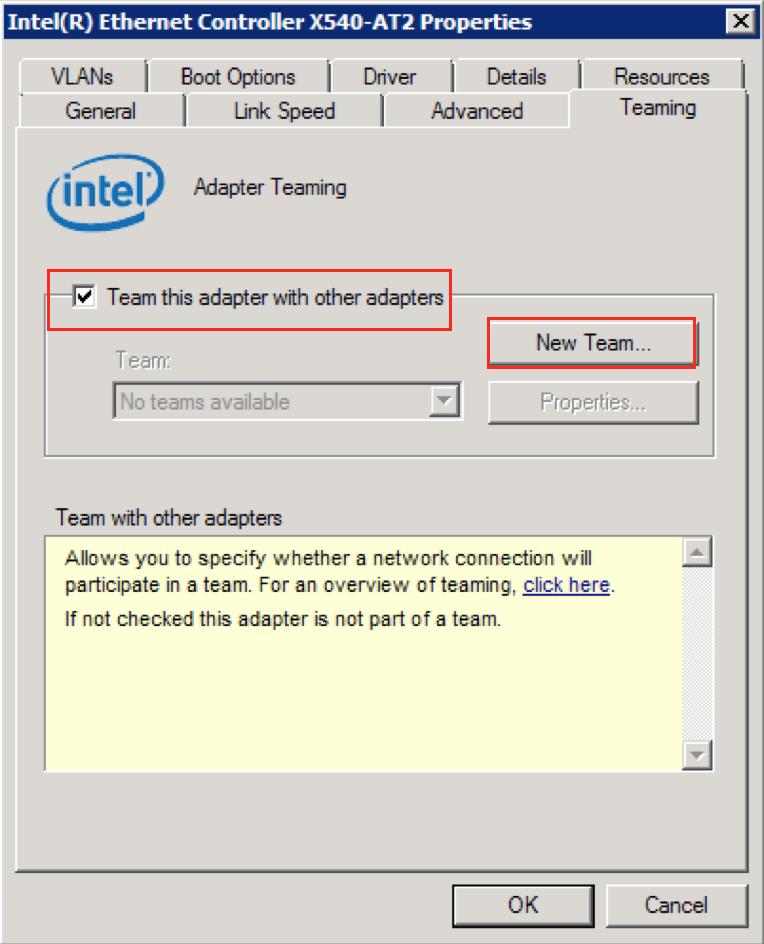
6. Navigate to the Teaming Tab
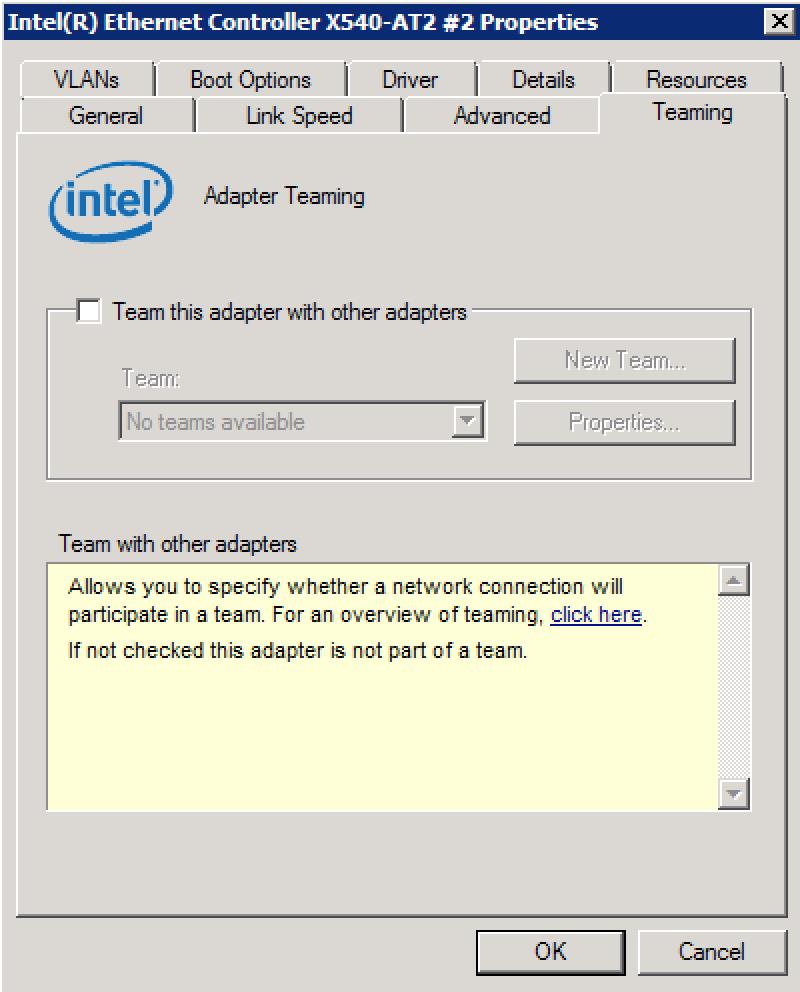
7. Select the checkbox, «Team this adapter with other adapters» and click on New Team
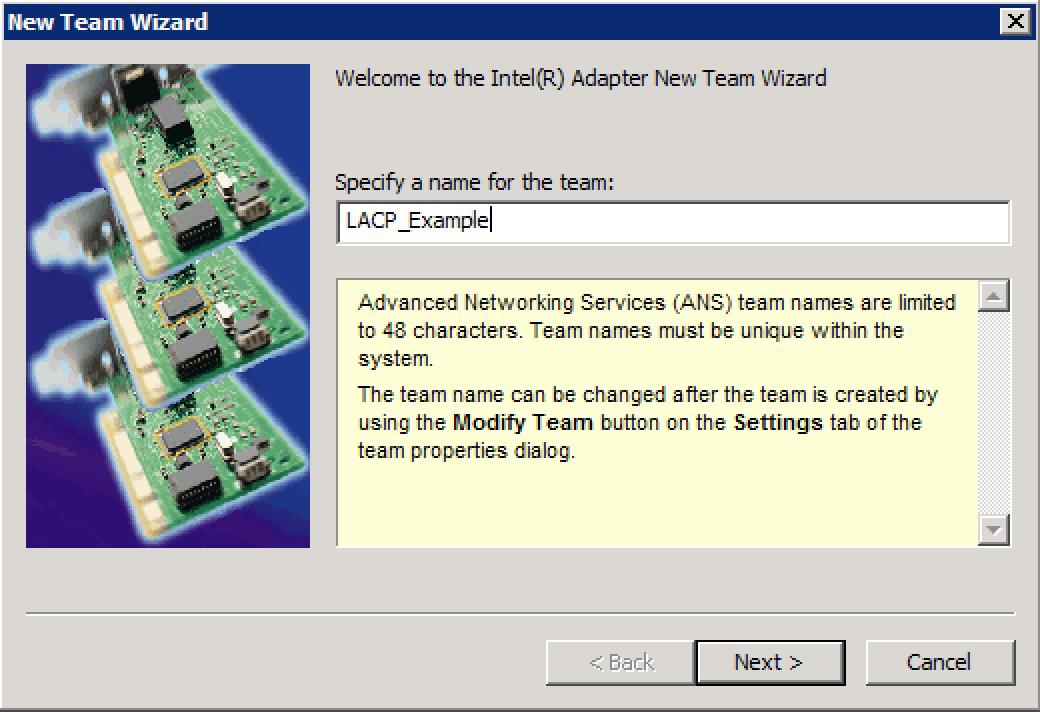
8. Specify a name for the team: LACP_Example
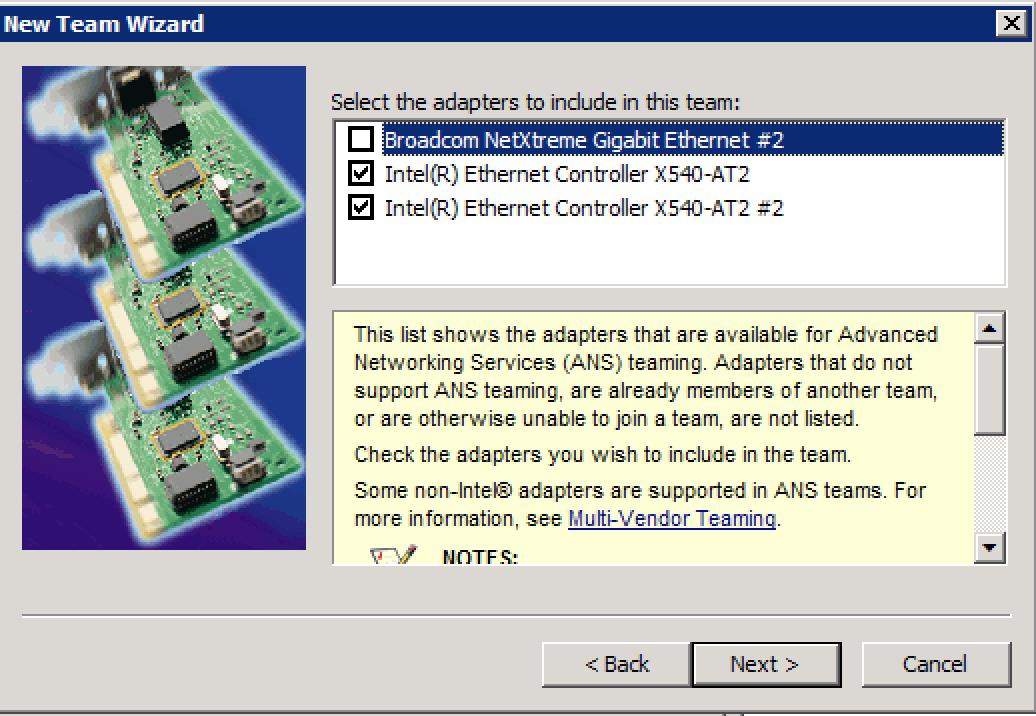
9. Click Next, and select both Intel(R) Ethernet Controller X540-AT2 and #2
10. Select a team type: IEEE 802.3ad Dynamic Link Aggregation. (There are other options to choose from, you may select the team type that best suits yours needs)
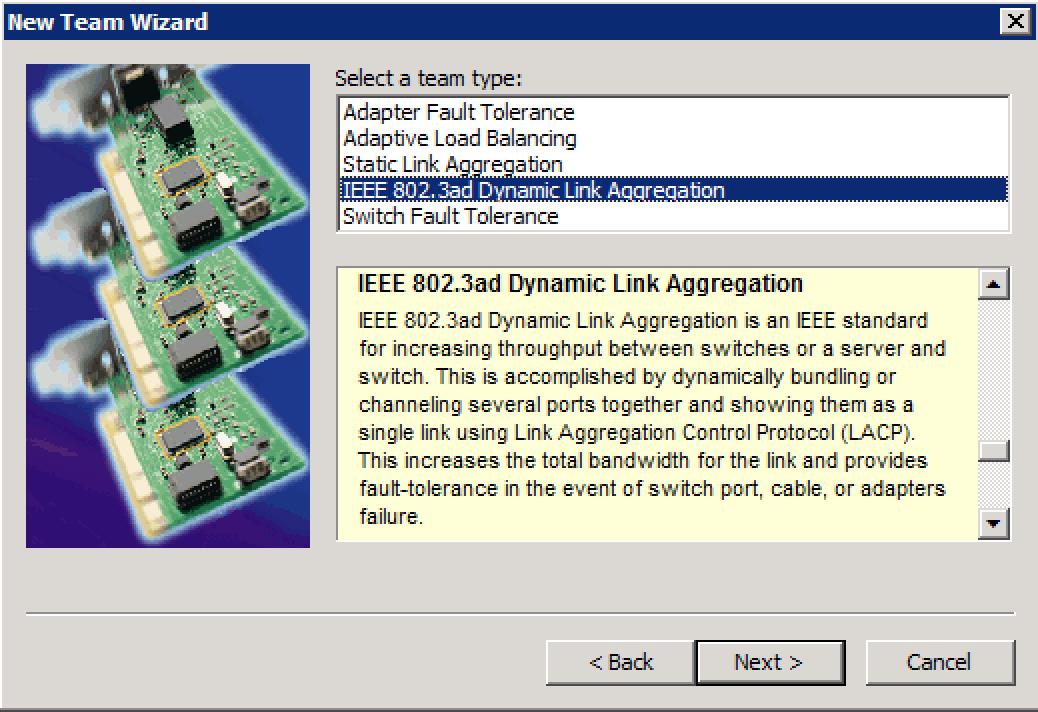
11. Select a profile to apply to the team: Standard Server

13. Go back to the Intel(R) Ethernet Controller X540-AT2 Properties and select the Teaming Tab
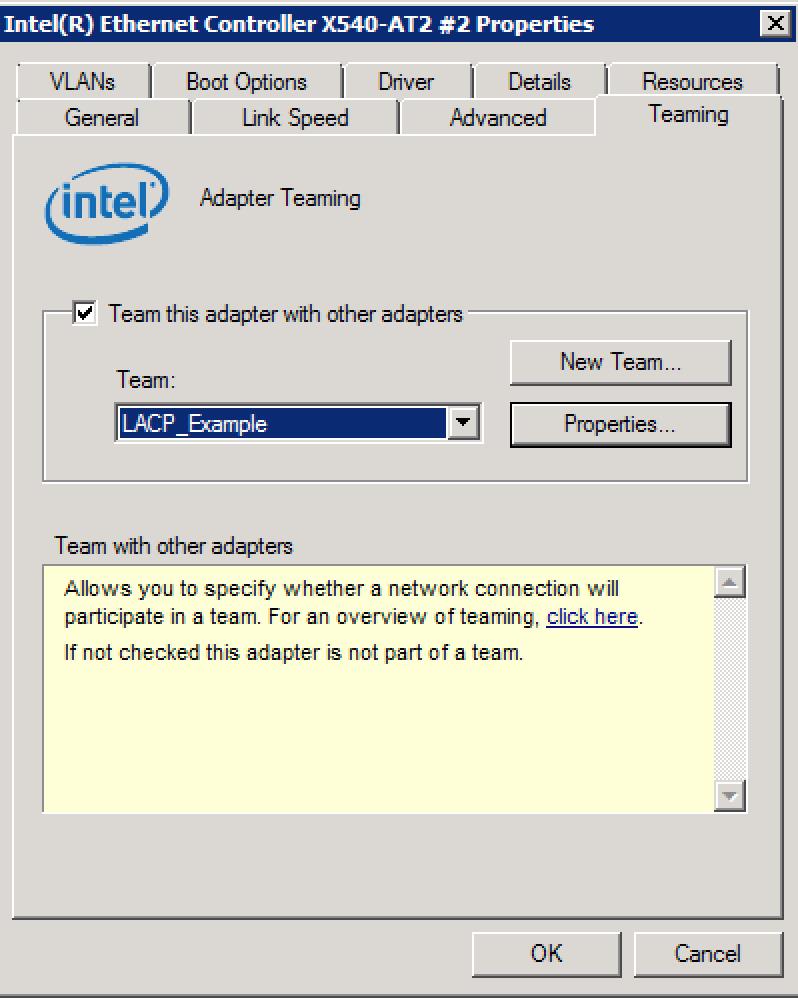
14. Go to Properties
15. In the Team LACP_Example Properties, go to the Settings tab.
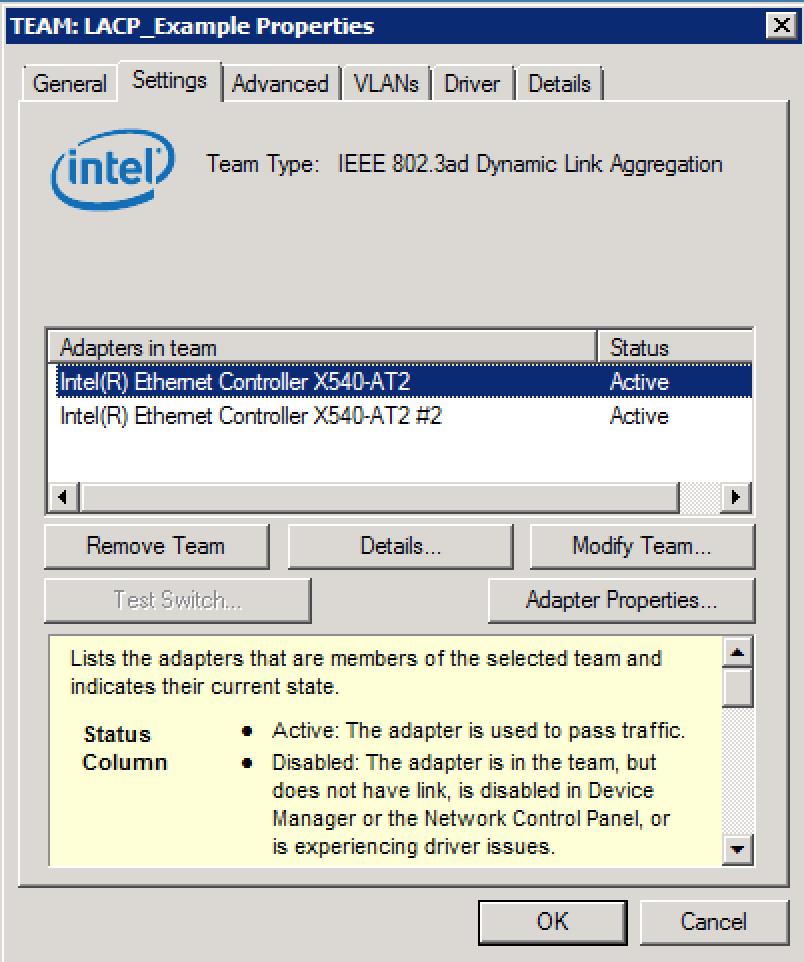
16. Validate that both 10Gb ports are Active as the screenshot above.
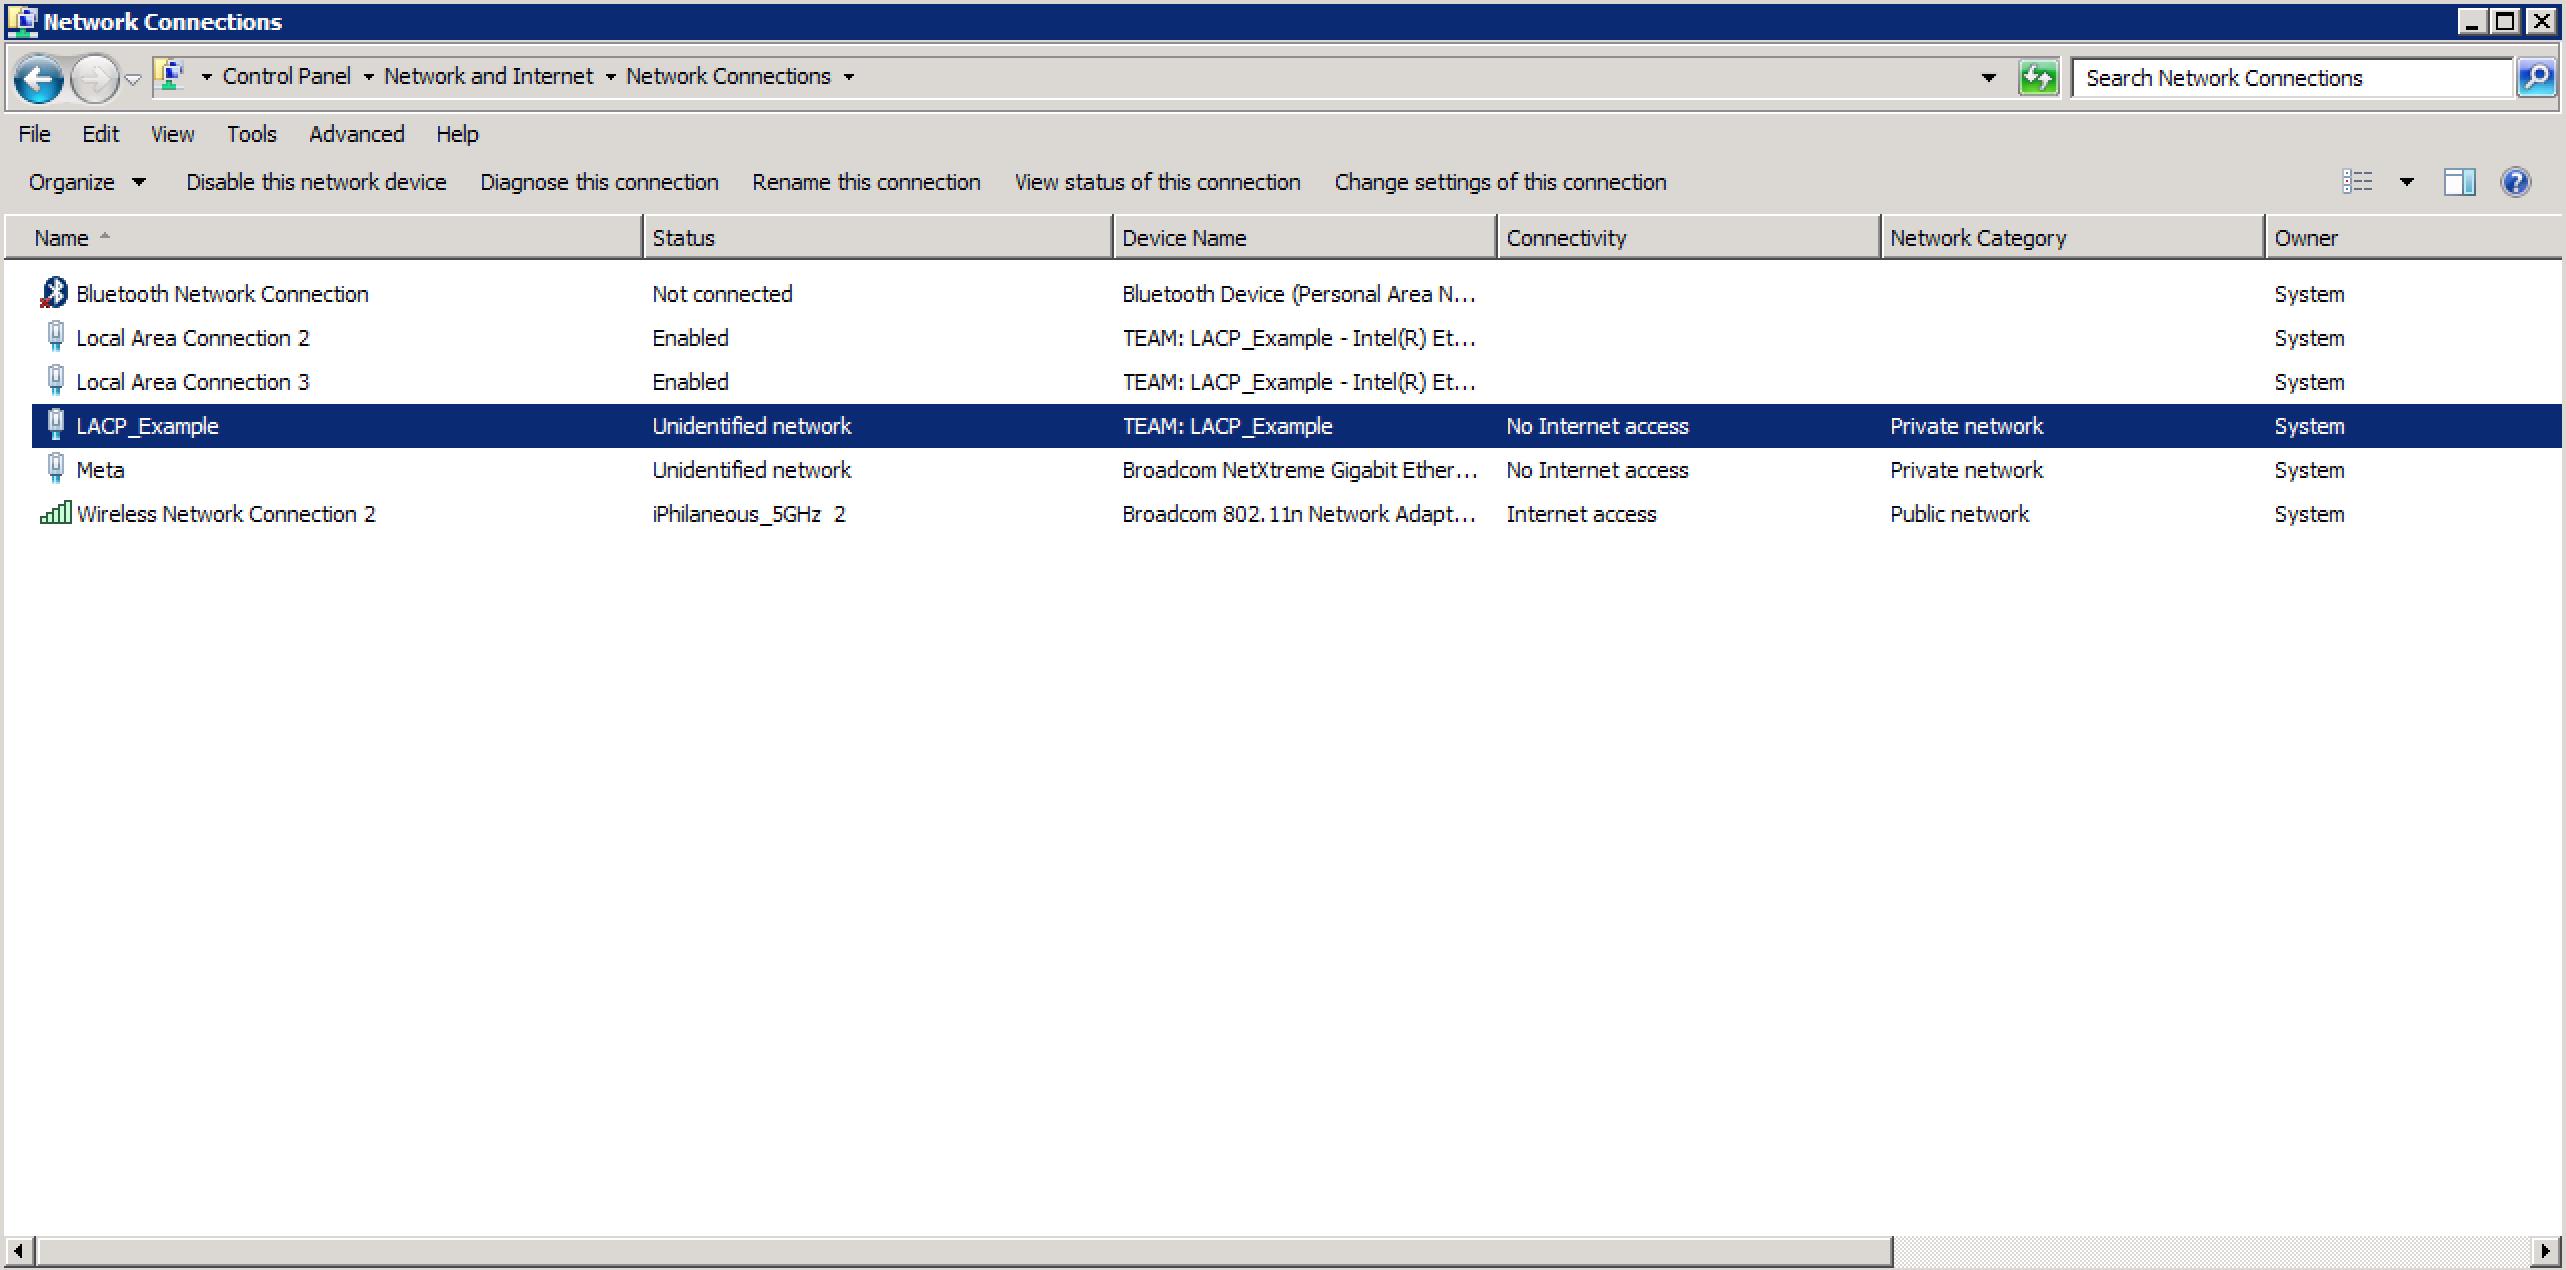
17. Open Network and Sharing [Control Panel\All Control Panel Items\Network and Sharing Center] and go back to Change adapter settings.
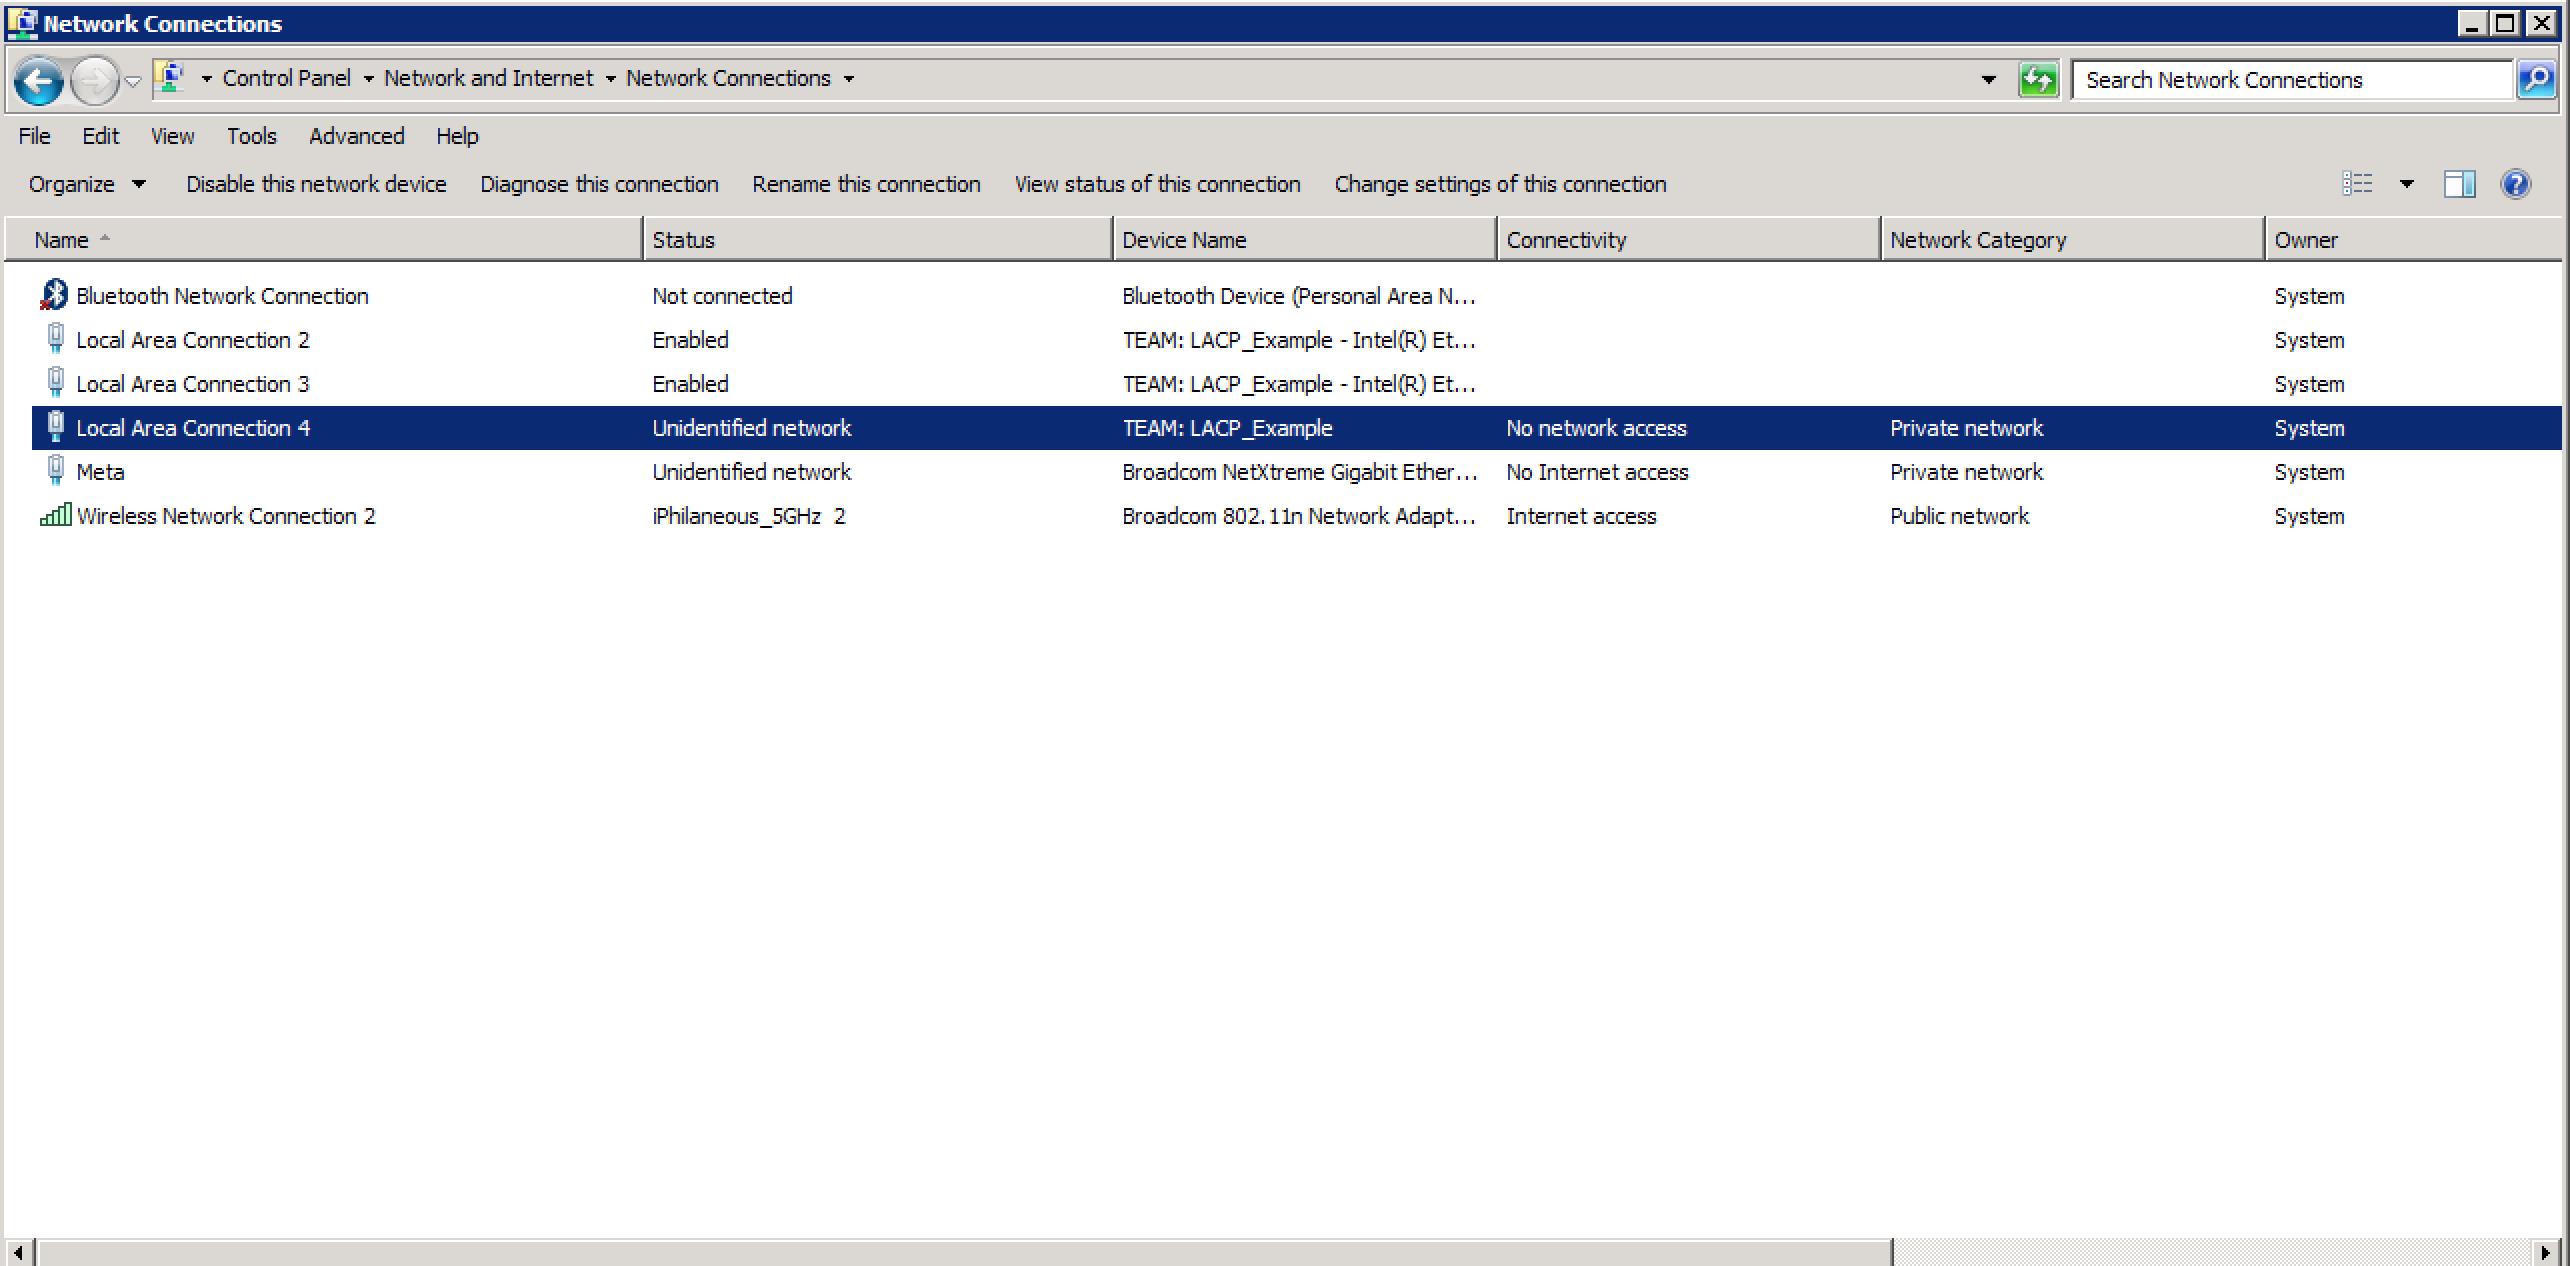
18. Depending on how your Windows Networking is configured (Public and Private), you will see a new Local Area Connection listed. (In this configuration, Local Connection 4 appeared under the Work Network due to the Local Policies set on this machine)
19. To validate the team configuration, click on Local Area Connection 4 (Or the number assigned to your connection)
You should see an aggregate of 20Gbps for the connection. The link speed is listed as 20 Gbps which signifies that (2) x 10Gb Ethernet ports are actually teamed together.

20. Click Properties. You can also verify in this dialogue that it is Connecting Using: TEAM: LACP_Example
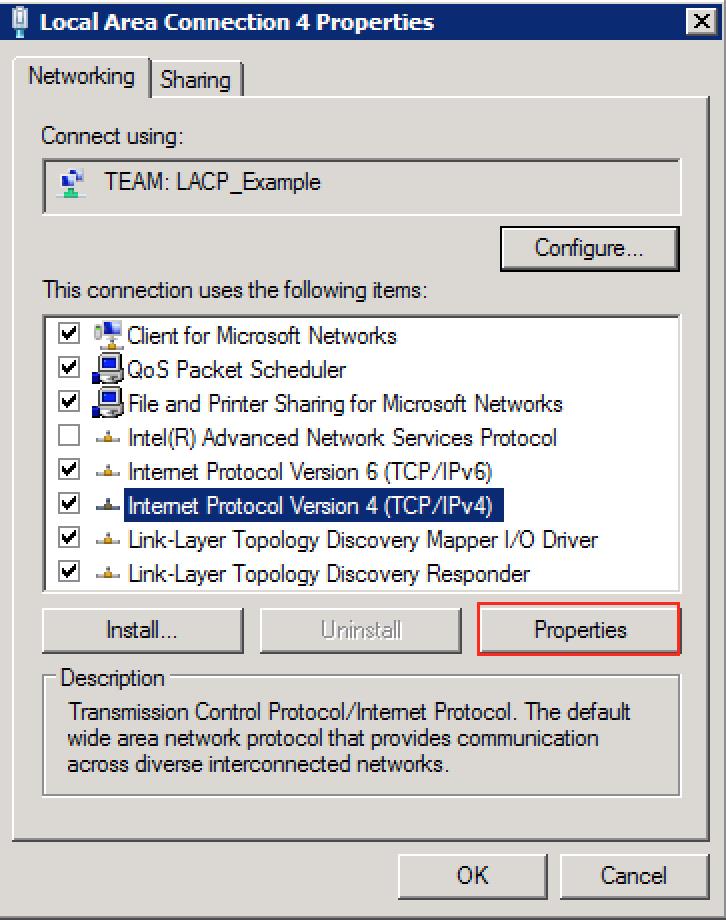
21. Select IPv4 (Double-Click) or click on Properties.
22. In this example, I’m configuring a static IP. Click OK to Save.
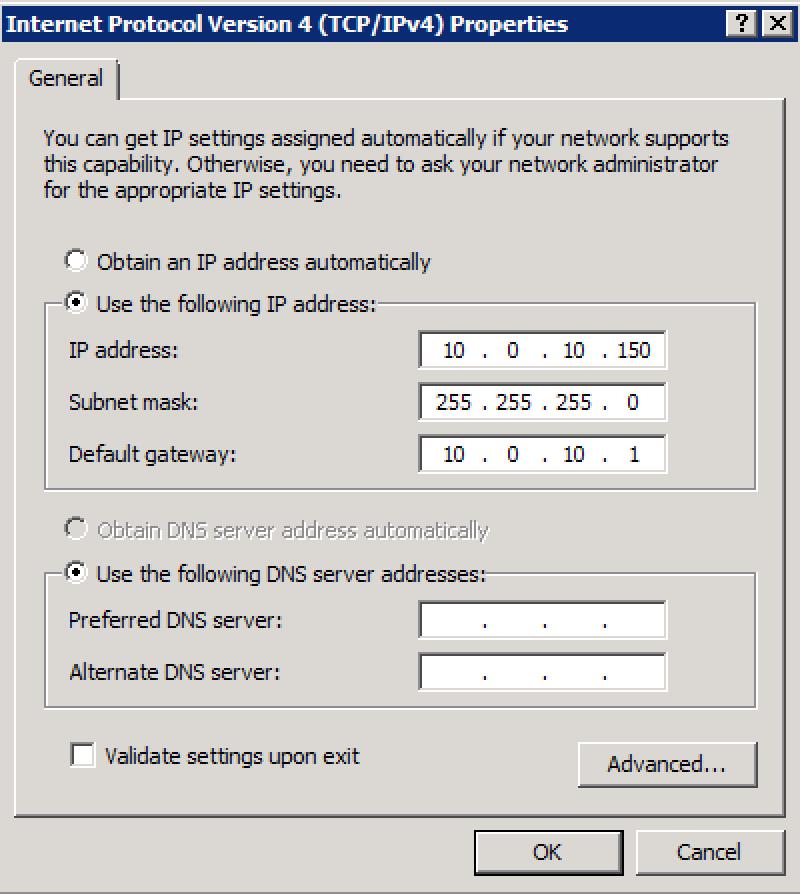
23. Make sure to ping other devices on the same network to test your connection to your Network Switch.
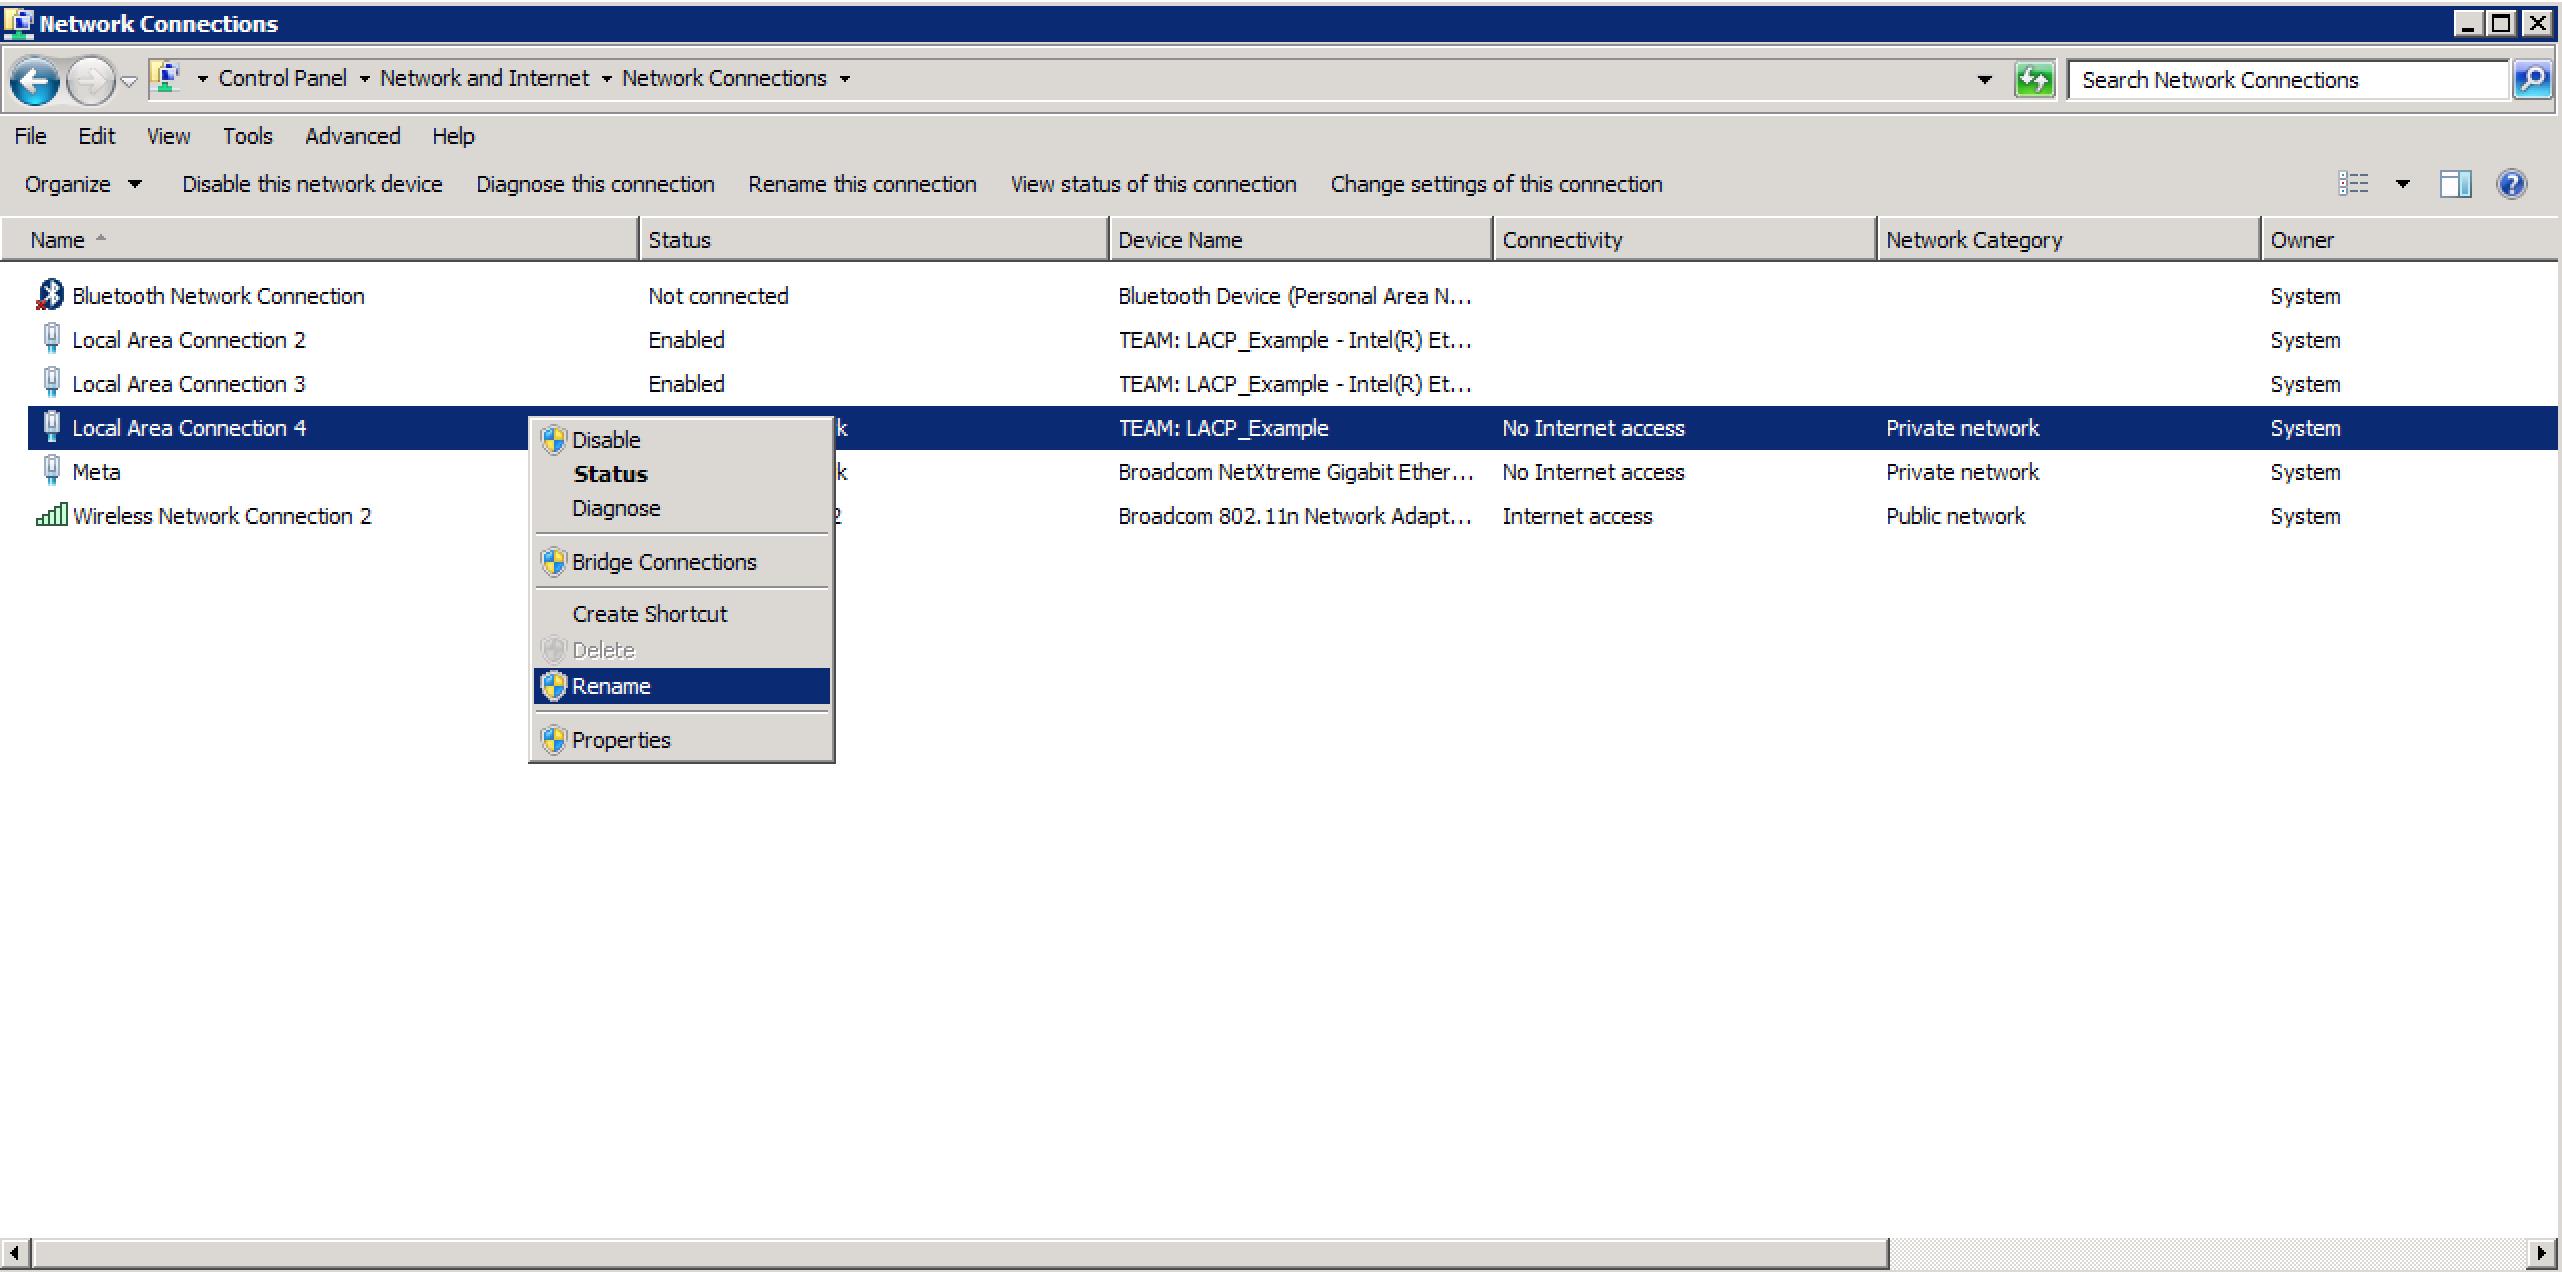
24. You may also rename the connection. Go to Change adapter settings and right click Rename on Local Area Connection 4
25. Rename the connection with a unique identifiable name of your choice.
II. Enable Jumbo Frames on Windows WHQL certified driver for Windows 7 SP1 / Windows 8.1 and Windows 10. (All 64bit ONLY)
Enable Jumbo Frames only if devices across the network support them and are configured to use the same frame size. When setting up Jumbo Frames on other network devices, be aware that different network devices calculate Jumbo Frame sizes differently. Some devices include the header information in the frame size while others do not.
1. To verify the current MTU set on the Ethernet Port Team, open Command Prompt and type the following:
netsh interface ipv4 show subinterfaces
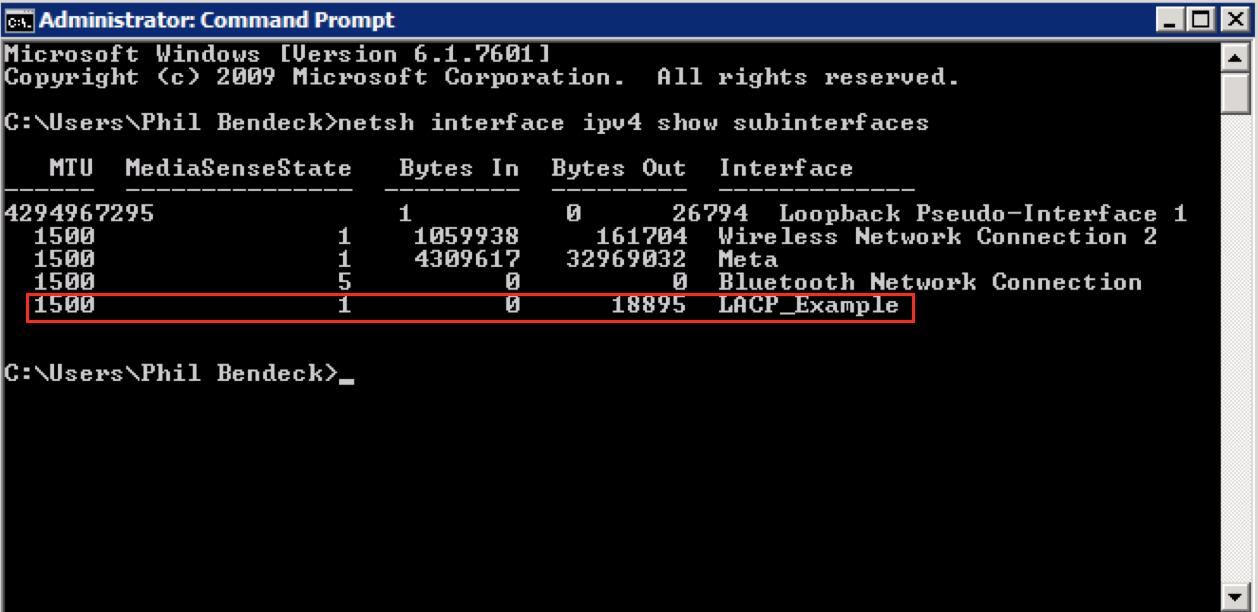
2. In this example, we see that the configured team interface, LACP_Example has an MTU of 1500 (Default)
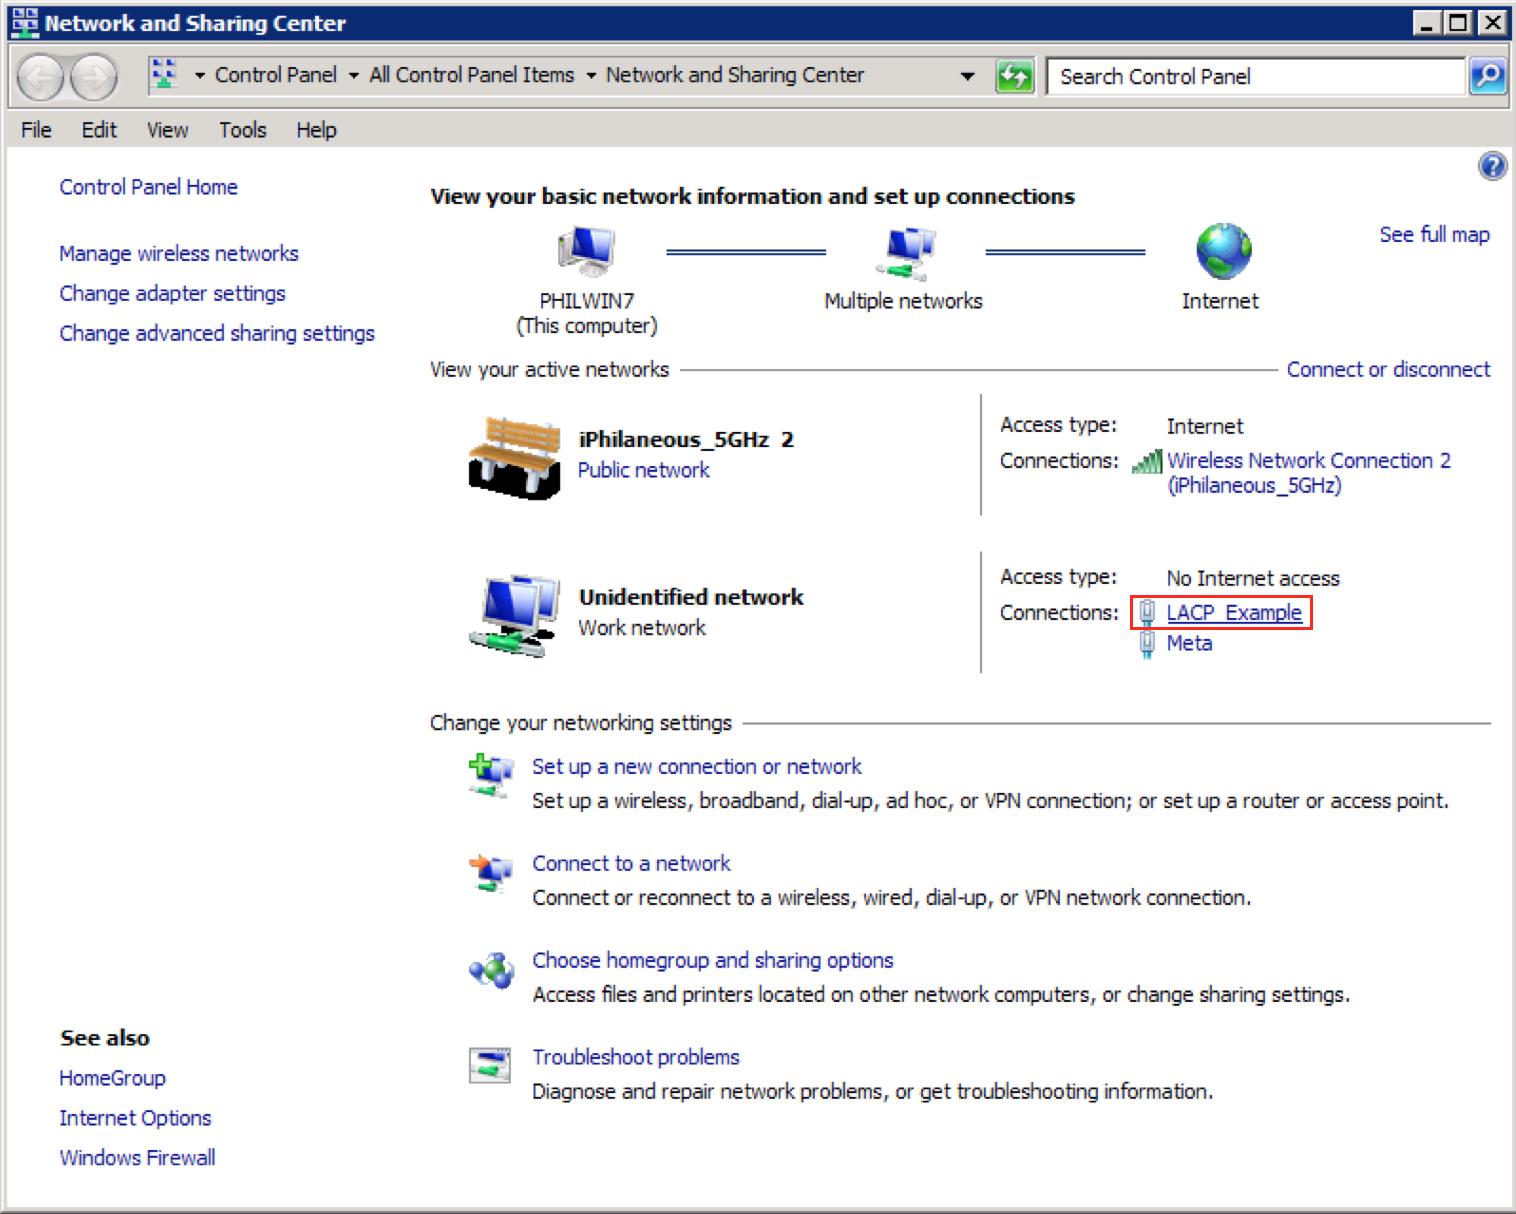
3. Open Network and Sharing Center and select your teamed interface (LACP_Example)
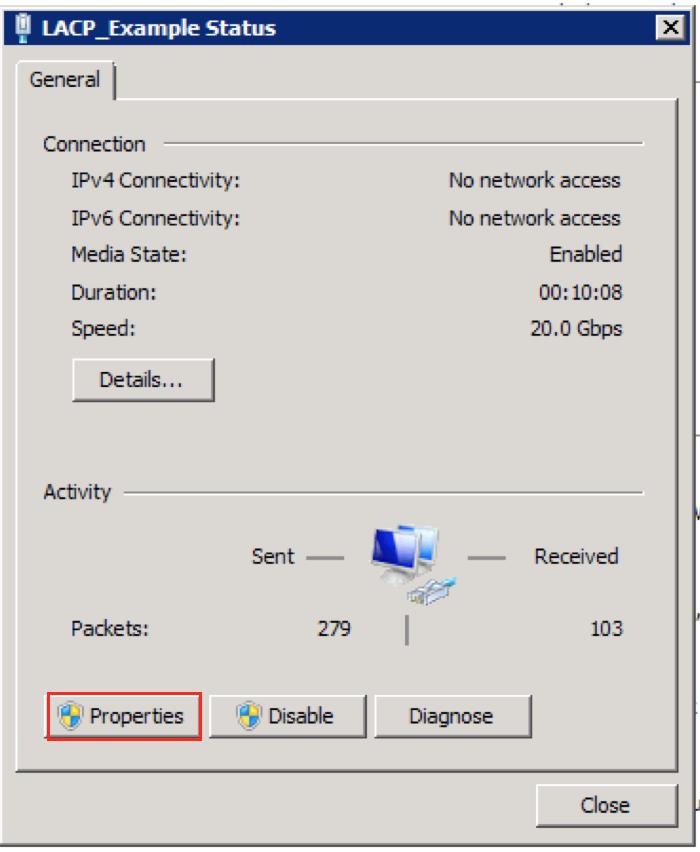
4. Click on Properties and click Configure
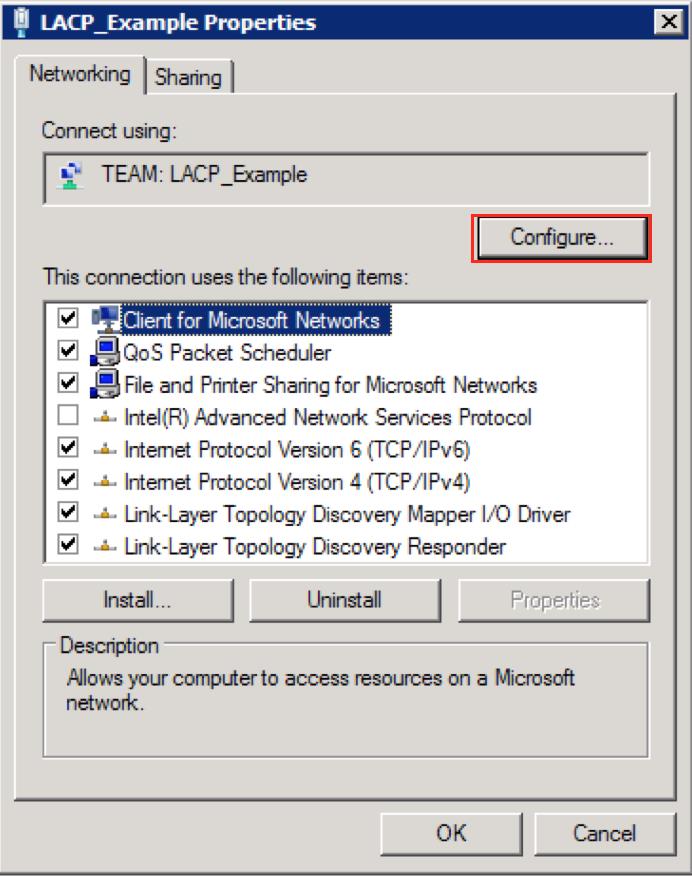
5. Go to the Settings tab and select one of the Adapters in the the team.
6. Click on Adapter Properties.
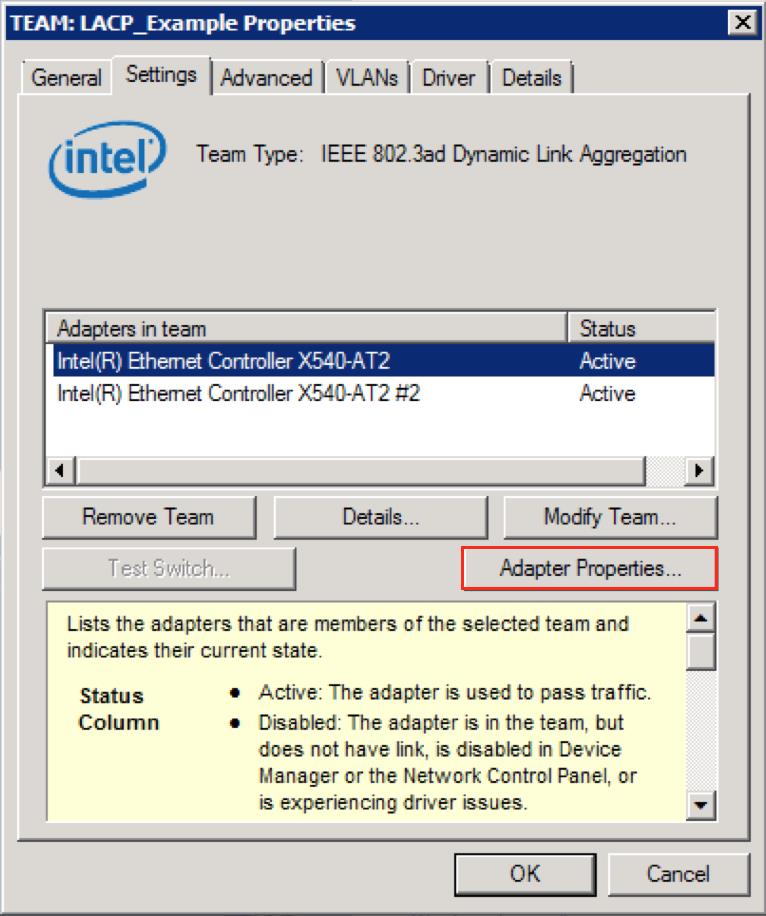
7. Go to the Advanced tab and locate Jumbo Packet.
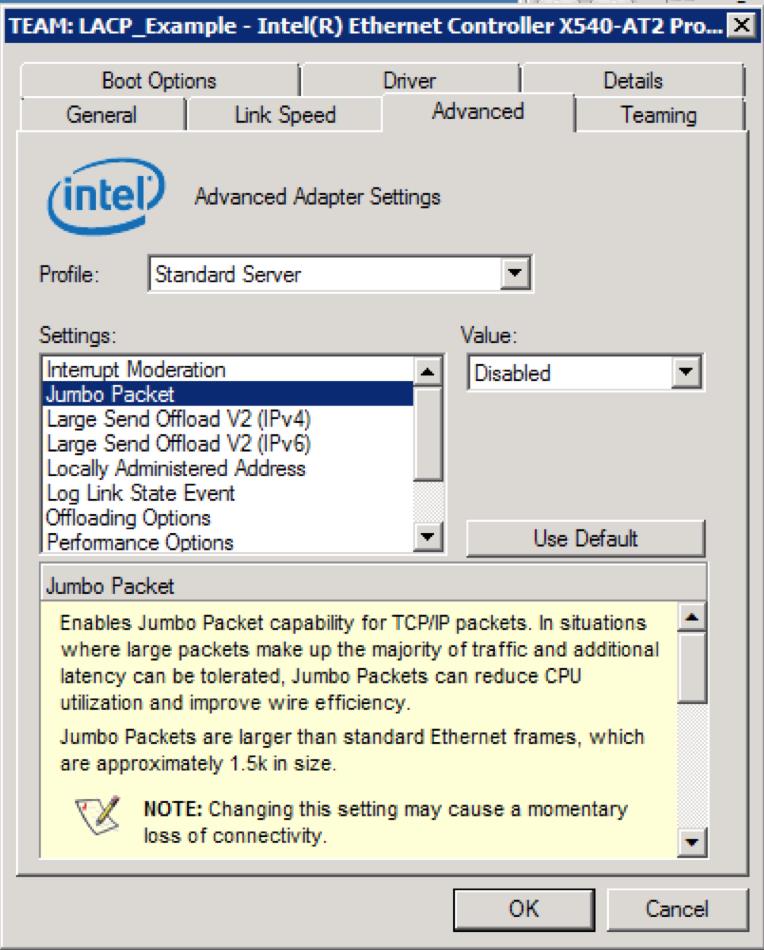
8. Change the Value to 9014 Bytes
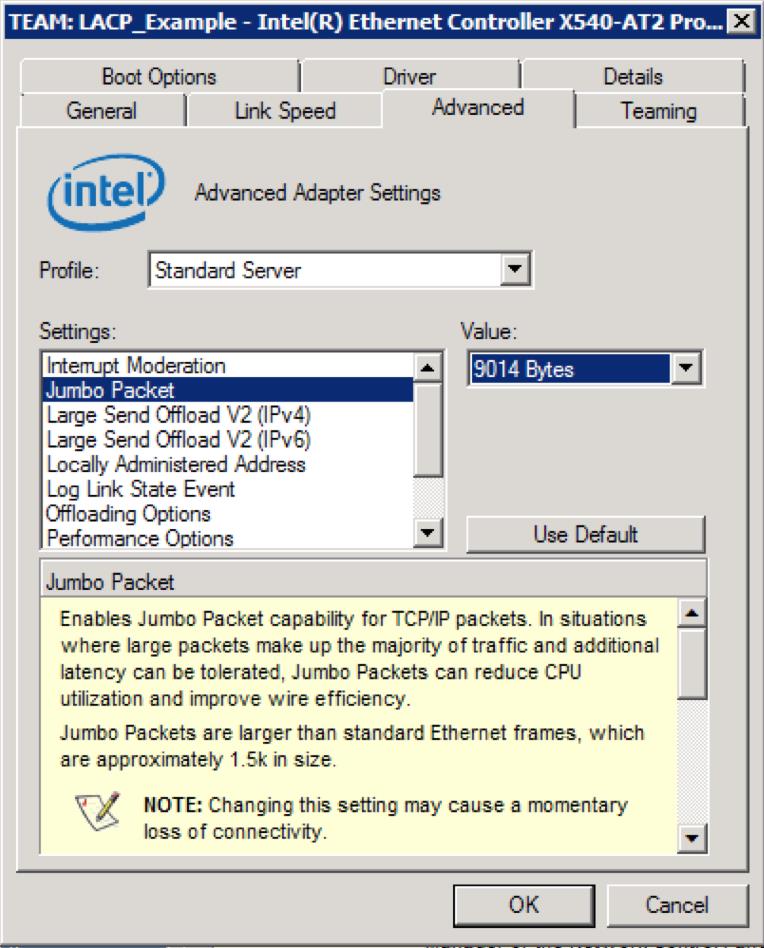
9. Click OK.
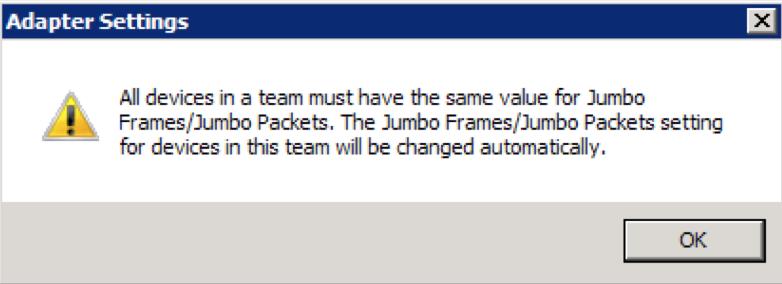
10. You will receive a dialogue that states:
«All devices in a team must have the same value for Jumbo Frames/Jumbo Packets. The Jumbo Frames/Jumbo Packets setting for devices in this team will be changed automatically.»
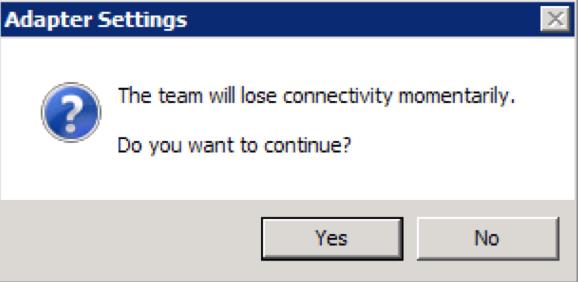
11. Click OK and you will be presented with another dialogue:
«The team will lose connectivity momentarily. Do you want to continue?» Click Yes
12. Allow the teamed interface to reconfigure itself and assign the newly MTU of 9000.
13. Open Command Prompt:
netsh interface ipv4 show subinterfaces
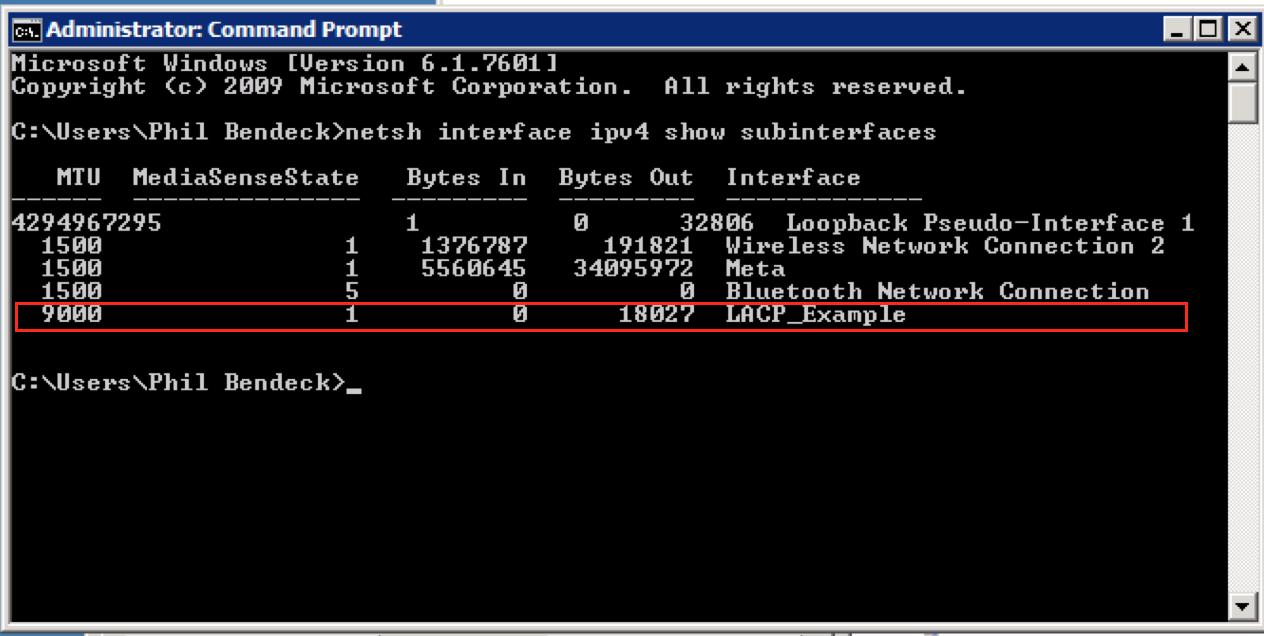
Now you have verified that the teamed interface now has an MTU of 9000.
III. Create LACP with Default MTU 1500 — OS X
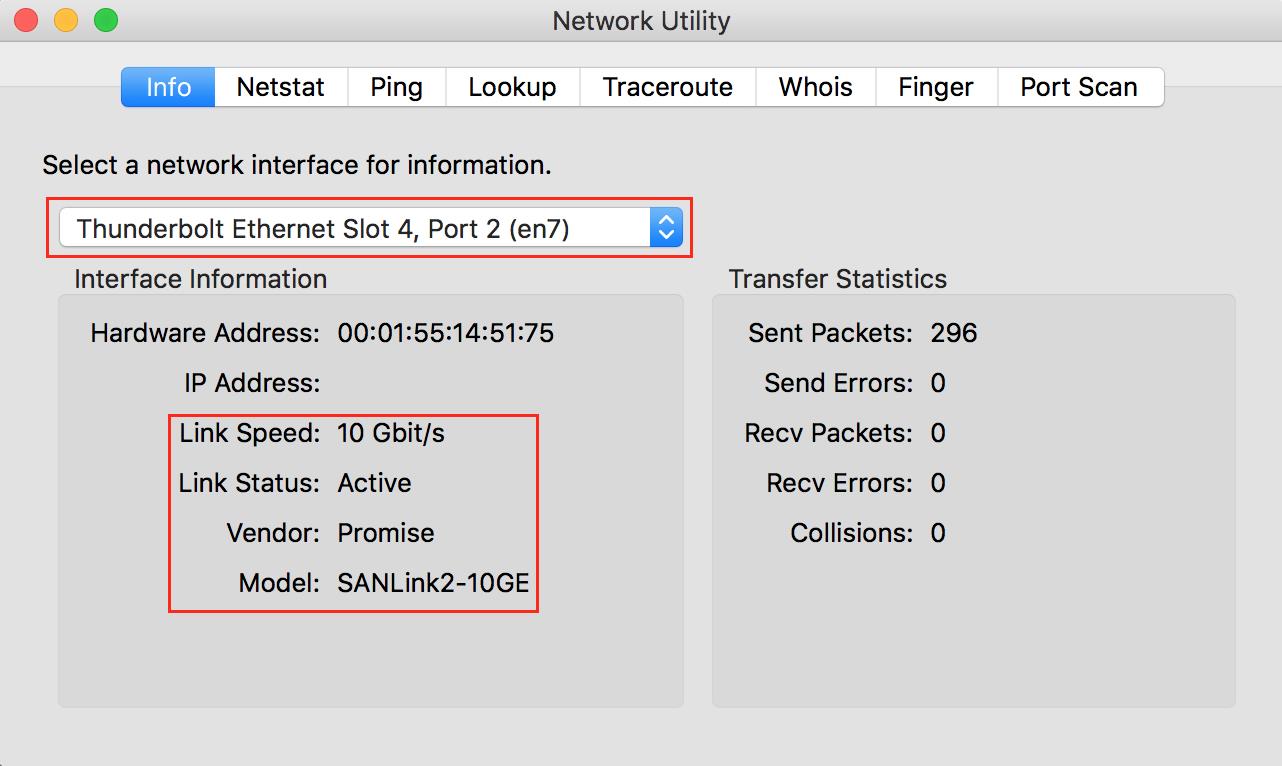
1. Identify the location for each 10Gb Port by opening Network Utility
Network Utility Location = /System/Library/CoreServices/Applications/Network\ Utility.app

You can also Spotlight Search for it as well.

2. Locate each 10Gb interface location:
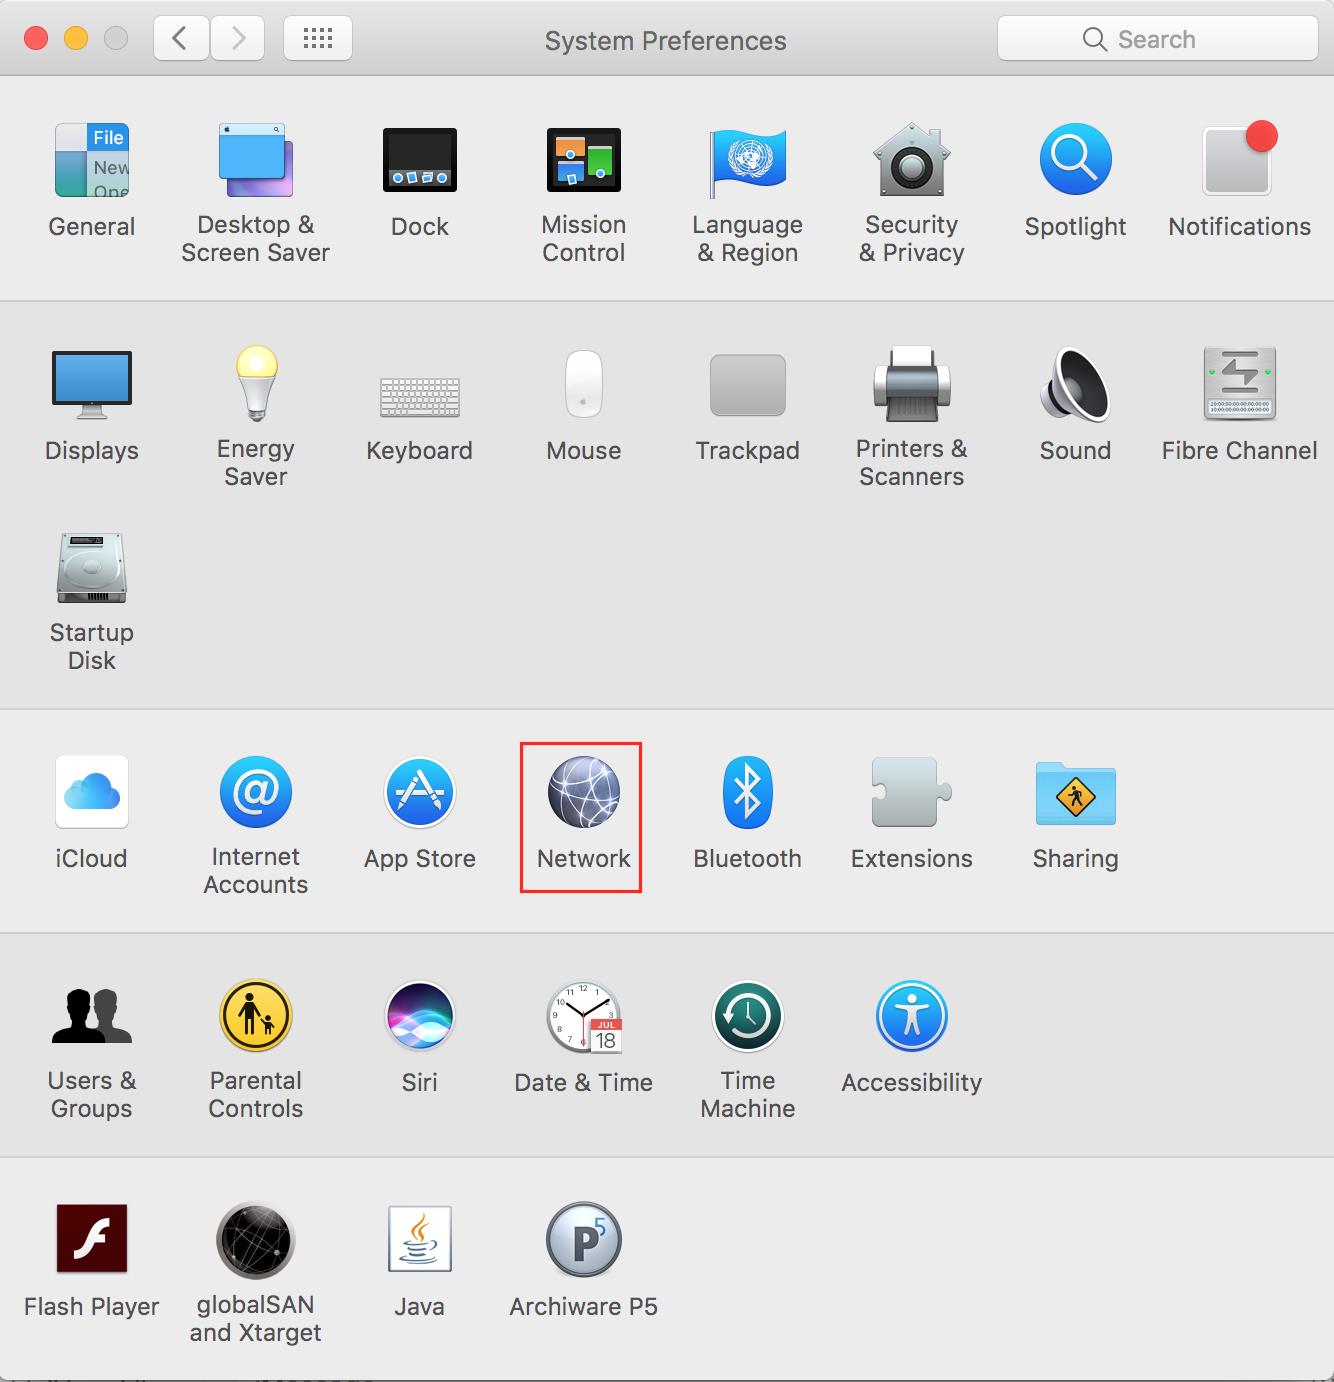
3. Open System Preferences
> System Preferences > Network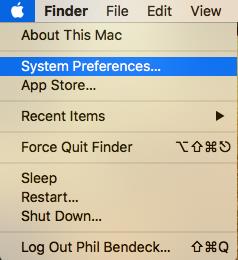
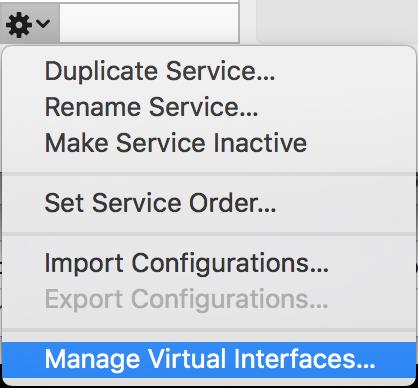
4. Click the Gear button to access the Menu 
5. Select Manage Virtual Interfaces
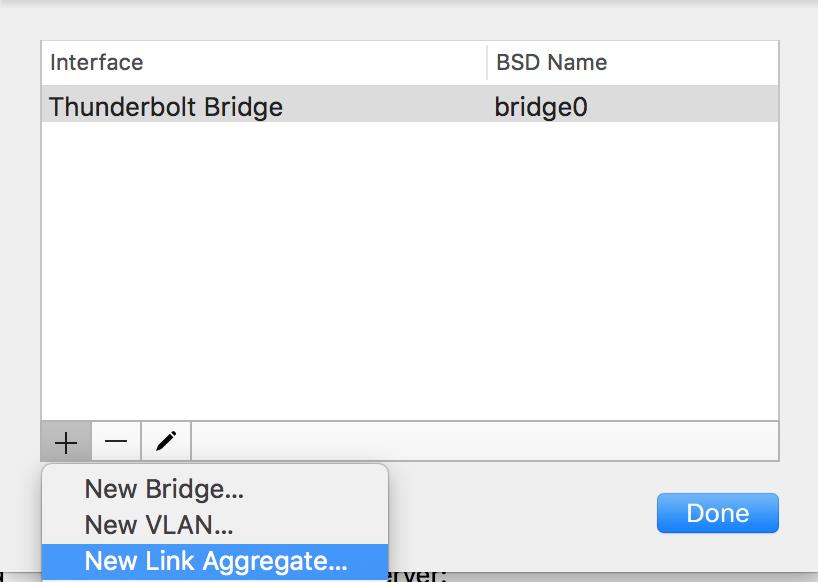
6. Click on the + symbol and select New Link Aggregate
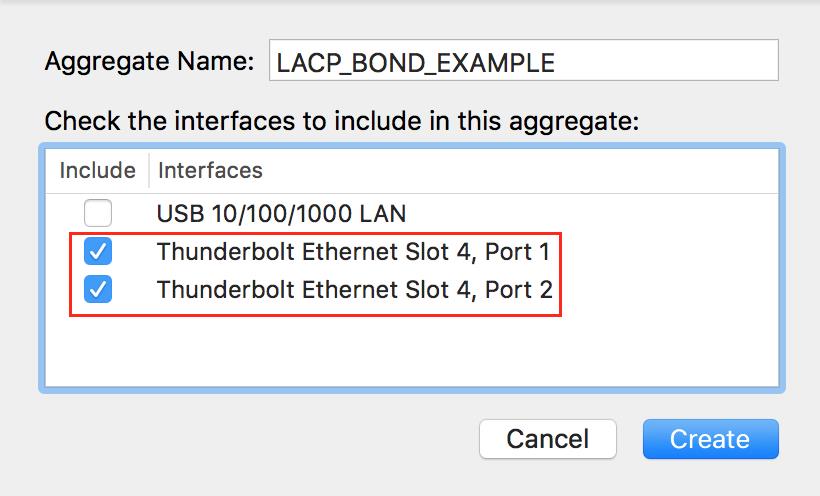
7. Enter the Aggregate Name and select both 10Gb Thunderbolt Ethernet Ports.
8. Click Create.
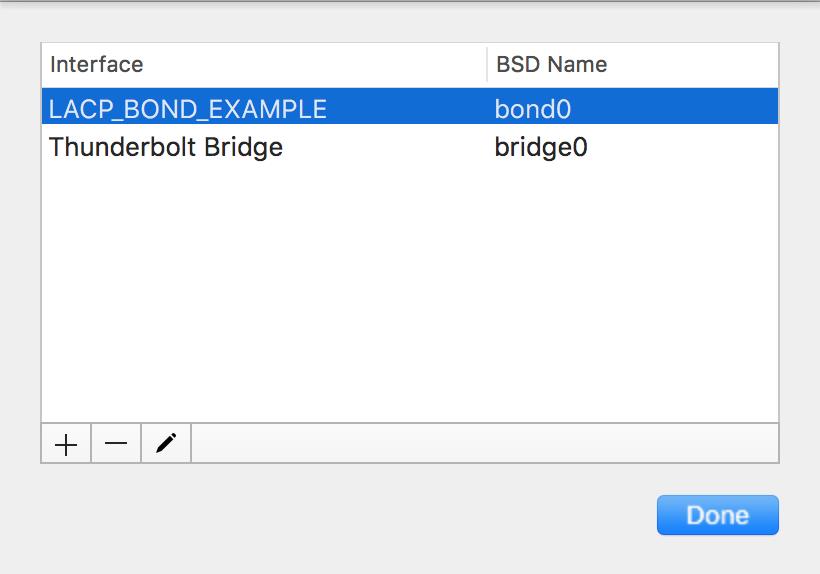
9. LACP_BOND_EXAMPLE has now been assigned to BSD Name bond0. Click Done
10. Click Apply to Save the Changes.

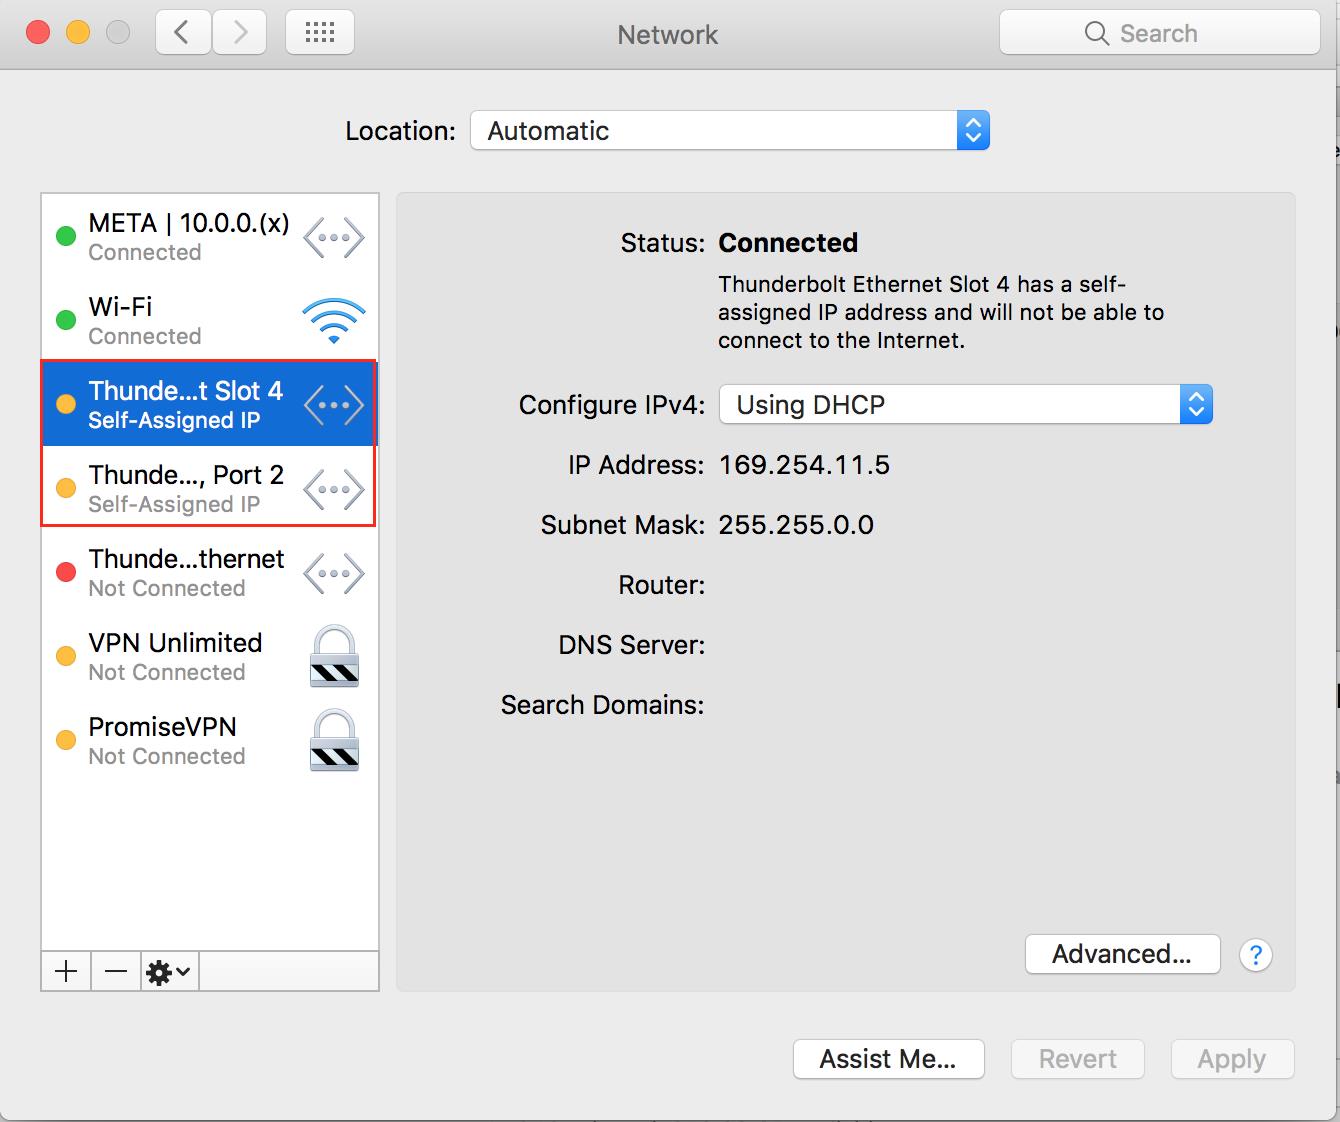
11. Now the LACP bond will have a yellow indicator after you click Apply. In this example, the bond configured itself with an IP Address of 169.254.67.24 with a class B subnet mask of 255.255.0.0. This will happen by default when there is no DHCP server and the client uses the self-configured IP address. All you need to do is assign the correct IP address and subnet mask that corresponds to your 10Gb network.

12. Before changing the IP address on the LACP bond, check to make sure both 10Gb ports are active. Go to Advanced
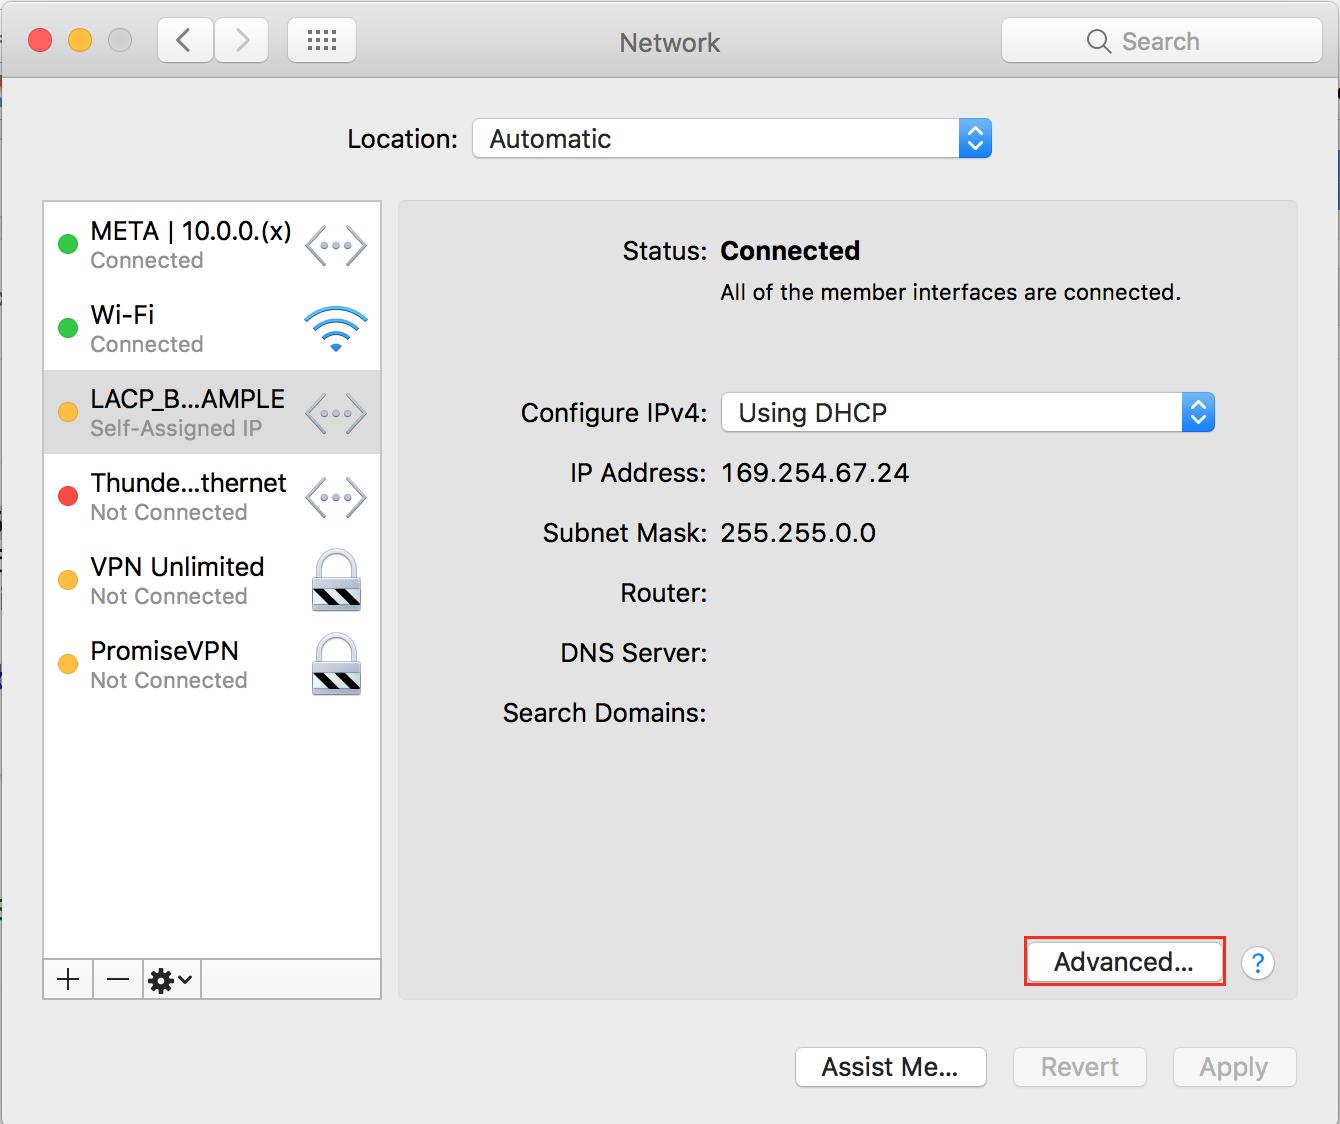
13. Verify the both ports in the Bond Status tab are both active (Sending/Receiving) and have an OK status.
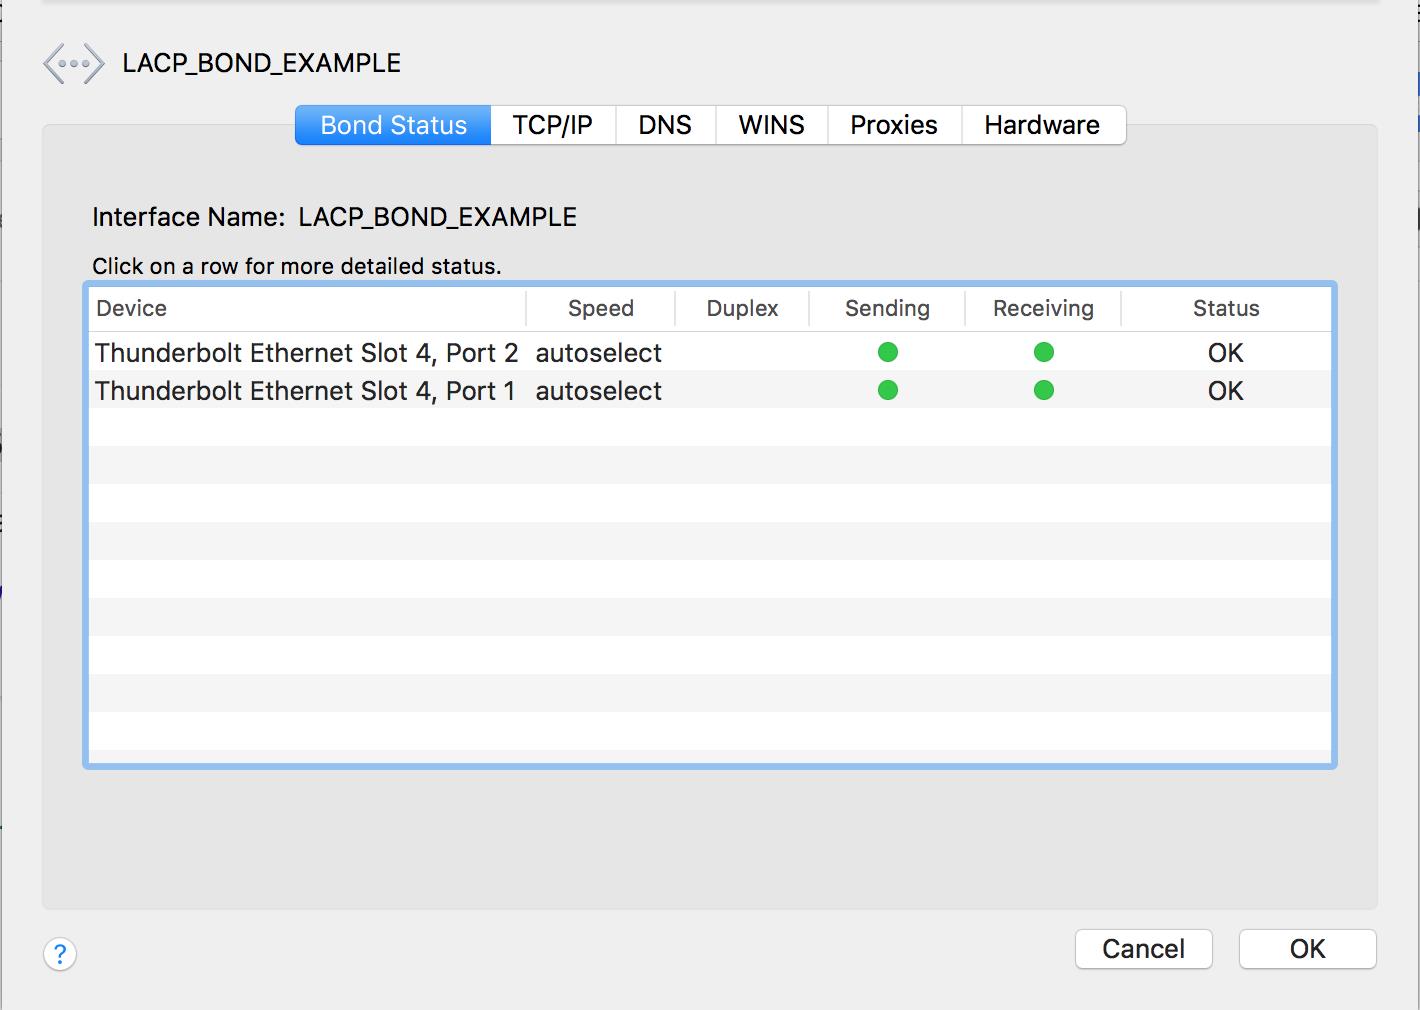
14. Click OK to exit.
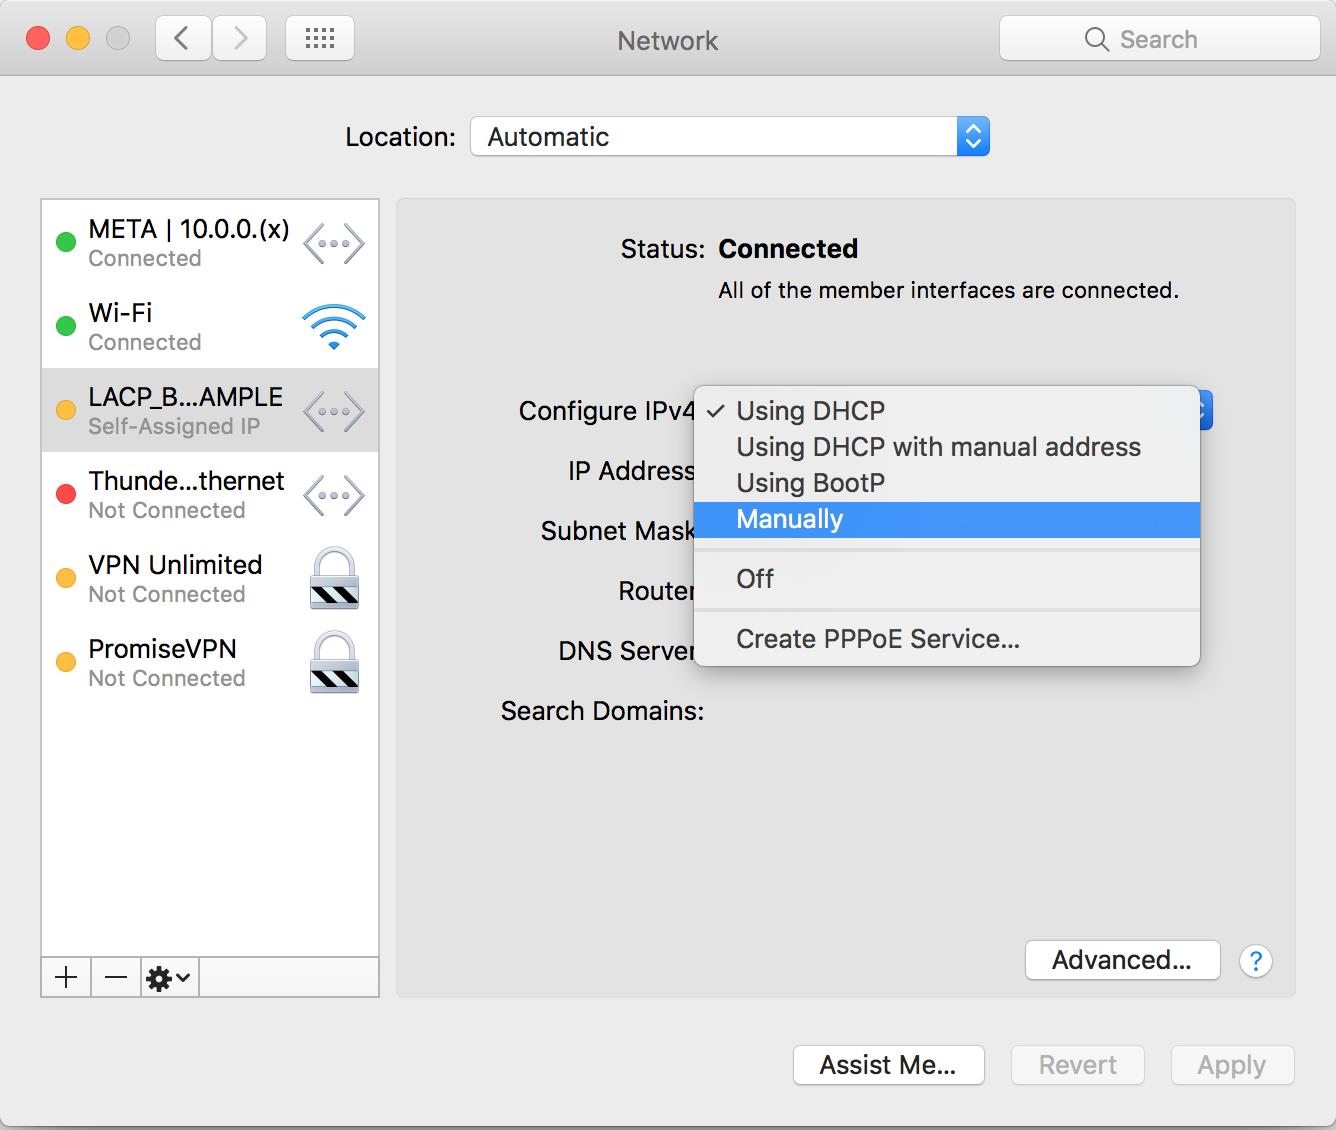
15. If you will be configuring a static IP Address, Configure IPv4 Manually
16. After assigning the IP Address and subnet mask on the LACP bond, click Apply. The indicator status light will turn to green after you click Apply.
(I’m not using a Router IP Address in this example)

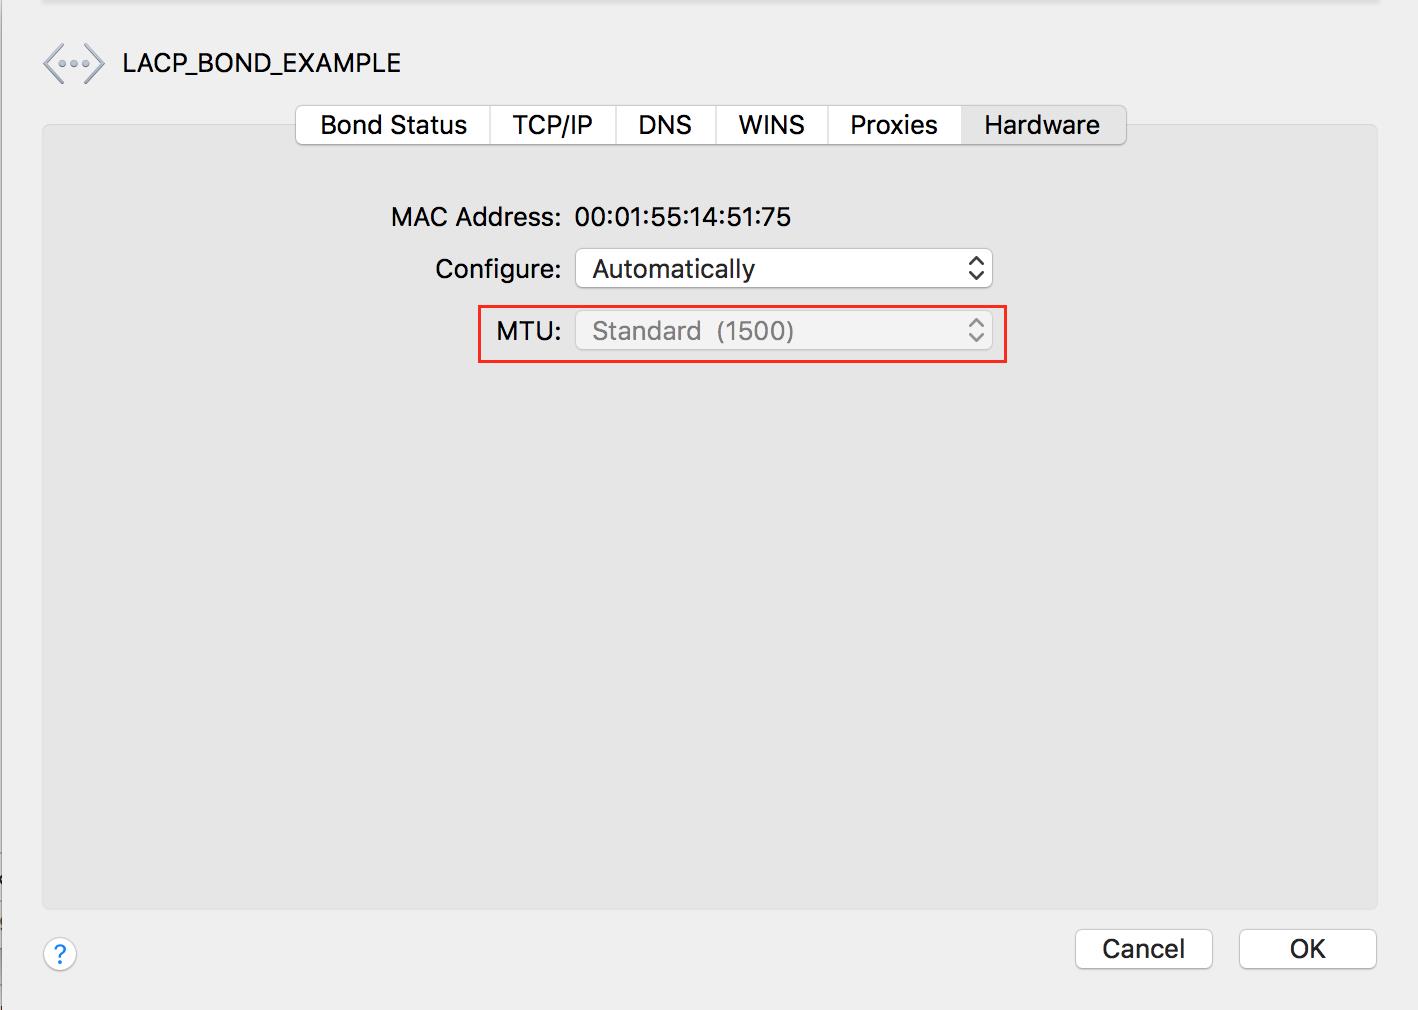
17. Verify the MTU by going back to Advanced and under the Hardware tab. The configuration is set to Automatically; therefore, it will negotiate at the MTU packet size that the switch is configured to transmit.
18. You can also verify the same in the Terminal with the following command:
ifconfig bond(x) = x being the number assigned to the bond.
In this example:
ifconfig bond0

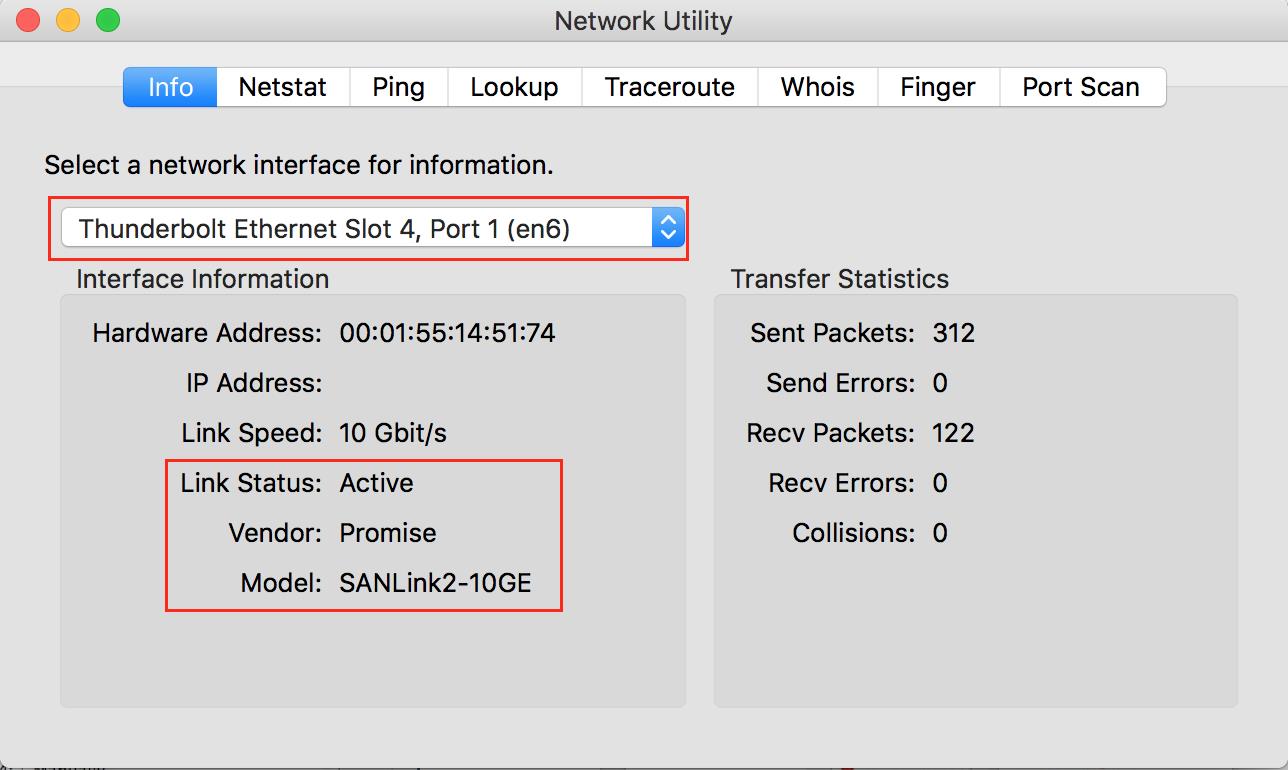
19. Verifying the MTU with the SANLink Utility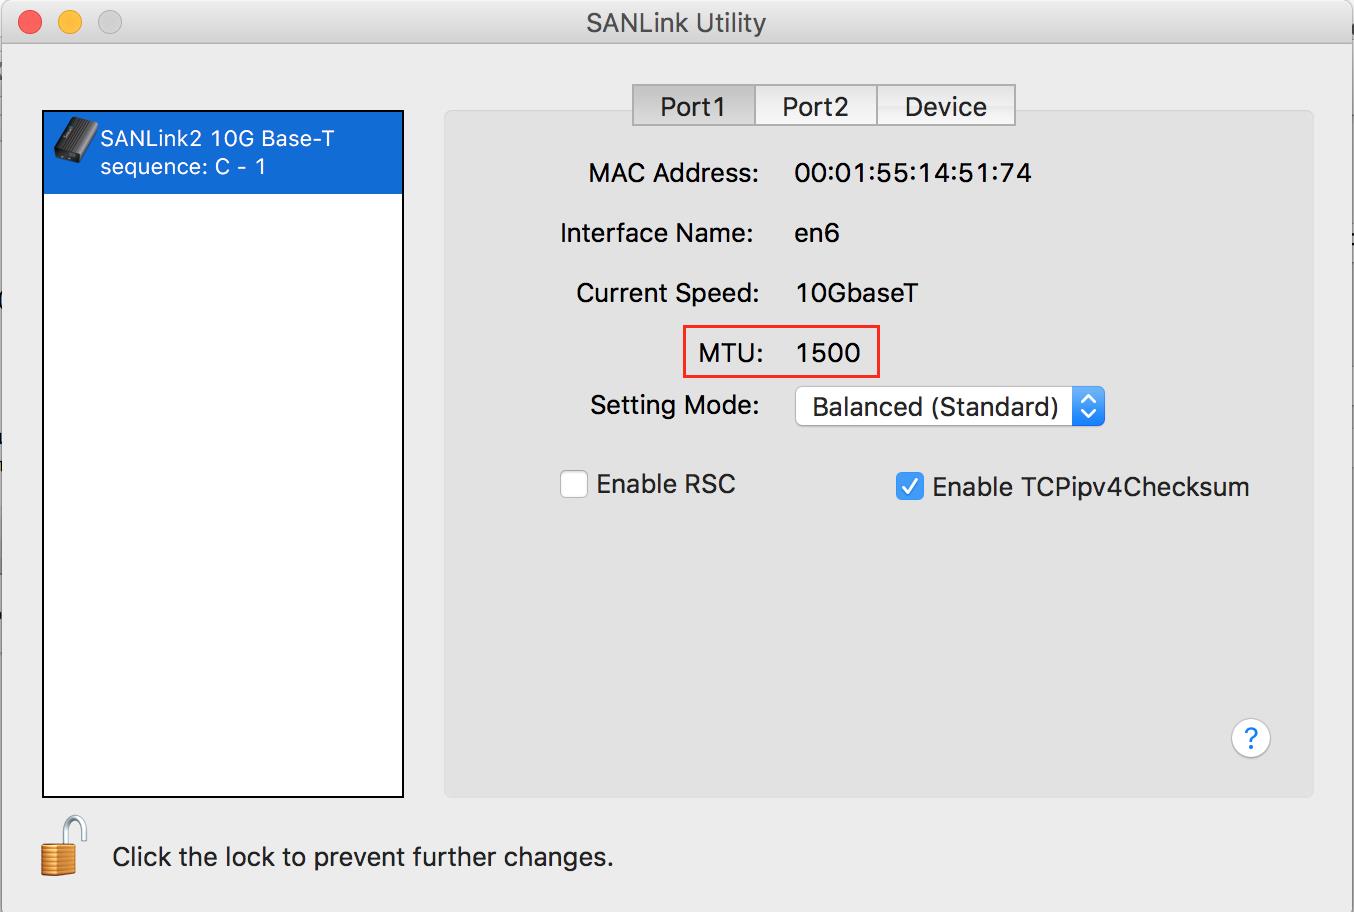
Note: RSC (Receive Side Coalescing) will be enabled by default, if your Network is configured on a Tagged VLAN, you may see an increase in performance by disabling it. It has also been documented in our previous SR 2.6 Release Notes.
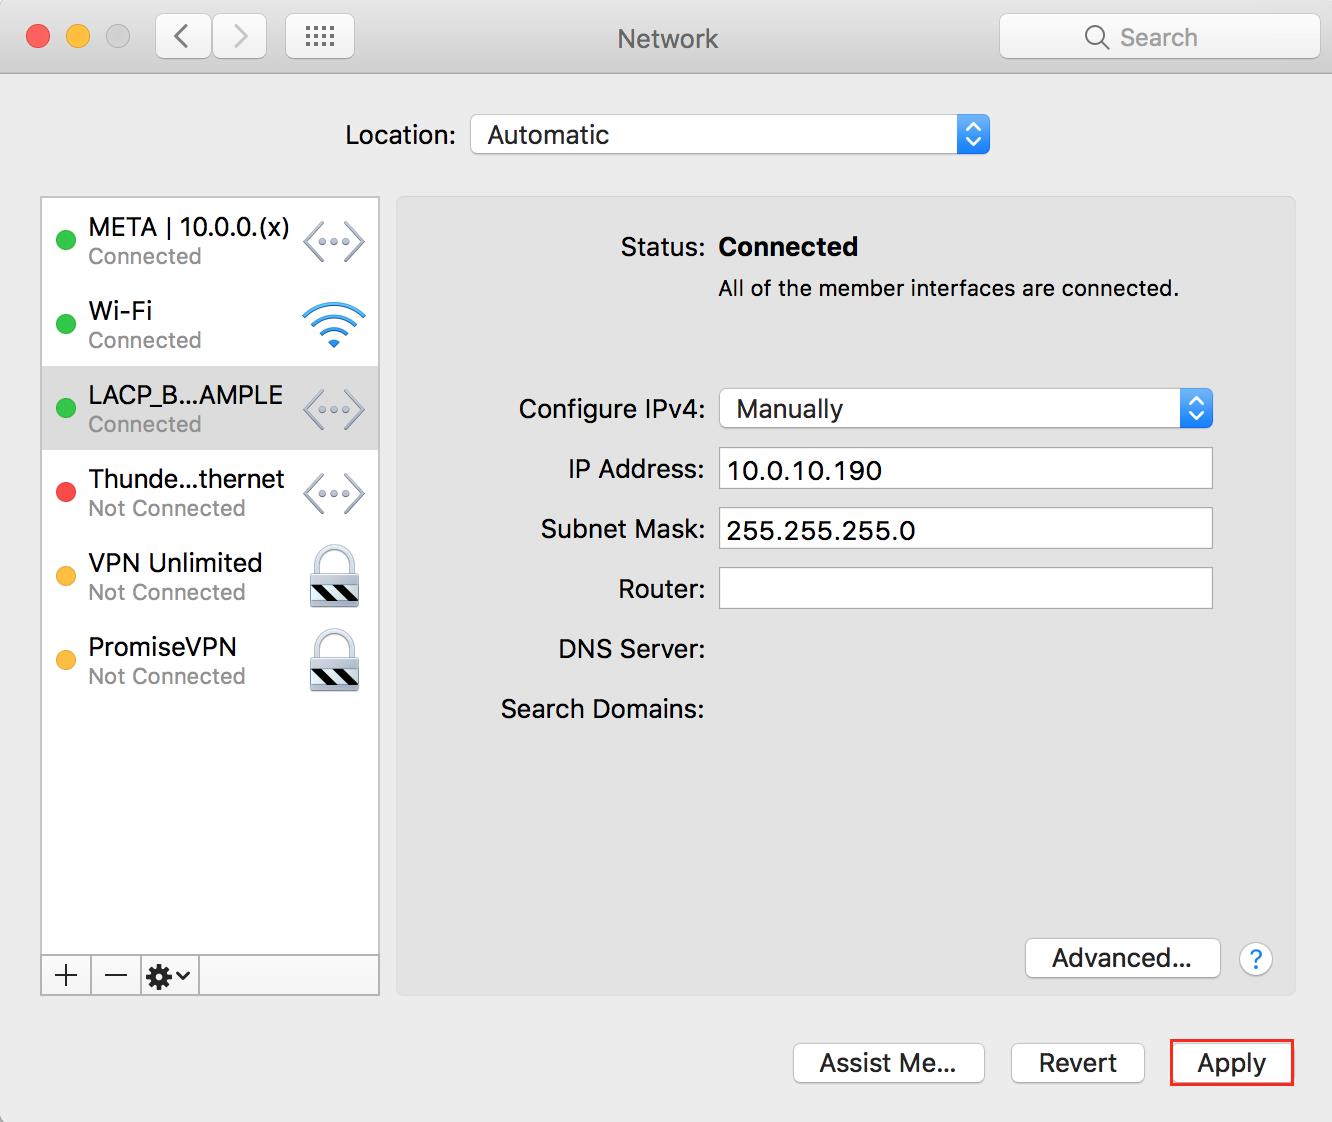
IV. Enable Jumbo Frames MTU 9000 — OS X
1. In Network Preferences, select your LACP bond (LACP_BOND_EXAMPLE)
2. Click Advanced and locate the Hardware Tab
3. Change Configure from Automatically to Manually
4. Change the MTU to Jumbo (9000) and click OK

5. Click Apply
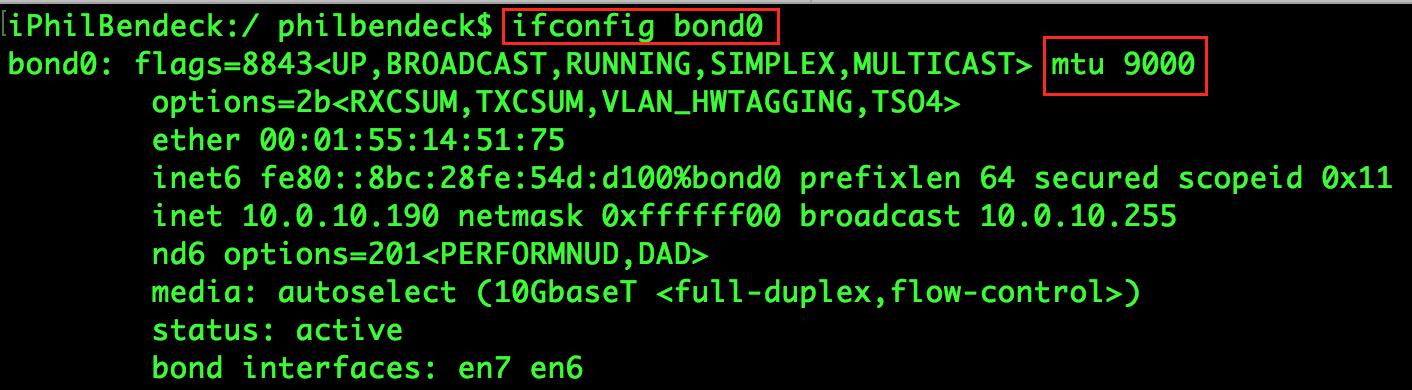
6. Verify the MTU change via Terminal.
ifconfig bond(x) = x being the number assigned to the bond.
In this example:
ifconfig bond0
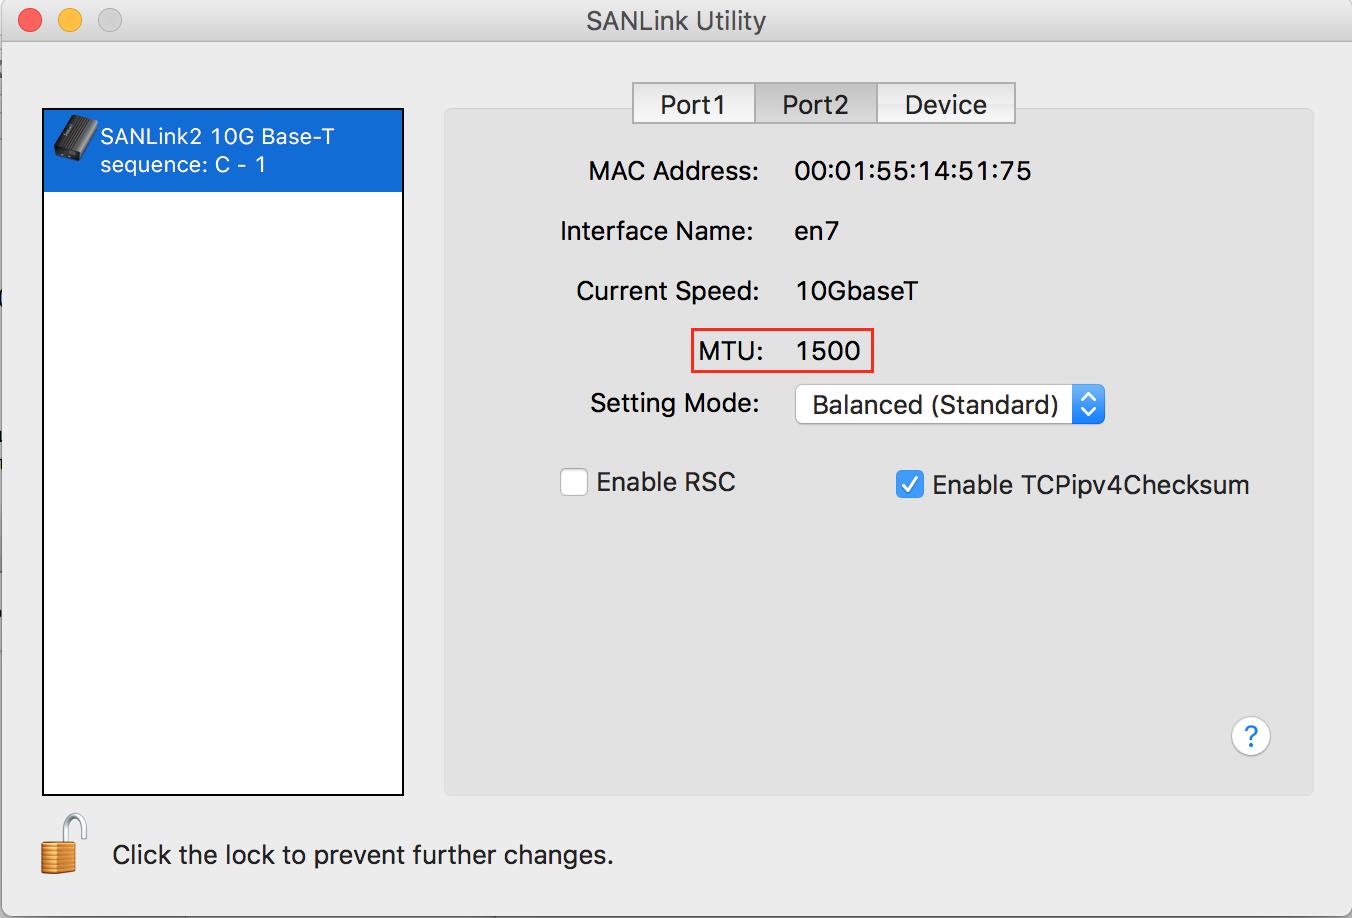
7. Verifying the MTU with the SANLink Utility
Источник


