- How to Modify or Create Custom Keyboard Layouts on Mac
- Ukelele: Create a Custom Keyboard Layout
- Customizing Preset Layouts with Ukelele
- Activating The New Layout
- Karabiner: Change the Functions of Modifier Keys with Ease
- Show Desktop by Pressing Cmd+D
- Toggle Bluetooth and WiFi with shortcuts
- Hold D for Dashboard/Shift+D for Dashboard
- Change the Behaviour of Command + Q
- Custom Keyboard Mappings: Make Your Mac Keyboard Yours
- How to Change the Keyboard Language Being Typed with a Keystroke in Mac OS X
- Set the Language Switching Keyboard Shortcut for Mac OS X
- Switching the Keyboard Languages with the Keystroke
- Enable a Keyboard / Language Indicator in the Mac Menu Bar
How to Modify or Create Custom Keyboard Layouts on Mac
There are 78 keys on your Macbook keyboard; 109 if you’re using a keyboard with a numeric keypad. That’s a lot of keys, which means a lot of potential for customisation according to your needs and usage patterns. However, it’s not easily done, and it might seem too difficult to some people, even though it’s not. In this article, I will tell you how you can create custom keyboard layouts on Mac and easily modify them. We’ll do this using two apps called Ukelele, and Karabiner.
So, if you have ever secretly wished you could map some of the keys on your Mac to a different function (one that you, personally, might have more need of), then these apps are meant for you. So, read on.
Ukelele: Create a Custom Keyboard Layout
Ukelele is an application that lets users edit, or create custom keyboard layouts on their Macs. The app has a simple, easy to understand interface. You can create a layout from scratch, by manually filling up the functions performed by various keys on your Mac’s keyboard. It’s easy to identify keys, because you can simply press the keys on your Mac and the corresponding keys on the Ukelele interface light up.
When you first start up Ukelele, you will notice that some keys are already filled up with their corresponding actions. These keys are the default function keys that you can edit if you want to, but it’s recommended to keep their default values. Fear not, you can tinker with these keys as well, and if you mess something up, you can always revert them back to their standard values.
Customizing Preset Layouts with Ukelele
Customizing Preset Layouts with Ukelele is easier than creating one from scratch, as it involves a lot less work, and you can simply edit the keys that you need to change. The best part is that you can switch between the edited keys and the default values in just two clicks, if you need to. To customize an existing layout, follow the steps below:
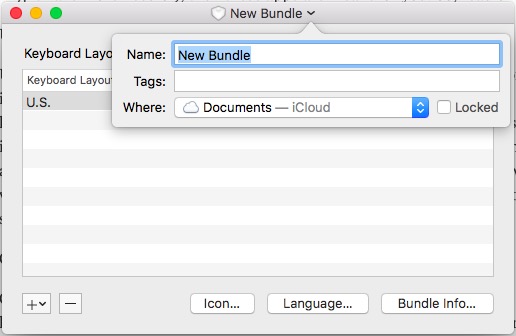
1. Launch Ukelele. Go to File -> New From Current Input Source. This will open up a window where you can set the name for the layout bundle, as well as the name of the layout that will be displayed when you select it in Keyboard Preferences.
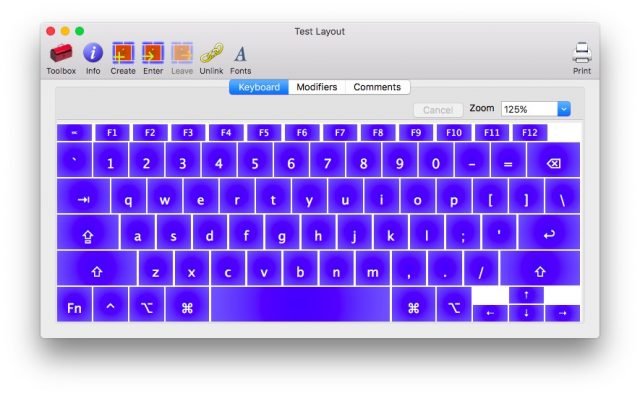
2. Next, double click on the name of the layout that you just created, to open it in Ukelele. The app will display the default values of the keys in the layout.
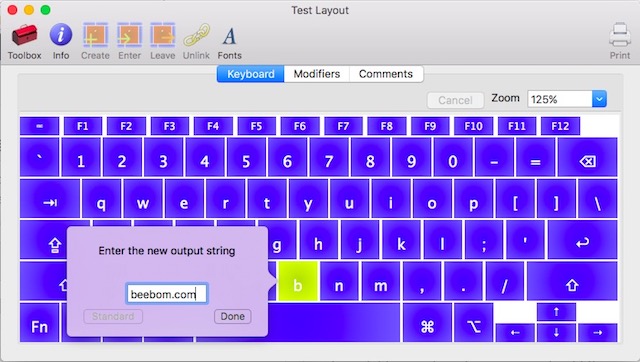
3. Suppose you want to change the “b” key to type in “beebom.com”. You can easily do this by double clicking on the “b” key in Ukelele, and entering the new output string as “beebom.com”, and clicking on “Done”.
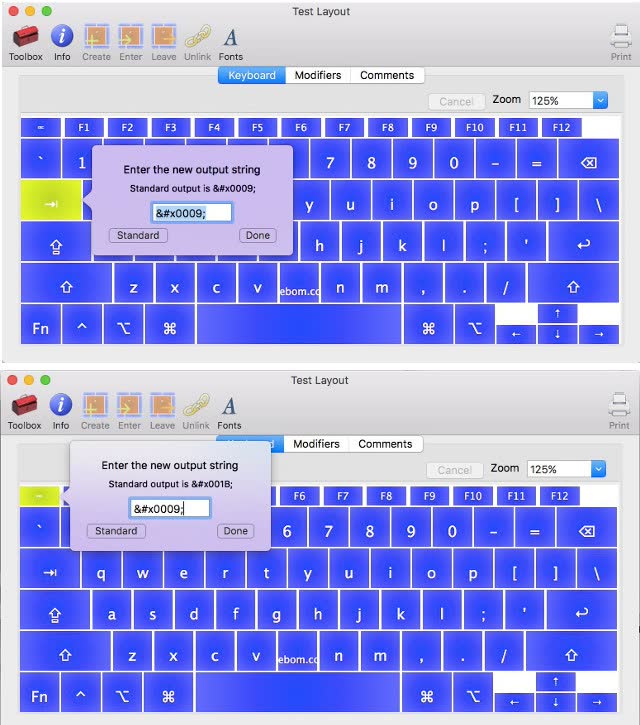
4. Or, maybe your Tab key is busted, and you want to use the Escape key to perform Tabs. You can do this by double-clicking on the Tab key, to find out the Unicode value for “tab”.
Next, double click on the “Esc” key, and enter the value of the “Tab” key in place of the default value, and click “Done”.
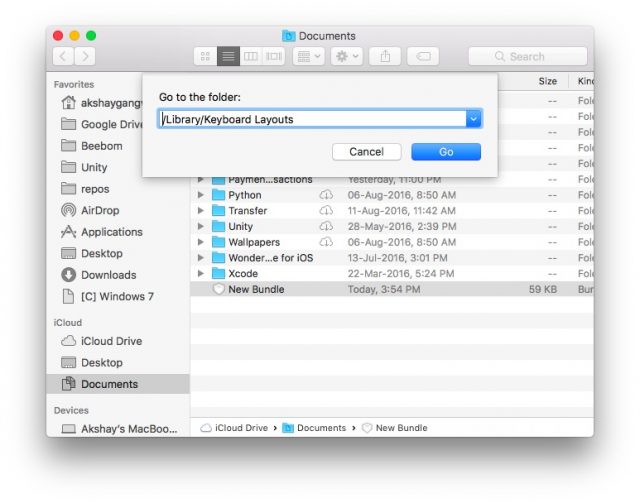
5. Once you are done editing the keys that you want to change, simply save the layout by going to “File -> Save“, or pressing “Cmd+S“. The bundle that you created in Step 1, is saved in Documents by default. Go to Finder, and copy the bundle you created in Documents.
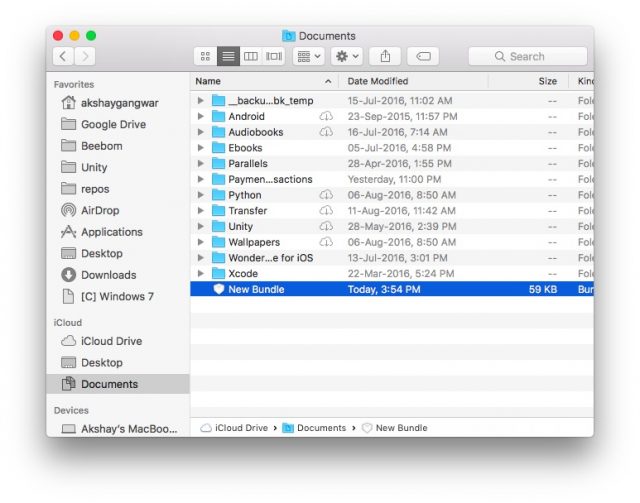
6. Next, press “Cmd+Shift+G“, and type “/Library/Keyboard Layouts/” to navigate to the Keyboard Layouts, and paste the bundle here.
Activating The New Layout
To activate the layout, you will need to add it to the layouts in your Keyboard Preferences. You can do this by following the steps outlined below:
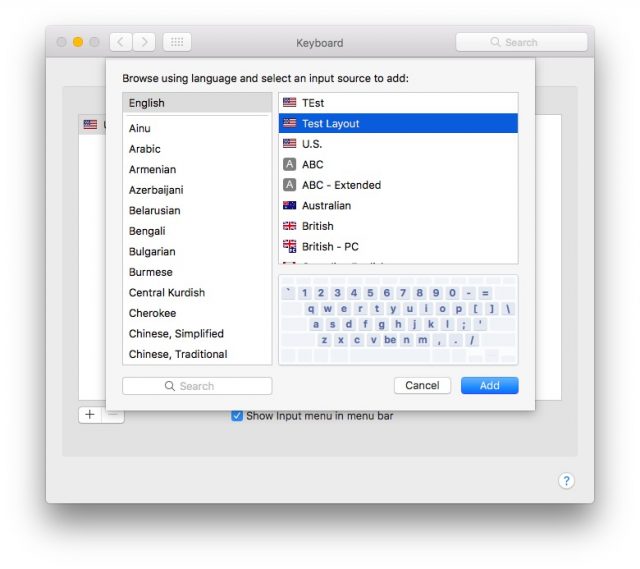
1. Go to System Preferences->Keyboard->Input Sources. Click on the “+” icon on the bottom left, and select your custom layout from the list in the sidebar.
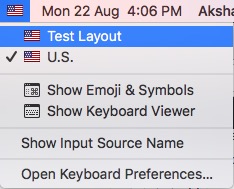
2. Click on the Input Sources icon on the menubar, and select your layout. Now, whenever you press the keys that you changed, it will perform the functions that you mapped to it, instead of the default functions.
Ukelele can let you customize the keys on your Mac with ease, and save them as layouts that you can switch to, on the fly. That’s not all, the app also supports QWERTY, AZERTY (French), QWERTZ (German), Dvorak and Colemak layouts for creating new layouts, and you can even export your custom layouts to an installable disk image, so you can take your custom layouts to any computer that you might need to use.
Install Ukelele: (Free)
Note : If you edit your custom layouts later, you will have to go to System Preferences->Keyboard->Input Sources and add them again in order for the changes to take effect.
Karabiner: Change the Functions of Modifier Keys with Ease
Karabiner is an app, that can let you change the functions performed by the modifier keys on your Mac’s keyboard, should you want to do it. But, that’s not all; the app also lets users to enable a lot of cool shortcuts and make modifications to the keyboard behaviour that might be very useful. Read on to learn about some of the coolest things that you can do in Karabiner:
Show Desktop by Pressing Cmd+D
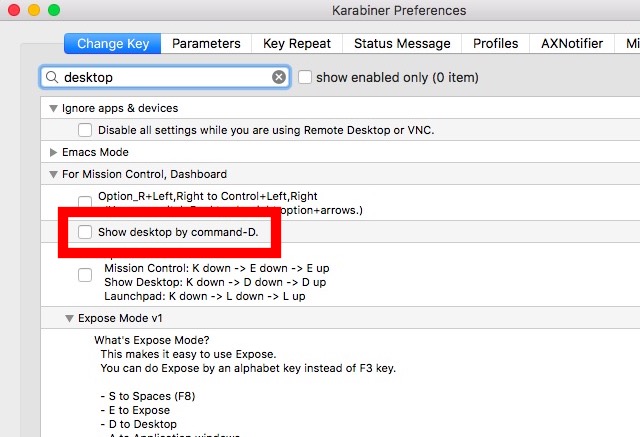
Let’s face it, we have almost all of our recently created files saved on the desktop, and screenshots, especially, are saved to the desktop by default. This means that in order to drag and drop a file from the Desktop, you’ll have to make the four finger pinch-out gesture to show the desktop, then drag the file with one finger, and make the four finger pinch-in gesture to get back to the application you wanted to drop the file into; and that’s with a Force-touch enabled trackpad. On a normal trackpad, you’ll have to use two fingers to drag the file around, plus the four finger gestures. Karabiner can allow you to show the desktop by just pressing Cmd+D, and go back by pressing the same combination again.
To enable this shortcut, simply launch Karabiner; and search for “Desktop”. Then, click on “For Mission Control, Dashboard”. Check the checkbox next to “Show Desktop by command-D“, and you’re done. You can now press Cmd+D to show and hide the desktop.
Toggle Bluetooth and WiFi with shortcuts
Karabiner also lets users set their Bluetooth and/or WiFi to be toggled by pressing fn+b, and fn+w respectively. This feature is definitely useful, especially for people who use the keyboard a lot, because switching between the keyboard and mouse can be a lot of hassle. To enable one, or both of these shortcuts, simply follow the steps below:
1. On Karabiner, search for “Shortcuts”, and click on “Custom Shortcuts“. Scroll down a little, and you will see the options to toggle Bluetooth by pressing Fn+B, and WiFi by pressing Fn+W.
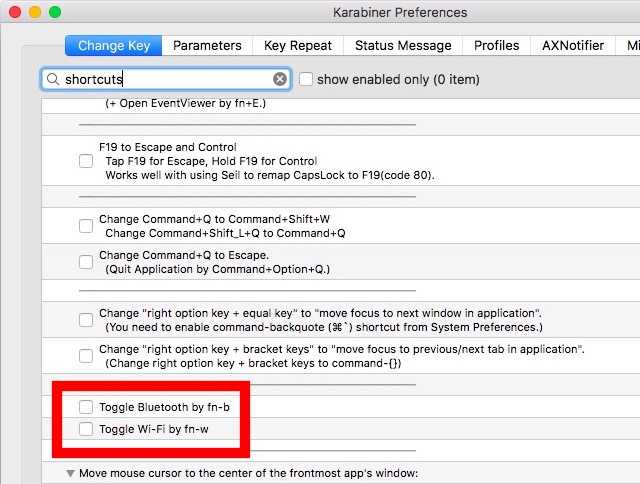
2. Check the checkboxes next to the shortcuts that you want to use, and you can start toggling Bluetooth and WiFi directly from your keyboard.
Hold D for Dashboard/Shift+D for Dashboard
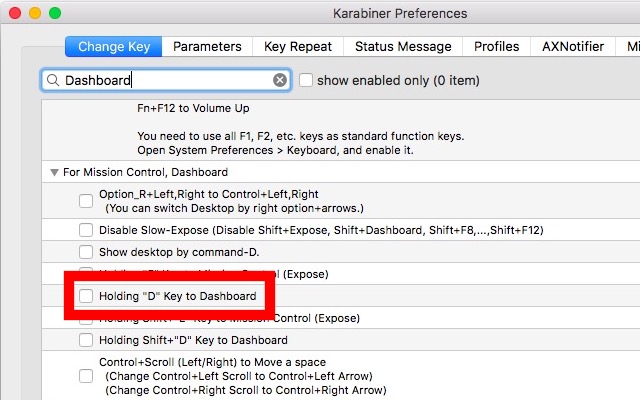
While Apple might not be paying a lot of attention to Dashboard anymore, the fact remains that it is a very useful part of the macOS environment. However, using three, or four finger swipes to get to the dashboard can be tedious, especially if you have a lot of desktops open on your Mac. Karabiner can help here, as well. You can set up a shortcut (Long press D, or Shift+D) to take you directly to Dashboard.
To set this up, search for “Dashboard”, and under “For Mission Control, Dashboard“, check the checkbox next to “Holding “D” key to Dashboard“, or “Holding Shift+D key to Dashboard“.
Change the Behaviour of Command + Q
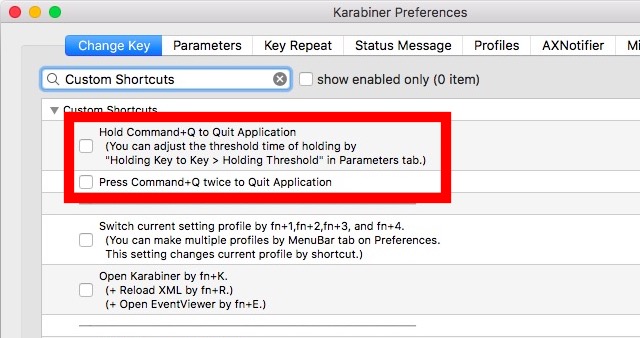
Command + Q is notorious for getting accidentally pressed when you’re actually only trying to use Command + W. Fortunately, Karabiner can change this default behaviour to make it more accident-proof. You can make it necessary to press Cmd + Q twice, in order to quit an application, or you can set it up to only quit applications on a long press. Both of these options can save you from a lot of trouble.
To set these up in Karabiner, search for “Custom Shortcuts”, and under “Custom Shortcuts”, check the checkbox next to the behaviour you want from Cmd + Q.
Karabiner can let you customise a lot more on your Mac, and help you get more out of your keyboard. The various custom settings offered by Karabiner are not all, the application also offers the option to create multiple profiles, that you can switch between by using keyboard shortcuts, so you are always ready to go, in every application that you use. Apart from that, Karabiner also lets you export profiles, quite like Ukelele, except that Karabiner profiles are exported as shell scripts, that you can import from the Terminal. For more help on using Karabiner, you can read the Karabiner manual.
Install Karabiner: (Free)
Custom Keyboard Mappings: Make Your Mac Keyboard Yours
Not everyone uses their keyboards in the exact same way as the others, and apps such as Karabiner and Ukelele can let users customise their keyboards to work exactly the way that they want them to. You can even use these apps to map a keyboard designed to be used with Windows PCs to work properly with Macs. When you consider the fact that Apple keyboards are a lot more expensive than other Windows keyboard options, it might be a better idea to go with a keyboard designed for a Windows PC, and use apps like Ukelele and Karabiner to customise it to function properly with a Mac.
Have you ever wanted to map certain keys on your keyboard to specific functions? If so, how did you do it? Did you use any of the applications mentioned in this article? We would like to know about your experience with changing keyboard mapping on a Mac, and any issues that you might have faced. Let us know about it in the comments section below.
Источник
How to Change the Keyboard Language Being Typed with a Keystroke in Mac OS X

If you’re bilingual, trilingual, or even just use an alternate keyboard input method from QWERY like DVORAK, you can make your typing life much easier by setting up a keyboard shortcut in Mac OS X that instantly changes the typed language. This shifts the keyboard to your other language or typing layout option(s), from an English keyboard to Chinese keyboard for example, with a quick keystroke entry. Additionally, we’ll cover a simple trick that provides a system-wide indicator of what is the currently active language or keyboard being used on the Mac, so you’ll always know exactly what language is active without having to type to find out.
This should probably go without saying, but you’ll need at least one other keyboard input source or language added to OS X for this to work, otherwise there’s nothing to switch between. If you haven’t added the other language keyboard yet but are waiting to do so, that can be done through System Preferences > Keyboard > Input Sources > and clicking the + plus button to select your language(s) of choice. That’s also where you can add another keyboard layout, like DVORAK.
Set the Language Switching Keyboard Shortcut for Mac OS X
This trick makes switching your active typing language as simple as a keystroke:
- Open System Preferences in OS X and go to “Keyboard” panel
- Choose the “Keyboard” tab and check the box for “Show Keyboard & Character Viewers in menu bar” – this enables a handy indicator in the menu bar to let you know what language / keyboard is currently active, more on this in a moment
- Now go to the “Shortcuts” tab and click on “Input Sources”
- Check the box next to “Select next source in Input Menu”, then click the cursor into the field to the right to set the keyboard shortcut to switch the language – in this example we used Command+Shift+Option+Spacebar but you can pick whatever you want that doesn’t conflict with another keyboard shortcut
Switching the Keyboard Languages with the Keystroke
You can hit the same keyboard shortcut again to switch back to English or whatever the other language setting is. Or, if you have more than two languages and keyboards added to the Mac, you hitting the keystroke will simply toggle to the next one.
If you use the virtual onscreen keyboard you’ll notice that language or keyboard layout changes there too.
This works really well, and yes it shifts the spelling tool and autocorrect as well if you’re in a new language with a respective dictionary. Using a keyboard shortcut is much faster to switch the current language than doing so manually through the keyboard input menu, this is really probably the fastest way to toggle keyboards and languages in OS X. Speaking of that input menu, let’s enable one final option that’s really handy.
Enable a Keyboard / Language Indicator in the Mac Menu Bar
In the second step above, we enabled an optional menu item for the keyboard, now we’re going to make that even better by turning it into a live language indicator for OS X:
- Pull down the input menu (usually displays a flag of the default keyboard type), and select “Show Input Source Name”
That’s it, now when you hit the aforementioned keyboard shortcut that you just set, you’ll also see a visual indicator in the menubar of which keyboard and/or language is currently active in Mac OS X.
Источник


