- Включение параметров Универсального доступа в окне входа в систему на Mac
- Lock the Mac Desktop from the Command Line
- How to Lock the Mac Screen from Terminal in OS X
- How to lock your Mac or put your screen to sleep in macOS
- Before we start
- How to set up a password to lock the screen
- How to lock your Mac
- 1. Use the Apple menu
- 2. Use shortcuts
- 3. Set up a hot corner
- 4. Use fast user switching
- 5. Add Keychain Access to the menu bar
- Other ways to protect your privacy
- 5 ways to lock a Mac computer to keep your files secure
- Setting up a password on Mac
- Closing the lid
- Apple menu bar
- Using keyboard shortcuts
- Using Hot Corners
- Using the Mac Touch Bar
Включение параметров Универсального доступа в окне входа в систему на Mac
Можно включить определенные функции универсального доступа в окне входа, чтобы упростить вход в систему Mac.
На Mac выберите меню Apple

> «Системные настройки», затем нажмите «Пользователи и группы».
Если замок в левом нижнем углу закрыт  , нажмите его, затем введите имя и пароль администратора. Если Ваш Mac поддерживает такую возможность, для разблокирования можно использовать Touch ID или Apple Watch.
Нажмите «Параметры входа», затем нажмите «Параметры Универсального доступа».
Выберите параметры универсального доступа, например VoiceOver или «Увеличение», которые должны быть включены в окне входа в систему.
Выбранные параметры включаются в окне входа для всех пользователей Вашего компьютера Mac.
Если выбран параметр «Ассистивная клавиатура» или «Виртуальный контроллер», Ваши текущие настройки клавиатуры или переключателей применяются в окне входа для всех пользователей (пока определенный пользователь не выключит или не включит эти параметры в своих настройках раздела «Параметры входа»).
Нажмите кнопку «Применить».
Если Вы изменили настройки клавиатуры или переключателей в разделе «Универсальный доступ» и хотите применить Ваши изменения к окну входа, откройте настройки универсального доступа в разделе «Пользователи и группы», затем нажмите «Применить».
Любой пользователь, выполнивший вход в систему Mac, может временно включить или выключить эти параметры в окне входа, нажав сочетание клавиш Option-Command-F5 (или, если на Вашем Mac или клавиатуре Magic Keyboard есть сенсор Touch ID, быстро нажмите Touch ID три раза), чтобы отобразить панель команд Универсального доступа.
Если Вы используете определенный параметр в окне входа и хотите использовать его повсеместно при работе на Mac, можете настроить его в настройках Универсального доступа. На Mac выберите меню Apple > «Системные настройки», затем нажмите «Универсальный доступ».
Источник
Lock the Mac Desktop from the Command Line
 With the help of a buried menu item, we can lock the Mac OS X screen right from the Terminal. This does not log a user out, it just brings up the standard Mac OS X lock screen and login window, requiring a valid user and password before the Mac can be used again.
This is very simple to use, if you find yourself locking the Mac often with this trick you may want to make an alias for easier access.
How to Lock the Mac Screen from Terminal in OS X
Open Terminal and enter the following in a single line:
/System/Library/CoreServices/Menu\ Extras/User.menu/Contents/Resources/CGSession -suspend
There isn’t any confirmation, the desktop is immediately locked and the lock screen appears regardless of what is currently going on with the active user account.
To make an alias, add something like the following to your profile:
alias lockscreen=’/System/Library/CoreServices/»Menu Extras»/User.menu/Contents/Resources/CGSession -suspend’
For those wondering, the menu item being used is the same Fast User Switching menu that displays a user name in the upper right corner, and the lock screen shown is identical to what is summoned if one were to select “Login Window…” from that same menu.
You can lock a screen using a keyboard shortcut as well, but using the command line offers two obvious advantages; it can be included within scripts or entered from SSH to remotely lock a Mac.
Источник
How to lock your Mac or put your screen to sleep in macOS

Before we start
Having spent some years coding applications for macOS we’ve created a tool that everybody can use. The all-round problem fixer for Mac.

So here’s a tip for you: Download CleanMyMac to quickly solve some of the issues mentioned in this article. But to help you do it all by yourself, we’ve gathered our best ideas and solutions below.
Features described in this article refer to the MacPaw site version of CleanMyMac X.
There are several different ways to lock or sleep your screen in macOS. Before we show them to you, however, it’s important to make the distinction between locking your screen and just putting it to sleep.
If you lock your Mac, you’ll put it to sleep and need to type in your login password on your Mac’s lock screen (or unlock it with TouchID on a MacBook Pro with Touch Bar or with an Apple Watch). However, if you put it to sleep, you won’t necessarily lock it. So in order to lock your screen, you need to set up the password in System Preferences. Here’s how to do that.
How to set up a password to lock the screen
- Launch System Preferences either by clicking on its icon in the Dock or choosing it from the Apple menu.
- Click on the Security & Privacy pane.
- Choose the General tab and check the option that starts «Require password….»
- Choose an option from the dropdown menu.

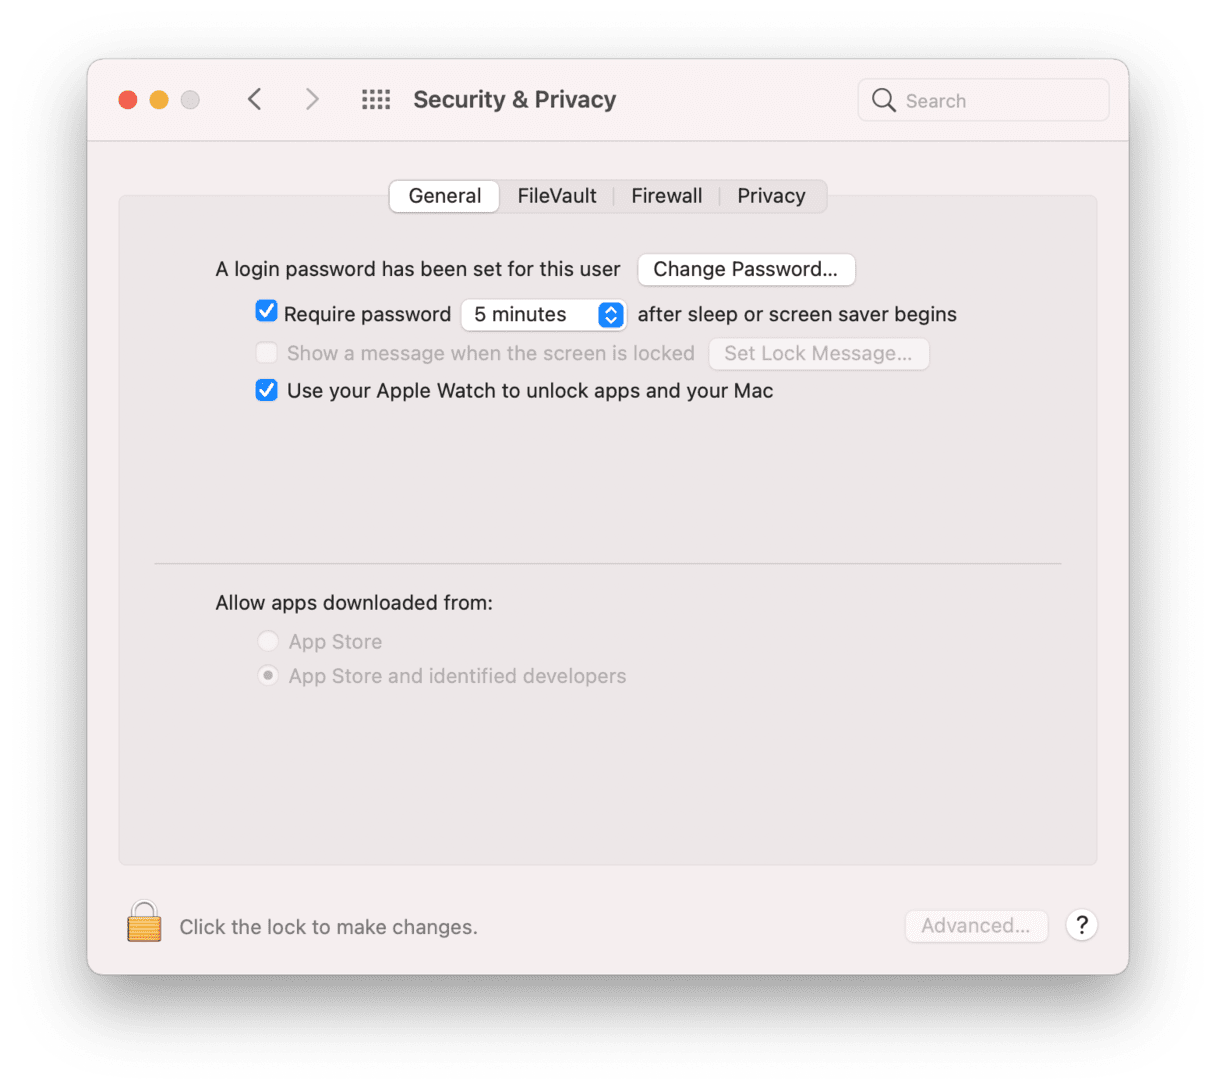
Now, whenever your Mac goes to sleep or a screensaver starts, it will lock, and you’ll have to authenticate with your user password, Apple Watch or TouchID to gain access.
Worried about your Mac’s security in public places? Get Beepify, a Setapp app that protects your Mac from theft.
How to lock your Mac
If you have a MacBook, a MacBook Air, or a MacBook Pro, the quickest and easiest way to lock your Mac is just to shut the lid. When you do that, the Mac goes to sleep, and when you open it again, you’ll need to unlock it.
However, there are occasions when you want to prevent anyone from seeing the screen without actually closing it. And, in any case, if you have an iMac, Mac mini, or Mac Pro, it’s not an option. So here are some other ways you can lock your Mac’s display.
1. Use the Apple menu
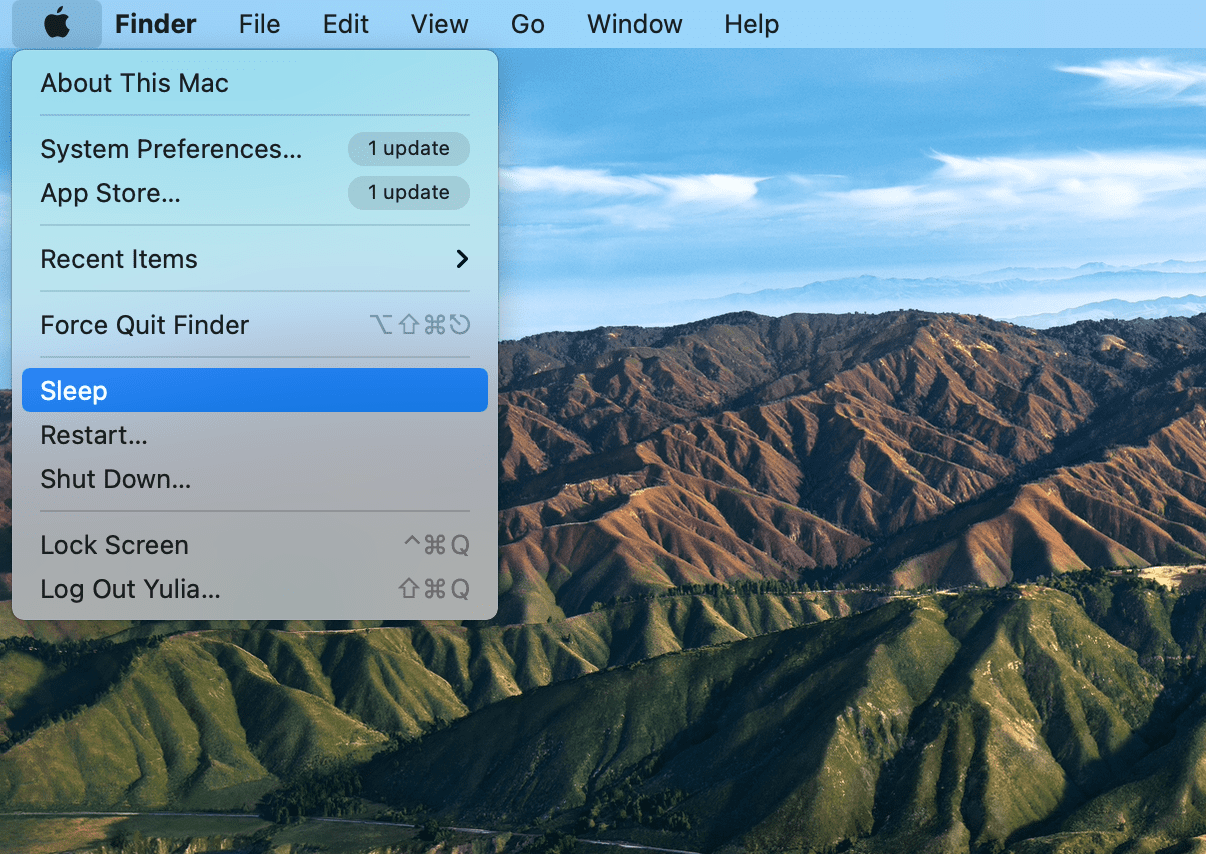
Go to the Apple menu and choose Sleep. This will display the login screen for your account and won’t unlock with a password (unless you’re wearing an Apple Watch when you do it, and then it will lock and unlock immediately)
If you want your Mac to remain locked even when you’re close by and have an Apple Watch, go to System Preferences > Security & Privacy > General and uncheck the «Use your Apple Watch to unlock apps and your Mac» option.
2. Use shortcuts
If you’re using a Mac that’s running the latest macOS version, go to the Apple menu and choose Lock Screen or press Command+Control+Q. This will lock your Mac and return you to the Login screen.
For older versions of the operating system, press Control+Shift+Power button (or Control+Shift+Eject if your Mac has an optical drive). It will lock the screen.
You can also use a keyboard shortcut to put your Mac to sleep. Press Command+Option+Power (or Eject). This works in a similar way to the previous one, but rather than just lock your Mac, it powers down the hard drive, puts the CPU into low power mode, and stops background tasks to save energy.
3. Set up a hot corner
Hot corners allow you to drag the mouse pointer to one of the four corners of the screen to initiate an action – you can use one as a sleep shortcut on your Mac. To set it up:
- Launch System Preferences.
- Choose the Desktop & Screen Saver pane.
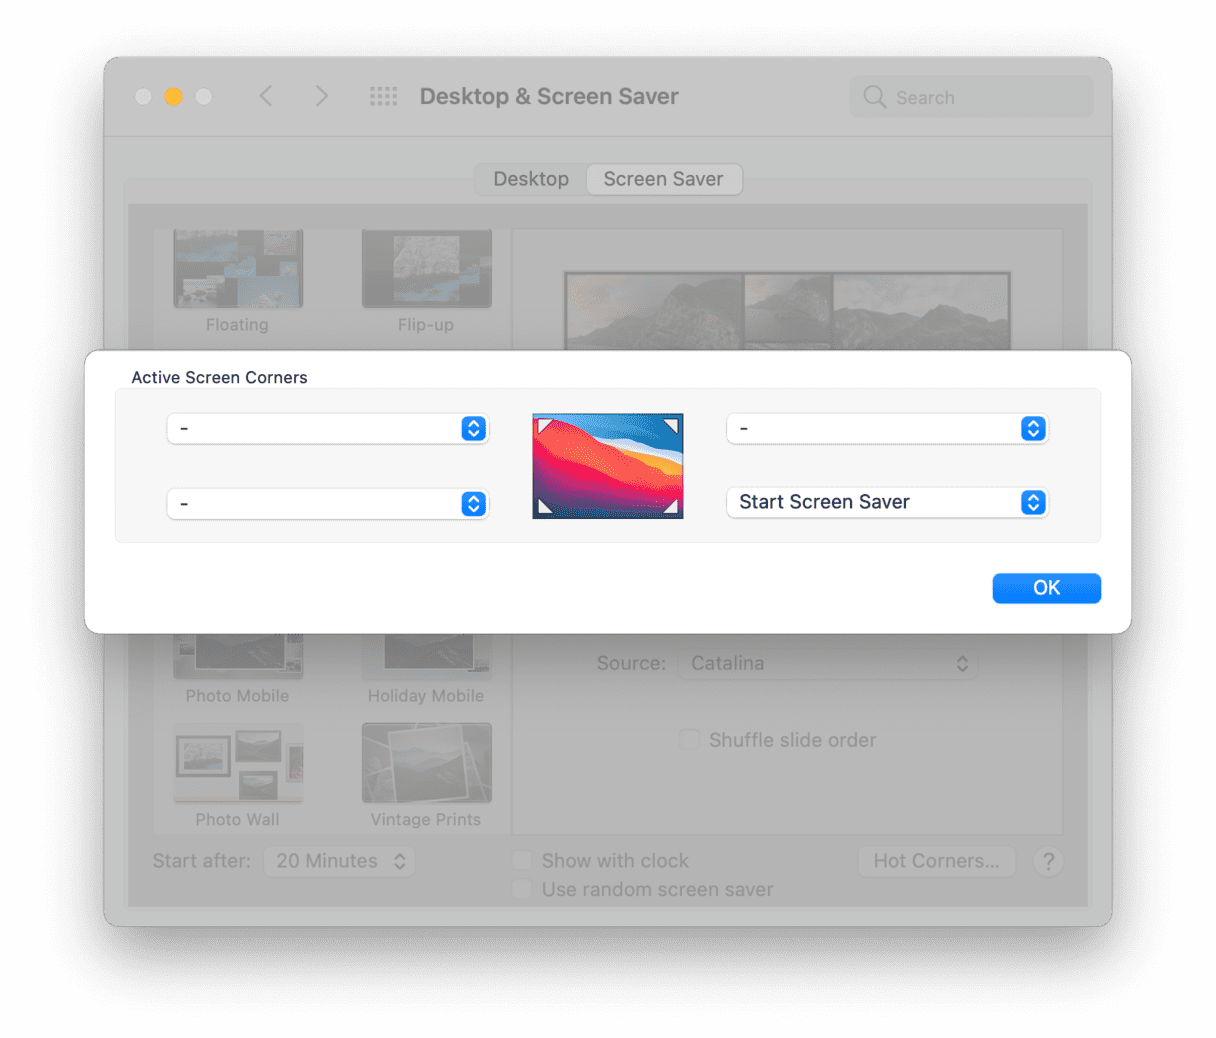
- Click the Hot Corners button at the bottom right of the window.
- In the drop-down window, choose a corner.
- Click on the menu and choose either Start Screen Saver or Put Display to Sleep.
4. Use fast user switching
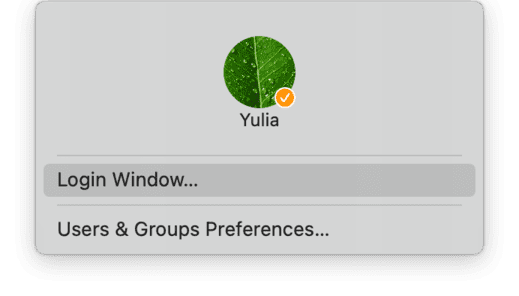
Fast user switching allows you to log into another user account on your Mac quickly. But you can also use it to return to the log-in window, which locks your Mac. Go to System Preferences > Users & Groups and click the padlock, then type in your password. Next, click Login Options and check the box next to ‘Show fast user switch menu as.’ You can also choose whether to show the menu as your full name, the account name, or an icon.

To lock your Mac, click the fast user switching menu at the right of the menu bar and choose Login Window…
5. Add Keychain Access to the menu bar
This option was removed in macOS Mojave, but it still works on versions before High Sierra.
- Go to Finder.
- Choose Applications > Utilities.
- Launch Keychain Access.
- Click in the Keychain Access menu and select Preferences.
- Check the box next to Show keychain status in the menu bar.
- You’ll see a lock in the Finder menu bar. Click it and choose Lock Screen to lock your Mac.
Other ways to protect your privacy
First of all, get a Finder-like Terminal for Mac that will help you completely control the login settings. It’s called MacPilot. The app covers over 1,200 hidden macOS features. For privacy, you can go into the Login tab and customize access by users, enable the option of automatic screen locking, and edit launch items.
If you’re looking for physical protection of your Mac, Beepify is the app you need. Whenever you have to step away from the computer in a public place, activate Beepify, and it will be set to produce a loud sound if someone tries to close the screen or disconnect the charger.
One of the main reasons for locking your Mac when you step away from it is to stop prying eyes accessing your files, browser history, or anything else you don’t want them to see. CleanMyMac X has a tool that gives you even more privacy protection.
CleanMyMac X’s Privacy tool allows you to quickly delete your browser history in Chrome, Firefox, and Safari. It also allows you to control application permissions, clear the Recent Items list, and remove unsecure Wi-Fi networks.

Also, CleanMyMac X’s Shredder is a quick and easy way to delete sensitive data securely. You can download CleanMyMac X for free and give it a try.
As you can see, putting your Mac to sleep or locking it is very easy. There are lots of different ways to do it, although some are dependent on the version of macOS you’re using. If you regularly lock your Mac to prevent others from accessing it, you should ensure your login password is strong and secure.
Finally, if privacy is important, CleanMyMac X has a couple of tools that can help delete sensitive data.
Источник
5 ways to lock a Mac computer to keep your files secure
Out of all the measures you should take to protect your digital privacy, locking a device might be the most basic, but it can surely be the most effective.
Whether you’re at school, an office, or even at home, locking your Mac — even if you step away just for a moment — is a no-brainer. Just think of all the sensitive information that’s just a few clicks away: Security codes, work documents, financial statements, all of your social accounts, and more.
There are several ways you can lock your Mac, which we outline below. But before you can do that, you’ll want to set up a password for your computer. Here’s everything you need to know.
Setting up a password on Mac
In order to lock your Mac, you’ll need to first set up a password. This password will be required for both logging into your Mac as well as approving changes to your computer.
1. Click the Apple icon, located in the top-left corner of your screen and select «System Preferences.»
2. Click «Security and Privacy»
3. In the General tab, check the box that says «Require password.» You can also set the timing of the password, from «immediately» up to «8 hours.» It’s important to choose «immediately» if you want your computer to automatically lock when it goes to sleep or screensaver mode.
We should also note that clicking «Advanced» in the lower-right hand corner of the window allows you to specify how long your computer can be idle before it automatically logs out and requires a password to get back in. This is an ideal last line of defense against would-be intruders.
Once your password is set, you’ll be able to lock your Mac in several different ways — the best method depends on your habits and preferences, and if you typically use your computer in a private or public setting.
Closing the lid
If you’re working on a MacBook, you can simply close the lid. This by far the easiest method, but only works if you’ve set the computer to «immediately» lock when you set up your password.
Apple menu bar
Another simple way to lock your Mac is from the Apple icon in the menu bar. From the Apple icon dropdown menu, click on «Lock Screen.»
Using keyboard shortcuts
You can easily lock your Mac from your keyboard:
- Press Control + Command + Q: This shortcut will take you directly to the lock screen.
- Press Control + Shift + Power button: This shortcut will turn your displays off only — background tasks, like music, will continue.
- Press Command + Option + Power button: This shortcut will put your computer into sleep mode.
Note: If you’re using an older Mac with a media eject button, press the Eject button in place of the Power button.
Using Hot Corners
If you prefer locking your screen with a flick of the wrist, you can set a shortcut so your screen goes into screensaver mode when you move your pointer to a certain corner of the screen. This feature is called Hot Corners, and here’s how to set it up:
1. Click the Apple icon. From the dropdown menu, click «System Preferences.»
2. Click «Desktop & Screen Saver»
3. In the window that pops up, navigate to the «Screen Saver» tab, then click «Hot Corners.»
4. Click the pop-up menu for the corner you want to use, and choose «Start Screen Saver,» then click «OK.» Now, whenever you move the cursor to the corner selected, your computer will enter screensaver mode.
Using the Mac Touch Bar
If you have a MacBook Pro with a Touch Bar, you can customize it to include a «Screen Lock» icon.
1. Click the Apple icon and open System Preferences.
2. Click «Keyboard.»
4. An icon menu will pop up from the bottom of your screen. Find the «Screen Lock» icon and drag it into the touch bar. You can arrange the buttons any way you like.
5. Once complete, click «Done.» You’ll now be able to lock your screen via the Touch Bar.
Источник


