- Как проверить необходимость в дополнительной оперативной памяти для Mac с помощью приложения «Мониторинг системы»
- How to Monitor Your Mac’s Memory Usage
- Using Activity Monitor
- Using iStat Pro
- Using iStat Menus
- Help! My Mac is Always Out of Memory
- Related Articles
- Subscribe to our email newsletter
- View memory usage in Activity Monitor on Mac
- How to reduce memory usage on your Mac
- How to Fix Your System Application Memory
- How to check RAM usage on Mac
- How to check CPU usage on Mac
- How to free up memory on Mac
- How to get rid of low memory notifications
- Fix kernel_task, a high CPU usage bug
- Reduce memory usage in Finder
- Improve Chrome’s Task Manager
- Clean up other browsers
- Disable login items
- Disable desktop widgets
- Declutter your desktop
- Schedule regular cleanups
Как проверить необходимость в дополнительной оперативной памяти для Mac с помощью приложения «Мониторинг системы»
В панели «Память» можно узнать, сколько памяти использует Ваш Mac, как часто система перемещает содержимое из оперативной памяти на загрузочный диск и обратно, а также объем памяти, предоставленный приложению, и объем сжатой памяти.
Наличие свободной или неиспользуемой памяти не обязательно означает повышение производительности компьютера. Операционная система macOS обеспечивает максимальную производительность за счет эффективного использования и управления всеми типами памяти компьютера Mac.
В приложении «Мониторинг системы»  на Mac нажмите «Память» (или воспользуйтесь панелью Touch Bar).
На графике «Нагрузка на память» можно увидеть, насколько эффективно компьютер использует доступную память.
График «Нагрузка на память» имеет зеленый цвет. Компьютер эффективно использует оперативную память.
График «Нагрузка на память» имеет желтый цвет. Компьютеру может понадобиться больше оперативной памяти.
График «Нагрузка на память» имеет красный цвет. Компьютеру нужно больше оперативной памяти.
Если график имеет желтый цвет, красный цвет или явные пики, проверьте, не исчерпало ли приложение выделенную память, тем самым увеличив нагрузку на память. Если запущенное приложение больше не нужно, завершите его.
Для точного измерения нагрузки на память Вашего компьютера определяется количество свободной памяти, коэффициент подкачки, количество зарезервированной памяти и кэшированной памяти. Это позволяет оценить, насколько эффективно Ваш компьютер использует оперативную память.
Чтобы узнать о добавлении оперативной памяти на Mac, выполните одно из следующих действий в зависимости от модели Mac.
Выберите меню Apple

> «Об этом Mac», нажмите «Память», затем нажмите «Инструкции по обновлению памяти».
Выберите меню Apple
> «Об этом Mac», нажмите «Поддержка», затем нажмите «Аппаратная поддержка».
Примечание. Этот параметр доступен только на компьютерах Mac с заменяемыми блоками оперативной памяти.
Источник
How to Monitor Your Mac’s Memory Usage
Imagine driving a vehicle with no gauges on the dashboard. You wouldn’t know how fast the car was going, how much fuel it had left, or whether or not the engine was about to overheat. In short, you’d be driving blind — hoping, by chance, that everything would just work out okay.
As ludicrous as this scenario sounds, millions of Mac users do essentially the same thing every day. Most people have no idea how much RAM is installed in their Mac, or how much memory it is currently using. Of course, since RAM memory stores the code and instructions for OS X and any applications open on your Mac, running out of it can slow your Mac down, or worse. That’s why it’s important to monitor your Mac’s memory usage in real time. You can see how much RAM is currently available on your Mac and stop potential problems before they start!
There are a couple different tools you can use to see how much memory your Mac is using. This tutorial covers three of them: Activity Monitor, iStat Pro, and iStat Menus. By the time you get to the end of the article, you’ll be a memory-monitoring pro!
Using Activity Monitor
Activity Monitor is a free application that comes bundled with every Mac. You can use this application to see how much RAM is currently free, how much RAM is currently allocated, and a whole lot more. In fact, Activity Monitor presents so much information that it’s easy to get overwhelmed when looking at it. Don’t worry if you don’t understand what it all means. Just follow these instructions to concentrate on the memory statistics.
Here’s how to use Activity Monitor to monitor your Mac’s memory usage:
Open the Activity Monitor application. (It’s in Applications → Utilities.) The window shown below appears.
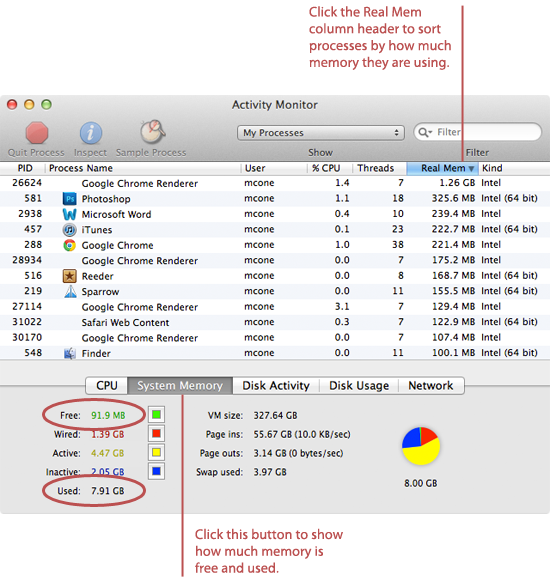
Click the Real Mem column header to sort the active processes by memory usage. This is a good way to see which applications are using the most memory on your Mac — the memory hogs are displayed at the top of the list.
Click the System Memory button. Now the bottom part of the window shows exactly how much free memory is currently available. If the free memory number looks too low, you should quit some applications to free up memory. (Ideally, your Mac should have 10% of the total memory available at any given time.)
To turn the Activity Monitor Dock icon in to a real time memory monitoring tool, right click on the Dock icon and select Dock Icon → Show Memory Usage, as shown below. The Activity Monitor Dock icon turns into a pie chart which displays how your memory is allocated.
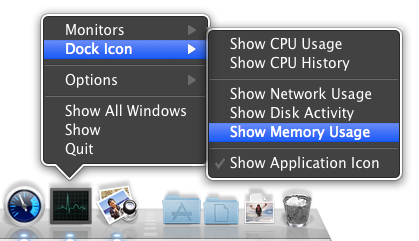
Now you have a way to monitor your Mac’s memory usage in real time. Keep an eye on that Dock icon! You want there to be enough green (which represents free memory) to open other applications.
Using iStat Pro
iStat Pro is a free Dashboard widget that provides tons of system information about your Mac, including memory usage. If you’re an avid Dashboard user, this is a good way to keep tabs on how much RAM is free and allocated. Just download and install iStat Pro and then open Dashboard. (To do so, you can press F4 on most Mac keyboards, or swipe left with four fingers on a trackpad.) The iStat Pro widget is shown below.

It’s a good idea to check the widget a couple times a day, just to make sure you have enough free RAM available. Remember, if the free RAM is getting dangerously low, quit some applications to free up space.
Using iStat Menus
Using iStat Menus ($16, free trial available) is probably the best option for monitoring your Mac’s memory. This application runs in the background and displays an icon on your menu bar that indicates how much RAM memory your Mac has available. And seriously, can you think of a better way to monitor memory than looking at your menu bar?
Here’s how to use iStat Menus to monitor your Mac’s memory usage:
Open the iStat Menus application.
On the sidebar, move the Memory slider to the On position. The window shown below appears.
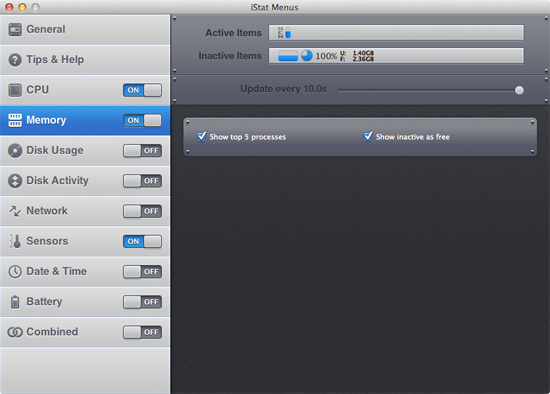
Now you need to customize the menu bar icon. Drag an icon from the Inactive Items bar to the Active Items bar. You really only need one memory icon to be active, but you can make multiple icons active.
Now you’ve got a handy little icon in your menu bar, as shown below. All you have to do is look up to monitor your Mac’s memory usage!

Help! My Mac is Always Out of Memory
If your Mac always seems to be running out of memory, you probably need to upgrade the RAM. You can never have enough! If you own a newer iMac, Mac Mini, or MacBook Pro that you purchased in 2011 or later, we recommend that you purchase these RAM modules for a total of 8 GB of RAM — enough memory for all but the most professional users. Users with other models of Macs can find inexpensive memory modules here.
Related Articles
Subscribe to our email newsletter
Sign up and get Macinstruct’s tutorials delivered to your inbox. No spam, promise!
Источник
View memory usage in Activity Monitor on Mac
You can see the amount of system memory being used on your Mac.
In the Activity Monitor app  on your Mac, click Memory (or use the Touch Bar) to see the following at the bottom of the window:
Memory Pressure: Graphically represents how efficiently your memory is serving your processing needs.
Memory pressure is determined by the amount of free memory, swap rate, wired memory and file cached memory.
Physical Memory: The amount of RAM installed.
Memory Used: The amount of RAM being used. To the right, you can see where the memory is allocated.
App Memory: The amount of memory being used by apps.
Wired Memory: Memory required by the system to operate. This memory can’t be cached and must stay in RAM, so it’s not available to other apps.
Compressed: The amount of memory that has been compressed to make more RAM available.
When your computer approaches its maximum memory capacity, inactive apps in memory are compressed, making more memory available to active apps. Select the Compressed Memory column, then look in the VM Compressed column for each app to see the amount of memory being compressed for that app.
Cached Files: The size of files cached by the system into unused memory to improve performance.
Until this memory is overwritten, it remains cached, so it can help improve performance when you reopen the app.
Swap Used: The amount of space being used on your startup disk to swap unused files to and from RAM.
To display more columns, choose View > Columns, then choose the columns you want to show.
Источник
How to reduce memory usage on your Mac
System cleanup in one click
Few things are as frustrating as your Mac telling you it has run out of memory when you’re trying to be productive. But it’s even frustrating when you’ve ignored the problem for quite some time and your Mac’s limitations simply won’t let you put a solution on hold any longer.
Usually, a popup warning isn’t the first sign that something is amiss. You may have noticed that your Mac isn’t running as fast as it used to, with the fan louder than normal as if it’s struggling to carry a heavy load up a hill.
Although Macs are wonderful computers, like any other, they have limitations. Thankfully, there is plenty you can do to resolve this problem and get your Mac operating smoothly again.
Reduce memory usage with Setapp
Instead of manually deleting files, get Setapp. It not only removes the clutter but also gives you full control over memory usage.
How to Fix Your System Application Memory
Mac memory usage is often occupied by apps, even browsers like Safari or Google Chrome. In the most dire circumstances, your Mac will toss a warning at you: “your system has run out of application memory.”
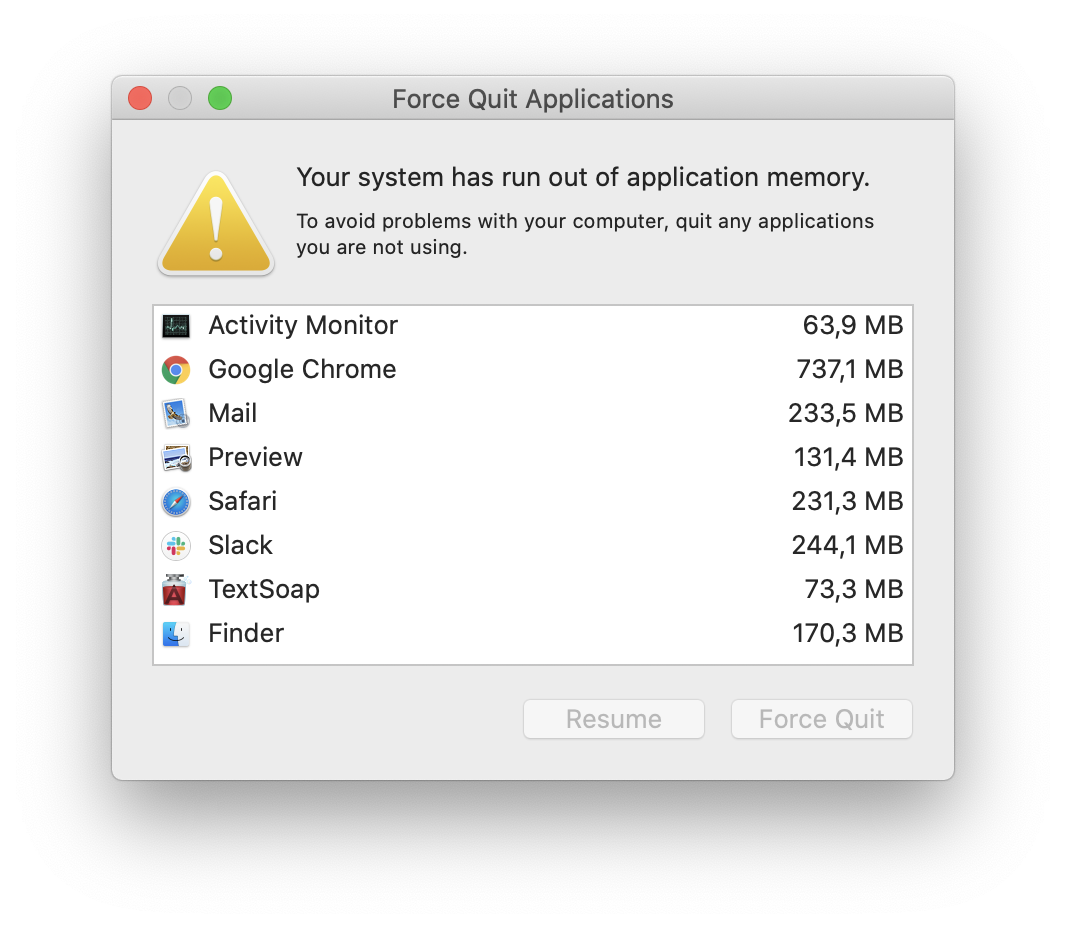
Don’t despair – it’s solvable. The first thing to note is this is a natural issue; your Mac has a limited amount of RAM. Though more expensive Macs have more RAM, even they can butt against limitations when too many applications are running.
It may also be an app that is hogging all of your resources. This is especially true of older applications which haven’t been optimized for modern computer architecture. Websites may also be a culprit. Let’s discuss all these possibilities step by step.
How to check RAM usage on Mac
To check your RAM use on any Mac, take the following steps:
- Open Activity Monitor from your list of applications. You can do this in Mac’s control center, via the Finder in your Dock, or by pressing ⌘ + Space and typing Activity Monitor in the Spotlight.
- Toggle to the Memory pane in the Activity Monitor window
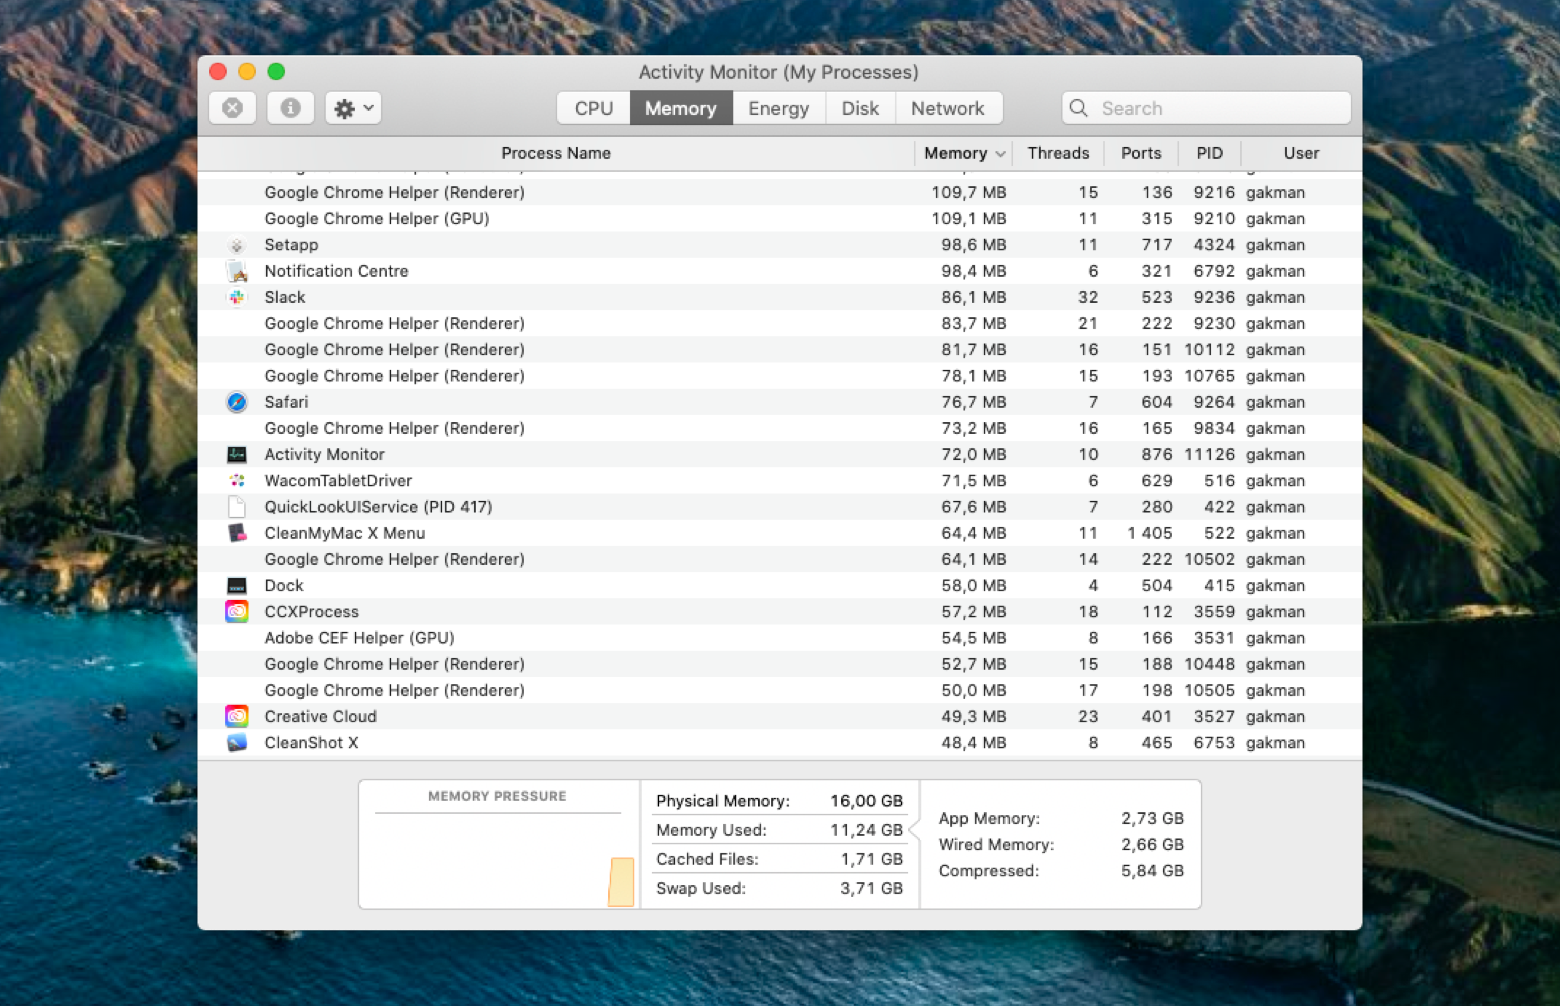
As you see in the above screenshot, Activity Monitor shows you all of your processes, sub-processes, and how much memory each is taking up. The most pertinent portion of the window is the bottom, where it shows you the total memory usage, and how it’s affecting your Mac.
A better way to monitor your Mac’s memory use is with iStat Menus. After installing the app, it makes a home in your Mac’s menu bar, and monitors just about everything, including memory, CPU, GPU, disks, and network usage.
You can choose which systems you’d like to monitor in the app itself. Only the items you’re monitoring will have an icon in your menu bar. A simple click on the menu bar icon surfaces a drop-down menu of how your Mac is performing at the time, and hovering over each graphic brings up a larger menu to inspect.
How to check CPU usage on Mac
Checking CPU use on your Mac is similar to the steps above for checking memory use. For Activity Monitor, you’d make sure to highlight the CPU section of the window. This will show you all the processes using your Mac’s CPU at the time.
Similarly, iStat Menus has a CPU & GPU toggle just above the memory section. Activating that will add a CPU and GPU monitor to your Mac menu bar, which has the same interactivity as the memory icon and menu shown above.
But what creates CPU-hogging problems overall and how do they lead to slow Mac performance?
Every Mac has a processor which handles the computing of any task, from opening an app to editing photos. Processors differ in power (expressed in GHz) and efficiency (generally, newer processors are more efficient).
For example, a 9th Generation 2.2 GHz Dual-Core Intel Core i7 processor means that it has two i7 chips, each of which is able to process data at up to 2.2 GHz, and its the 9th iteration of that processor overall.
However, regardless of the power of your processor, if you throw too many tasks at it, it will start to slow because it’s trying to process too much information at once (try opening 100 Google Chrome tabs), creating a bottleneck. That’s why you can have applications not responding. So you need to do something about it.
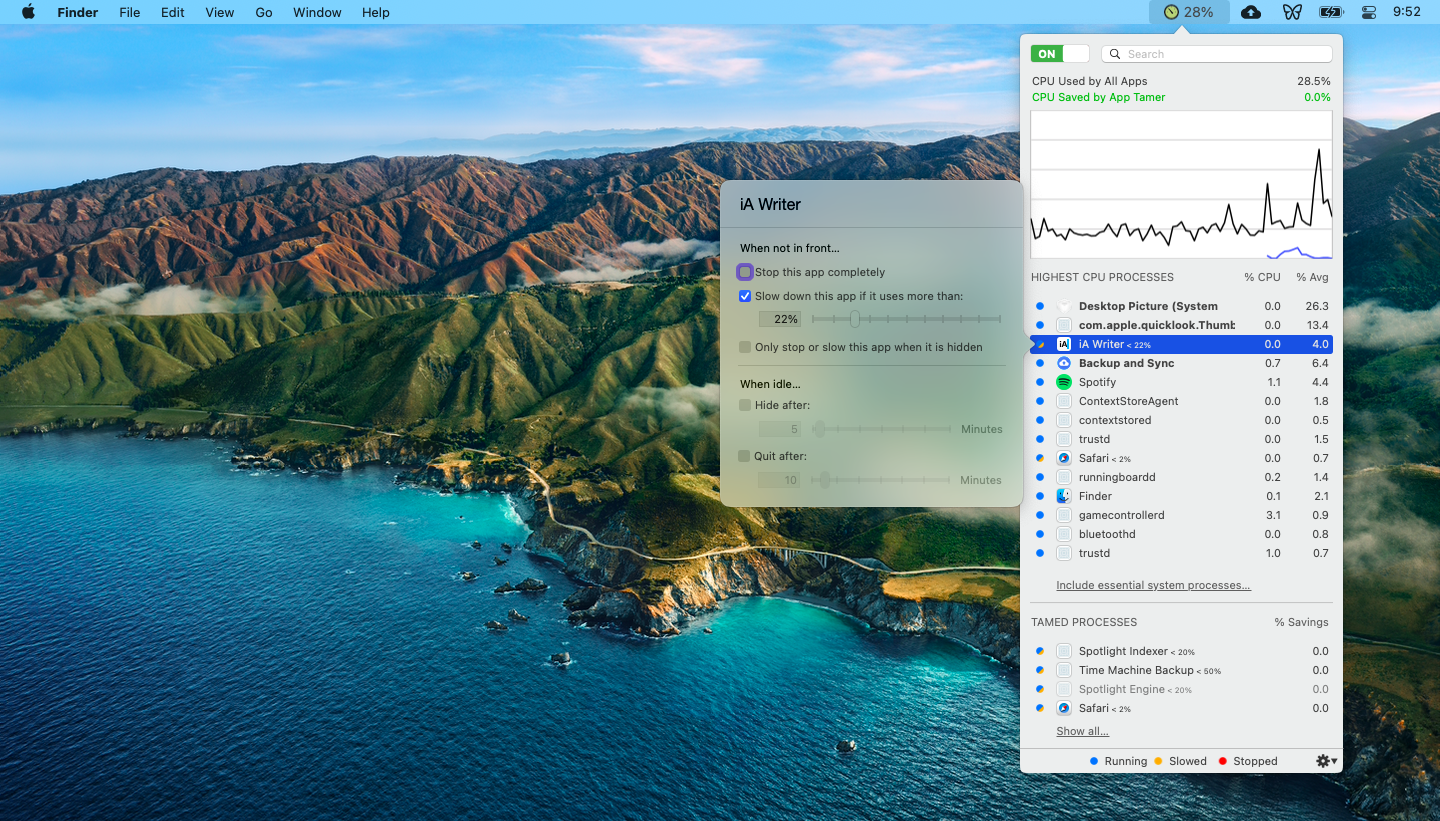
App Tamer is perhaps the most powerful smart CPU manager out there. Not only does it show the exact CPU percentage and battery impact each process is taking from your Mac, it lets you create simple rules to prevent certain processes from hogging too much CPU.
To tame any app, just click on it in App Tamer (located in the menu bar), select “Slow down this app if it uses more than” and specify the exact CPU percentage.
How to free up memory on Mac
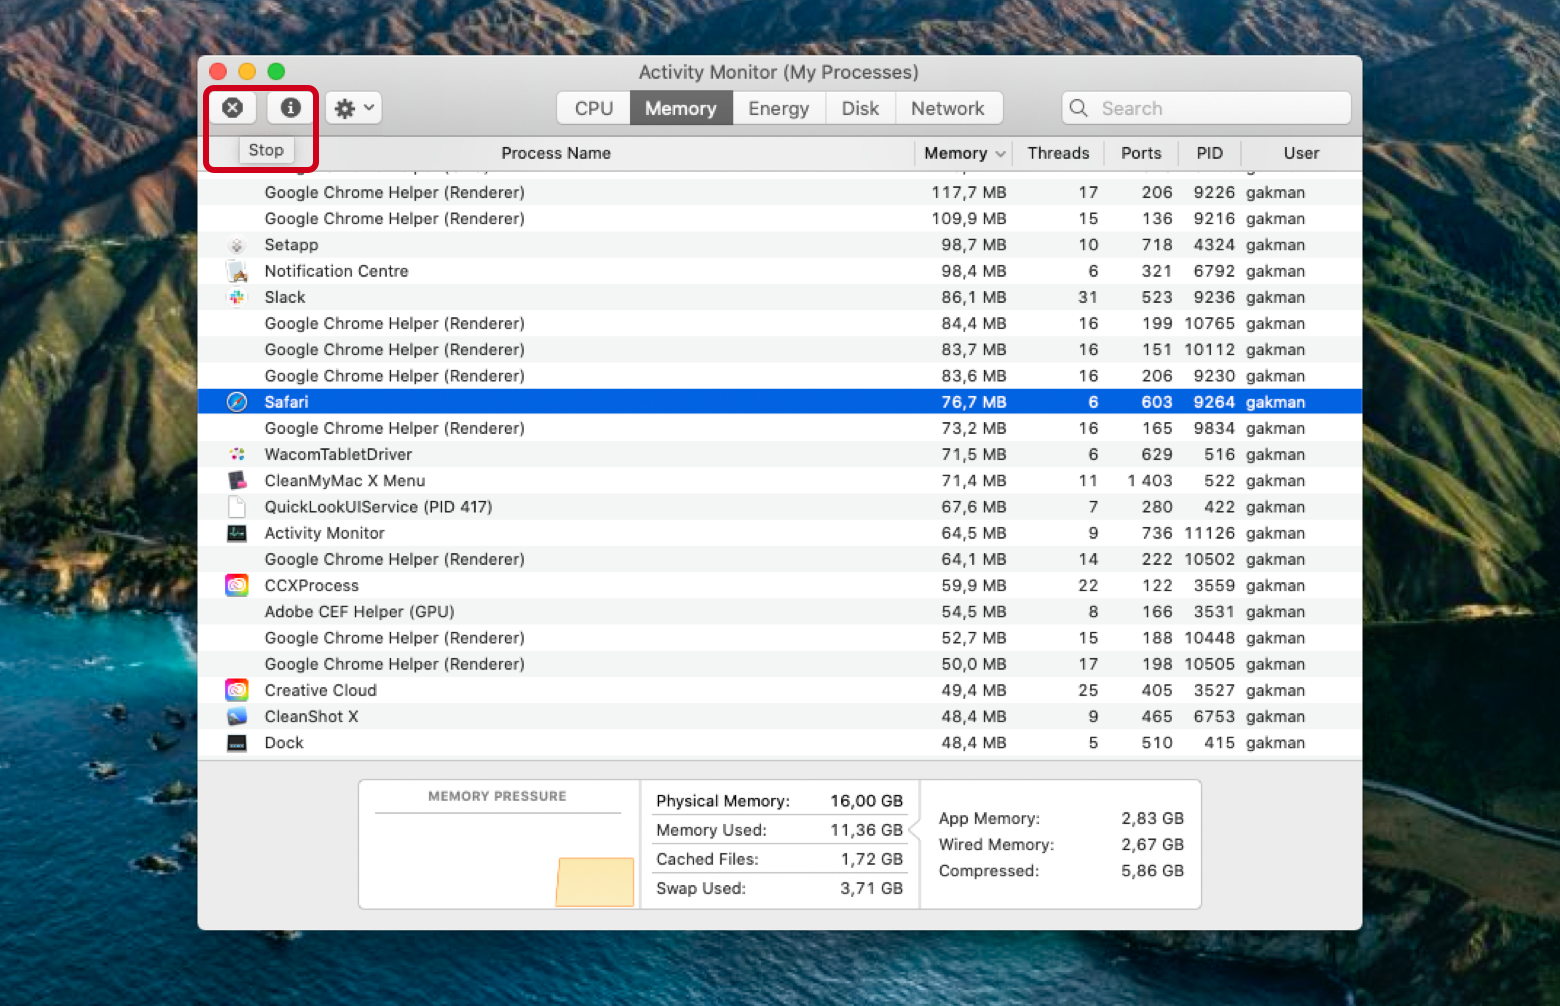
Knowing how to clear memory on Mac is important, especially if you have a Mac with limited resources. One option is using Activity Monitor:
- Open Activity Monitor on your Mac
- Select an app using a lot of memory
- Click the stop icon in the top bar
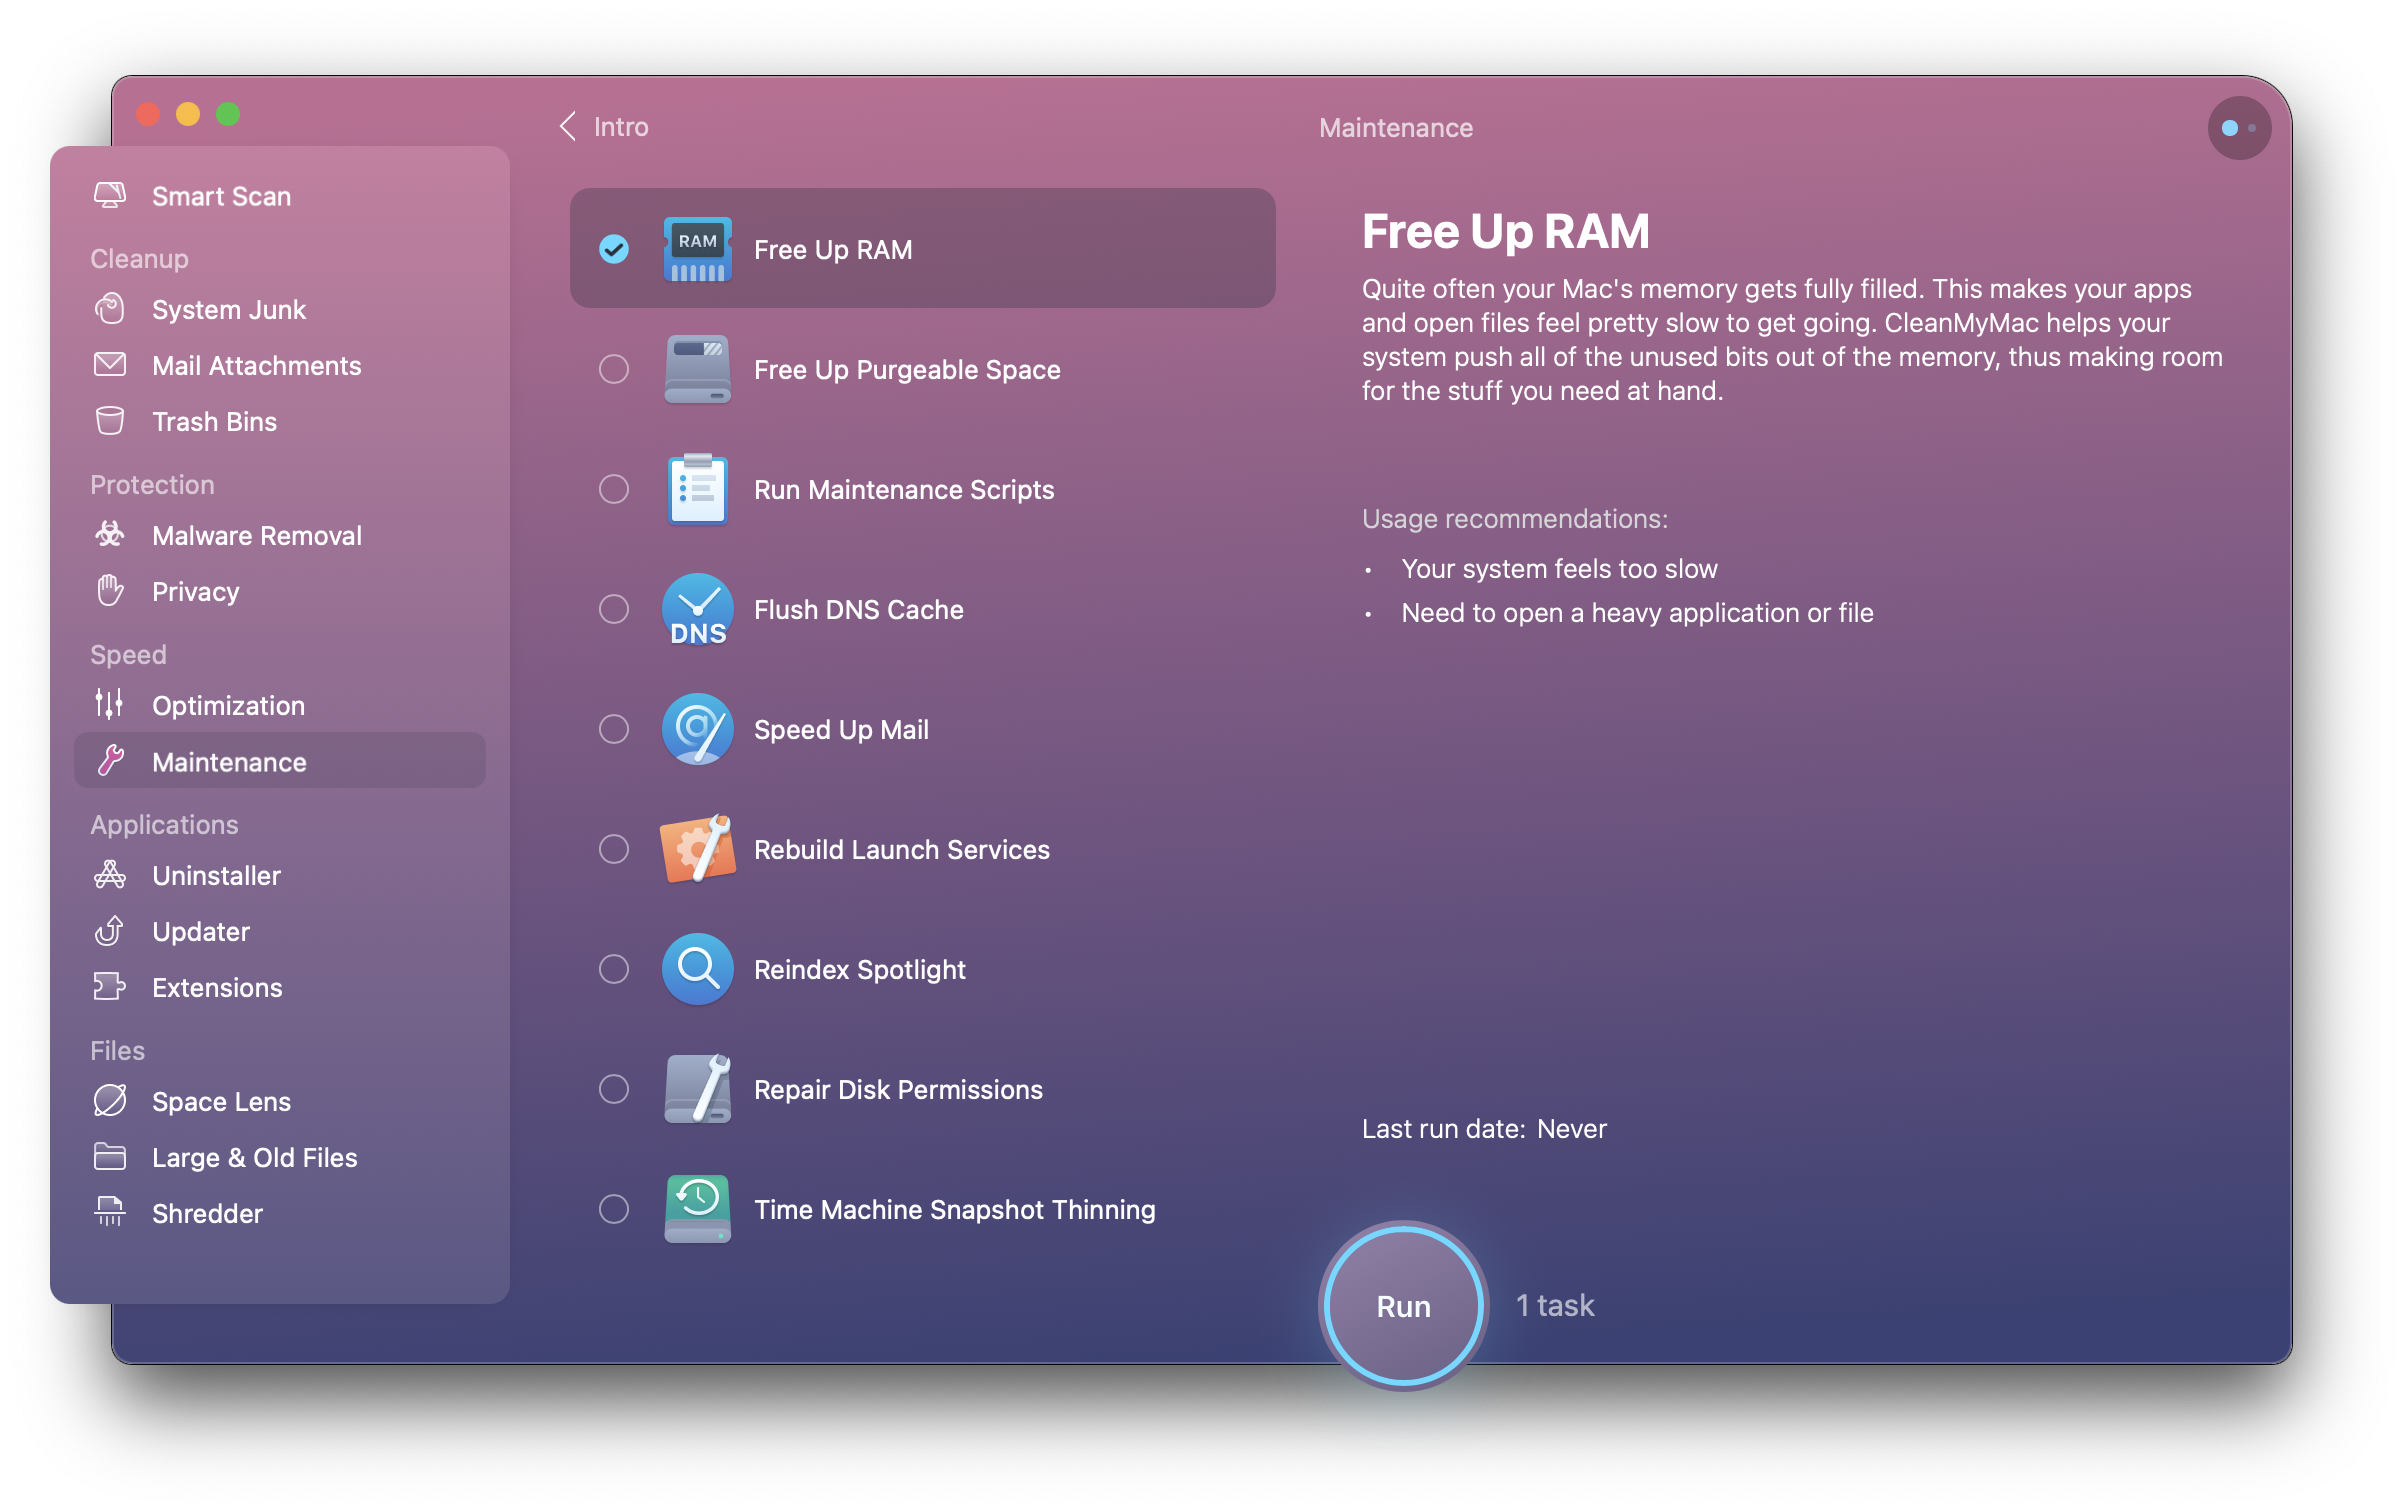
This is straightforward, but there’s a better way. CleanMyMac X has an automated CPU and memory monitors built-in, which can give you a real-time view of memory usage in your Mac’s menu bar. It also has a really quick and easy way to free up memory without digging through Activity Monitor and manually shutting down apps.
All you have to do is click the CleanMyMac X icon, select Free Up in the memory pane, and the app takes care of the rest! Oftentimes, it doesn’t even shut apps down.
This is a quick fix, but CleanMyMac X takes it a step further in the app itself. Under the app’s Maintenance section is an option to Free Up RAM, which helps you clear RAM on Mac. Once you’ve got this option selected, simply select Run at the bottom of the window, and CleanMyMac X will do a thorough scrubbing of your Mac’s RAM, and clear unused files out of the way.
How to get rid of low memory notifications
Most apps are pretty good about how they use your Mac’s resources. Having too many open or running in the background can severely limit what your Mac can handle, and is often why a Mac overheats or slows down.
Below we list a few tips to reduce high memory usage manually if you’re experiencing unique warnings or issues.
Fix kernel_task, a high CPU usage bug
You may have noticed through Activity Monitor something called kernel_task absorbing a large amount of processing power. One of the functions of kernel_task is to help manage CPU temperature; you may find that your Mac fan is loud and always on, even if the device isn’t hot to the touch.
That’s because kernel_task usually performs this way when one or more applications are trying to use too much CPU. Unfortunately, one of the potential downsides is a Mac can overheat to such an extent that internal systems are damaged, sometimes irreparably.
Working through the following steps in this article is one way to avoid similar problems. If none of this work and kernel_task is still absorbing a high percentage of your CPU, then one or more of the following could be the cause:
- Cooling system inefficiency
- A failed or disconnected temperature sensor
- Another hardware issue, including a worn out batter
- Your System Management Controller needs a rest
If you’re experiencing severe issues, Apple recommends a system management controller (SMC) reset. It’s essentially a hard reset for your Mac, and should help your RAM and other hardware components start from scratch. Keep in mind you won’t lose any data in this process.
Reduce memory usage in Finder
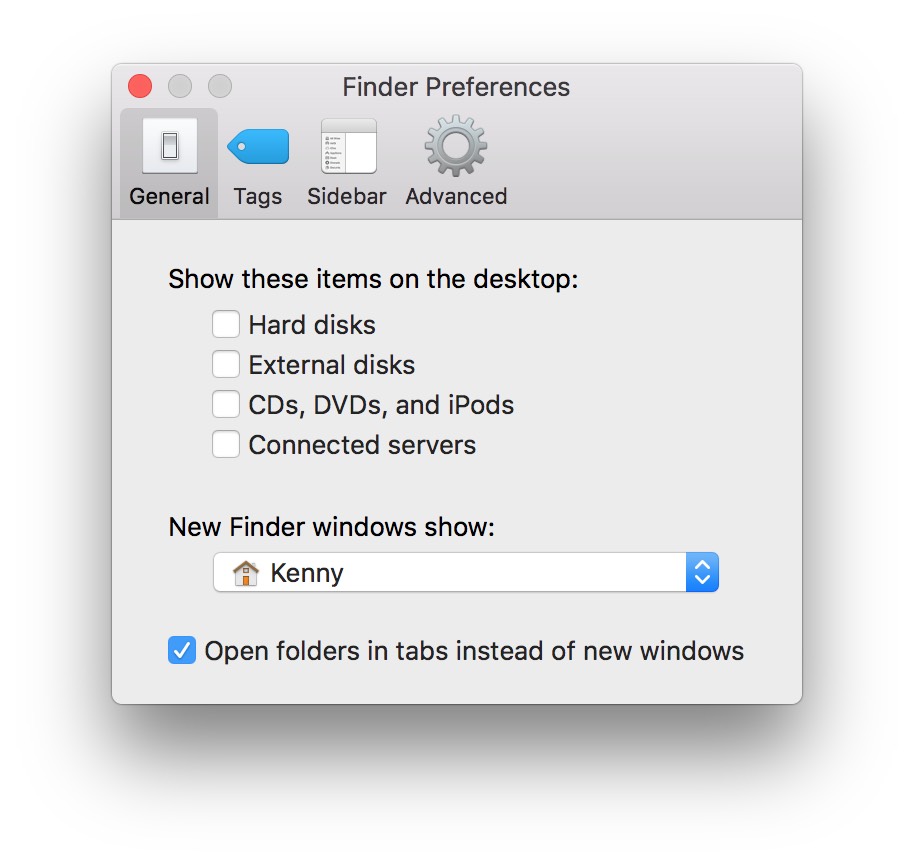
One common culprit for RAM issues is Finder, your Mac’s file manager. If iStat Menus or Activity Monitor has highlighted Finder as using hundreds of MBs of RAM, there is an easy solution: change the default display for a new Finder window so it doesn’t show All My Files:
- Click on the Finder icon in the Dock and click on the Finder menu, then select Preferences
- Click on General. Under ‘New Finder windows show’, click the dropdown menu and choose any option except All My Files
- Close Preferences, press Alt-Control, and click on the Finder icon in the Dock. Click Relaunch
Finder will now relaunch with new windows opening at the option you selected in step two.
Improve Chrome’s Task Manager
Chrome is a popular browser, but it’s a resource hog! Chrome uses a GPU Process as standard, which means it speeds up the loading of web pages, which can be great except at times when your computer is struggling with insufficient RAM.
Here’s how to make it better:
- Open Chrome on your Mac
- On the right side of the Chrome window, select the three-dot menu
- Select More tools
- Select Task Manager
- Select a Chrome process you’d like to kill
- Select End Process at the bottom right of the window
Here’s another way to reduce Chrome’s use of your Mac’s memory:
- Open Chrome on your Mac
- On the right side of the Chrome window, select the three-dot menu
- Select Settings
- Scroll to the bottom of the page and select Advanced
- Scroll down to System, and toggle «Use hardware acceleration when available» off
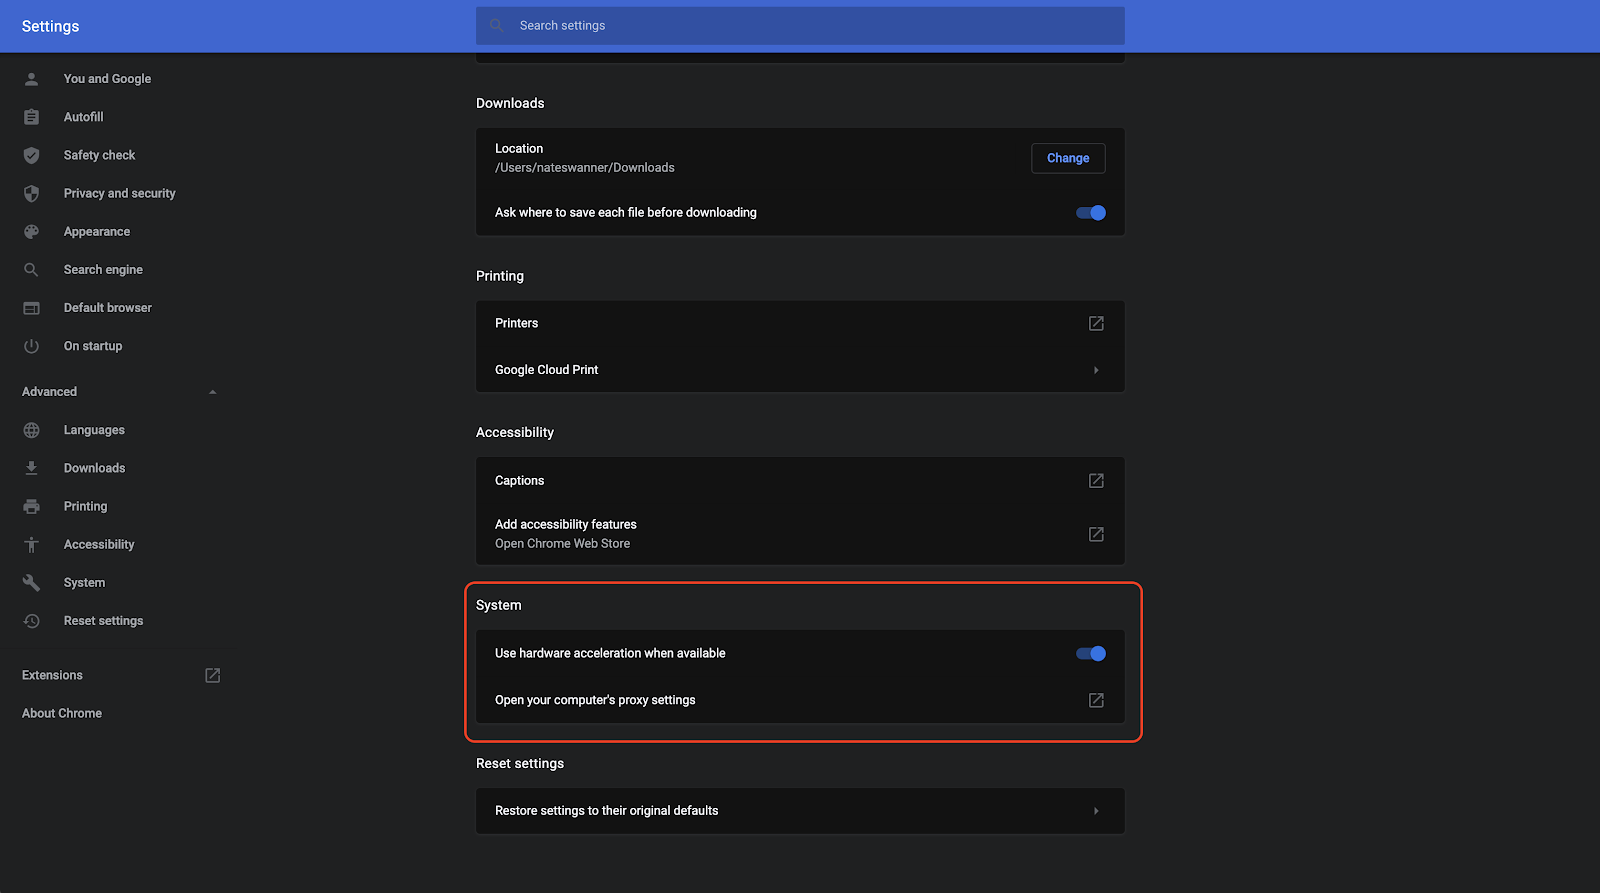
This will affect how Chrome runs on your Mac, and your experience won’t be as smooth. You can also remove unused or unwanted Chrome extensions to help it use less resources on your Mac.
Get CMM X to free up space
Install CleanMyMac X and streamline the entire process of memory management on Mac. Clever memory usage control done for you.
Clean up other browsers
In every browser you use regularly, there are always going to be extensions and popups that take up space and use RAM. You can manage each one manually or use a tool such as CleanMyMac X to identify and delete them.
In the CleanMyMac X app is a section titled Extensions, which lists each extension you have for your browser or browsers. All you have to do is view the list of extensions, select the ones you no longer want, and remove them. It’s really that simple!

Disable login items
Login items, browser extensions, and preference panes, such as Flash, are another common source of memory usage. Most of us have several installed that we rarely use, but which hog memory and reduce performance.
One way to do this is through System Preferences:
- From your Mac menu bar, select System Preferences
- Select Users & Groups
- Select Login Items
- Deselect items you no longer want active at login
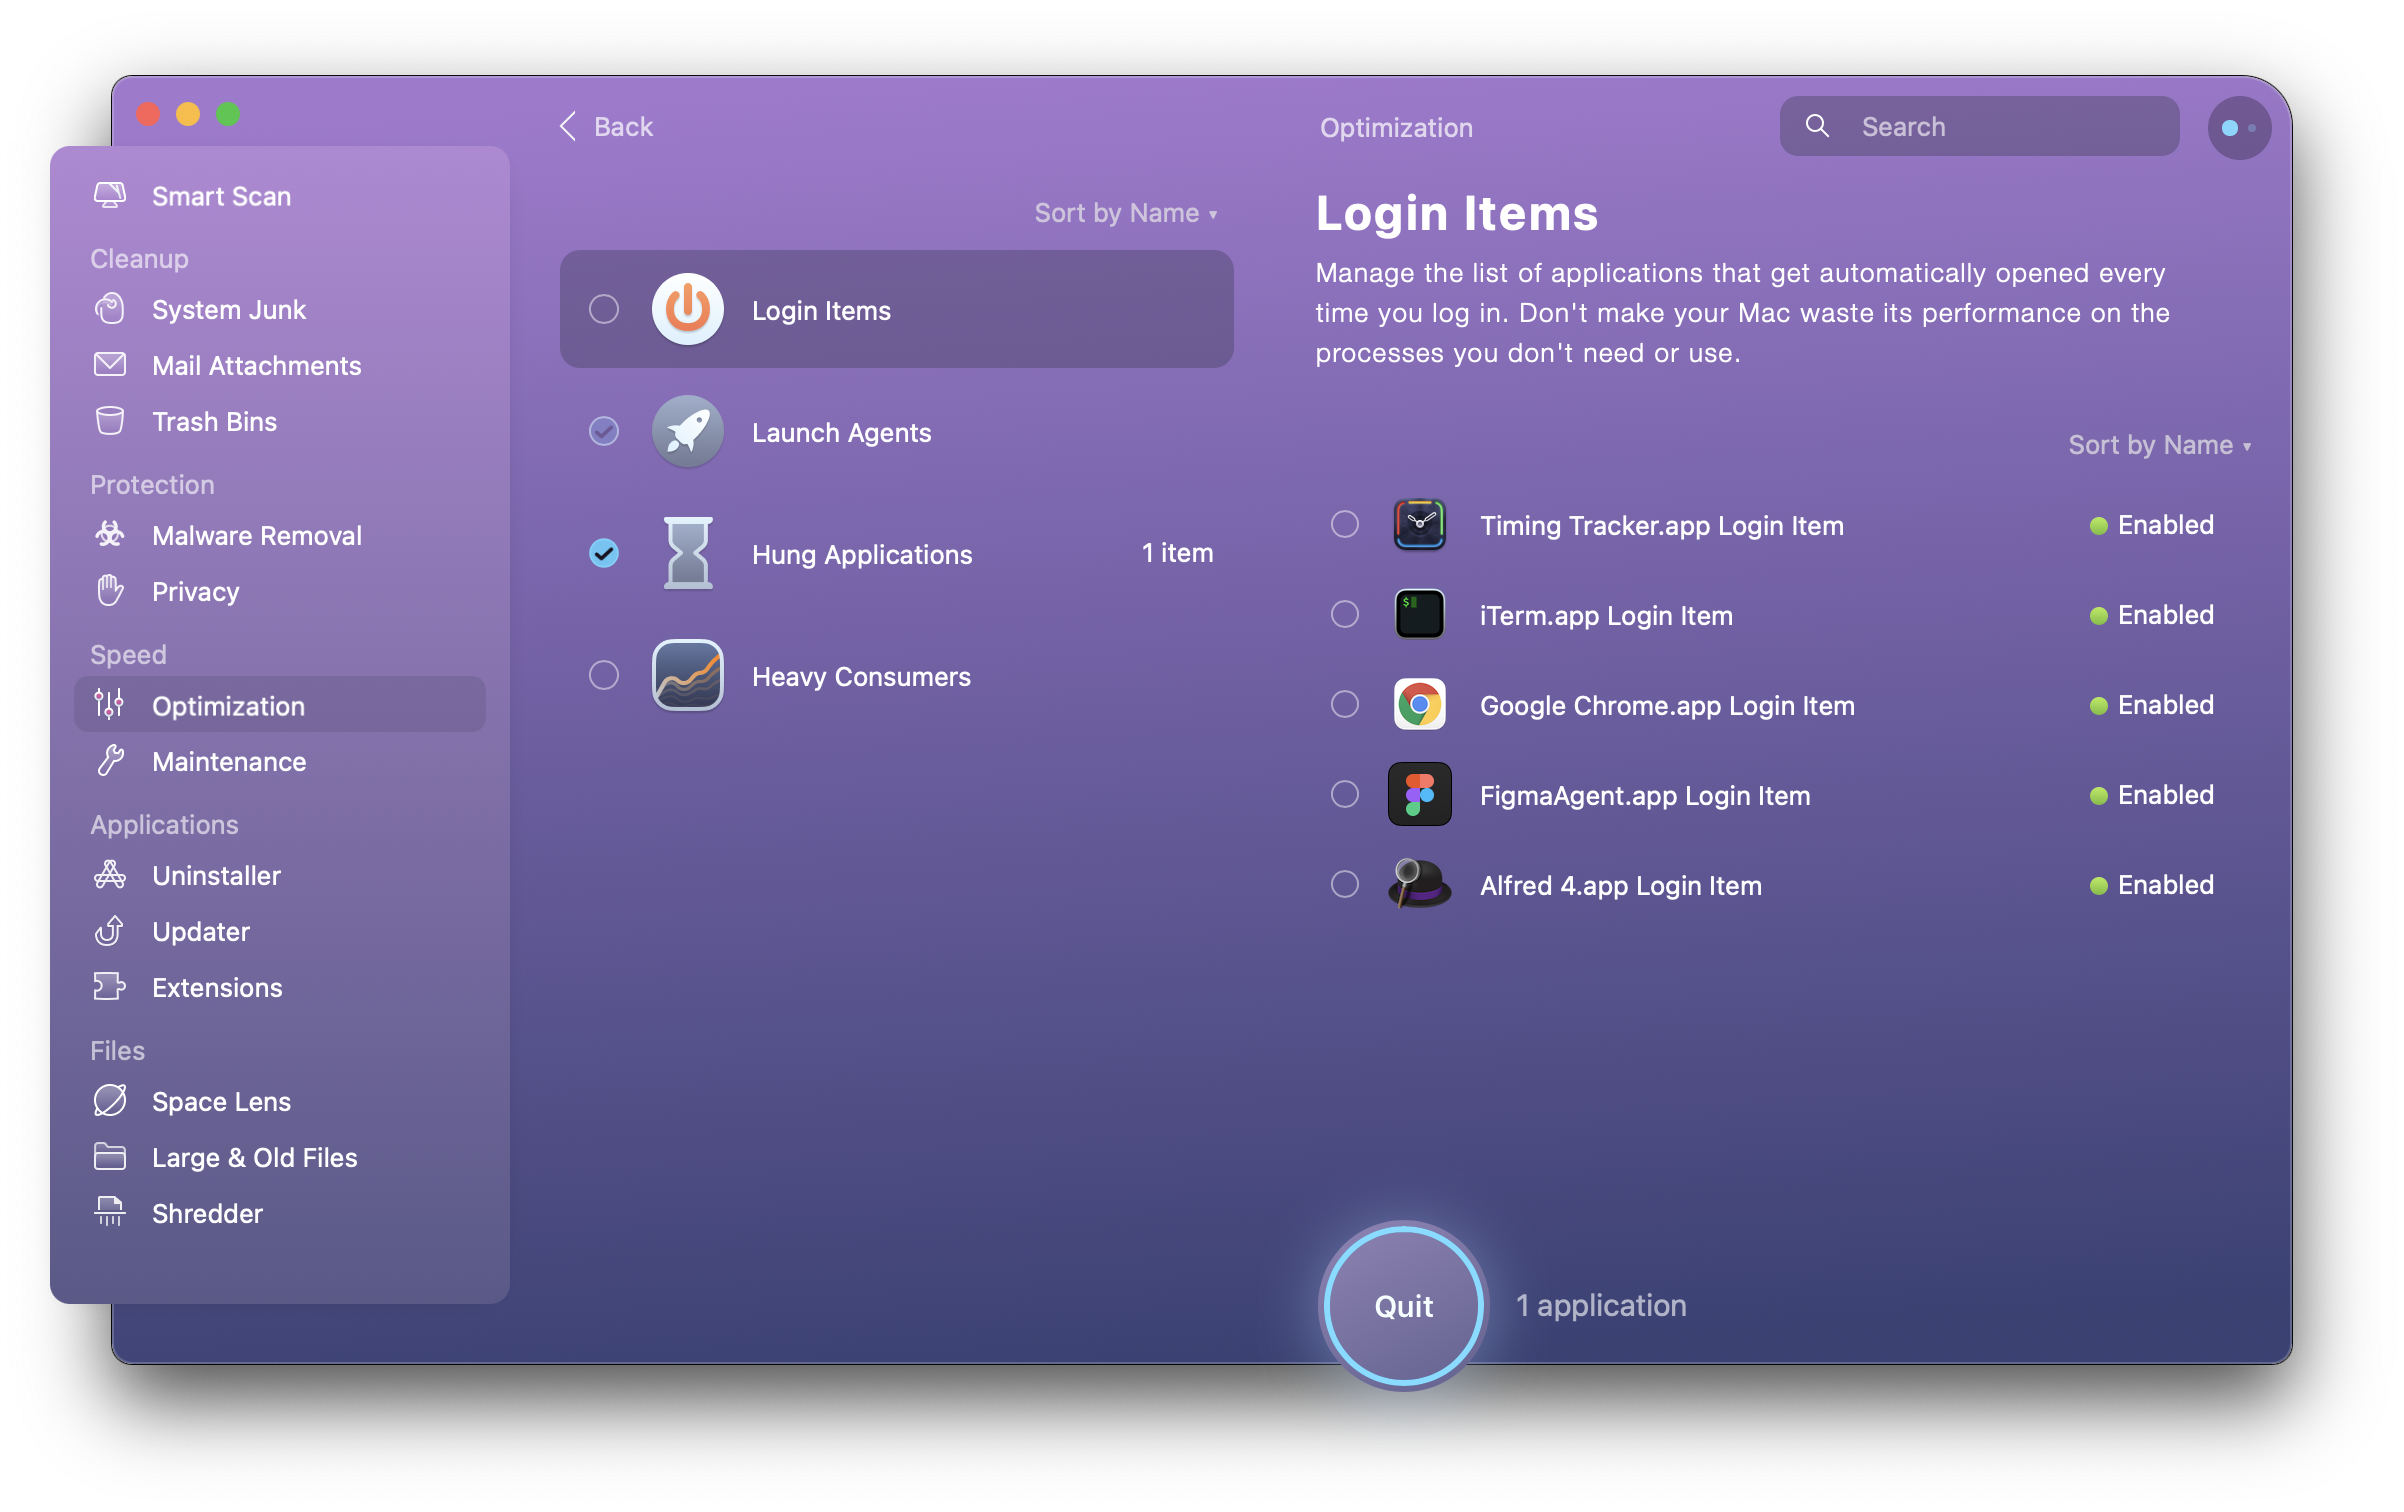
Another way, one that is even quicker, is to employ CleanMyMac to identify and cleanup login items:
- Open CleanMyMac X
- Under Speed, select Optimization
- Select Login Items
You can remove all login items, or select the ones you’d like to remove individually on the right side of the window.
Disable desktop widgets
Older Macs running a version of macOS older than Catalina can disable widgets. Desktop widgets can provide a useful shortcut to apps you need to access fairly often. But they can take up processing memory that is slowing your whole Mac down. One way to close them completely is in System Preferences.
Go to Mission Control ➙ switch off the Dashboard
Declutter your desktop
Apple’s built-in decluttering tool is handy for many. All you have to do on your cluttered desktop is right-click, then select Use Stacks. This places all of your desktop files into folders unique to their filetype, like Screenshots and Images.
A better way is to use Spotless, an app that gives you far more control over how your Mac is organized. It has several triggers for automated cleanup of files on your desktop, placing them wherever you see fit. It’s particularly useful for power users who produce several files daily, but don’t want to take the time to place each in a respective folder.
You can also select many files on your Mac desktop, and tell Spotless to tidy them up. You always have full control!
Schedule regular cleanups
Constant use of your Mac, or leaving it on all the time, will slow it down over time. Shutting it down and restarting is a traditional way of ‘cleaning up’ a computer.
We also like CleanMyMac X’s scheduled cleanup feature. Telling the app when you’d like to perform a thorough cleaning up of your Mac’s system is a method many prefer to shutting down and restarting often. It has the upshot of removing files and folders you no longer use, and cleaning up tasks that are slowing your Mac down behind the scenes. A simple shutdown may not do this.
Keeping your Mac in tip-top shape is critical. While we’d all like to think computers are brilliant little devices that can handle anything, they need some care, too.
All of the apps mentioned in this article help with taking care of your Mac, and protecting your investment. Best of all they’re each free as part of a seven day trial of Setapp. Give it a try today!
Источник


