- Как получить старые версии macOS
- Проверка совместимости
- Загрузка macOS на компьютер Mac с помощью Safari
- Как запустить macOS Mojave на неподдерживаемых Mac
- Устройства, на которые установка macOS Mojave с помощью патчера возможна:
- НЕ поддерживаемые устройства:
- Что понадобится:
- Возможные проблемы:
- ID, НЕ работающие с Mojave:
- Как установить macOS Mojave Patcher Tool:
- Дополнительная информация:
- Переустановка патчей:
- macOS Mojave Patcher Tool for Unsupported Macs
Как получить старые версии macOS
Если ваш компьютер Mac несовместим с последней версией macOS, можно перейти на более раннюю версию macOS, например: macOS Catalina, Mojave, High Sierra, Sierra или El Capitan.
Для получения новейшего функционала и поддержания безопасности, стабильности, совместимости и производительности компьютера Mac крайне важно поддерживать программное обеспечение в актуальном состоянии. Apple рекомендует использовать последнюю версию macOS, совместимую с вашим компьютером Mac.
Проверка совместимости
Версия macOS, входящая в комплект поставки компьютера Mac, является самой ранней версией, которую он поддерживает. Например, если на вашем компьютере Mac была установлена macOS Big Sur, вам не удастся установить macOS Catalina или более ранние версии.
Если версия macOS не может использоваться на компьютере Mac, приложение App Store или установщик сообщит вам об этом. Например, он может сообщить о несовместимости с данным устройством или что установщик устарел для открытия в этой версии macOS. Чтобы проверить совместимость до начала загрузки, проверьте минимальные требования к аппаратному обеспечению.
- Требования к аппаратному обеспечению macOS Catalina 10.15
- Требования к аппаратному обеспечению macOS Mojave 10.14
- Требования к аппаратному обеспечению macOS High Sierra 10.13
- Требования к аппаратному обеспечению macOS Sierra 10.12
- Требования к аппаратному обеспечению OS X El Capitan 10.11
- Требования к аппаратному обеспечению OS X Yosemite 10.10
Загрузка macOS на компьютер Mac с помощью Safari
Safari использует эти ссылки для поиска устаревших установщиков в App Store. После выполнения загрузки из App Store установщик открывается автоматически.
- macOS Catalina 10.15 обновляет Mojave, High Sierra, Sierra, El Capitan, Yosemite, Mavericks
- macOS Mojave 10.14 обновляет High Sierra, Sierra, El Capitan, Yosemite, Mavericks, Mountain Lion
- macOS High Sierra 10.13 обновляет Sierra, El Capitan, Yosemite, Mavericks, Mountain Lion
Safari загружает следующие более старые установщики в виде образа диска с именем InstallOS.dmg или InstallMacOSX.dmg. Откройте образ диска, затем откройте установщик .pkg из образа диска. Он устанавливает приложение с именем «Установить [ название версии ]». Чтобы начать установку операционной системы, откройте это приложение из папки «Программы».
- macOS Sierra 10.12 обновляет El Capitan, Yosemite, Mavericks, Mountain Lion или Lion
- OS X El Capitan 10.11 обновляет Yosemite, Mavericks, Mountain Lion, Lion или Snow Leopard
- OS X Yosemite 10.10обновляет Mavericks, Mountain Lion, Lion или Snow Leopard
Источник
Как запустить macOS Mojave на неподдерживаемых Mac
Сегодня я расскажу вам как установить macOS Mojave на неподдерживаемых Mac с помощью Mojave Patcher Tool . Данная утилита доступна бесплатно. Дополнительную информацию и обновления патчера вы можете посмотреть тут .
Не забывайте! Все действия с компьютером и программой вы проводите на свой страх и риск! Никто не несёт ответственность за повреждение компьютера или утерю данных кроме вас! Если у вас кривые руки, не беритесь за это!
Устройства, на которые установка macOS Mojave с помощью патчера возможна:
1. Mac Pro, iMac, or MacBook Pro раннего 2008 или новее:
• MacPro3,1
• MacPro4,1
• iMac8,1
• iMac9,1
• iMac10,x
2. iMac11,x (системы, использующие GPU AMD Radeon HD 5xxx и 6xxx практически невозможно использовать в Mojave. Более подробно эта проблема разбирается ниже.)
• iMac12,x (системы, использующие GPU AMD Radeon HD 5xxx и 6xxx практически невозможно использовать в Mojave. Более подробно эта проблема разбирается ниже.)
3. MacBookPro4,1
• MacBookPro5,x
• MacBookPro6,x
• MacBookPro7,1
• MacBookPro8,x
4. MacBook Air или Aluminum Unibody MacBook позднего 2008 или новее:
• MacBookAir2,1
• MacBookAir3,x
• MacBookAir4,x
• MacBook5,1
5. Mac Mini или пластиковые MacBook раннего 2009 или новее:
• Macmini3,1
• Macmini4,1
• Macmini5,x
• MacBook5,2
• MacBook6,1
• MacBook7,1
6. Xserve раннего 2008 или новее:
НЕ поддерживаемые устройства:
Mac Pro, iMac, MacBook Pro, и Mac Mini 2006-2007:
• MacPro1,1
• MacPro2,1
• iMac4,1
• iMac5,x
• iMac6,1
• iMac7,1 (iMac 7,1 2007 может быть совместим, если поставить CPU Core 2 Duo, например T9300.)
• MacBookPro1,1
• MacBookPro2,1
• MacBookPro3,1
• Macmini1,1
• Macmini2,1
• MacBook1,1
• MacBook2,1
• MacBook3,1
• MacBook4,1
• 2008 MacBook Air (MacBookAir 1,1)
Что понадобится:
• Копия macOS Mojave Installer App. Ее можно загрузить из Mac App Store на устройстве, поддерживающем Mojave, либо через macOS Mojave Patcher Tool (в меню выбрать «Tools > Download macOS Mojave…»)

• Флешка USB объемом не меньше 16 GB
(Текущая версия: 1.2.3, SHA1: 57cd15435e42ad8928ae3ff8f5a45033a0ed1d9e)
Возможные проблемы:
- Аномалии графики. В настоящее время видеокарты, не поддерживающие технологию Metal, работающие с Mojave, накладывают странный темно-серый эффект на Menu Bar и боковое меню Finder при использовании светлой темы. При этом в темной теме подобные аномалии не наблюдаются.
- Видеоускорение в AMD Radeon HD 5xxx/6xxx series. В настоящий момент невозможно максимально разогнать графику Radeon HD 5xxx или 6xxx series на Mojave. Это касается 15″ и 17″ MacBook Pro (MacBookPro8,2 и 8,3). Если вы хотите активировать видеоускорение на этих устройствах, вам потребуется отключить AMD GPU (это можно сделать ТОЛЬКО на данных моделях MacBook Pro! На iMac такое не пройдет). Эти видеокарты также дают странные цветовые эффекты при использовании Mojave.
- Поддержка GPU на Early-2008 Mac Pro (MacPro3,1). На устройство с Mojave НЕЛЬЗЯ поставить более позднюю модель видеокарты AMD, даже если она поддерживает технологию Metal и не конфликтует с Mojave. Обновленным драйверам AMD для Mojave нужен набор инструкций SSE4.2, который не поддерживается на MacPro3,1. В настоящее время не существует альтернативных решений этой проблемы. Единственный выход — подключить к MacPro3,1 видеокарту nVidia, которая будет абсолютно совместимой.
- Камеры iSight. В данный момент встроенные камеры на некоторых устройствах могут некорректно работать. Пока вы не установите систему, вы не можете знать, будет работать ваша iSight камера или нет.
- Трекпад (только на MacBook5,2). Трекпад MacBook5,2 теряет некоторые функции при работе на Mojave. Так как Mojave распознает его как обычную мышь, он будет работать, но некоторые действия, предусмотренные только для трекпада, будут недоступны.
- Неподдерживаемые WiFi-модули на некоторых системах. Устройства Mac, использующие WiFi-модули Broadcom BCM4321 будут лишены доступа к беспроводному интернету на Mojave. Решение здесь — только замена WiFi-карты на совместимую. С этой проблемой столкнутся пользователи некоторых MacPro3,1, MacBook5,2, MacBookPro4,1, iMac8,1, Macmini3,1 и MacBookAir2,1. Однако не все из перечисленных моделей имеют неподдерживаемые WiFi-карты, все зависит от конфигурации устройства. Чтобы узнать тип своей WiFi-карты, откройте «Об этом Mac>Отчет о системе…» и кликните на WiFi в разделе «Сеть». Нам важен номер напротив пункта «Тип карты».
ID, НЕ работающие с Mojave:
- (0x14E4, 0x8C)
• (0x14E4, 0x9D)
• (0x14E4, 0x87)
• (0x14E4, 0x88)
• (0x14E4, 0x8B)
• (0x14E4, 0x89)
• (0x14E4, 0x90)
Любые другие ID, например (0x14E4, 0x8D), являются рабочими, и полностью совместимы с Mojave.

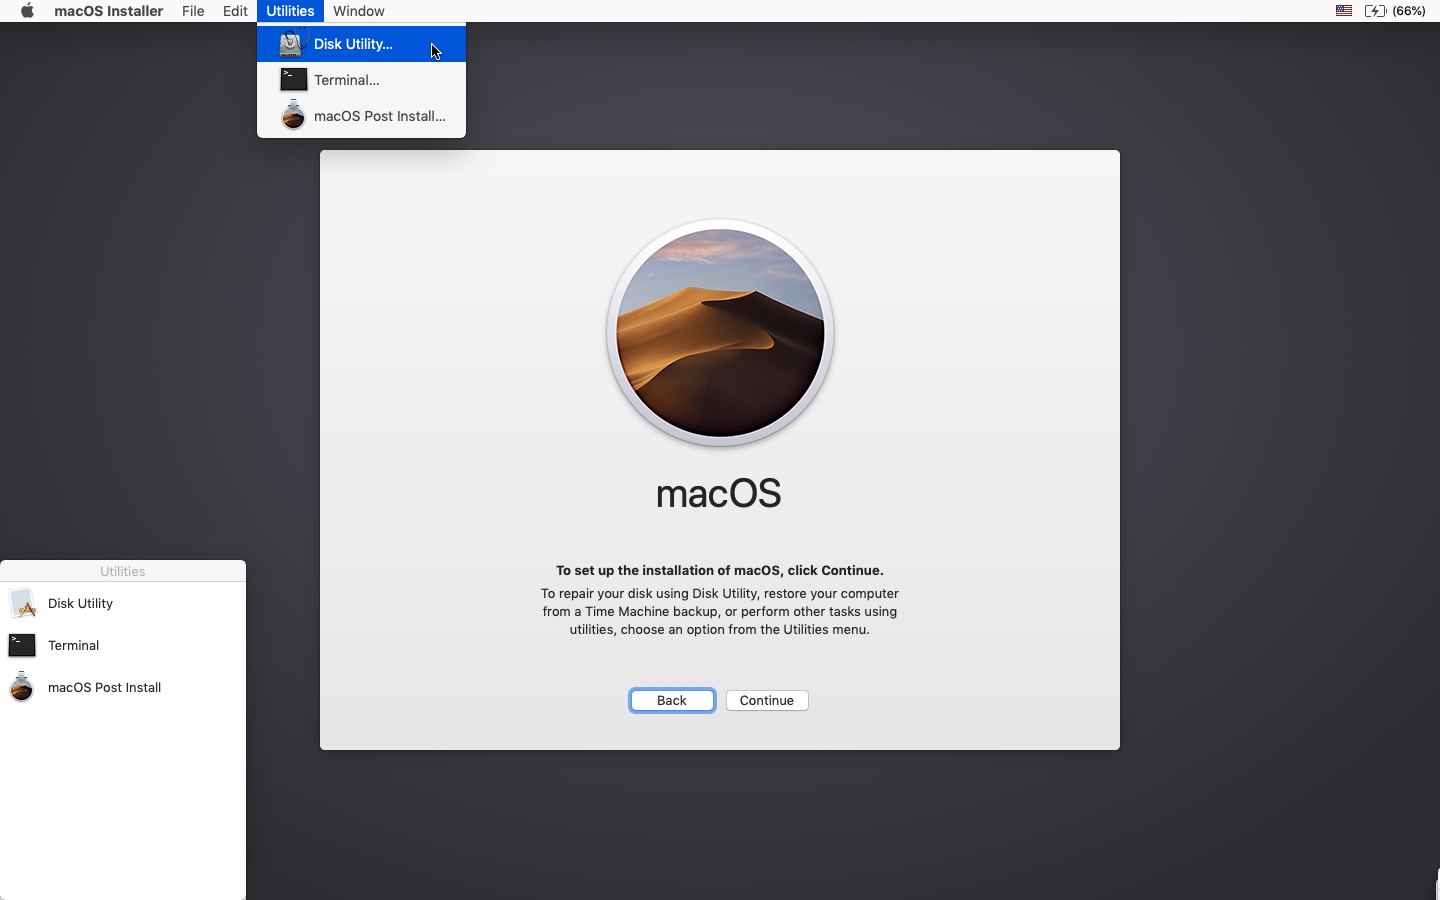
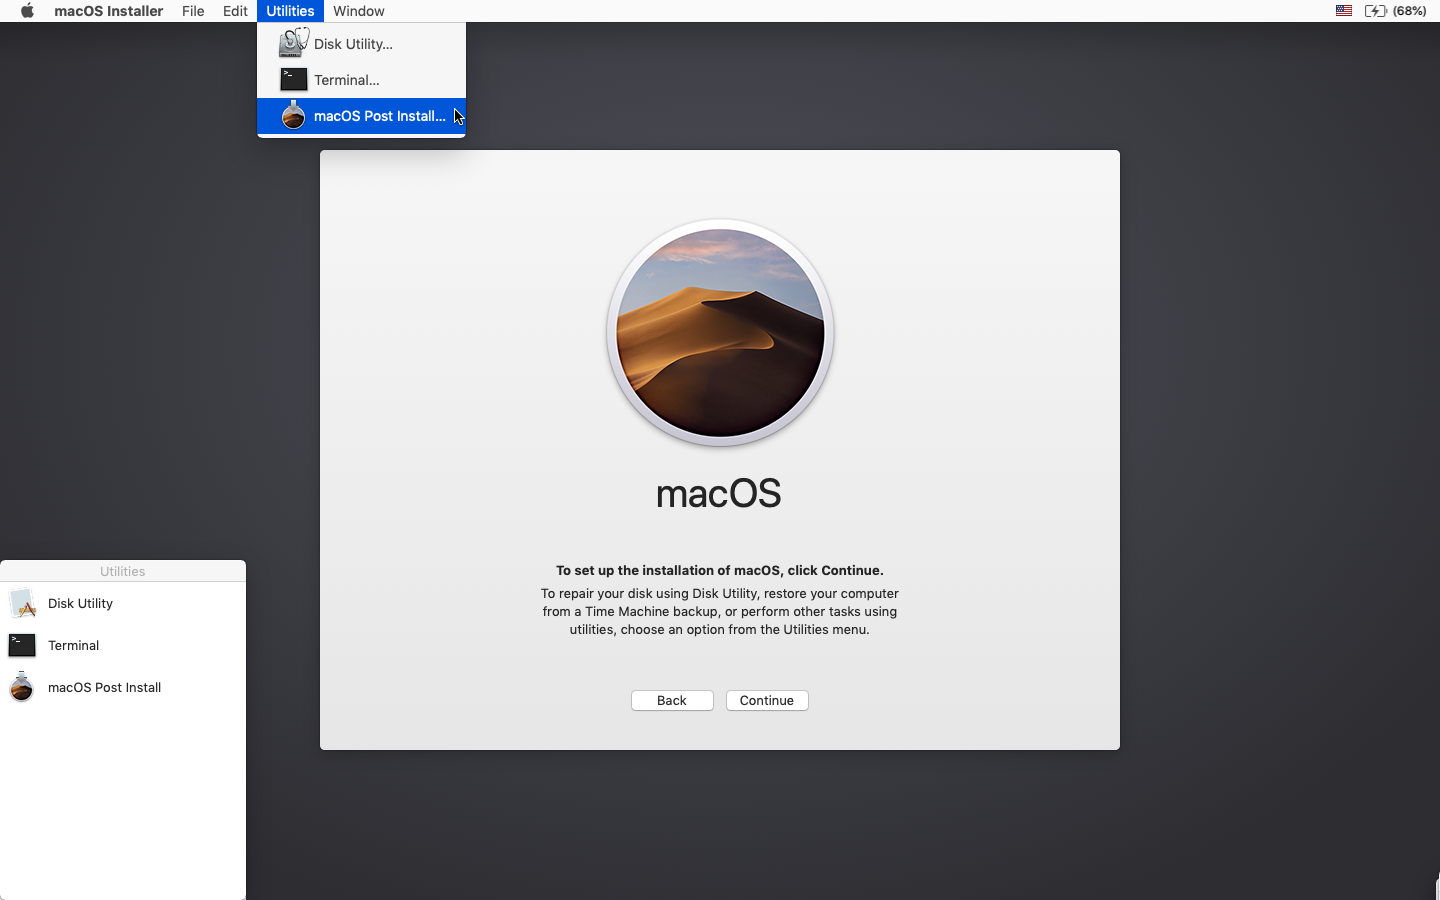
Как установить macOS Mojave Patcher Tool:
- Вставьте подходящую флешку, откройте Дисковую Утилиту и отформатируйте ее в OS X Extended (журнальный).

- Откройте «macOS Mojave Patcher» и укажите путь к вашему инсталлеру macOS Mojave. (Убедитесь, что патчер успешно нашел программу)
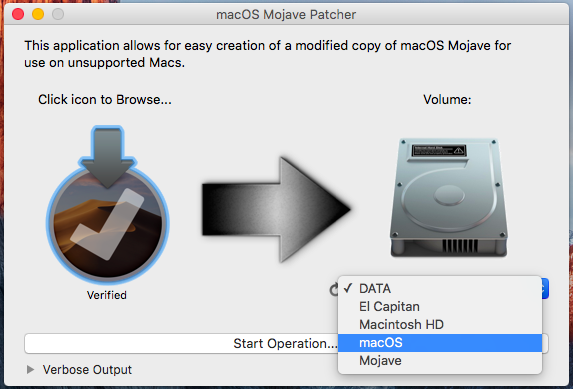
- Выберите свою флешку в списке устройств и нажмите «Start Operation».


Внимание: Шаги 5 и 6 предназначены для чистой установки.
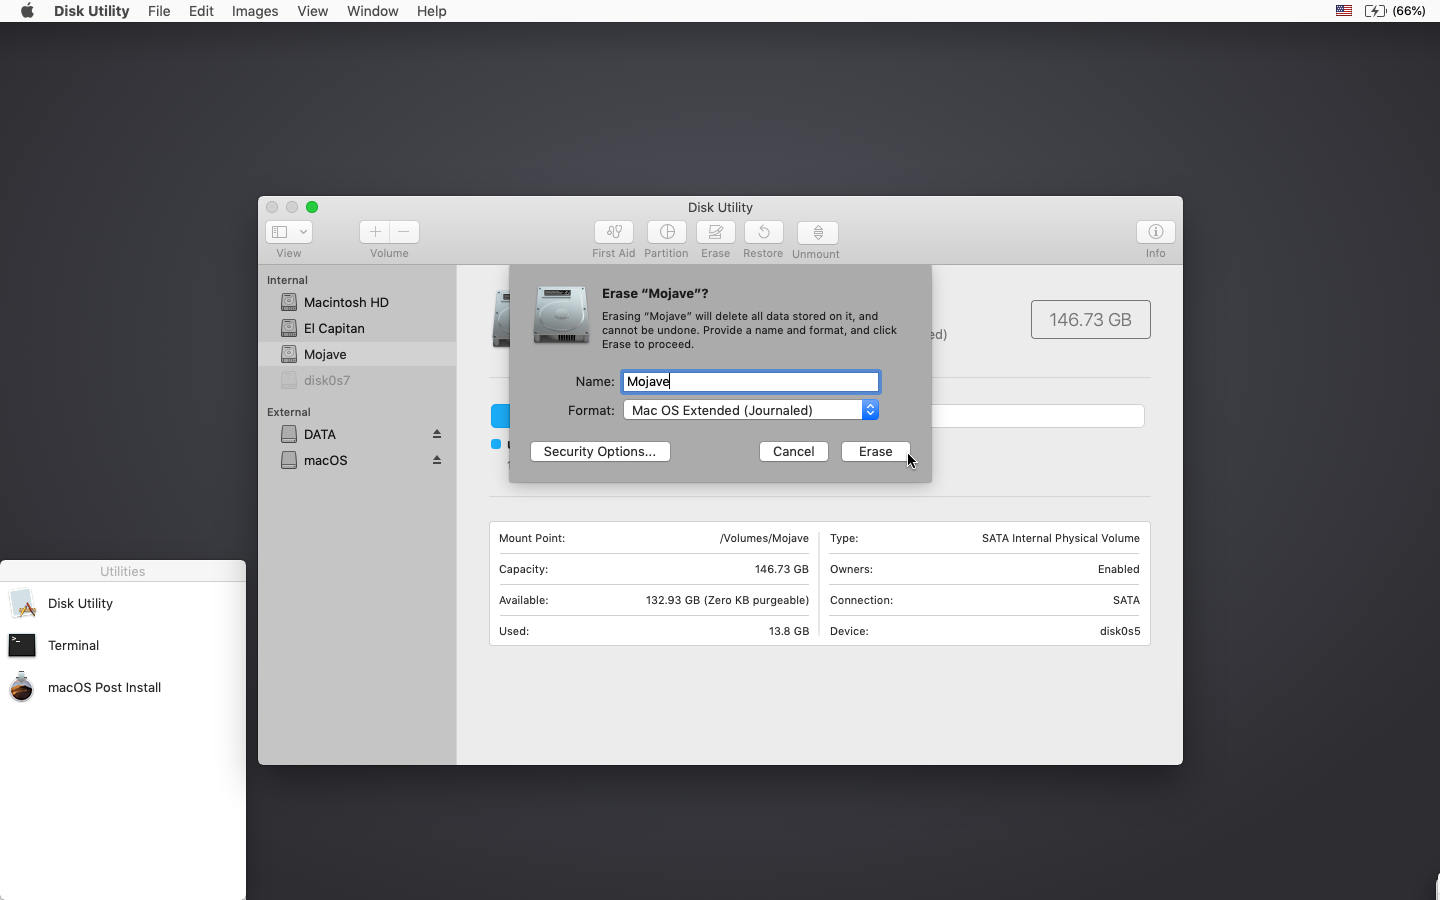
5. Когда запустится инсталлер, откройте Дисковую утилиту в меню Utilities или дважды кликните на окне Utilities в нижнем левом углу экрана.

6. Выберите диск или раздел, на который вы хотите выполнить установку, и отформатируйте его, убедившись, что выбран тип файловой системы Mac OS Extended (журнальный) или APFS.
- На устройствах Late-2009 и новее APFS будет работать так же, как на High Sierra. Рекомендуется устанавливать Mojave на SSD.
- Если ваше устройство не поддерживало High Sierra (а значит, не может по умолчанию загрузить APFS), вы не сможете создать раздел восстановления. Если вы решите использовать APFS, вам вам понадобится Post-install tool. Загрузка этой файловой системы будет не такой гладкой, как на поддерживающих ее устройствах, зато убережет от возможных проблем с работой Mojave.

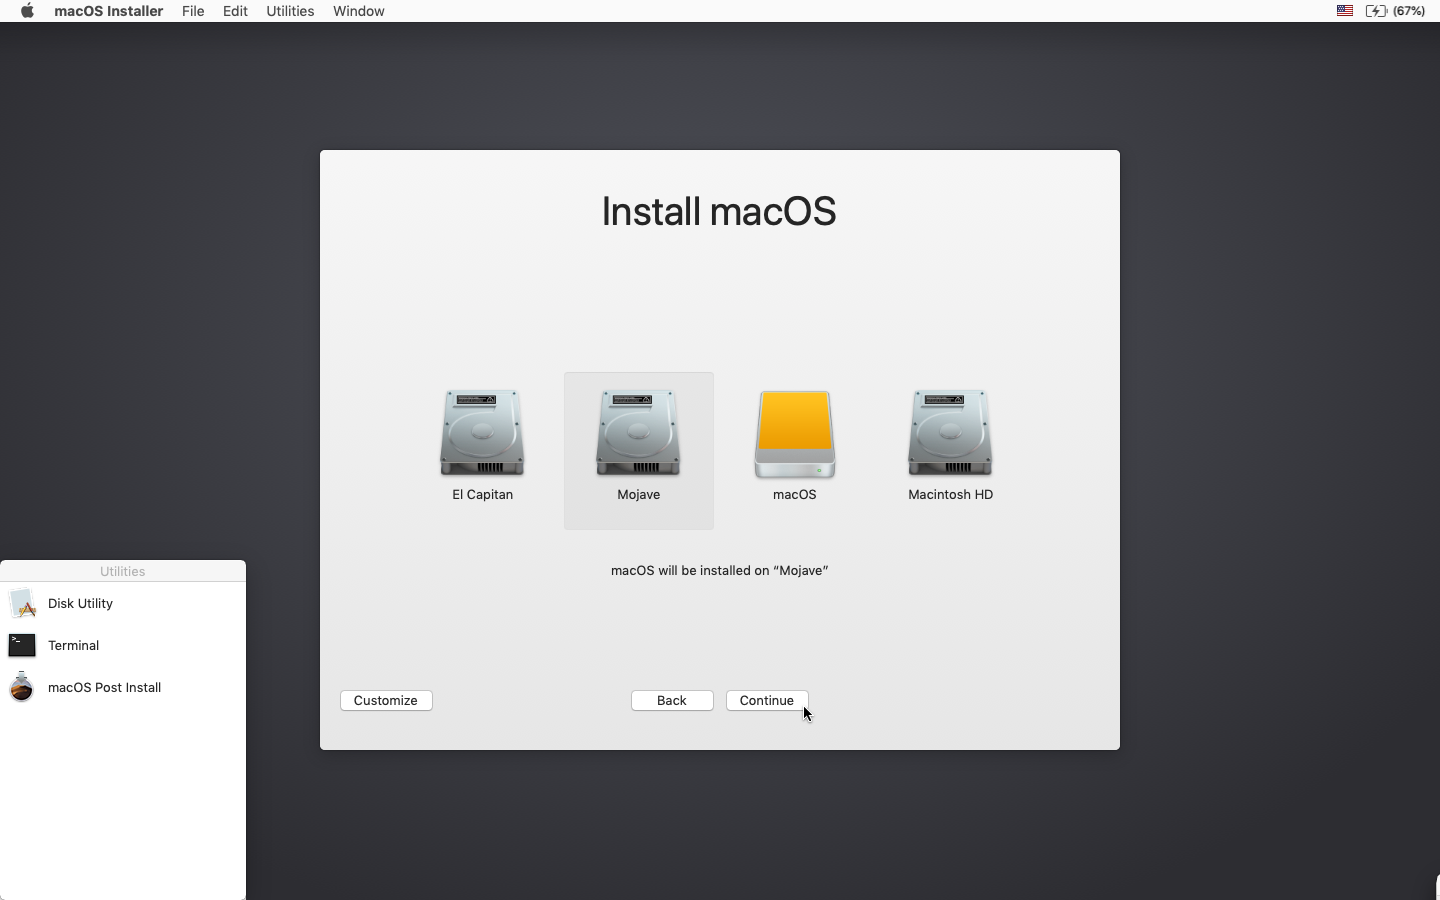
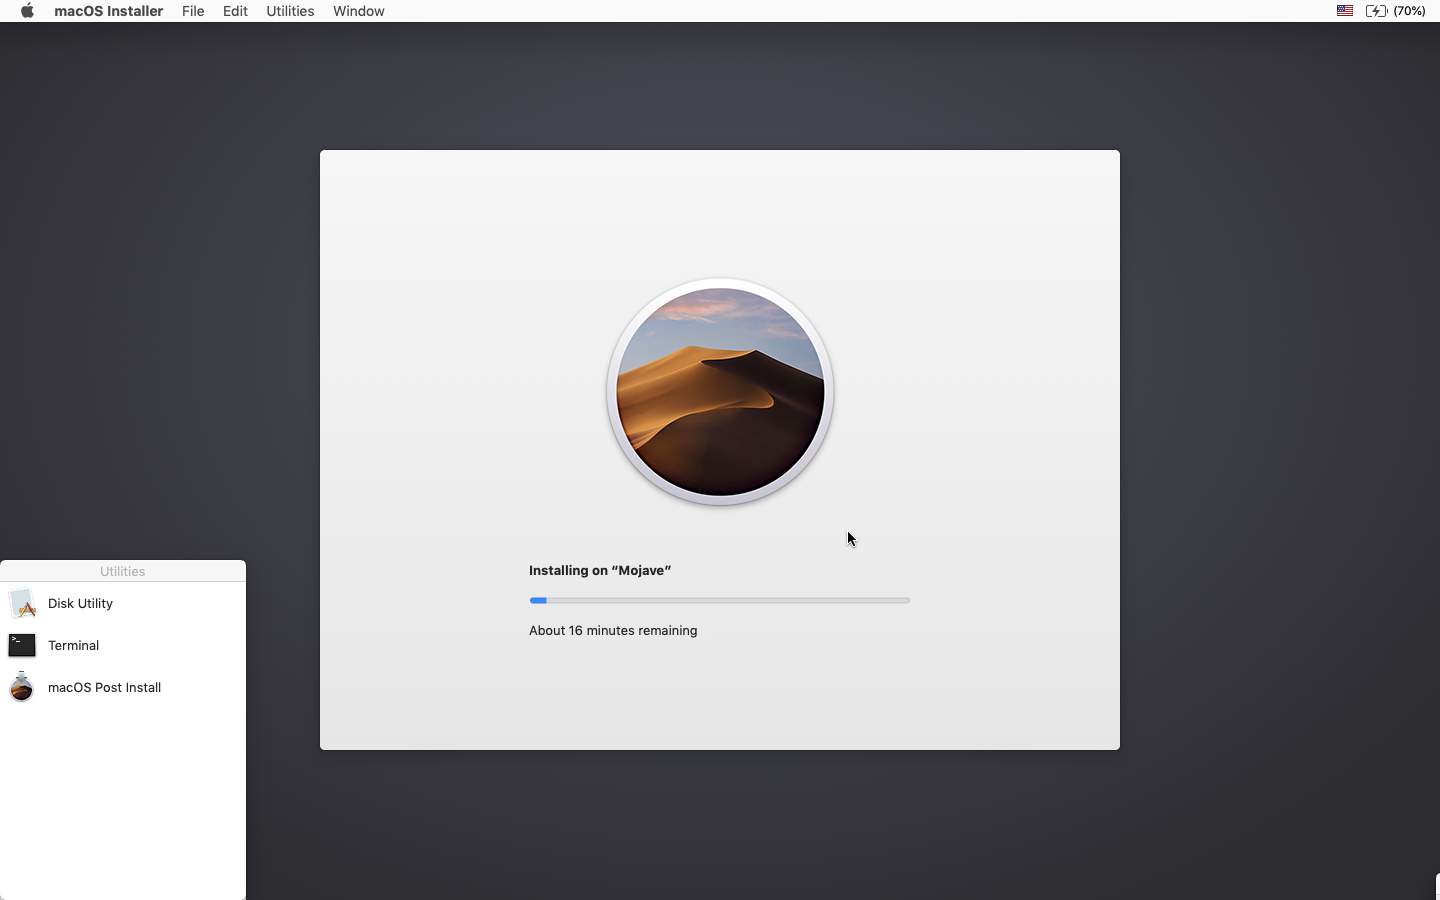
7. Выполните установку macOS на выбранный раздел диска.


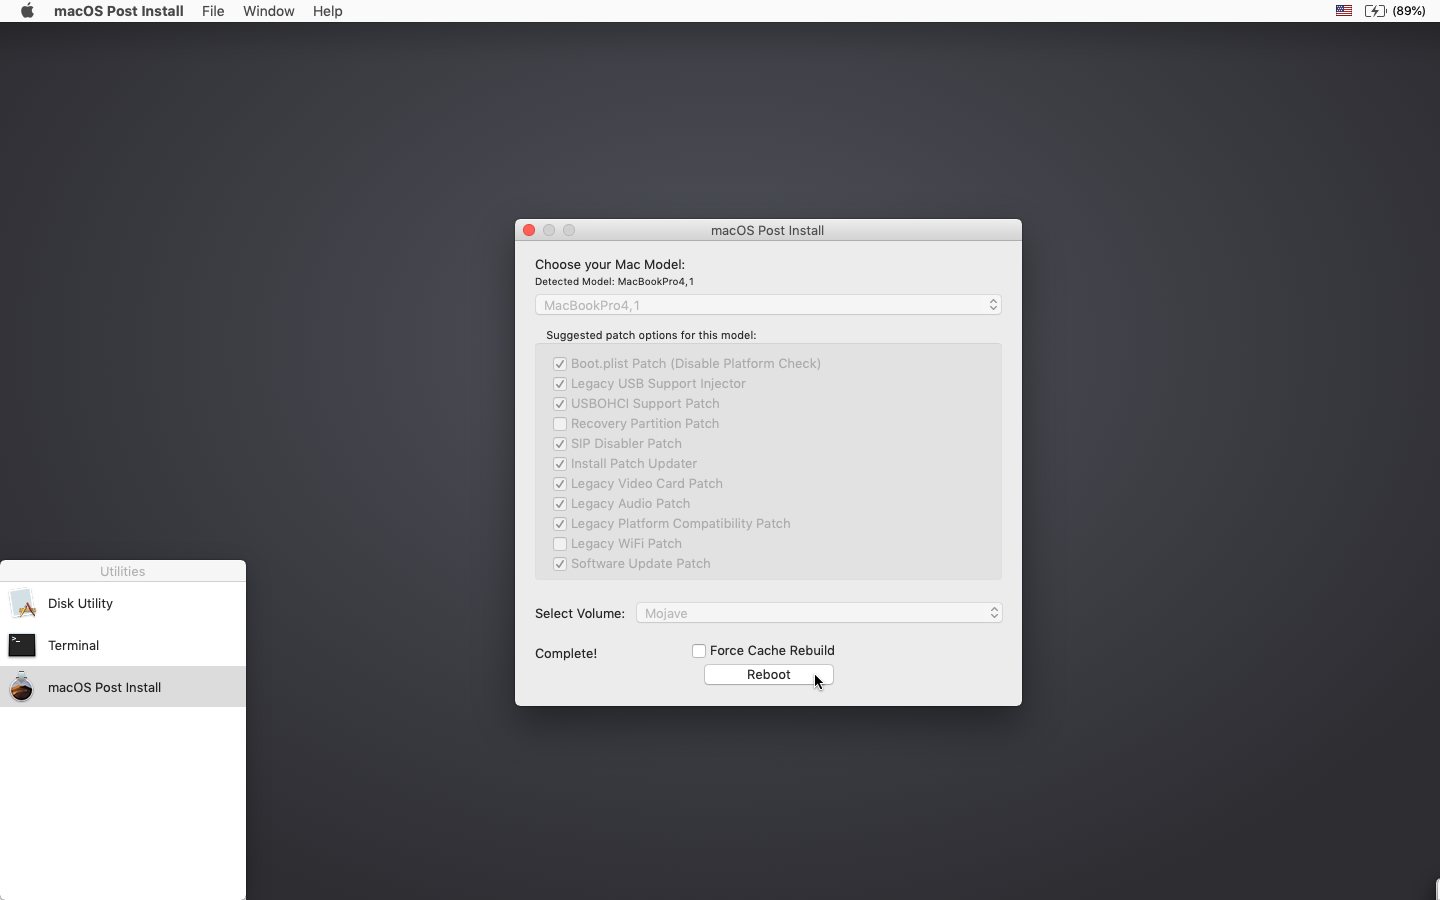
8. Когда процесс установки завершится, перезагрузите устройство, выбрав для загрузки диск установщика. После этого откройте приложение macOS Post Install.

9. В окне приложения выберите вашу модель Mac. Вам будут предложены оптимальные патчи на основе выбранной модели. Вы также можете отметить другие патчи по желанию.

10. Выберите раздел, на который была установлена система macOS Mojave, и нажмите «Patch». Когда процесс завершится, нажмите «Reboot». Перестройка кэша перед перезагрузкой системы может занять некоторое время.

Если по какой-то причине система работает некорректно после перезагрузки, перезагрузите свой Mac с зажатой кнопкой Option (Alt), в загрузочном меню выберите диск установщика, затем снова запустите патч Post Install и выберите опцию «Force Cache Rebuild». Затем перезагрузите устройство.
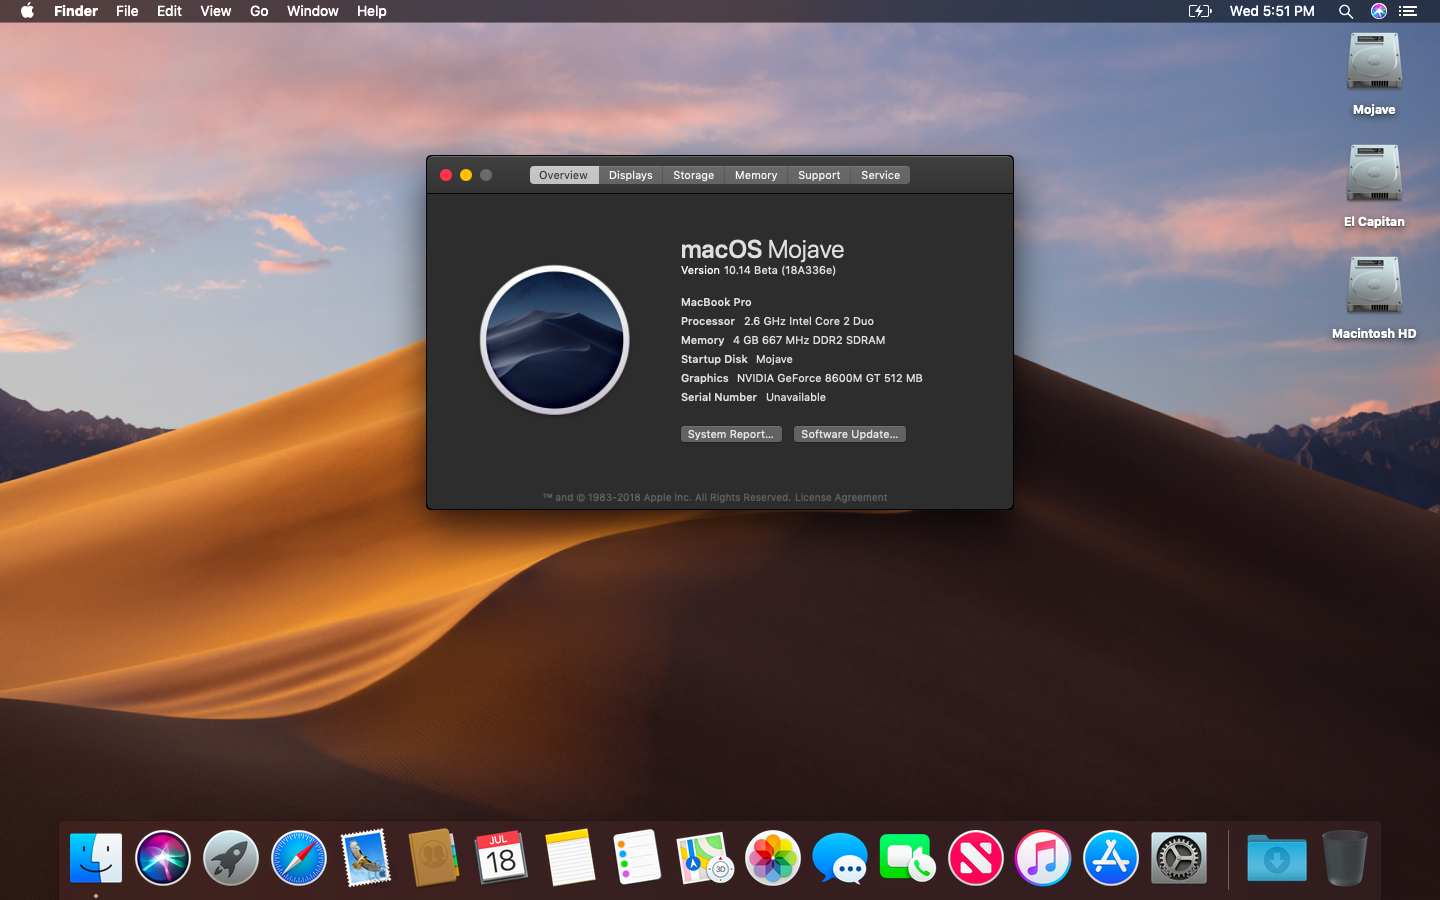
11. Когда Mac перезагрузится, он запустит полностью рабочую версию macOS Mojave.

Дополнительная информация:
Когда вы установите систему с помощью macOS Post Install tool, на вашем Mac появится программа под названием Patch Updater (папка Программы/Утилиты). Эта программа будет сообщать вам об обновлениях патчей, доступных для вашего устройства, и предлагать установить их. Если эта программа у вас не появилась, но вы бы хотели ее установить, , скачайте ее здесь

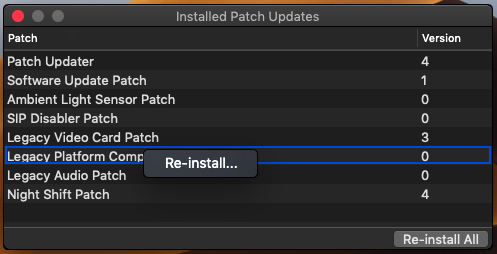
Переустановка патчей:
- При обновлении системы некоторые патчи могут быть перезаписаны. С помощью программы Patch Updater tool их можно переустановив в один клик. Для этого нужно открыть ее и выбрать «View Installed Updates» или зайти в меню «View > Show Installed Updates» на панели меню.
- Чтобы переустановить патч, просто кликните правой клавишей мыши на выбранной строке списка и нажмите «Re-install». Также можно нажать кнопку «Re-install All» для переустановки всех патчей сразу.
 Источник
Источник
macOS Mojave Patcher Tool for Unsupported Macs
Questions or comments? Feel free to contact me at [email protected] Please take a look at the FAQ located at the bottom of this page as well.
I also have a YouTube video showing the process, which can be viewed here.
Important Note: 10.14.4 and later CANNOT be patched properly using Mojave Patcher version 1.2.3 and older. If you update to 10.14.4 or later, and HAVE NOT updated your installer volume with version 1.3.0 or later of Mojave Patcher, you WILL NOT be able to get your system to boot after updating! Please read the updates section for more info.
• Early-2008 or newer Mac Pro, iMac, or MacBook Pro:
Machines that ARE NOT supported:
• 2006-2007 Mac Pros, iMacs, MacBook Pros, and Mac Minis:
— The 2007 iMac 7,1 is compatible if the CPU is upgraded to a Penryn-based Core 2 Duo, such as a T9300.
• 2008 MacBook Air (MacBookAir 1,1)
• A copy of the macOS Mojave Installer App. This can be obtained from the Mac App Store using a machine that supports Mojave, or by using the built-in downloading feature of the tool. In the Menu Bar, simply select «Tools > Download macOS Mojave. «

• A USB drive that’s at least 16 GB in size
• A copy of the tool — Download:
• View changelog and download older versions here
• AMD Radeon HD 5xxx/6xxx series GPU acceleration: Currently, it is not possible to get full graphics acceleration when running Mojave on a system with a Radeon HD 5xxx or 6xxx series GPU. Mojave will be almost UNUSABLE without graphics acceleration. This includes the 15″ and 17″ MacBook Pro systems (MacBookPro8,2 and 8,3). If you want to enable GPU acceleration on these machines, you’ll need to disable the AMD GPU (This will work on MacBook Pro 8,2 and 8,3 systems ONLY. You CANNOT disable the AMD GPU in an iMac.) Weird colors will also be produced when running Mojave with one of these video cards installed/enabled. To disable the AMD GPU on a 2011 MacBook Pro 8,2 or 8,3, follow the guide found here.
• Built-in iSight cameras: Currently, built-in iSight cameras do not work correctly on some machines. It seems to be hit or miss, but when installing, expect your iSight camera to be non-functional.
• Trackpad (MacBook5,2 affected only). The trackpad in the MacBook5,2 isn’t fully supported in Mojave. While it works and is fully usable, Mojave detects it as just a standard mouse, preventing you from changing some trackpad-oriented settings.
Important Note: If you have a machine that supports High Sierra natively, you MUST ensure you have the latest version of the system’s BootROM installed if you want to boot from an APFS volume. If you have NOT previously installed High Sierra, you can download and install this package to install the latest BootROM version. When installing, ensure your system is plugged in to power, or the update will not be installed.
1. Insert your desired USB drive, open Disk Utility, and format it as OS X Extended (Journaled). 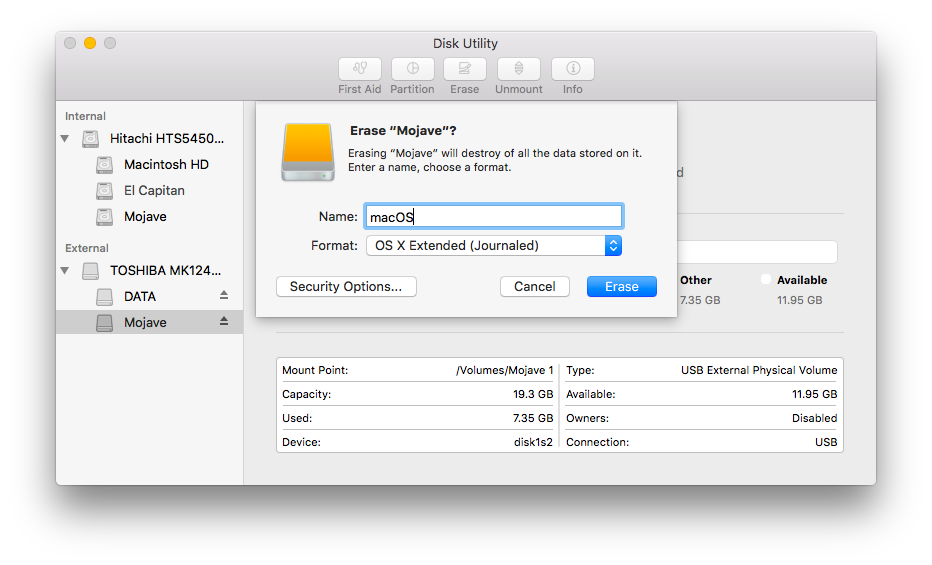
2. Open the «macOS Mojave Patcher» tool, and browse for your copy of the macOS Mojave Installer App. 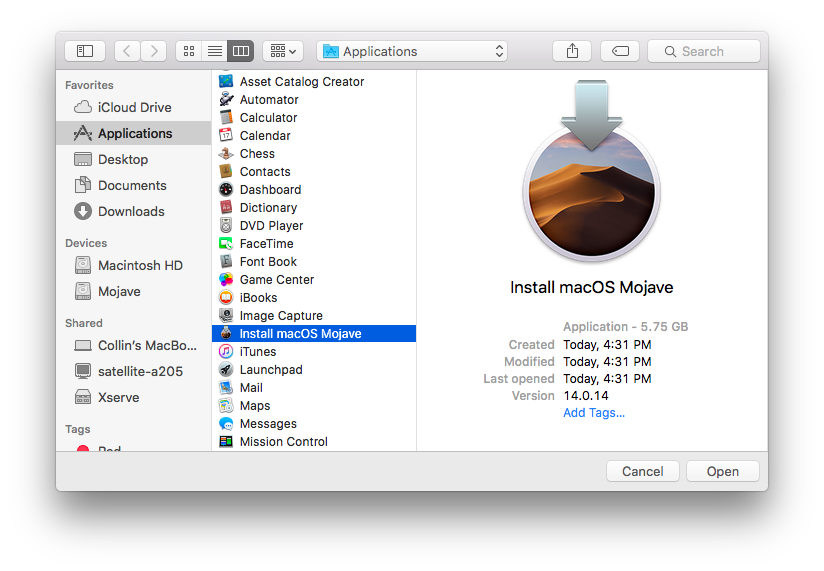
*Ensure that the tool successfully verifies the app. 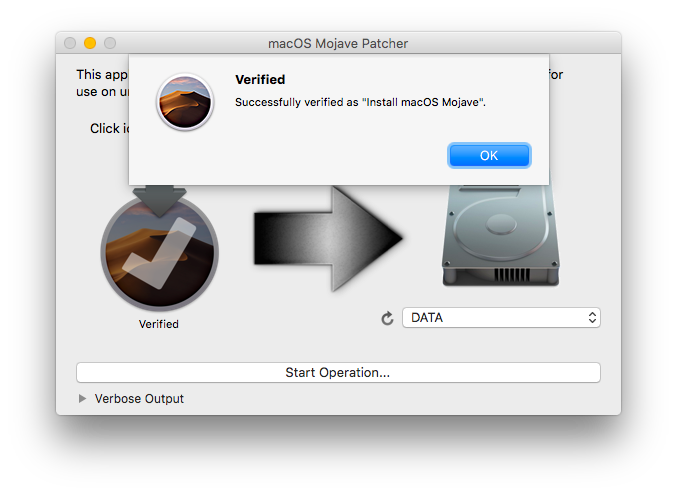
3. Next, select your USB drive in the Target Volume list, and click «Start Operation.»
4. When the operation completes, boot your target unsupported Mac off the USB drive you just created by holding down the Option key while turning on the machine, and selecting the drive.

Note: Only perform steps 5 and 6 if you intend to do a clean install. Otherwise, you can simply skip these steps and install to your volume containg a previous version of OS X, and it’ll do an in-place upgrade.
5. When the installer boots, open Disk Utility from the Utilities menu, or by double-clicking it in the Utilities window on the bottom left corner of the screen.
6. Select the disk or partition you want to install on, and erase it, ensuring to use either Mac OS Extended (Journaled), or APFS as the filesystem type. If formatting an entire drive, ensure GUID is selected.
Important Note: Using APFS is REQUIRED in Mojave in order to receive system updates via the normal Software Update method. If you choose to continue using macOS Extended (Journaled) as your filesystem type, you will NOT receive System Updates via System Preferences.
• Using APFS on Late-2009 and later machines will work no differently than it did with High Sierra.
• If you have a machine that did NOT natively support High Sierra (and therefore cannot boot APFS volumes natively), please note the following:
7. Install macOS normally onto the desired volume.
8. When the install completes, reboot back onto the installer drive. This time, open the «macOS Post Install» application.
9. In the application, select the Mac model you are using. The optimal patches will be selected for you based on the model you select. You can also select other patches of your choosing.

10. Select the volume you have just installed macOS Mojave on, and click «Patch.» When it finishes patching, click «Reboot». It may sit there for a few moments rebuilding caches before rebooting.
• If for some reason the system fails to work correctly after rebooting, boot back into your installer drive, run the post install patch again, and select «Force Cache Rebuild» before rebooting. This isn’t necessary under most circumstances.
11. When it reboots, it should now boot into a fully working copy of macOS Mojave.
• If selected in the macOS Post Install tool, your Mojave install will have a program named «Patch Updater» located in your /Applications/Utilities folder. This program will alert you when new updates to patches are available for your machine, and will prompt you to install them. If you do not have Patch Updater installed, but would like it, you can download and run the script found here to do so. 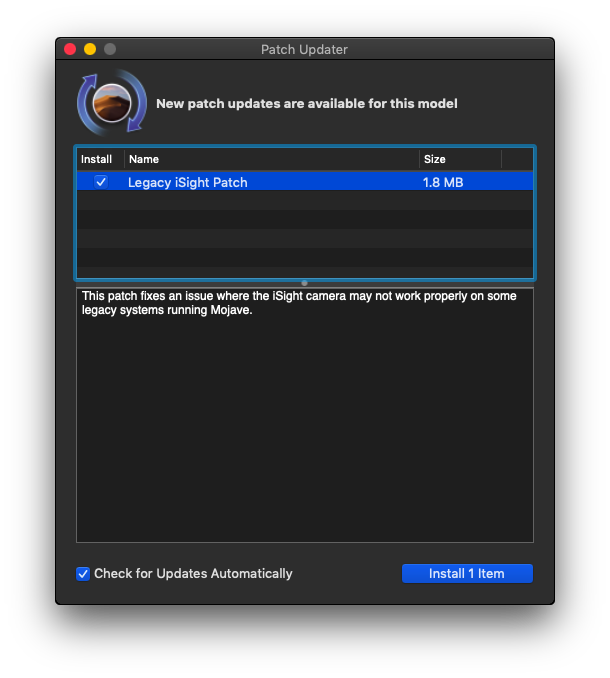
Re-installing Patches
• During system updates, some patches may get overwritten. Using the Patch Updater tool, it is possible to re-install these patches with one click. To do so, open the Patch Updater application, and select «View Installed Updates», or use the «View > Show Installed Updates» menu in the Menu Bar.
• To re-install a patch, simply right-click on it in the list and select «Re-install». You can also select the «Re-install All» button to re-install all currently installed patches at once.
Important Notes:
- Using APFS is REQUIRED in Mojave in order to receive system updates via the normal Software Update method. If you choose to continue using macOS Extended (Journaled) as your filesystem type, you will NOT receive System Updates via System Preferences. If you are not using APFS, you can follow the 10.14.1 installation steps below.
- After applying ANY system update via Software Update, re-applying post-install patches using your Mojave Patcher installer volume will most likely be necessary. If you install a software update and the system fails to boot afterwards, this is what needs to be done.
10.14.6 can be updated normally via Software Update if using an APFS volume, and will need to be patched using an installer volume created with Mojave Patcher version 1.3.2 or later after installing.
10.14.5 can be updated normally via Software Update if using an APFS volume, and will need to be patched using an installer volume created with Mojave Patcher version 1.3.1 or later after installing.
10.14.4 adds new changes that ARE NOT patchable by the post-install tool of Mojave Patcher v1.2.3 and older! Before updating to 10.14.4, you you will need to use the latest Mojave Patcher version to create a new installer volume, using the 10.14.4 installer app. Then, update to 10.14.4, either by installing via Software Update, or by just using the installer volume you’ve created to install.
If you are currently running 10.14.1 or 10.14.2, you can simply use the Software Update pane of System Preferences (if using APFS) to apply the 10.14.3 update. Once the update is installed, you will most likely need to re-apply post-install patches to get the system to boot again. This process is detailed in steps 8 — 10 above. If you are currently running 10.14.0, you’ll need to proceed with the 10.14.1 update method described below.
If you are currently running 10.14.1, you can simply use the Software Update pane of System Preferences (if using APFS) to apply the 10.14.2 update. Once the update is installed, you will most likely need to re-apply post-install patches to get the system to boot again. This process is detailed in steps 8 — 10 above. If you are currently running 10.14.0, or are using a non-AFPS volume, you’ll need to proceed with the 10.14.1 update method described below.
10.14.1/macOS Extended (Journaled) volumes
The Mojave 10.14.1 update does NOT install properly on unsupported machines, and could result in an unbootable OS. If you want to install the 10.14.1 update (and are not currently running 10.14.1), perform the following steps:
• Download the latest version of Mojave Patcher
• Download the installer using the Tools menu of Mojave Patcher • Create a patched USB installer
• Boot from that, and install 10.14.1 onto the volume containing an older release. • Once done, apply the post-install patches, and you should now be on 10.14.1.
Q: The tool created the USB drive successfully, but when booting, the progress bar hangs a bit more than half way.
A: Check your copy of the Install macOS Mojave App. If you’re using the latest version of the tool, you must be using the latest version of the Install macOS Mojave App. Version 1.1 of the patch tool and older support older versions of the installer app.
Q: The patch tool gives me errors, such as «Error copying files. «.
A: Check to make sure your USB drive is writeable. Try re-formatting it, or just try a different USB drive.
Q: The patch tool gives me a «Mounting Failed» error
A: Open up Disk Utility, and verify that «InstallESD» is not mounted. If it is, eject it, and then try again. Also, check to make sure your Install macOS Mojave App is the correct one. It should be around 6GB in size. If you used the «Skip App Verification» option, you have most likely selected an invalid app that doesn’t contain the necessary files.
Q: I don’t see my hard drive partition in the installer screen or in the post-install tool.
A: Make sure FileVault is disabled, or use the instructions found here to unlock it manually using Terminal.
Q: I get a «NO» symbol when starting up after successfully installing Mojave.
A: Make sure you have run the post-install patch on the correct volume, as detailed above in steps 8-10.
Q: I get a «NO» symbol when starting up from the patched USB drive
A: Check the supported/not supported list at the top of this page. Ensure your machine is in the supported list.
Q: I get «NSURL» errors when trying to update my machine or use the App Store
A: This is usually the result of having an invalid CatalogURL set. To revert to stock, simply run «sudo softwareupdate —clear-catalog» in Terminal, and then run the software update patch script located above.
Q: Safari, App Store, and/or Mail stopped working after installing a system update
A: Download and run the Onyx application, select «Maintenence» at the top, then click the Run button.
Q: I get a «No packages were eligible for install» error when attepting to install Mojave
A: This is due to your system’s date and time being set incorrectly. To fix it, you can either boot into your current OS X install and set the date, or you can use Terminal after booting from your patched USB installer drive to set the date. Instructions to set the date using Terminal can be found here.
Q: System updates are not appearing in the Software Update Prefpane
A: Make sure you’re running Mojave off an APFS formatted volume. If you are using a macOS Extended (Journaled) volume, then you will either net to convert the volume to APFS using Disk Utility in the patched installer drive, or simply apply the desired system update by following the method detailed for 10.14.1 in the above section.
Q: The Zoom application does not show any video during meetings
A: This is due to the latest Zoom versions requiring a Metal-compatible GPU for video rendering. To patch this out of the Zoom application, download and run the script located here, or here for later Zoom versions.
Источник


