- Play audio through multiple devices at once in Audio MIDI Setup on Mac
- Многоканальное аудио для MAC OS своими руками или как обЪединять интерфейсы
- How to output audio to multiple devices on macOS
- Output audio to multiple devices
- 1 Comment
- Leave a Reply Cancel reply
- Question: Q: Volume control for multiple output devices. Speakers and/or headset
- How to manage volume for Multi-output Audio devices on macOS
- Volume for multi-output devices
- Change master device volume
- Leave a Reply Cancel reply
Play audio through multiple devices at once in Audio MIDI Setup on Mac
If you use more than one audio device to create a multi-output device, you can play audio through several devices at once. For example, when you add two devices to a multi-output device, audio sent to the master device also plays through any other device in the stack.
In the Audio MIDI Setup app  on your Mac, click the Add button
  at the bottom of the sidebar in the Audio Devices window, then choose Create Multi-Output Device.
A new multi-output device appears in the sidebar. To rename the device, click it, then enter a new name.
Select the new multi-output device, then on the right side of the Audio Devices window, select the Use checkbox of each device you want to use in the multi-output device.
To set the master device for the multi-output device, click the Master Device pop-up menu, then choose an output device.
To remove a multi-output device, select it on the right side of the Audio Devices window, then click the Remove button  .
.
Источник
Многоканальное аудио для MAC OS своими руками или как обЪединять интерфейсы
 Пошаговое руководство, как скрутить вместе 2 разных аудиоинтерфейса в один под MAC OS X без паяльника и дополнительных проводов. Думаю, будет полезно дискжокеям и сочувствующим.
**Если вступление не интересно, можно сразу прокручивать до 2-й картинки.
Энное количество времени назад решил попробовать заняться созданием музыки. И как дитя эпохи компьютеризации и маковод в одном флаконе, я первым делом подумал, что делать это нужно в правильном софте. Как сабж был выбран Ableton (хотя это совершенно не принципиально). Но стало ясно, что одного аудиовыхода будет мало. При правильном раскладе 2 канала (стерео) идут на мастер-выход (тот, что в «зал»), два на наушники (чтобы можно было прослушать дорожку или инструмент перед сведением). Конечно, можно было бы не запариваться, распаять обычный мини-джек на два моно-канала и упражняться в моно. Но эта идея не прижилась, ибо, во-первых, не комильфо, во-вторых, паять тогда совсем не хотелось. Я подумал, что можно просто купить дешевенькую USB-аудиокату и получить все недостающие плюшки за кактих-то 350-600 рэ. Затем только Ableton настроить, чтобы тот мастера выводил через встроенный звук, а наушники уже подрубить к внешней карточке и сводить-сводить-сводить (в т.ч. с ума соседей).
Но как было досадно, когда оказалось, что в настройках всех секвенсеров можно выбрать не более одного девайса.
Поэтому получилось, что за кажущейся простотой и очевидностью, идея стремительно прогорела, в связи с чем была оставлена. Потом прошло несколько лет, поменялась работа и уже появилась возможность обзавестись дорогим (профессиональным) интерфейсом (который позже был продан за ненадобностью), не заморачиваясь с колдовством над усб. Тем не менее далеко не у всех появляется желание да и возможность расставаться со своими кровными 3500+ рублей.
Не так давно я прикупил себе карточку Creative Sound Blaster X-Fi HD. Только для того, чтоб ненароком не свернуть голову штатному 3.5 мм разЪему на буке (мало ли что может случиться-будет жалко). Она симпатичная, с хорошими характеристиками и работает без дров (если не считать отсутствия возможности воспользоваться всякими улучшайзерами, которые доступны из-под виндов с помощью комплектного софта). На ее примере и расскажу, как потратив немного своего времени и денег, получить возможность пользоваться одновременно 2-мя разными аудио-интерфейсами под MAC OS X (на примере OS X 10.7).
Итак, для фокуса понадобятся мак, внешняя карта, 5 минут времени.
Для начала подрубаем карту к компу. Далее заходим в /Applicatons/Utilities. Там потребуется утилита настройки аудио и midi.
Если карта подключена верно, то после запуска утилиты она отобразится в списке доступных аудио-устройств. В моем случае это USB Sound Blaster HD.
Внизу списка находятся кнопки меню. Нужно нажать на плюс и создать Aggregate Device (не знаю, как это будет в руксской локализации, но проблем не должно возникнуть).
После чего в списке устройств появляется «Aggregate Device» со значком в виде большого положительного электрона. В меню справа нужно выбрать девайсы, которые необходимо обЪединить. Я решил не мелочиться и обЪединить все линейные входы и выходы. При желании Aggregate Device можно переименовать. Что и было сделано.
Готово! Теперь можно запустить программу и увидеть, что появилась возможность выбрать из списка свежесозданный интерфейс.
Плюсы:
— Низкая стоимость
— Простота настройки
Минусы:
— Единственное «НО», при таком объединении устройств общая частота дискретизации и разрядность выходного сигнала ограничивается наименьшей из девайсов. В случае недорогих карт это 44,100 Hz, 16 bit.
Источник
How to output audio to multiple devices on macOS
Sep 12, 2019
Comment
Audio devices generally work solo. A MacBook, for example, only has one audio jack which means you can only connect one set of headphones or external speakers to it however, there are simple ways to get around it. Devices that connect via the audio jack can be forced to work together with a cheap hardware but the audio jack isn’t the only way an audio output device connects to a Mac.
USB and Bluetooth powered audio devices connect just as easily with a Mac. If you need them to work with the built-in speakers, or any other device connected to the audio jack, it’s fairly easy. There’s a built-in tool on macOS that lets you combine and output audio to multiple devices.
Output audio to multiple devices
Connect all the audio devices that you want to use to your Mac. On the Mac, look for and open an app called Audio MIDI Setup. This is a stock app on macOS and you should be able to open it from Spotlight, Launchpad, or the Applications folder.
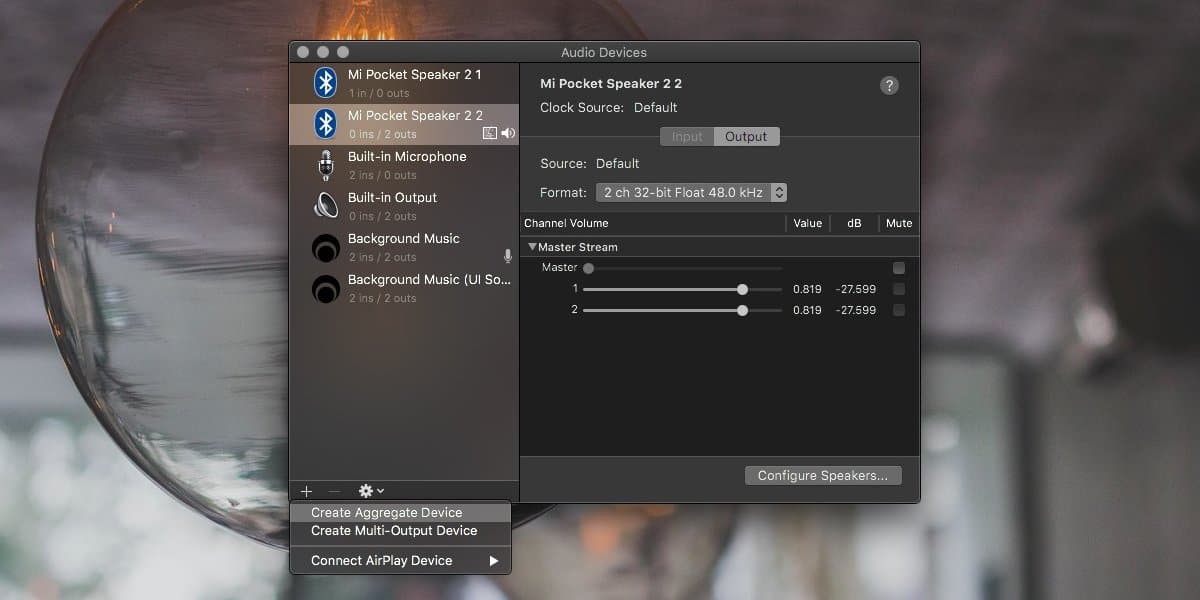
Once you have the app open, you’ll notice that all the audio devices that are connected to your Mac are listed in a column on the left. At the bottom of this column, there’s a plus button. Click it, and select ‘Create Aggregate Device’ from the menu.
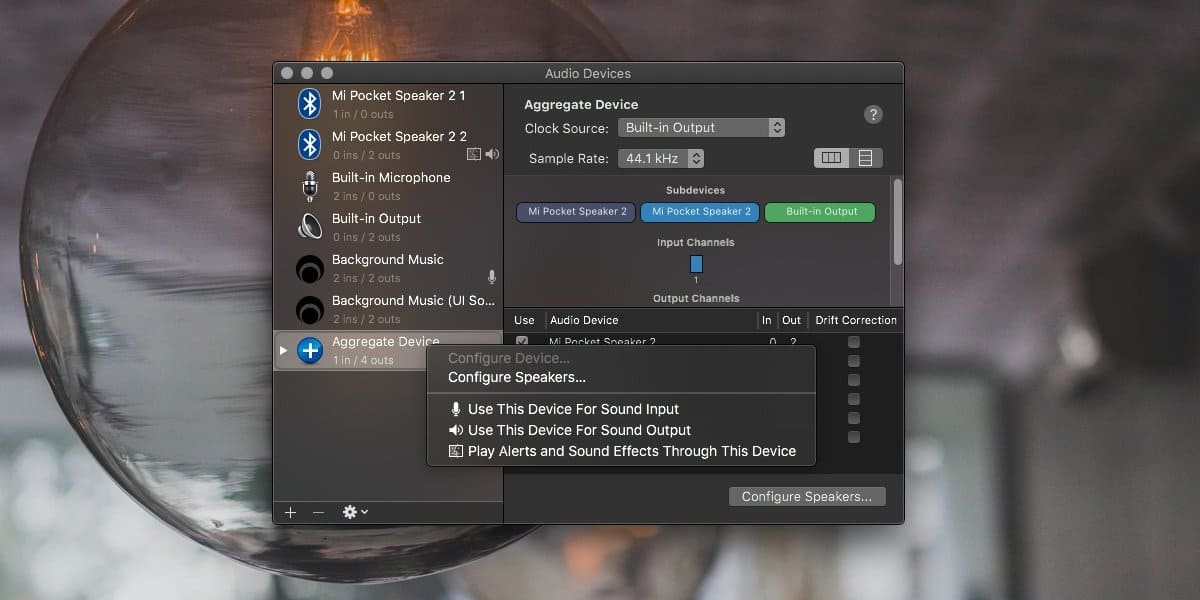
This will add a new device to the left column. Select it and the pane on the right will list all the audio devices that are connected to your system. Check the box next to each device you want to output sound to.
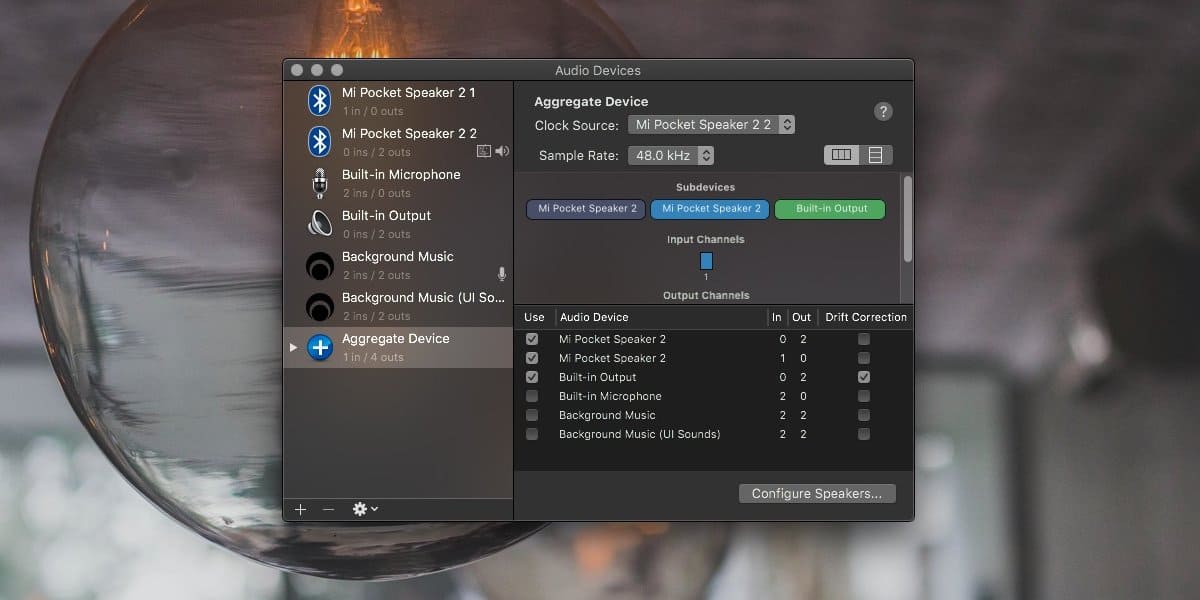
Next, open the Clock Source dropdown and select one of the audio output devices. Next, look at the devices listed under ‘Subdevices’. You can change the order of these devices. Move the device that you select as the Clock Source to the very end.
Note: You may have noticed that I’ve added the same device i.e., a Bluetooth speaker twice. The speaker in question is both an input and an output device and in order to add it, I had to select all instances of it. You will likely have to do the same. If you’re using just a speaker with no mic, and you only care about outputing audio, you can instead create an aggregate Multi-output device. The process is much simpler; all you have to do is select the option from the plus button, and select your output devices.
When you’re done, right-click the aggregate device in the column on the left, and select the ‘Use This Device For Sound Output’ option.
Play audio, or video with audio, on your Mac and the audio will be routed to all the devices you selected to create the aggregate device.
If you want to use multiple audio input devices at once e.g., multiple mics, you can use this same trick but set the aggregate device as the audio input device.
I tested this out with a Bluetooth speaker and the built-in/in-line speakers on a MacBook and it worked flawlessly. This should work with just about any audio device you have as long as it can connect to your Mac. The exception will be where you cannot connect multiple devices e.g., you may not be able to connect multiple Bluetooth speakers to a Mac at once. In that case, you’re limited not by how many devices audio can be routed to, but how many can be connected.
1 Comment
Pretty cool trick! Unfortunately I had problems with the audio being slightly delayed between each device. Played with the clock source and drift settings, but no luck. Still, awesome that you can do this.
Leave a Reply Cancel reply
This site uses Akismet to reduce spam. Learn how your comment data is processed.
Источник
Question: Q: Volume control for multiple output devices. Speakers and/or headset
My work has changed over to VOIP phones now. Getting Audio out from more than 1 Device is not working properly.
Here is what I have learned so far:
To get Volume from the Headset, you need to select the headset from PREF>Sound>OUTPUT and INPUT and select Headset name. But doing this kills the sound from the speakers.
If you want to watch/listen to something you want your speakers/headphones, but if someone calls you would have to go to settings to switch to the Headset.
This is an Obviously Problem.
- Open «AUDIO MIDI Setup» from /UTILITIES
- Click + (Add) at the bottom
- Choose Multi Output Device or Aggregate Device (Output ONLY device / Output and Input devices) — In my case, only the Multi Output Device works—Partially, I’ll explain in a moment.
- Check off your Line Out (should be your Speakers / Headphone)
- Check off your Headset
- [WARNING] — Next step you may want the headphones off your head
- Go to «System Preferences » > Sound > Output > select Multi Output device
- Go to «System Preferences » > Sound > Input > select headset device (this is your Mic)
As mentioned, this is a Bandaid / Partial solution. You’ll now note that your Volume controls no longer work. The Volume is set to MAX and you’ll ONLY be able to change the volume on your earpiece, and if your desktop speakers have a volume knob, there too. But the volume control is now dead.
What’s really funny is that our SMART Phones are Smarter than our computers. If you’re listening to music, it’s smart enough to turn off the music an answer phone, Why can’t a Computer figure this out?
VOIP is OLD news these days, I’m surprised a decade later this problem still exists!
Has anyone Solved this yet?
3.2 GHz Quad-OTHER, OS X El Capitan (10.11.4), 24 GB 1066 DDR3 ECC
Источник
How to manage volume for Multi-output Audio devices on macOS
Oct 4, 2019
Comment
On macOS, you can create a Multi-output audio device, or an aggregate audio device and route audio to multiple devices at once. It’s fairly easy to do once you understand the concept behind it. It does come with a shortcoming; no volume control. When you configure a multi-output device, the volume controls suddenly become inactive. Tapping the volume keys on a MacBook will show the volume control with a cancel button. The Sound preference in System Preferences will likewise show a volume slider that is inactive. Here’s how you can mange the volume of multi-output devices on macOS.
Volume for multi-output devices
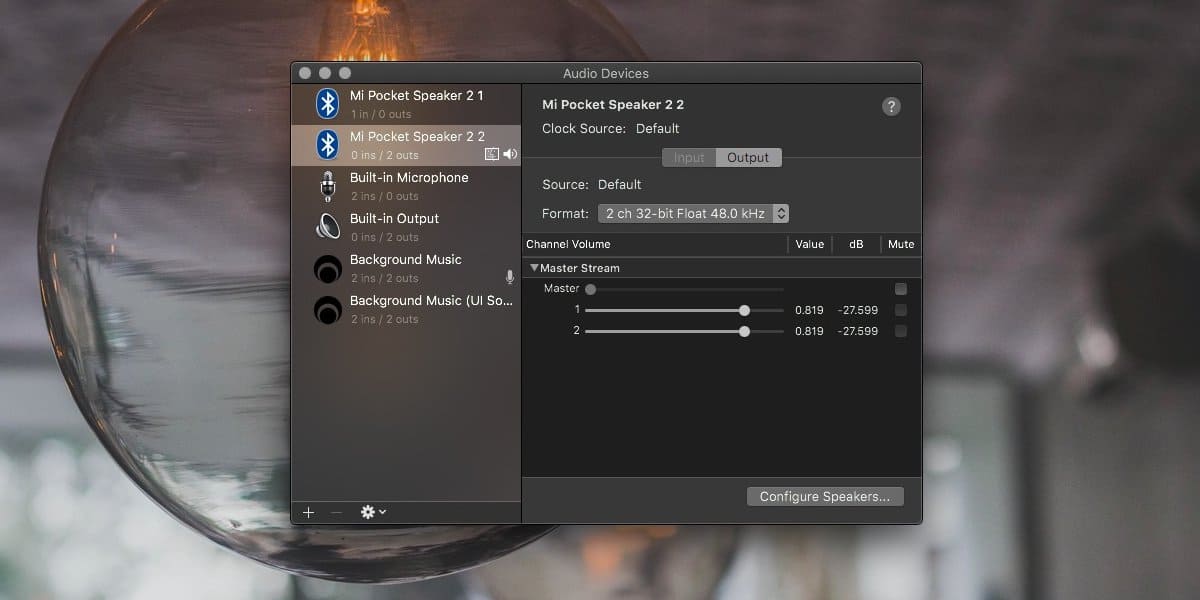
You will need to go through the Audio MIDI app to change the volume for multi-output devices. Open the app and select the device from the column on the left. Check if all the devices that have been added to the multi-output device are listed under it.
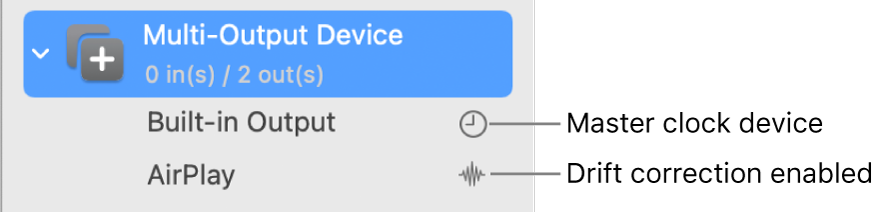
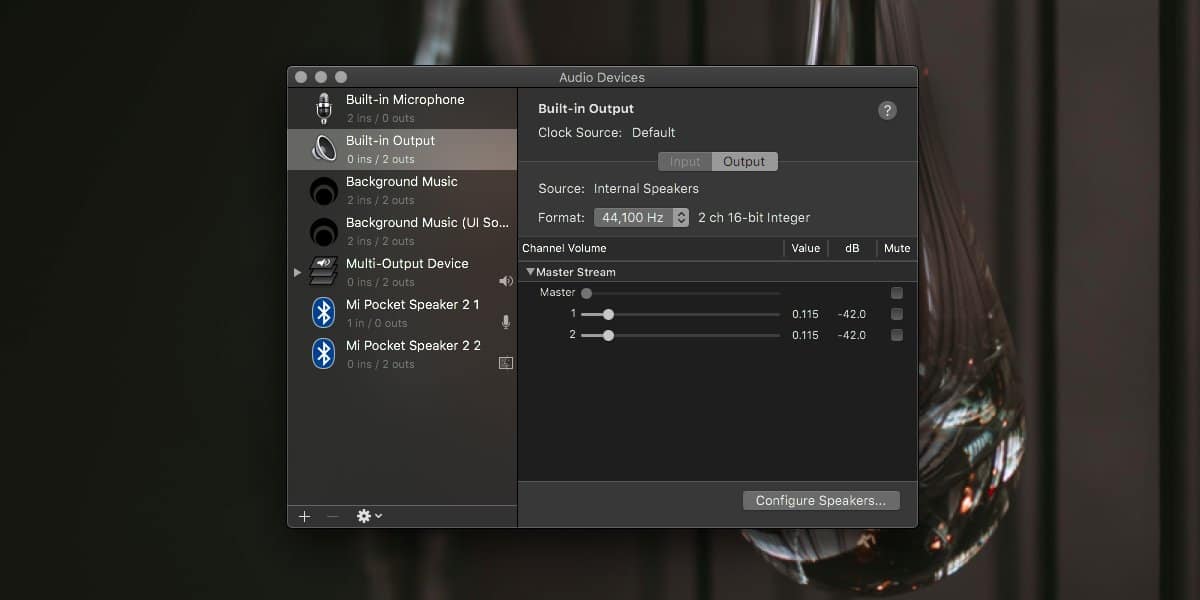
In the screenshot below, two different devices have been added to the multi-output device but only one appears listed under it. This isn’t a problem but it will change how the volume is managed to a minor extent.
The first audio device that’s a part of this multi-output device is the built-in speakers and they’re not showing up under the device. In such a case, select the device from the column on the left and use its volume control to change the volume.
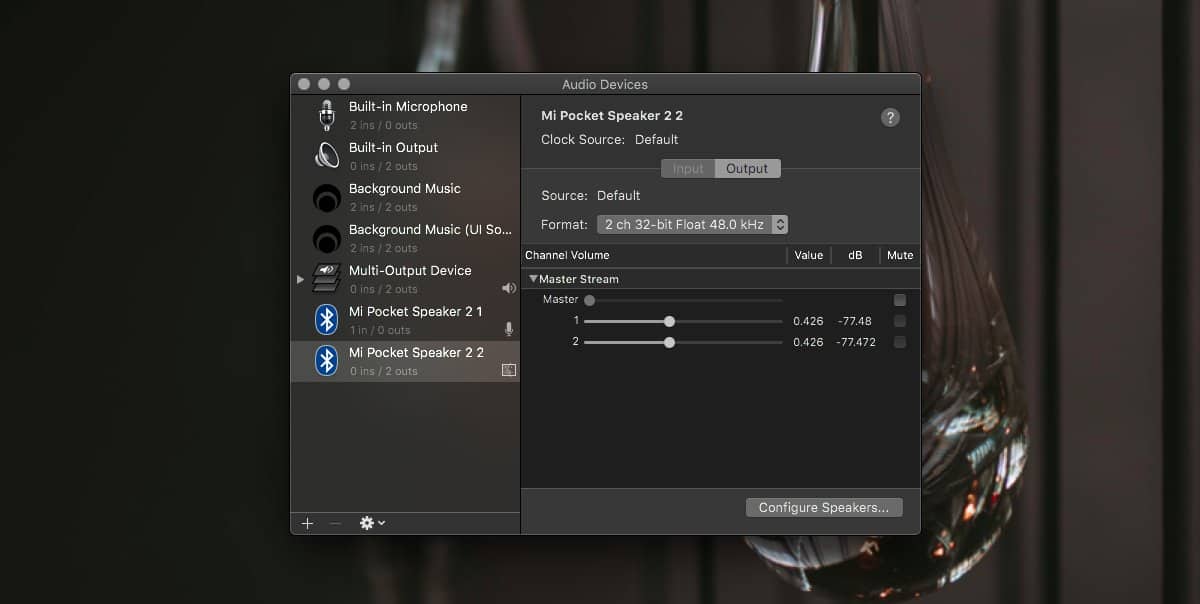
Next, move on to the other device(s) listed under the multi-output device. Use the volume sliders in the pane on the right to change its volume. The volume for the multi-output device will now reflect the new levels you’ve set.
Change master device volume
There is one other way to change the volume of a multi-output device however, this changes the volume of the device as a whole and does nothing to the individual volume levels of the various devices. It may result in the devices being more quieter than they should be.
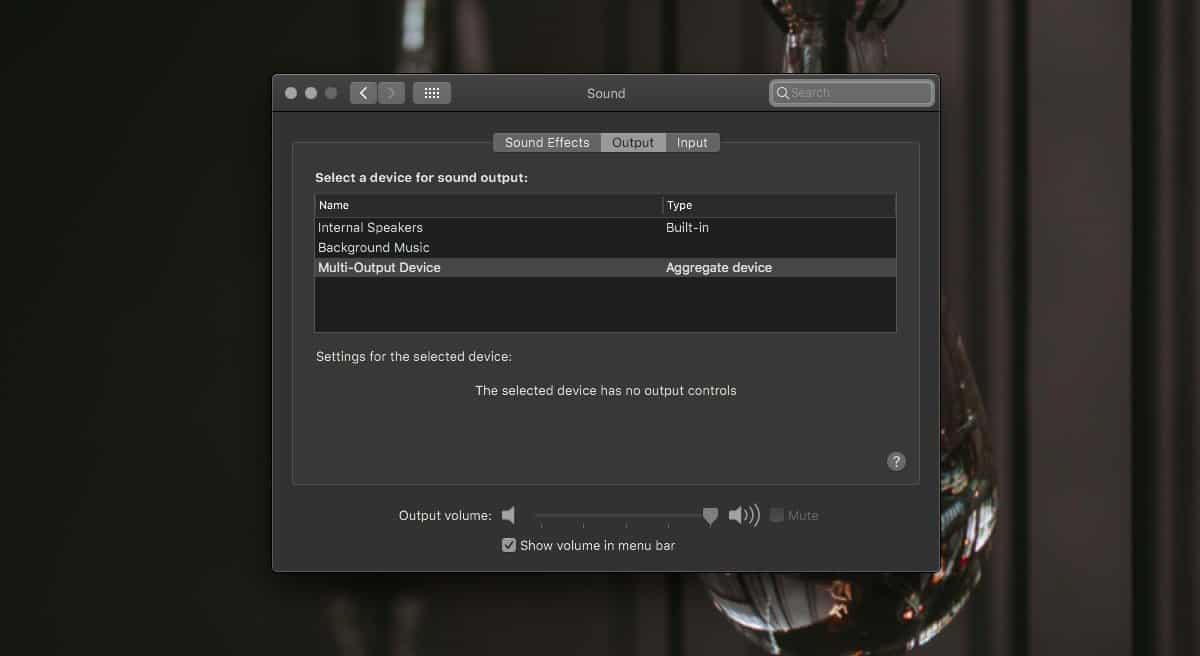
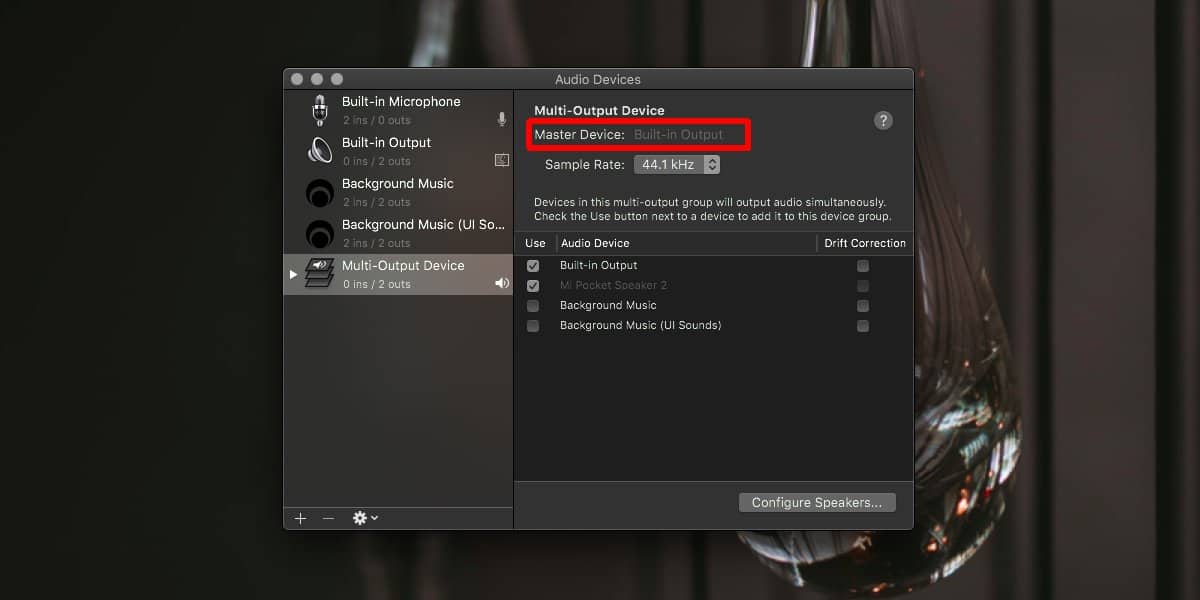
Determine which audio device is set at the Master device. You can check this from the Audio MIDI app. Select the multi-output device and look at the Master Device dropdown.
Open the System Preferences and go to the Sound preference. Select the Output tab, and select the device that is used as the Master device in the multi-output audio device. Once it’s been selected, use the volume slider at the bottom to change its volume. On this same tab, you will see the multi-output device you created. After you’ve changed the volume for the master device, select the multi-output device. Play audio on your Mac and the change in volume will be reflected in the multi-output device.
Leave a Reply Cancel reply
This site uses Akismet to reduce spam. Learn how your comment data is processed.
Источник


