- Mac os network printer
- Подключение принтера к MAC через USB.
- Подключение к MACBOOK AIR, PRO, MAC mini или iMAC расшаренного принтера подключенного к Windows.
- Подключение сетевого принтера к MAC OS (MACBOOK AIR, PRO, MAC mini или iMAC).
- Add a printer on Mac
- Add a USB printer
- Add a Wi-Fi or network printer
- Add a network printer by its IP address
- Add a Bluetooth printer
- Add a Wi-Fi or mobile printer that requires a configuration profile
Mac os network printer
Подключение принтера к MACBOOK AIR, PRO или iMAC вещь довольна простая и не требует специфических знаний, как в принципе и на Windows. Но тем кто перешел с Windows на MAC могут возникнуть сложности, связанные прежде всего с иным интерфейсом МАК ОС. Для того, что бы облегчить эту задачу я написал эту статью, здесь пошагово описано как подключить принтер на MAC ( MACBOOK AIR, PRO, MAC mini или iMAC ) устройство разными способами (через USB или сетевой интерфейс).
Подключение принтера к MAC через USB.
Самый простой способ подключения принтера к МАК — с помощью USB интерфейса, для этого достаточно подключить ваш МАК к принтеру с помощью USB кабеля. Затем необходимо зайти в «Системные настройки» на панели Dock.

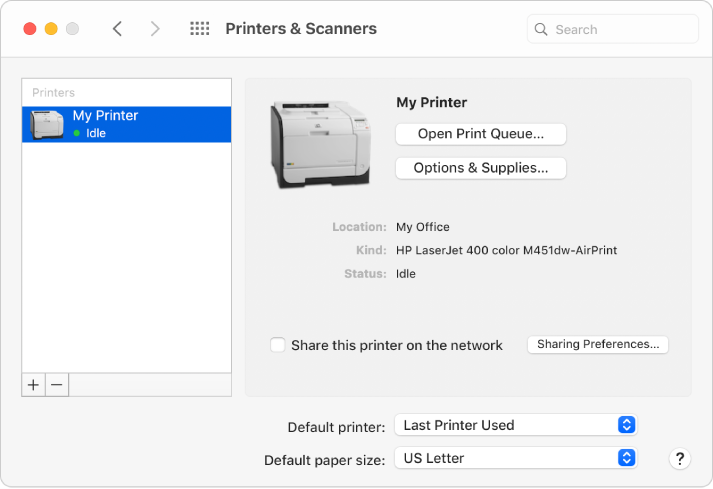
В панели «Системные настройки» нажмите на «Принтеры и сканеры».
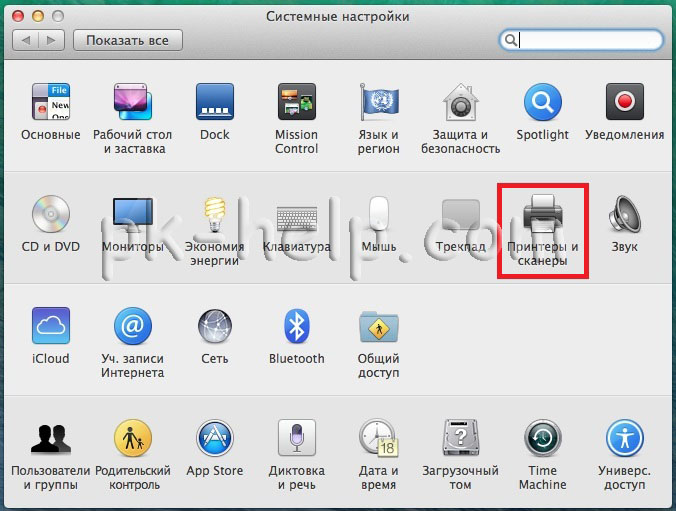
Далее нажмите на значок «Плюс», что бы добавить принтер.

После этого вам будет предложено установить ПО для принтера, как вы можете понять для того, что бы его загрузить, необходим выход в Интернет с вашего МАК устройства. Нажмите на кнопку «Установить». Подобное окно может появиться сразу послед подключения принтера к МАК.
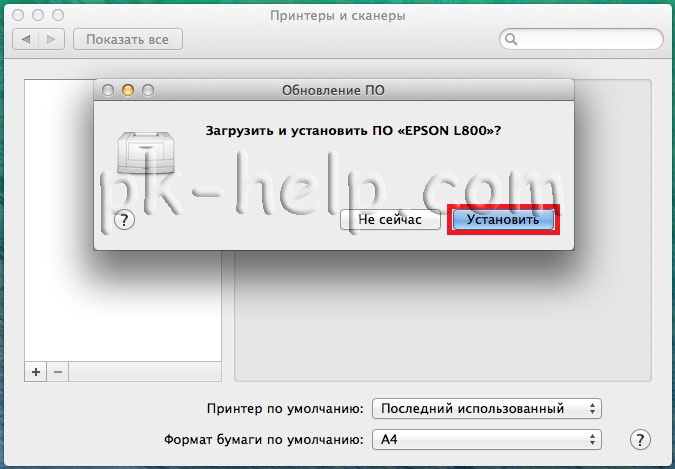
Затем начнется процесс загрузки и установки необходимого ПО.
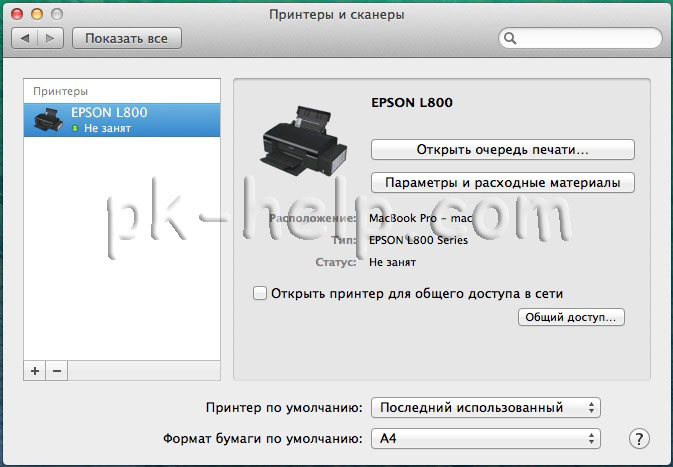
После этого принтер будет доступен для печати.
Подключение к MACBOOK AIR, PRO, MAC mini или iMAC расшаренного принтера подключенного к Windows.
Рассмотрим другую ситуацию, когда ваш принтер подключен к компьютеру/ ноутбуку с операционной системой Windows и его необходимо подключить к MACBOOK AIR, PRO или iMAC. Для этого вовсе не обязательно каждый раз подключать USB от принтера к MAC устройству, достаточно расшарить (сделать сетевым) принтер на Windows, как это сделать я описал в статье Подключение и настройка сетевого принтера в Windows 7 .
После того как вы расшарили принтер на Windows теперь его достаточно просто подключить к MACBOOK AIR, PRO или iMAC. Для этого зайдите в «Системные настройки» в панели Dock.
Выберите пункт «Принтеры и сканеры».
Далее выберите вкладку «Windows». После кратковременного сканирования сети, МАК ОС выдаст вам доступные рабочие сети — имя вашего компьютера и сетевой принтер.
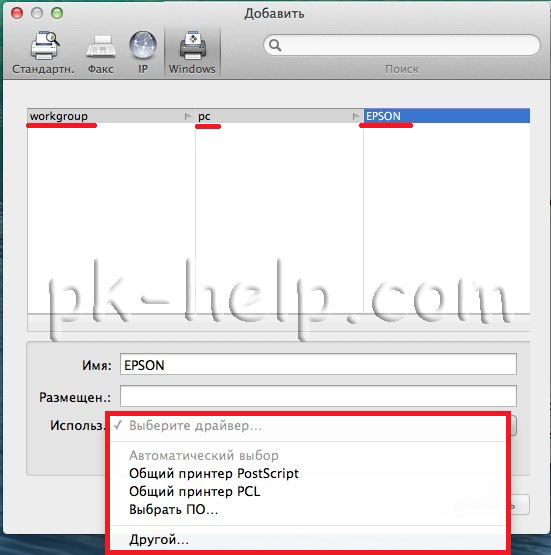
Нажав на принтер, в поле «Использ.» выберите драйвер, тут возможно несколько вариантов:
Общий принтер PostScript -универсальный драйвер для принтеров. Его необходимо использовать в крайних случаях, если нету «родных» драйверов для принтера.
Общий принтер PCL — Printer Command Language — язык управления принтером разработанный компанией Hewlett-Packard.
Выбрать ПО — предоставляется выбор необоримого ПО, который уже установлен в MAC OS — наиболее предпочтительный вариант.
Другой — можете указать файл с необходимым ПО и драйверами (их скачивать желательно с официального сайта принтера).
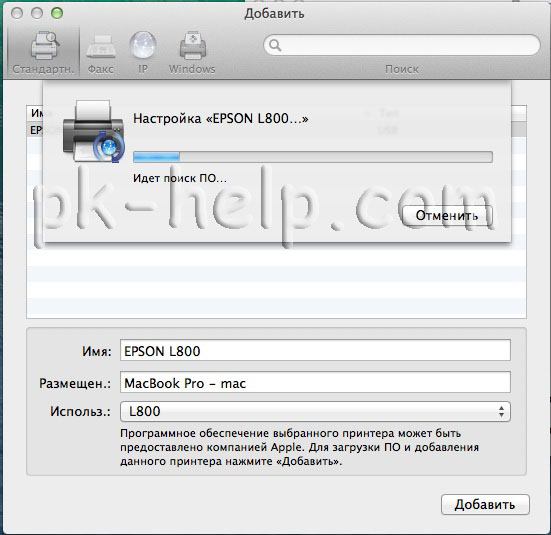
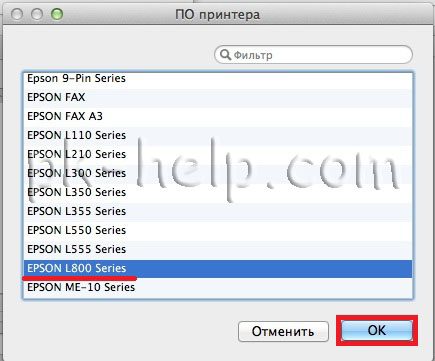
В моем случае мне подошел вариант «Выбрать ПО», после чего я указал модель подключаемого принтера.
После этого нажмите кнопку «Добавить».
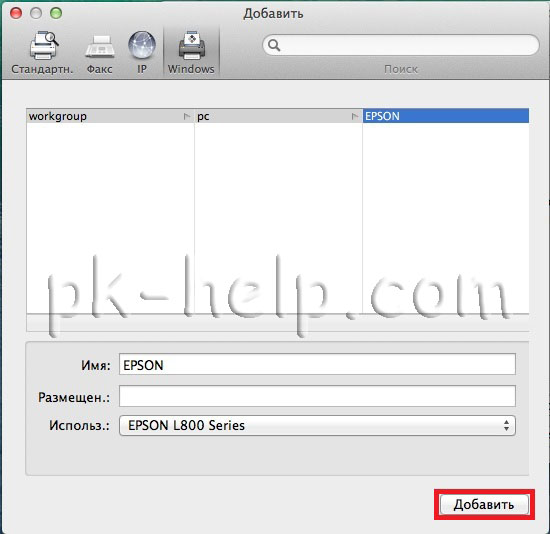
Принтер будет добавлен на вашу МАК ОС.
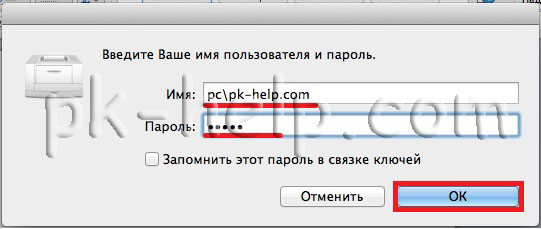
Если вы захотите, что либо напечатать у вас появится окно в котором вам нужно ввести учетные данные компьютера с Windows (имя компьютера/ учетная запись и пароль). Что бы не вводить это каждый раз поставьте галочку «Запомнить этот пароль в связке ключей».
Подключение сетевого принтера к MAC OS (MACBOOK AIR, PRO, MAC mini или iMAC).
В случае, если необходимо подключить сетевой принтер к МАК ОС (под сетевым принтером в данном случае я понимаю принтер, подключенный напрямую в вашу сеть (с помощью Wi-Fi или кабеля Ethernet) или через принтсервер — вообщем принтер имеющий IP адрес в вашей сети).
Как и в предыдущих случаях заходите в «Системные настройки».
Выбираете «Принтеры и сканеры».
Нажимаете на плюс, для добавления нового принтера.
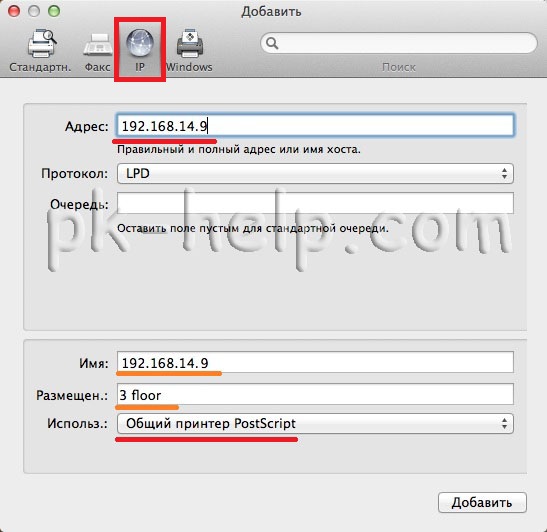
В окне «Добавить» выбираете вкладку «IP». В поле «Адрес» вписываете ip адрес принтера или его имя в сети. Что бы узнать IP адрес принтера достаточно в его настройках выбрать — Печать сетевых настроек (название зависит от модели принтера), если принтер подключен через принтсервер то IP адрес можно узнать из DHCP сервера (если в роли DHCP выступает роутер то необходимо зайти на его веб интерфейс и в списке подключенных устройств найти принтер и узнать его IP).
Поле «Протокол», «Очередь» можете оставить пустым, в поле «Имя» можете указать имя принтера (имя которое будет использоваться на вашем МАК для этого принтера), так же можете указать его местоположение. В самом нижнем необходимо выбрать драйвера или использовать универсальные — «Общий принтер PostScript».
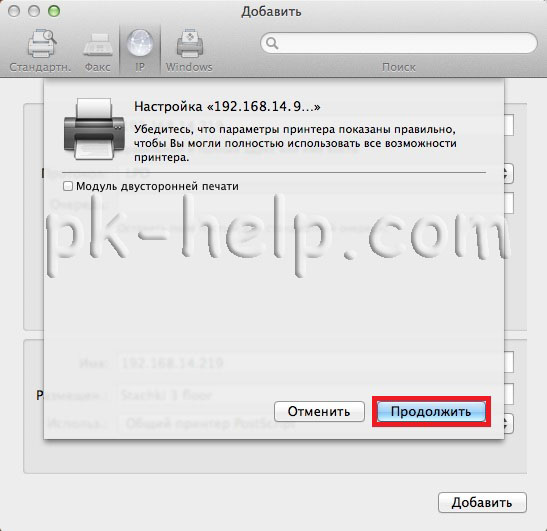
Подтвердите свой выбор и нажмите «Продолжить».
Принтер будет добавлен на ваш MACBOOK AIR, PRO, MAC mini или iMAC и вы беспрепятственно можете им пользоваться.
Источник
Add a printer on Mac
To use a printer, you must add it to your list of printers using Printers & Scanners preferences. (If you switched from using a Windows computer to a Mac, using Printers & Scanners preferences is similar to using the Printing control panel in Windows.)
In most cases, when you add a printer, macOS uses AirPrint to connect to the printer or automatically downloads the printer’s software (also called a printer driver). Don’t install the software that came with the printer or from the manufacturer’s website; follow the instructions in one of the tasks below, and macOS prompts you to download the latest software if it’s needed.
If your printer is AirPrint-enabled, it’s compatible with macOS. If your printer isn’t AirPrint-enabled, you can make sure it’s compatible with macOS by checking the Apple Support article Printer and scanner drivers for Mac.
For information about using a printer with an iPhone or iPad, see Use AirPrint to print from your iPhone, iPad or iPod touch.
Add a USB printer
For most USB printers, all you have to do is update your software and then connect the printer to your Mac. macOS automatically detects the printer and downloads any necessary software. For other printers, you may have to complete a few steps to add the printer.
On your Mac, update your software: Choose Apple menu

> System Preferences, click Software Update, then install any software updates listed. Even if no updates appear, this ensures that macOS has the latest information about printer software it can download from Apple. If you don’t do this, you may see a message that software isn’t available when you connect your printer.
Prepare your printer: Use the instructions that came with your printer to unpack the printer, install ink or toner, and add paper. Turn on the printer and make sure it’s not displaying any errors.
Connect your printer: Connect the USB cable to your Mac. If you see a message prompting you to download new software, make sure to download and install it.
Important: If your Mac has a single USB-C port, use a multiport adapter. Connect the printer, then connect a USB-C cable to a power supply to prolong the battery life of your Mac. See About USB-C.
For information about adding an AirPrint-enabled printer using USB, see Add your printer with different settings.
Add a Wi-Fi or network printer
If your Mac and printer are already connected to the same Wi-Fi network, the printer might be available to you without any setup. To check, choose File > Print, click the Printer pop-up menu, choose Nearby Printers or Printers & Scanners preferences, then choose your printer. If your printer isn’t available, you can add it.
On your Mac, update your software (if you don’t have an AirPrint printer): Choose Apple menu
> System Preferences, click Software Update, then install any software updates listed. Even if no updates appear, this ensures that macOS has the latest information about printer software it can download from Apple. If you don’t do this, you may see a message that software isn’t available when you connect your printer.
If you have an AirPrint printer, you don’t need to check for software updates.
Prepare your printer: Use the instructions that came with your printer to unpack the printer, install ink or toner, and add paper. Turn on the printer and make sure it’s not displaying any errors.
Connect your printer: Follow the instructions that came with the printer to connect it to the network.
If you have a Wi-Fi printer, you might need to connect the printer to your Mac with a USB cable to set up Wi-Fi printing. After connecting the printer to your Mac, install the Mac software that came with the printer and use the printer’s setup assistant to connect the printer to your Wi-Fi network. After setting up, you can disconnect the cable from your printer and Mac and the printer should remain connected to the Wi-Fi network. See the Apple Support article Connect an AirPrint printer to a Wi-Fi network.
Add the printer to your list of available printers: Choose Apple menu
> System Preferences, then click Printers & Scanners.
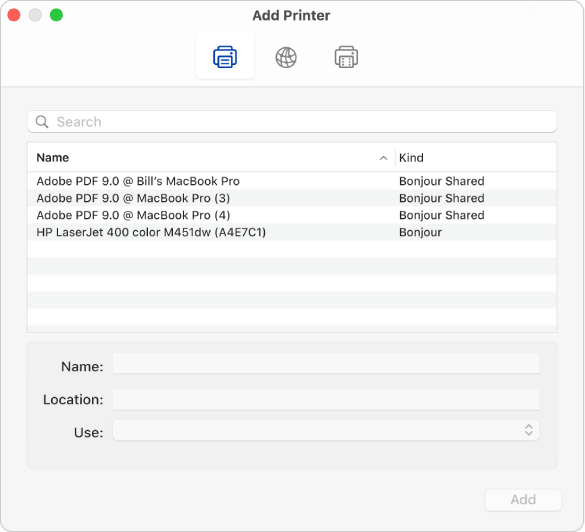
If you don’t see your printer listed on the left, click the Add button  at the bottom of the list. A dialogue appears listing printers on your local network. It may take a minute or two for your printer to appear. Select your printer when it appears in the list, then click Add. If you see a message prompting you to download new software, make sure to download and install it.
If your printer still doesn’t appear in the list, try adding the printer by its IP address (see below).
When you add a printer, macOS can usually detect whether the printer has special accessories installed, such as additional paper trays, extra memory or a duplex unit. If it can’t, a dialogue appears that lets you specify them. Make sure the settings in that dialogue accurately reflect your printer’s installed accessories so you can take full advantage of them.
Add a network printer by its IP address
If a network printer you want to use isn’t in the list of available printers, you can add it as an IP printer. The printer must support one of these printing protocols: AirPrint, HP Jetdirect (Socket), Line Printer Daemon (LPD), or Internet Printing Protocol (IPP).
Note: Some printers connected using these generic protocols may offer limited functionality.
You must know the network printer’s IP address or host name, printing protocol, and model number or printer software name. If it uses a special queue, you also need to know the queue name. See the person who manages the printer or server for assistance.
On your Mac, update your software (if you don’t have an AirPrint printer): Choose Apple menu
> System Preferences, click Software Update, then install any software updates listed. Even if no updates appear, this ensures that macOS has the latest information about printer software it can download from Apple. If you don’t do this, you may see a message that software isn’t available when you connect your printer.
If you have an AirPrint printer, you don’t need to check for software updates.
Prepare your printer: Use the instructions that came with your printer to unpack the printer, install ink or toner, and add paper. Turn on the printer and make sure it’s not displaying any errors.
Connect your printer: Follow the instructions that came with the printer to connect it to the network. See the Apple Support article Connect an AirPrint printer to a Wi-Fi network.
Add the printer to your list of available printers: Choose Apple menu
> System Preferences, then click Printers & Scanners.
Click the Add button at the bottom of the printer list, click IP button  , then enter the printer information using the following table as a guide.
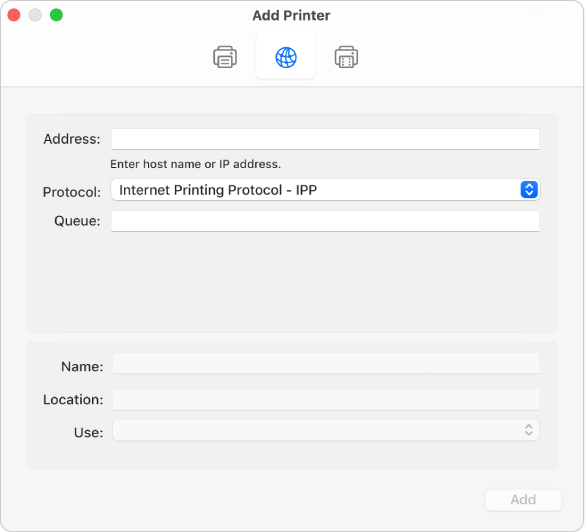
Enter the printer’s IP address (a number that looks like 192.168.20.11) or host name (for example, printer.example.com).
Click the Protocol pop-up menu, then choose a printing protocol your printer supports:
AirPrint: The AirPrint protocol enables Wi-Fi, USB and Ethernet network access to a printer’s printing and scanning options (if the specific printer supports these features). You don’t need to download or install printer software to use AirPrint-enabled printers. A wide variety of printers, including Aurora, Brother, Canon, Dell, Epson, Fuji, Hewlett Packard, Samsung, Xerox and many others, support the AirPrint protocol.
HP Jetdirect – Socket: Hewlett Packard and many other printer manufacturers use this protocol.
Line Printer Daemon — LPD: Older printers and print servers may use this protocol.
Internet Printing Protocol — IPP: Modern printers and print servers use this protocol.
If your printer requires it, enter the queue name for your printer. If you don’t know the queue name, try leaving it blank or see your network administrator.
Enter a descriptive name for the printer (for example, Colour Laser Printer) so you can identify it in the Printer pop-up menu.
Enter the printer’s location (for example, “outside my office”), so you can identify it in the Printer pop-up menu.
If this pop-up menu doesn’t display the appropriate software for the printer, choose Select Printer Software, then select your printer in the Printer Software list.
If that list doesn’t include your printer, try downloading and installing the printer software (also called a printer driver) from the printer manufacturer. You can also try choosing generic printer software from the pop-up menu.
Add a Bluetooth printer
If your Mac came with Bluetooth installed, or if you are using a USB Bluetooth adapter, you can print wirelessly to a Bluetooth-enabled printer.
On your Mac, update your software: Choose Apple menu
> System Preferences, click Software Update, then install any software updates listed. Even if no updates appear, this ensures that macOS has the latest information about printer software it can download from Apple. If you don’t do this, you may see a message that software isn’t available when you connect your printer.
If you have an AirPrint printer, you don’t need to check for software updates.
Prepare your printer: Use the instructions that came with your printer to unpack the printer, install ink or toner, and add paper. Turn on the printer and make sure it’s not displaying any errors.
Connect your printer: Follow the instructions that came with your printer to make sure it’s ready to connect with Bluetooth.
Add your Bluetooth printer to your printer list: Choose Apple menu
> System Preferences, then click Printers & Scanners. Click the Add button , then click the Default button  .
.
Select the printer in the Printers list, then click Add. If the printer you expect to see is not in the list, enter its name in the search field and press Return.
If your printer doesn’t appear in the list, make sure you have the latest Bluetooth driver for the printer installed. Check with the manufacturer for the latest driver.
After you connect your printer, if you see a message prompting you to download new software, make sure you download and install it.
Add a Wi-Fi or mobile printer that requires a configuration profile
Some network printers may require you to install a configuration profile so that the printer can be discovered on your network using AirPrint. If you are provided a profile to install, download or copy the printer profile to your Mac and then install it.
On your Mac, double-click the profile to open it.
When you see a message asking if you want to install the profile, click Continue.
When a message appears asking you to confirm that you want to install the profile, click Install.
The profile is installed in the Profiles pane of System Preferences. You can then add the printer to your printer list.
To add your printer to the printer list, choose Apple menu
> System Preferences, then click Printers & Scanners.
To add your printer to the printer list, choose Apple menu
> System Preferences, then click Printers & Scanners. Click the Add button , then click the Default button .
Select the printer (listed as an AirPrint Profile) in the Printers list, then click Add.
If your printer doesn’t appear in the list, make sure you have the latest profile for the printer installed and that there is a network path for your computer to the printer. Check with your network administrator for the latest profile.
Источник


