- How to solve external hard drive read-only without formatting on Mac?
- Case 1: The file system of external hard drive is NTFS
- How do I know if my external hard drive is NTFS file system?
- How to fix NTFS external hard drive read-only issue on Mac:
- iBoysoft NTFS for Mac- Best NTFS Disk Management for Mac
- Case 2: Disk permissions are changed as read-only
- Solution 1: Change the permission of this external hard drive
- Solution 2: Ignore Permissions on external hard drive in the Finder
- Case 3: External hard drive corruption
- Solution: Repair external hard drive with Disk Utility
- Conclusion
- Quick Tip: Solving “Read Only” External Drive Problems on Your Mac
- The Cause of «Read Only» Disk Errors
- Correcting the «Read Only» Disk Error
- Conclusion
How to solve external hard drive read-only without formatting on Mac?
Summary: You will find the efficient methods to solve Mac external hard drive read-only error. Free download iBoysoft NTFS for Mac if external hard drive is NTFS file system.
Usually, you can read and write to files on an external hard drive on your Mac, but there are chances that this external hard drive shows read-only on Mac. For example, many people have reported that their WD My Passport read-only on Mac and don’t know how to unlock Seagate external hard drive read-only on Mac.
This post will analyze the three external hard drive read-only cases. Then, you can find a relevant and feasible solution to fix Mac external hard drive read-only issue without formatting.
Here are the main causes of why your external hard drive is read-only on Mac:
Case 1: The file system of external hard drive is NTFS
A file system controls how data is stored and retrieved on a disk. There are many different kinds of file systems, and each one has different structure and logic, properties of speed, flexibility, security, size, etc.
By default, Windows uses Microsoft NTFS file system while Mac uses HFS+ and APFS for OS volume. FAT32 and exFAT are usable for both Windows and Mac operating systems. That’s to say, you are unable to write to NTFS drive on Mac.
If you try to copy or drag files to an NTFS-formatted external hard drive on Mac, you’ll be unable to but see the greyed-out no symbol as below.
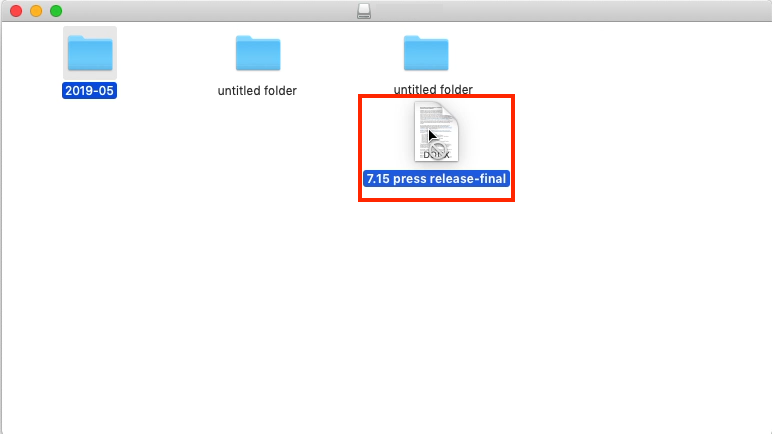
And when you open files on this external hard drive, you will find your documents being read-only.
Therefore, if you find your external hard drive read-only, the first thing that comes to your mind should be to check if this drive is NTFS file system.
How do I know if my external hard drive is NTFS file system?
Simply, you can check this by viewing its disk information either in Disk Utility or in the Finder, and here is how.
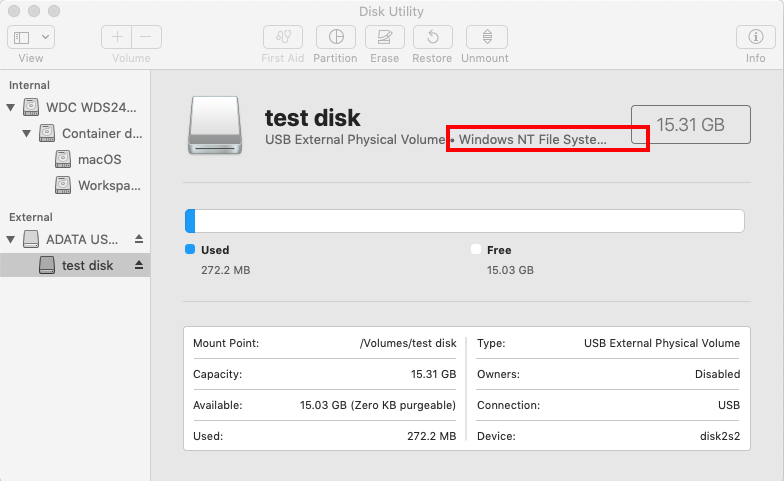
Method 1: Check it in Disk Utility
- 1. Click on Launchpad at the dock of your Mac and choose Other in the menu.
- 2. Choose Disk Utility among these utilities and open it.
- 3. When it is launched, click on the external hard drive you have read-only problem with in the left sidebar. You will see an obvious «Windows NT File System» in the right column.

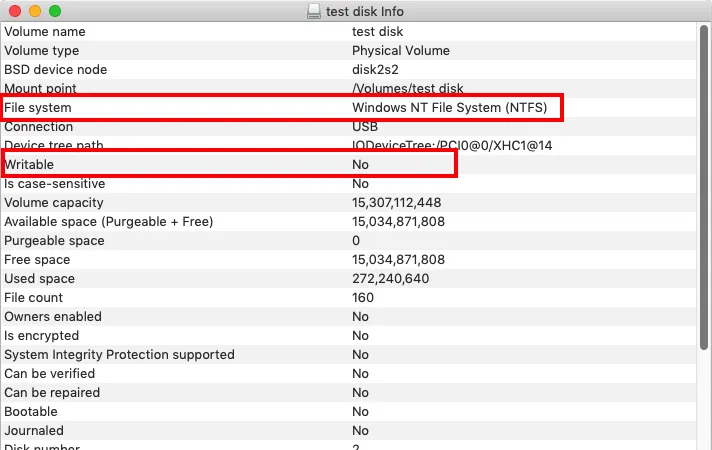
Method 2: Check it in the Finder
You can also check this in the Finder with a few clicks.
- 1. Open the Finder and right-click on this external hard drive.
- 2. Choose Get info in the context menu.
- 3. You will see «Windows NT File System (NTFS)» after File system if the read-only drive is formatted with Microsoft NTFS file system.
How to fix NTFS external hard drive read-only issue on Mac:
Then, after making sure that it is the Windows NTFS file system that makes your external hard drive read-only on Mac, you can go head to fix this problem. Try to repair the read-only external hard drive with or without formatting.
Solution 1: Using NTFS for Mac tool
If you have important files on this external hard drive, and you frequently swap your work between Windows and Mac, formatting this drive definitely is the last solution you would resort to. The reason is, as you may know, formatting will wipe your data out of this drive and cause data loss.
Then when external drive is NTFS-formatted, how can you fix the read-only drive without formatting?
An NTFS driver for Mac should be the most convenient tool for you to fix this read-only issue without formatting. With an NTFS for Mac software, you can use NTFS external hard drives natively and seamlessly on your Mac.
Here, iBoysoft NTFS for Mac is your best choice. This easy-to-operate NTFS for Mac software can make the NTFS drives readable and writable on Mac.
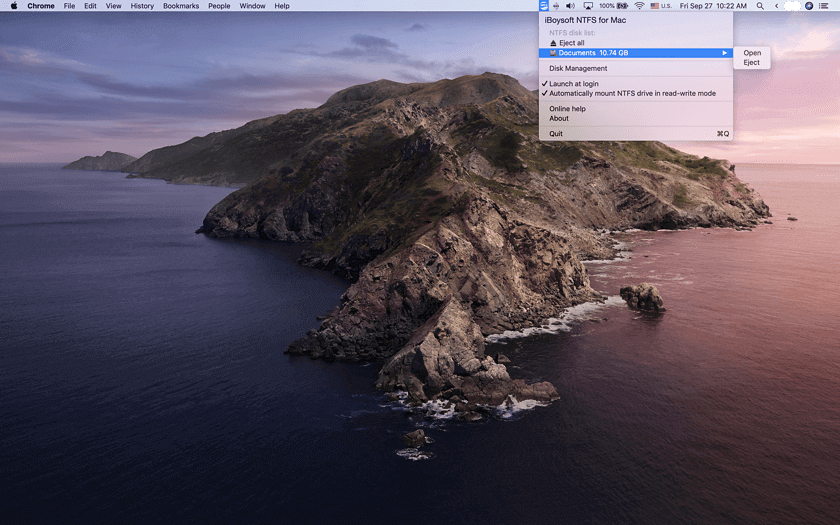
About iBoysoft NTFS for Mac
iBoysoft NTFS for Mac can mount NTFS external hard drives in read-write mode on your Mac, granting people full access to read NTFS drive on Mac and write files on NTFS-formatted drives.
iBoysoft NTFS for Mac- Best NTFS Disk Management for Mac
- Grant full access to Windows NTFS file system on Mac
- Read, write, modify, transfer, and delete files on NTFS drives on Mac
- Erase disks to NTFS file system on Mac
- Unmount multiple drives with one click
- Support macOS 11 to macOS 10.13
- Fully support Apple M1 Mac
iBoysoft NTFS for Mac is also a wonderful tool to manage NTFS external drives on Mac. It’s a menu bar app, from which users can mount, repair, erase NTFS hard drives, external hard drives, SD cards, USB flash drives, etc. with a simple click.
Tutorial to write to NTFS-formatted external hard drive on Mac with iBoysoft NTFS for Mac
- 1. Free download and install iBoysoft NTFS for Mac on your computer, and then restart the Mac.
- 2. Connect NTFS external hard drive to Mac and launch iBoysoft NTFS for Mac.
- 3. Write to NTFS external hard drive after the external hard drive is mounted successfully.
Solution 2: Enable NTFS read-write with Terminal (not recommend)
You can also try the experimental method to enable NTFS read-write support with command prompt on your Mac. However, it is not recommended as it is not stable and could result in data loss if it goes wrong. So, use the command line with caution!
Warning: Do not use this method as a long-term solution to write to NTFS drives that contain important files. Meanwhile, do not use this method if you are not familiar with the command line, in case that you input a wrong command and cause unexpected damage to your Mac and drives.
Well, if you insist…here is how to do this:
- 1. Click Go at the upper right of your desktop and go to the Applications > Utilities > Terminal .
- 2. Input «sudo nano /etc/fstab» to edit the fstab file (supply your password when prompted).
- 3. Type «LABEL=NAME none ntfs rw,auto,nobrowse» in the editor window for the fstab file. (Be sure to change the word NAME to the name of your drive)
- 4. Press Control + O to save the file, followed by Control + X to exit.
- 5. Unmount your NTFS drive and attach it again.
Solution 3: Reformat external hard drive to exFAT/FAT32
It is possible that you just recently bought a new hard drive and found it is formatted as NTFS. In this case, if you don’t have anything important on this drive or you have a copy of a data backup, you can simply format this external hard drive without worrying about data loss.
To formatting this read-only hard drive, you can just go to Disk Utility and Erase it. There are several formats you can choose, and erasing this disk into which file system depends on how you intend to use the drive.
- APFS: If you plan to use the drive on macOS 11 Big Sur, 10.15 Catalina, macOS 10.14 Mojave, and macOS 10.13 High Sierra, you can format it into APFS for better experience.
- HFS+: It is also known as Mac OS Extended, whose later versions added journaling to prevent corruption of the file system structure. Therefore, you can choose HFS+ if you are going to use this external hard drive on macOS Sierra and earlier Mac operating systems.
- FAT32/exFAT: If your storage device is an SD card or USB flash drive, and you’d like to read-write this portable drive both on Mac and Windows OS, you’d better erase it with exFAT or FAT32.
Case 2: Disk permissions are changed as read-only
The Sharing and Permissions option is set up to determine who can delete or modify a file or program copied to the drive. Thus, if the permissions are changed by you or others, a message will pop up and inform you that the file is read-only or you don’t have permission to save when you save changes to this disk.
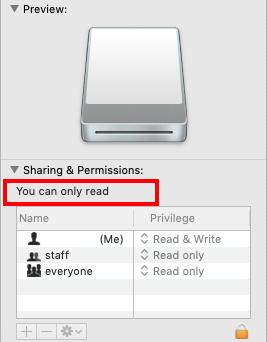
In this case, if you right-click on the icon of your disk and choose «Get info» to check the disk information, you will find you can only read this external hard drive or SD card even though it is not NTFS file system. That’s to say, you can’t write to this drive.
If this is the cause for your external hard drive being read-only, you can try the following solutions and fix this issue without formatting your drive.
Solution 1: Change the permission of this external hard drive
If your files on this external hard drive show as read-only or locked, or if you try to move some files to the Trash but get no response, you can try to change the permission of this disk.
- 1. Open the Finder and find your external hard drive in the left sidebar.
- 2. Right-click on this drive or volume and choose Get info , and then scroll down to Sharing & Permissions .
- 3. Extend this column by clicking on the triangle symbol, and then click on the Lock icon.
- 4. Input the password of your Mac, and click on Read only , then change your privilege as Read & Write in the right column.
- 5. Click the gear button ( Action menu) at the bottom of the window, choose Apply to enclosed items , and then click OK to confirm the action.
Solution 2: Ignore Permissions on external hard drive in the Finder
To prevent such errors from happening, Mac operating system includes a setting to ignore Permissions on external drives, so all files on the drive should be fully accessible regardless of their Permissions settings. Here below are steps to ignore the permission on external hard drives:
Step 1: Select the external hard drive on your desktop or in the Finder sidebar, and then press Command + I to get information on the drive.
Step 2: Click on the arrow that is on the left side of the Sharing & Permissions tab near the bottom of the window.
Step 3: Check the box to Ignore ownership on this volume , or toggle it off and then on if it’s already enabled. (Provide the password of your Mac if it is required.)
Case 3: External hard drive corruption
Some internal errors will cause an external hard drive to be read-only as well. When this happens, your drive will be only mounted in read-only mode to prevent the data on it from corruption.
Solution: Repair external hard drive with Disk Utility
Fortunately, you can take some actions to repair these minor disk errors with Disk Utility on your Mac. You can use the following guide to fix read-only external hard drive in Disk Utility without formatting.
- Step 1: Click Go at the upper right of your desktop and go to Utilities , and then open Disk Utility.
- Step 2: Select the read-only external hard drive on the left window.
- Step 3: Click First Aid in the and choose Run .
However, if First Aid can’t repair your read-only external hard drive, the drive may be seriously corrupted due to some reasons. For instance, your disk becomes read-only after a macOS update.
Under this circumstance, if the solutions above are unable to fix this read-only external hard drive, you may need to format this drive. But formatting the corrupted drive will make data loss. You should rescue files off the external drive with data recovery software.
iBoysoft Mac Data Recovery, the free data recovery software, works to recover data from corrupted, unmounted, inaccessible hard drives with only a few clicks: Scan, Preview, and Recover. It is compatible with macOS Big Sur, Catalina, Mojave, and earlier OS versions.
Conclusion
Generally speaking, Mac external hard drive read-only issue appears when it is formatted with NTFS file system, corrupted, or set with read-only disk permission. The solutions above are useful to fix external hard drive read-only on Mac without formatting, while using NTFS for Mac software is most recommended.
Nevertheless, if your external hard drive is not NTFS formatted, and failed to repair with Disk Utility, it could be a failed external hard drive which needs to be replaced, or you can try your luck by sending it to a local disk repair service.

Connie Yang is the primary columnist and website editor at iBoysoft. She is enthusiastic about sharing tech tutorials about data recovery and OS-related issue fixing tutorials.
Источник
Quick Tip: Solving “Read Only” External Drive Problems on Your Mac
More and more people are finding themselves using both Macs and Windows based PCs. While compatibility is almost a non-issue now days between Macs and PCs, as well as Macs and third party peripherals, there is one area that may still cause confusion. In this tutorial I will explain the “Read Only” error you may run into while using external storage devices, and also show you how simple it is to fix.
Quick Tip: Solving “Read Only” External Drive Problems on Your Mac
The Cause of «Read Only» Disk Errors
I have a USB drive that I purchased and use with various PCs at work and school. I am able to open the drive and can even copy files from the drive. But if I attempt to copy a file to the drive on my Mac, I get an icon telling me that I am not able to copy the file. If I try to delete a file, by pressing Command+Delete, nothing happens and, if I right click the file, the option to move it to the trash can is missing. Something is obviously not right with the storage drive.


Trying to copy a file to my USB drive gives an icon indicating that you cannot copy files to the volume.
If you right click the drive and select Get Info, you can see at the bottom of the info window under the sharing and permissions twirl down, you only have permission to read from this drive and nothing else.


Looking in the info window you can see that the permissions for the drive only allow for reading.
The cause of this is due to the filing system the storage device is formatted in. If you look in the general twirl-down under format you can see that this drive is formatted in the windows NT file system. The NTFS file system is a system specifically optimized for Windows in the way that it organizes the data on the drive. While this file system is readable on Macs because OS X can rearrange the data as it is reading it, the way that NTFS writes the files to the storage device is not; hence, you can read, but not write.


The cause of the «Read Only» behavior is due to the format of the file system.
Many storage devices such as USB drives and external hard disk drives come pre-formatted in NTFS because a larger number of consumers are using them on PCs. However, making your storage device Mac compatible, and even cross compatible with Macs and PCs, is as simple as reformatting the drive.
Correcting the «Read Only» Disk Error
First and foremost before proceeding any further, you are about to format your storage device. Be sure to copy any and all file from the drive as all the data on the drive will be erased. This can be a simple task or a long undertaking depending on the size and usage of the storage device, but is a necessary and important step.
You can reformat a hard drive on Mac OS X by using Disk Utility. In the left-hand side inside of Disk Utility you will see a list of all the connected hard drives. Each physical drive is shown with the partitions of that drive nested below. Highlight the physical drive you wish to reformat and on the menu at the top to the right select erase.
You are about to format your storage device. Be sure to copy any and all file from the drive as all the data on the drive will be erased.
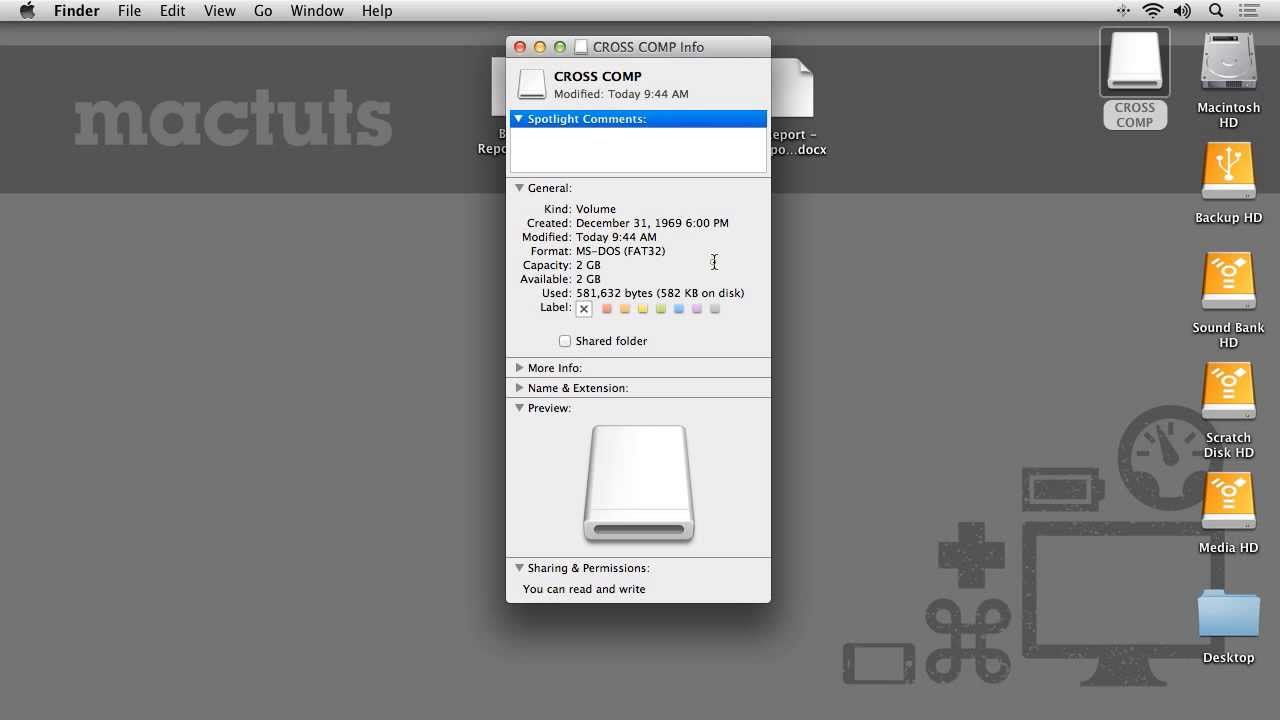
You will see two fields where you can choose a file system format and a field to name the new partition you are going to create. If you are just going to use your drive on Mac computers, you can select one of the Mac OS options. If you wish to create a partition that is cross compatible with Mac computers as well as PCs, you can select either the MS-DOS Fils System format or the exFAT format. You can rename the hard drive to whatever descriptive name you like then click erase and now the drive is formatted in a cross compatible filing system. If you click on the drive and select get info you can now see that the permissions are set to read and write.


Showing the info of the newly formatted drive, you can see the disc is now set to read and write.
Conclusion
The NTFS file system format is a great format to use if you are using your drive solely on Windows based PCs. But if you need to use your drive on Mac OS, or on both PCs and Mac OS, NTFS will unfortunately not be the best format to use. In this tutorial I’ve identified the cause of the “read only” error that Mac users may find when using external storage devices, and also how to easily fix the problem by reformatting your drive to a fully Mac OS compatible format.
Источник


