- Mac OS X: Set Port Forwarding Nat Router (Internet Sharing)
- Turn On Internet Sharing
- How Do I Use Shared Internet Connection On Other Computers?
- How Do I Setup Port Forwarding OS X Router?
- Sample ipfw rules
- References:
- Как открыть порты в брандмауэре Mac OS X
- Как работает брандмауэр в Mac OS X?
- Использование брандмауэра OS X для блокировки и открытия портов
- Как открыть порт приложения в брандмауэре OS X
- Как открыть определенный порт в брандмауэре OS X
Mac OS X: Set Port Forwarding Nat Router (Internet Sharing)
I ‘d like to set my Macbook as a router for my other desktop computer. How do I set NAT and port forwarding under MAC OS X? How do I forward ports using OS X for BitTorrent clients?
Network address translation (NAT) is the process of modifying network address information in IP packet headers while in transit across a traffic routing device for the purpose of remapping a given address space into another. Almost all modern Operating system provides NAT support. In other words, if your Mac book connected to the Internet, you can share its Internet connection with other computers on your LAN.
In this example, your Macbook is connected to the Internet via Airport and you are sharing the Internet via Ethernet which is connected to your desktop. Airport gets a public IP address via ISP connection and Ethernet has the following manual IP settings:
Mac OS X Ethernet Network Settings
Turn On Internet Sharing
Open System Preferences by visiting Apple menu > System Preferences:
Fig.01: Mac OS X System Preferences
Click Sharing:
Fig.02: Mac OS X Sharing the Internet Connection
Select Internet Sharing:
Fig.03: Mac OS X Sharing Airport Internet Connection With Ethernet Connected Computers
You need to select your Internet connection using Airport. Also use select “Ethernet”. Change these settings as per your requirement.
How Do I Use Shared Internet Connection On Other Computers?
You need to input the following networking settings for desktop computer called desktop1:
- IP address 192.168.2.2
- IP netmask 255.255.255.0
- IP gateway 192.168.2.1
- IP DNS server 192.168.2.1
For example, if you are using Ubuntu Linux on desktop update networking configuration as follows in /etc/network/interfaces:
How Do I Setup Port Forwarding OS X Router?
Macbook OS X has no direct GUI option to configure port forwarding. However, you can create a shell script as follows (open terminal and create a script called osx_fw.sh):
- No ads and tracking
- In-depth guides for developers and sysadmins at Opensourceflare✨
- Join my Patreon to support independent content creators and start reading latest guides:
- How to set up Redis sentinel cluster on Ubuntu or Debian Linux
- How To Set Up SSH Keys With YubiKey as two-factor authentication (U2F/FIDO2)
- How to set up Mariadb Galera cluster on Ubuntu or Debian Linux
- A podman tutorial for beginners – part I (run Linux containers without Docker and in daemonless mode)
- How to protect Linux against rogue USB devices using USBGuard
Join Patreon ➔
Simply run this script whenever you need to forward ports:
Sample ipfw rules
Type the following command to list current rules (these are set by above Internet sharing procedure):
See ipfw man page to secure your network via firewall. My Ubuntu desktop connected to transmission BT client:
Fig.04: Transmission Ubuntu BT Client Connected To The Internet Via OS X Router
References:
🐧 Get the latest tutorials on Linux, Open Source & DevOps via
| Category | List of Unix and Linux commands |
|---|---|
| Documentation | help • mandb • man • pinfo |
| Disk space analyzers | df • duf • ncdu • pydf |
| File Management | cat • cp • less • mkdir • more • tree |
| Firewall | Alpine Awall • CentOS 8 • OpenSUSE • RHEL 8 • Ubuntu 16.04 • Ubuntu 18.04 • Ubuntu 20.04 |
| Linux Desktop Apps | Skype • Spotify • VLC 3 |
| Modern utilities | bat • exa |
| Network Utilities | NetHogs • dig • host • ip • nmap |
| OpenVPN | CentOS 7 • CentOS 8 • Debian 10 • Debian 8/9 • Ubuntu 18.04 • Ubuntu 20.04 |
| Package Manager | apk • apt |
| Processes Management | bg • chroot • cron • disown • fg • glances • gtop • jobs • killall • kill • pidof • pstree • pwdx • time • vtop |
| Searching | ag • grep • whereis • which |
| Shell builtins | compgen • echo • printf |
| Text processing | cut • rev |
| User Information | groups • id • lastcomm • last • lid/libuser-lid • logname • members • users • whoami • who • w |
| WireGuard VPN | Alpine • CentOS 8 • Debian 10 • Firewall • Ubuntu 20.04 |
Comments on this entry are closed.
Nice Work VIvek,
I am really excited about the recent additions in OSX to your infamuos BLOG.
I’m getting lots of questions about OS X via email and I think it is a time to address all of them. In short, you will see more OS X here but no Windows 7 soon 🙂 heh
Sorry moderator the above post was mangled here is the correct one please ignore the first in moderating
This is not really the best way to do it if you already have and existing network as OS X will change your network settings to its own defaults 10.0.0.x/8 on airport and 192.168.2.x/24 on ethernet.
If your internet connection is pppd based you are better of calling
from with in your /etc/ppp/ip-up file and
from your /etc/ppp/ip-down file
If you are using ethernet as your internet connection even better you can start natd at boot as well as ipfw using configuration files.
This ensures your network remains the way it is, and you are not running unnecessarily services on your OS X machine, as enabling internet sharing via the GUI automatically starts up a named DNS proxy server, a BOOTP service and NATD which you may not really need in an existing network.
DISCLAIMER,
The above examples do not include firewall protection, they are just to show a command line based way of achieving this in a better way.
How can I reset all the changes I’ve made?
Many thanks for this useful article and posts.
You propose calling the following processes from the init files:
/usr/sbin/natd -clamp_mss -dynamic -unregistered_only -interface $1
/sbin/ipfw add divert natd all from any to any via $1
I don’t understand why it is necessary to provide the “via $1” argument and I’m also wondering whether this is correct. I understand from the man page of ipwf that the via argument causes the interface to always be checked. I understand that we may want to masquerade before sending out packets coming from our internal LAN. So the interface is always checked, packets will be sent to natd for masquerading when coming in.
To make it clearer, if WAN is on en0 and LAN is on en1, then the script should probably rather call:
/usr/sbin/natd -clamp_mss -dynamic -unregistered_only -interface en0
/sbin/ipfw add divert natd all from any to any via en1 # i.e.
$1 indicates that those commands are stored in a shell script. In this case it is stored in /etc/ppp/ip-up to use $1, $2 etc. The /etc/ppp/up-up is executed with the parameters as follows:
See pppd man page.
Hi I use Command and Conquer Zero Hour on my MAC computer but have problems with the game There is a warning which comes up :
Port Restricted Cone Nat Router
Your internet connection is behind a port restricted cone nat router that may prevent you from connecting to some players in peer group games.
I have been supplied with a wireless router Huawei Echolife HG521, and I need to enable port forwarding for UDP port 16000.
How does this need to be set up?
I am writing from my friend’s account who is a tech but out of town. th
I am trying to share my internet connection on this intel powerbook osx 10.6.7
I get internet just fine via ethernet modem (eztether) and want to create a wireless network for my other computers to share so I guess i want this computer to be router too. So I have enabled airport, selected create computer to computer network, set up name, password, etc. It can be see by other air computers but it only selbf assigns a faux IP. When I go to DCHP manual using a subnet that the orig ethernet input is giving me, it still will not translate to usable addys. This should be automatic on a mac no? Even when I use all manual and insert the same subnet settings as the EZ share are showing (all internal – sans the DNS ) I still get no love. I want to share this connection with my other powerbooks by air so HELP. Thanks in advance. Mike (using Rick’s computer with permission.)
I’ve been trying to get this to work because I’m in Afghanistan and our ISP only allows 1 device to connect to the network at a time. Since I have a MBP and an iPad, I wanted to connect both at the same time. I’ve tried using the directions above to share my internet connect (on en0) across my AirPort to my iPad, but it does not appear that NAT is working, because my ISP blocks my iPad from the internet. Am I missing something!?
This doesn’t work for 10.7 anymore. How can I do port forwarding with pfctl?
In 10.7. ipfw is obsolete: ” Note that use of this utility is DEPRECATED. Please use pfctl(8) instead.”
Take a look at pf tutorial. I will write a new one soon for 10.7.
I want to reach my internal web server from the internet. I have 2 network cards. The external is en2 and the internal is en0. The external ip is 10.222.10.165. I edit the pf.conf file like this:
#
# com.apple anchor point
#
nat-anchor “com.apple/*”
rdr-anchor “com.apple/*”
anchor “com.apple/*”
load anchor “com.apple” from “/etc/pf.anchors/com.apple”
web_serv_int = “192.168.2.1”
web_serv_ext = “10.222.10.165”
pass on en2 from $web_serv_int to any binat-to $web_serv_ext
I get an error at the last line. Whats wrong. Internet- and web-sharing is turned on
http://whatismyipaddress.com/ says my ip is 80.226.1.7 should I use this ip for external web_serv?
Please could you show how to NAT a L2TP VPN connection with natd and pf. I have never got this to work with ipfw.
My problem is fixed. I use a UMTS connection. All incoming traffic to specific ports is blocked from the provider. So it is impossible to reach the internal web server from outside.
no luck. I want to share mac’s internet connection with BeagleBoneBlack(BBB). I’ve enabled internet sharing. I set BBB’s default gw to 192.168.7.1. I tried to ping 8.8.8.8. It didn’t ping. subnet of mac n BBB is 192.168.7.0/24. subnet of mac n lan is 192.168.2.0/24. what could be the reason. I think we got to setup NAT. Help me out please.
$ sudo ipfw list
Password:
65535 allow ip from any to any
above is the result whether I turn internet sharing off or on!
sudo ./osx_fw.sh
Password:
Binding to NATPM port failed!
I get that when i run the script.
The script w/ changes:
/usr/sbin/natd -alias_address 192.168.1.13 -interface en1 -use_sockets -same_ports -unregistered_only -dynamic -clamp_mss -enable_natportmap -natportmap_interface en0 -redirect_port tcp 192.168.3.3:21 21 -l
___________________________________
I have my mac connected to a ppp vpn on centos, I’m sharing that connection with a ethernet to my pc. The pc has ftp setup, i can connect to it on the mac by using the internal ip address of the pc. I’m not for sure if the vpn would cause that binding to NATPM port failed. Can anyone help?
Источник
Как открыть порты в брандмауэре Mac OS X

Mac OS X поставляется со встроенной службой брандмауэра, которую можно использовать для защиты вашего Mac от угроз безопасности в Интернете. Брандмауэр расположен между OS X и Интернетом и позволяет входящему трафику проходить только через определенные порты. OS X управляет брандмауэром для каждого отдельного приложения, но иногда вы хотите открыть определенный порт на вашем Mac.
Вы можете разрешить или заблокировать входящий трафик для определенных приложений, используя настройки безопасности, но вы можете открыть определенные порты в терминале. Раньше это делалось с использованием ipfw, но в OS X 10.10 и более поздних версиях вы используете новую команду: pfctl.
Как использовать Системные настройки в Mac OS X Yosemite
Как подключить Mac к сети и обмениваться файлами между компьютерами Mac по сети
Терминальные советы и хитрости: 10 терминальных проектов
Как работает брандмауэр в Mac OS X?
Это может помочь прояснить понятие портов и брандмауэров. Порты — это особые соединения между вашим Mac и сетью, а межсетевой экран находится между вашим Mac и сетью и решает, какой порт открыт, а какой закрыт. Представьте себе IP-адрес вашего Mac (используемый для подключения к сети) как отель, порты как номера комнат и приложения в качестве гостей. С выключенным межсетевым экраном каждое приложение имеет доступ к каждой области. Брандмауэр OS X разрешает доступ только к определенным областям.
Использование брандмауэра OS X для блокировки и открытия портов
Брандмауэр в OS X отключен по умолчанию. Это может показаться вам странным, потому что Apple так заинтересована в безопасности. Тем не менее, большинство компьютеров больше не подключаются напрямую к Интернету через модем DSL, вместо этого большинство из них используют маршрутизатор, предоставленный их поставщиком услуг Интернета (или через корпоративную сеть). В любом случае предоставляется аппаратный брандмауэр, как правило, как часть NAT (трансляция сетевых адресов).
Другая странность заключается в том, что брандмауэр OS X управляет портами не индивидуально, а отдельно для каждого приложения. Следуйте этим настройкам, чтобы получить доступ к параметрам брандмауэра:
- Откройте «Системные настройки» (меню «Apple»> «Системные настройки»).
- Нажмите Безопасность Конфиденциальность.
- Нажмите Брандмауэр.
- Нажмите Параметры брандмауэра.
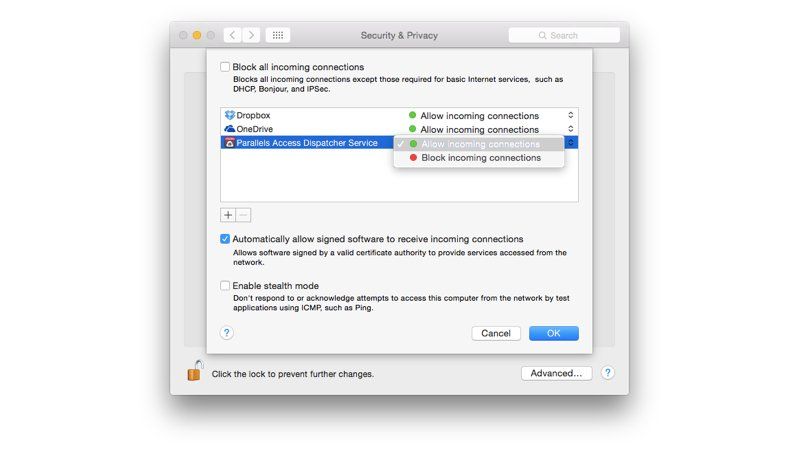
Охрана Окно конфиденциальности отображает окно с выбором опций:
- Блокировать все входящие соединения. Это блокирует все, кроме основных интернет-сервисов, таких как DHCP, Bonjour и IPSec. Если вы установите этот флажок, другие приложения, использующие интернет-сервисы, такие как Dropbox, перестанут работать.
- Приложения. В главном окне отображается список приложений со статусом «Разрешить входящие подключения» или «Блокировать входящие подключения». Обратите внимание, что это не относится к исходящим соединениям.
- Автоматически разрешать подписанному программному обеспечению принимать входящие соединения. Эта опция включена по умолчанию. Если приложение имеет действительный сертификат, брандмауэр разрешает входящие соединения.
- Включить стелс-режим. Это не позволяет другим людям (или компьютерам в локальной сети) обнаружить ваш Mac. Ваш Mac больше не будет отвечать на запросы ping. Мы думаем, что это маленькая «шапка из фольги» для большинства пользователей.
Как открыть порт приложения в брандмауэре OS X
Если у вас включен брандмауэр OS X, вы можете установить новое приложение, которое требует, чтобы вы разрешили ему доступ через брандмауэр. Вам решать, доверяете ли вы приложению. Вот как разрешить приложению принимать входящие соединения.
- Откройте Системные настройки> Безопасность Конфиденциальность> Брандмауэр> Параметры брандмауэра.
- Нажмите Добавить.
- Выберите приложение из папки «Приложения» и нажмите «Добавить».
- Убедитесь, что параметр рядом с приложением установлен на Разрешить входящие подключения.
- Нажмите ОК.
OS X вручную управляет портами, запрошенными приложением, и открывает их соответственно. Большинство пользователей, использующих брандмауэр OS X по умолчанию, должны использовать этот метод для разрешения и блокировки входящих подключений, а не открывать порты вручную. Однако некоторые опытные пользователи, такие как веб-разработчики или системные администраторы, имеют законную необходимость открыть определенный порт.
Как открыть определенный порт в брандмауэре OS X
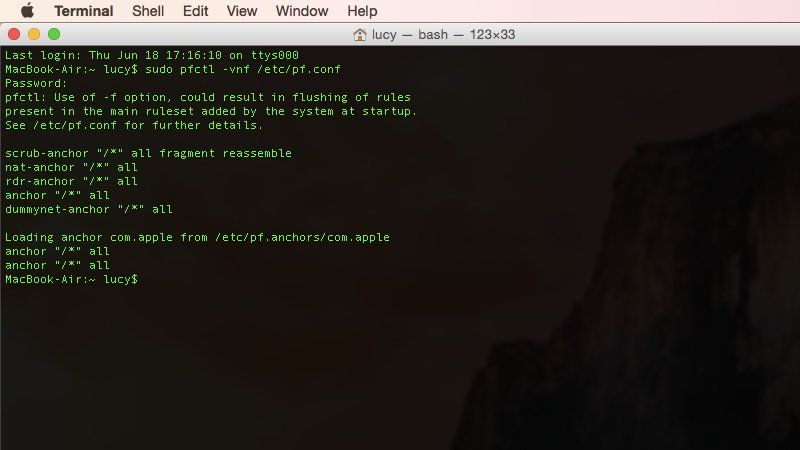
Можно открыть определенный порт в OS X, хотя вам нужно будет перейти в терминал. В OS X 10.10 вы используете команду pfctl (используйте man для инструкций). Более ранние версии OS X используют ipfw, который теперь устарел. Выполните эти шаги, чтобы открыть определенный порт (в этом примере 8080) в OS X.
- Откройте Терминал (Go> Utilites).
- Введите sudo pfctl -vnf /etc/pf.conf
Чтобы открыть порт при запуске системы, используйте sudo nano /etc/pf.conf и добавьте sudo pfctl -vnf /etc/pf.conf в этот файл pf.conf.
Прочитайте определения других технических терминов, связанных с Apple, в техническом жаргоне.
Источник


