- Mac os pid process
- Find the Process Listening to Port on Mac OS X
- Step-by-Step
- Find the Process ID (PID)
- Find the Process ID (PID) Using lsof
- Find the Process ID (PID) Using netstat
- Find the Process Name
- Other Useful Commands
- How to Kill or Stop the Process by PID
- The lsof Command
- How to View and Kill Processes Using the Terminal in Mac OS X
- About Terminal
- About Activity Monitor
- How to Use Terminal
- Basic Terminal Commands
- To View All Processes
- To Find a Specific Process
- To Terminate (Kill) a Process
- Before you go
- How To View And Kill Processes on your Mac
- How to show which processes consume a lot of memory
- How to kill process using Activity Monitor
- How to shut down processes using Terminal
- How to prevent problematic processes
- How to kill a background process
- How to easily remove startup items
- How to Force Quit an application that’s not responding
- Fix crashing apps with Spindump
- How to create a Spindump file on Mac
- Reset a problematic app
Mac os pid process
I’ve recently switched from Linux to Mac OS X and I’m trying to get used to the new environment. One of the differences from Linux is the way to find the process id (pid) listening on a specific port. In Linux you do like this:
to show the pid listening on port 8080. On Max OS X how ever you’ll run into the following error message:
The way to find the pid on the Mac is to do like this:
which will give us:
java 4582 johan 194u IPv6 0x1de155f6b2c74d03 0t0 TCP *:websm (LISTEN)
where 4582 is the pid listening on port 8080. The problem, for me at least, is that this is not a trivial command to remember. To make it simpler I wanted to add it as an alias in .bash_profile in my home directory. The problem now is that aliases won’t accept parameters the same way that bash scripts does (by using $@ ). This is actually not a problem if parameters should be added to the end of an alias. For example consider the following alias:
We’ve now aliased grep to be case-insensitive so when running for example
we can find the folder called foldername
But in our case the port parameter should not be appended at the end of our alias. So what we have to do to get around this is to first wrap the command in a function and then create an alias to that function:
You can now use pidport 8080 to find the pid of the process listening on port 8080. Prefix lsof with sudo to see process ids that you don’t own.
Источник
Find the Process Listening to Port on Mac OS X

Step-by-Step
To find the process that is listening to a port on Mac OS X, we’ll use the lsof command to find the process ID (PID), and the ps command to show the name.
Find the Process ID (PID)
There are two different ways we can use to find the process that is listening to a port on Mac OS X.
Find the Process ID (PID) Using lsof
Using the lsof command we can find the process ID (PID) for a specific port that is in a LISTEN state. In a terminal type the following and replace the “
” with our port number.
This generates output that looks like this:
In the output above the PID (process ID) is the second value, in this example output the process ID (PID) is “63851”. This command will also print out the port number, which is 9999 in the above output example.
Find the Process ID (PID) Using netstat
Using the nestat command we can find the process ID (PID) for a specific port. In a terminal type the following and replace the “
” with our port number.
This generates output that looks like this:
In the output above the PID (process ID) is the ninth value (the fourth value from the end), in this example output the process ID (PID) is “63851”. This command will also print out the port number, which is 9999 in the above output example.
Find the Process Name
We can now use the process status command ps to display the process name for the process ID (PID).
This generates output that looks like this:
In the output above the process name is the last value “the-process.” Now we know the name of the process that is listening to the port. The reason as to why the grep command is listed twice is to avoid displaying the process ID (PID) for the grep command itself.
Other Useful Commands
How to Kill or Stop the Process by PID
You can kill the process by process ID (PID) using the kill command. Replace “
” with the process ID from lsof or netstat.
The lsof Command
The lsof command lists open files. Network sockets count as files, so each open network socket, either listening or actively in use is listed by lsof. In addtion you can run the man lsof command to display all the different options for lsof.
lsof can take a very long time to execute, so I suggest that you use -n (inhibits the conversion of network numbers to host names for network files) and -P (inhibits the conversion of port numbers to port names for network files) to speed it up.
Источник
How to View and Kill Processes Using the Terminal in Mac OS X
Occasionally in Mac OS X, it may be necessary to force a program or process to quit. For example, if a particular program fails to respond or unexpectedly hangs. Every application on a Mac comprises of one or more processes.
It’s usually possible to use the Force Quit command (⌘⌥ esc) in the Apple Menu, but only individual applications are listed in the Force Quit Applications window rather than all processes which are running on your computer.
If you are new to using the OSX Terminal, I can recommend the Macintosh Terminal Pocket Guide by Daniel J. Barrett as a great way to get started.
The basic steps to check and kill a process are:
- Open the Terminal application
- List the running processes
- Find the process you want to close
- Kill the process
About Terminal
Probably the most useful tool to check and kill processes is called Terminal, which is an application that provides access to the lower levels of the Mac OS X operating system and files. Terminal is a text-based tool which lets you conduct all manner of routine tasks such as viewing directories, copying, moving and deleting files, as well as obtain detailed information about each process running including:
- the process ID (PID)
- the elapsed time spent running
- the command or application file path
About Activity Monitor
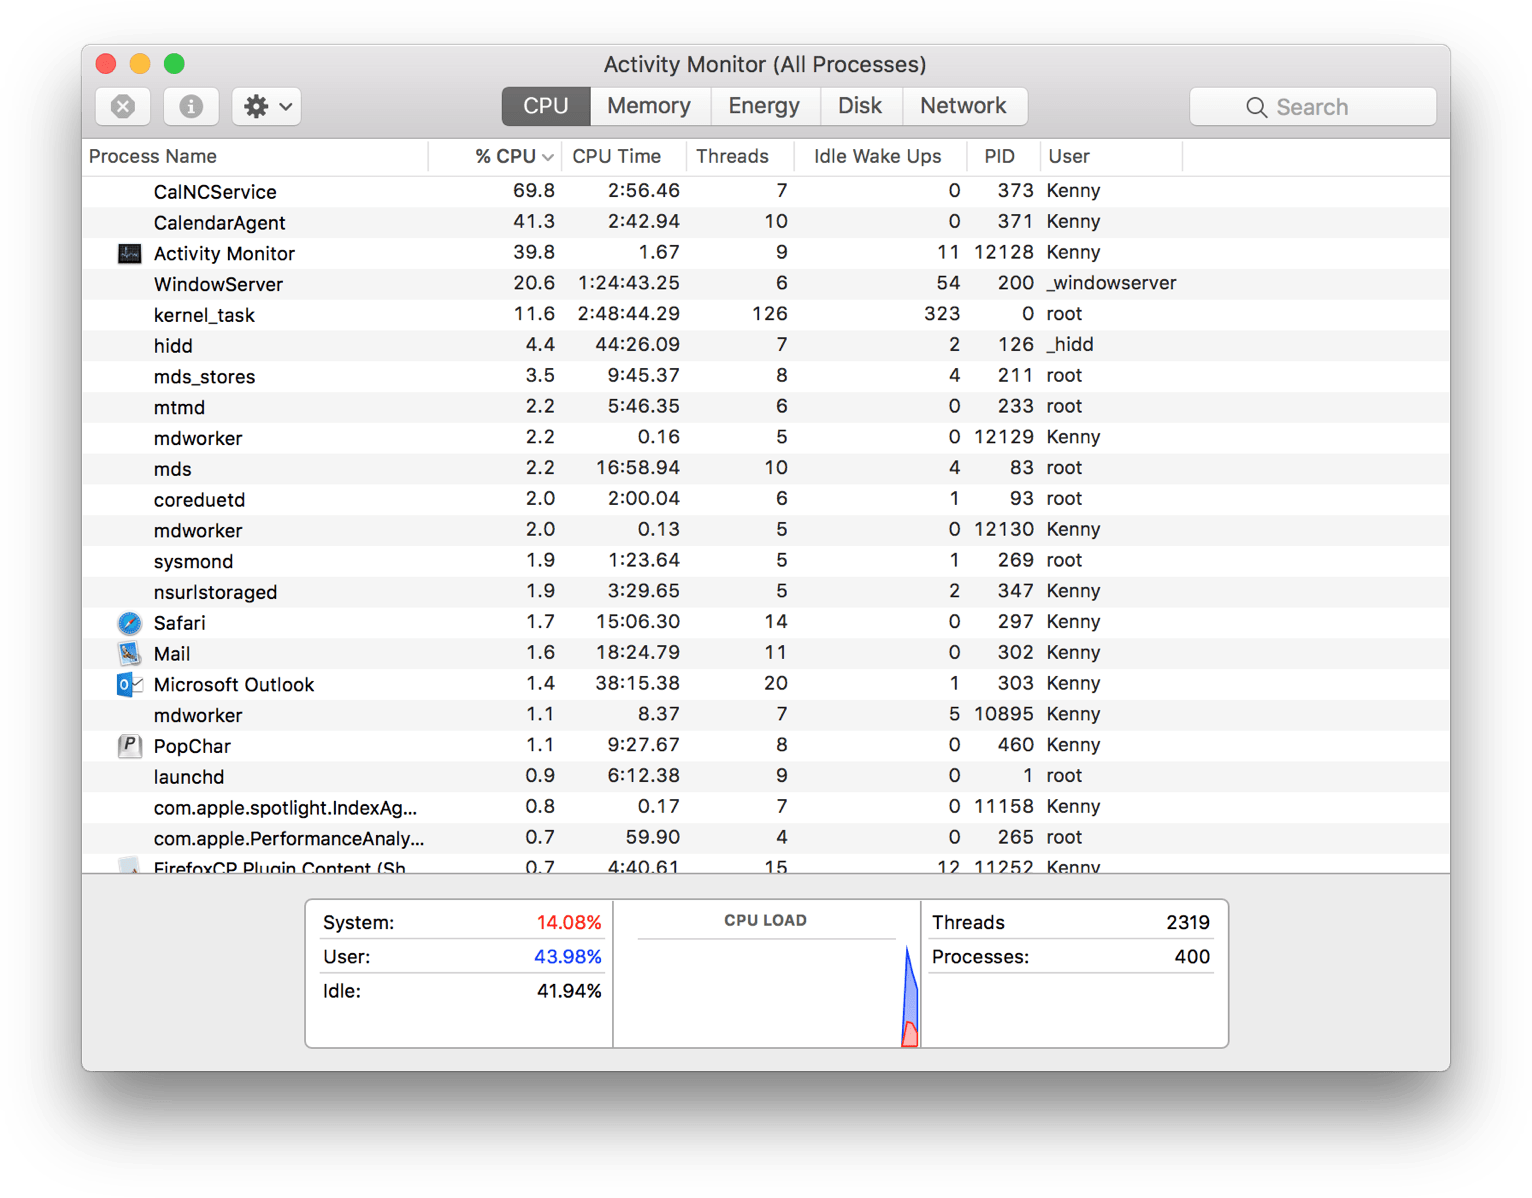
A related indispensable application is Activity Monitor – a graphical tool that allows you to manage processes, however it doesn’t have quite the same capabilities that Terminal does. Activity Monitor shows common process-related details such as the memory used and percentage of CPU that each process is consuming. When used together, Activity Monitor and Terminal provide a powerful yet relatively straightforward way to inspect and manage wayward processes.
The main Activity Monitor window is shown below.
Each application on your Mac has an associated Process ID (a PID) and a user-friendly name. From here you can inspect or quit each process, but in this example we use Activity Monitor simply as a companion to Terminal.
The Apple Mail application is displayed in Activity Monitor with a PID number of 14649. Note that process ID’s are assigned by Mac OS, and therefore will not be the same on your computer as somebody else’s.
The Activity Monitor Application
» data-medium-file=»https://www.chriswrites.com/wp-content/uploads/B1-Pic1-Activity-Monitor-300×220.png» data-large-file=»https://www.chriswrites.com/wp-content/uploads/B1-Pic1-Activity-Monitor.png» loading=»lazy» src data-src=»https://www.chriswrites.com/wp-content/uploads/B1-Pic1-Activity-Monitor.png» alt=»The Activity Monitor Application» width=»550″ height=»404″> The Activity Monitor Application
How to Use Terminal
The first step is to open Terminal either from the Applications -> Utilities folder or simply type Terminal into Spotlight. Terminal is always represented by the icon below.
Once it opens you’ll be presented with a standard Terminal window as below.
The first line shows the date and time when you last logged in. The second line is the command prompt which is where you enter the commands you wish to execute . The command prompt always begins with your computer name followed by your local Account Name.
The current directory (the “working directory”) when you open Terminal always defaults to your Home Folder.
The Terminal Window
» data-medium-file=»https://www.chriswrites.com/wp-content/uploads/B1-Pic3-Terminal-Window-300×191.png» data-large-file=»https://www.chriswrites.com/wp-content/uploads/B1-Pic3-Terminal-Window.png» loading=»lazy» src data-src=»https://www.chriswrites.com/wp-content/uploads/B1-Pic3-Terminal-Window.png» alt width=»550″ height=»351″>
Basic Terminal Commands
Before we describe how to check and terminate a process on your computer it’s worth knowing a few basic Terminal commands.
- To show the current folder name type pwd
- To list the files in the current folder type ls -l
- To move into another folder type cd
Note that many commands in Terminal can accept various options (sometimes called switches) that can alter their effect. The simplest way to discover the available command-line options is to type the command into Terminal followed by -? such as ls -?
Another useful command is apropos. Enter apropos into the Terminal window for a description of that command and its options.
To View All Processes
- Type ps -ax at Terminal’s command prompt to list every process running, along with additional details such as the PID, the elapsed time running, and the process name and location (shown in the CMD column)
» data-medium-file=»https://www.chriswrites.com/wp-content/uploads/B1-A2-Pic4-Process-List-300×125.png» data-large-file=»https://www.chriswrites.com/wp-content/uploads/B1-A2-Pic4-Process-List.png» loading=»lazy» src data-src=»https://www.chriswrites.com/wp-content/uploads/B1-A2-Pic4-Process-List.png» alt=»Running Processes Displayed» width=»550″ height=»229″> Running Processes Displayed
To Find a Specific Process
The process list displayed using ps -ax may include a hundred or more processes, but it’s quite simple to identify a process based on the name in the CMD column (for example Skype is listed as /Applications/Skype.app/Contents/MacOS/Skype), or even by the PID if you already know it.
As shown in Activity Monitor earlier, the Mail application on my Mac had the PID 14649, so it’s simple to scroll down the Terminal window until the relevant process is found.
One very useful command to help find a process by name or PID is grep which can filter out the desired information. It can be used in conjunction with the ps -ax command to list only the process that you are interested in.
The “pipe” function (“|”) simply uses the output from the process list as an input to grep, to filter out the desired process name.
Assuming that Skype is actually running, you may see a result something like this:
roly$ ps -ax | grep Skype 14530 ?? 0:56.32 /Applications/Skype.app/Contents/MacOS/Skype -psn_0_9218250 14947 ttys000 0:00.00 grep Skype
This example shows that Skype has a PID of 14530 and also the folder where Skype was launched from. The last line is just the process ID of the grep command itself, which can be safely ignored.
Repeating the command with the Skype process ID instead i.e. ps -ax | grep Skype yields the same result.
To Terminate (Kill) a Process
Once you know the process ID, killing it using Terminal is very simple. Be cautious however because forcing a process to suddenly exit can have unforeseen consequences, so it’s advisable to check carefully that the process you are about to kill is the correct one. There are essentially two easy ways to kill a process:
- By PID: the simplest way is with the kill command followed by the PID, which causes the selected process to terminate immediately. In the Sky example, kill 14530 does the job and causes the process to exit immediately
- By name: this method uses the killall command to kill all the processes that contain that name. For example killall Skype will terminate all the processes that have Skype in their name
Caution: killall should be used sparingly to avoid accidentally terminating the wrong processes. There is no confirmation prompt to ask if you really do wish to kill the processes, so check carefully beforehand.
Before you go
After spending over 20 years working with Macs, both old and new, theres a tool I think would be useful to every Mac owner who is experiencing performance issues.
CleanMyMac is highest rated all-round cleaning app for the Mac, it can quickly diagnose and solve a whole plethora of common (but sometimes tedious to fix) issues at the click of a button. It also just happens to resolve many of the issues covered in the speed up section of this site, so Download CleanMyMac to get your Mac back up to speed today.
Источник
How To View And Kill Processes on your Mac
All-mighty Mac system monitor
When your Mac slows down or starts behaving erratically, chances are it’s because an application that’s running, perhaps in the background, is misbehaving. And if it’s not an application that’s causing the problem, it will almost certainly be a process associated with macOS or an ancillary service.
Solving this problem is usually as simple as killing the process, but in order to do that you need to identify which one.Here’s a comprehensive guide on how to view and kill processes on your Mac.
Best task killers for Mac
Try the best tools that help you find and kill processes hampering your Mac’s performance.
How to show which processes consume a lot of memory
The easiest way to view all active processes running on your Mac is to launch Activity Monitor from your Applications folder. In the default CPU tab, you can see how much processing power every process takes, ranked by the most consuming. And if you switch to the Memory tab, you will see the same list ranked by the amount of used up RAM.
For more immediate and elaborate information on how your computer resources are consumed, use iStat Menus, which handily lives in your menu bar and, in its MEM table, shows you applications and processes that are consuming more than their fair share of RAM in real time.
How to kill process using Activity Monitor
- Launch Activity Monitor.
The easiest way to launch Activity Monitor is to press Command and spacebar to call up Spotlight, then start typing Activity Monitor. When it appears in Spotlight, hit Return to launch it. Alternatively, go to Utilities in the Applications folder and double-click on its icon. Or open Activity Monitor in one click through iStat Menus app.
- View and filter tasks.
You’ll notice there are five tabs across the top of the Activity Monitor window: CPU, Energy, Memory, Disk, and Network. Clicking on any of those tabs organizes processes according to the percentage of the resource they are using. So, clicking on CPU lists tasks in the order of how much CPU capacity they’re using. By default, processes are ordered starting with the one that’s consuming the most of the resource at the top, so you can quickly see where problems are occurring or likely to occur. To flip the order, so that processes consuming the least of the resource are at the top, click the arrow next to Memory or CPU above the list of processes. - Kill problematic processes.
When you identify a process that’s causing a problem, either because it’s hogging lots of CPU cycles or memory, or because it’s highlighted in the Activity Monitor as having crashed, you need to kill it. To do that, click on the process first and then on the X in the Activity Monitor toolbar. The process will quit and free up the resources it was taking up. If it’s a critical process, it will restart. If it’s an application, it will remain shut down.

Activity Monitor alternatives
Get an advanced system monitor for macOS – an improved alternative to the default program.
How to shut down processes using Terminal
- Launch Terminal. Press Command and spacebar to pull up Spotlight then start typing Terminal. When the Terminal app appears in Spotlight, tap Return to launch it. Alternatively, navigate to the Utilities folder in Applications and double-click Terminal.
- View processes. When Terminal has launched, type «top» into the Terminal window. You’ll see a list of currently running processes. At the top of the list is an overview of the processes that are running and the resources they’re consuming.
- Kill an unwanted process. When you identify a process that’s causing a problem or consuming too many resources, take note of the number in the PID column next to the name of the process. To kill the process, type «kill -9» followed by the PID number. Press Enter. The problem process will now quit.
How to prevent problematic processes
You can pretty much avoid issues altogether by being a little bit proactive in hunting down the common culprits. Here, iStat Menus will help you identify which applications or processes are consuming finite resources, such as CPU and RAM.
Then, you can use CleanMyMac maintenance routines that, when run regularly, will keep you Mac running smoothly. Here’s how to do that:
- Launch Setapp and search for CleanMyMac.
- Find the maintenance scripts. Under the Speed section in the left sidebar, click on Maintenance. You will see a list of tasks that CleanMyMac would suggest you to perform to optimize your Mac. You should try to run them all, but the one especially important for us is under Run Maintenance Scripts.
- Run the maintenance scripts. Click on the checkbox next to Run Maintenance Scripts and then click Run. Alternatively, choose another specific maintenance script such as Speed Up Mail or Reindex Spotlight and click Run. When it’s finished, click Select Tasks to return to the list of maintenance tasks.
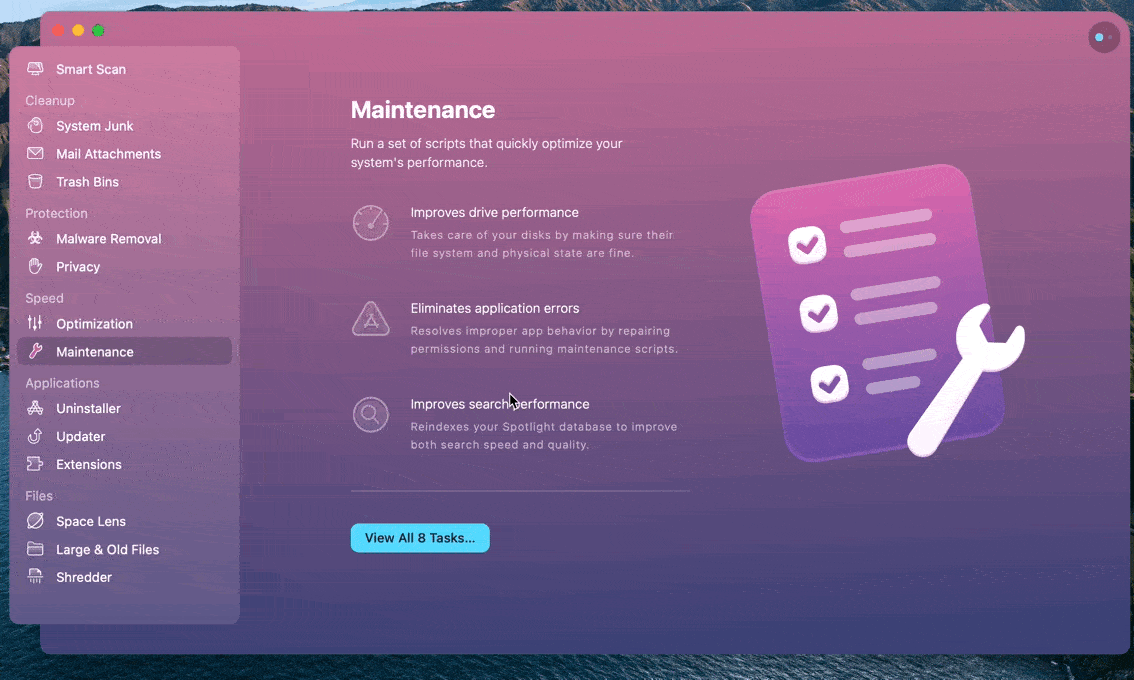
Run other tasks, as necessary. If you’re having problems with Mail, repeat step 3, but this time click the checkbox next to Speed Up Mail. Likewise, if Spotlight is running slowly, run the Reindex Spotlight task.
How to kill a background process
To kill a background process, use Activity Monitor. While the steps are the same as described in the «How to kill a running process using Activity Monitor» section above, the key difference is that background processes often have obscure names that don’t clearly describe what they do.
Be careful when killing a background process and, if not sure, leave it alone or search online for its exact role in your system. Otherwise, you might risk causes problems for your macOS. Generally, background processes don’t tend to consume significant RAM or CPU cycles, so if you spot one that does, it has probably got into trouble. Kill it using the X in the Activity Monitor toolbar.
How to easily remove startup items
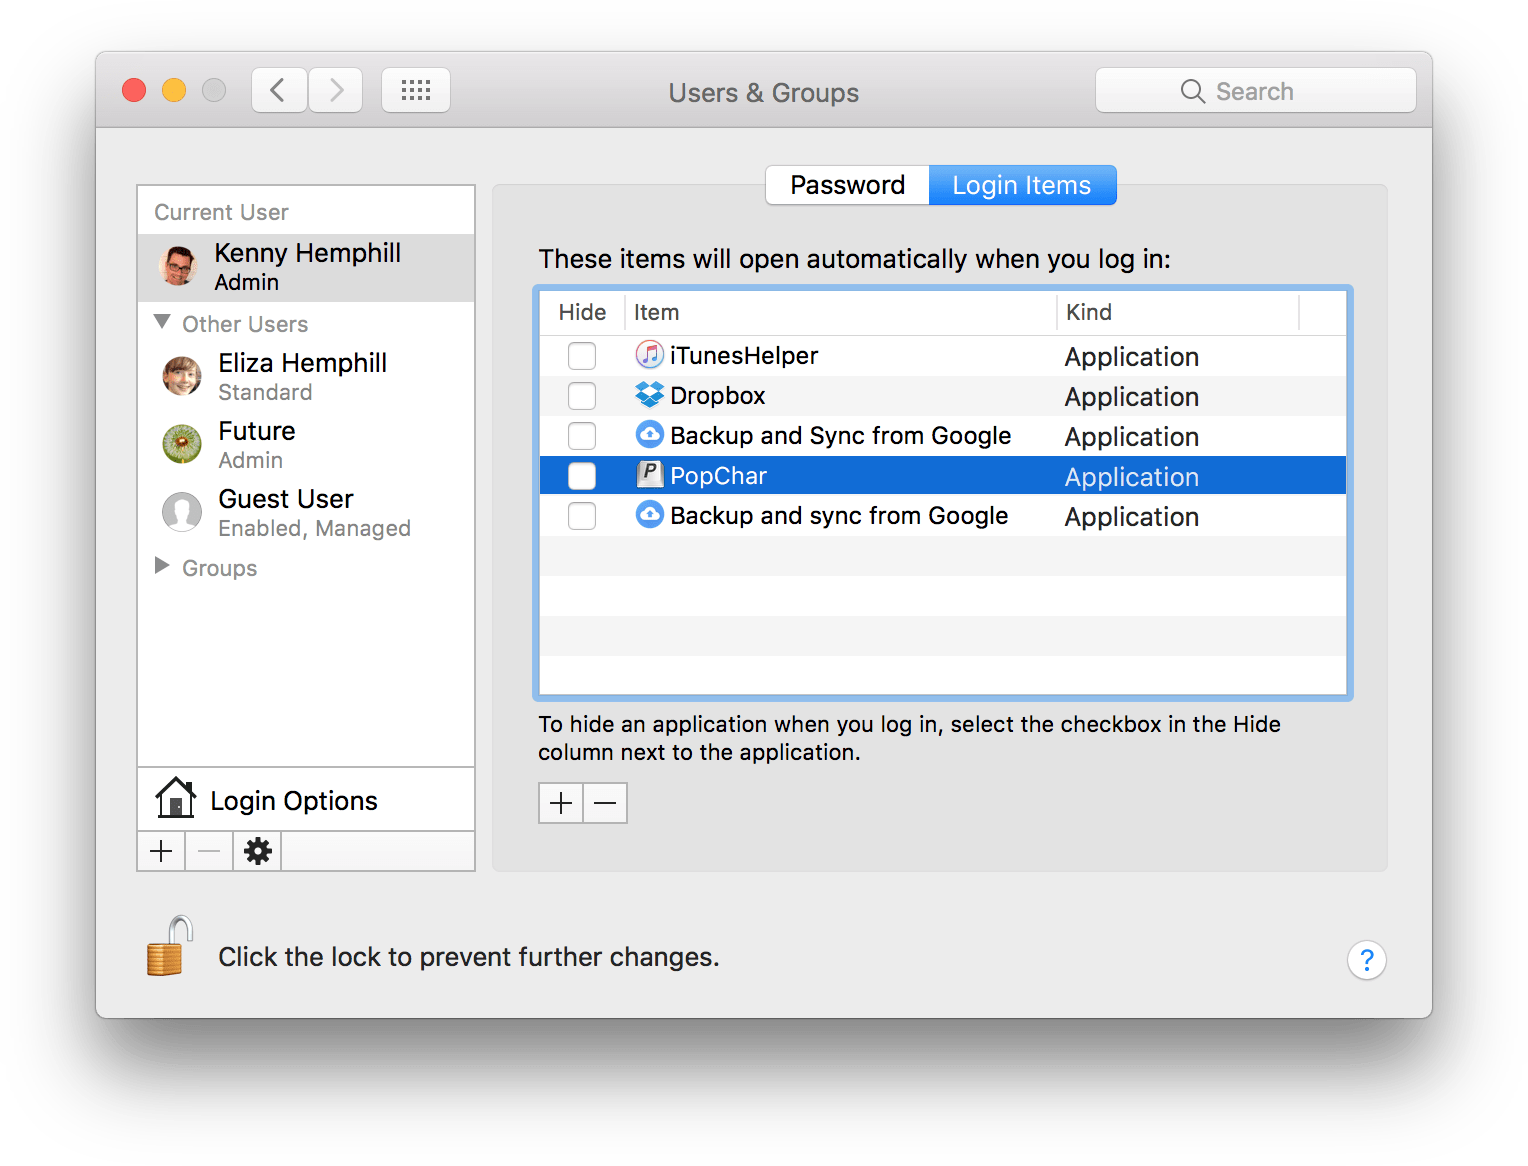
One common cause of Macs running slowly or having problems is items that launch automatically at startup. These could be helper apps for something like iTunes or just complete apps in their own right. They are also frequently apps you once used but no longer need.
To review the apps and helpers that startup when you log in
- Launch System Preferences from the Apple menu and click on the Users & Groups pane.
- Click the padlock and type in your password.
- Then select your username in the left panel and click the Login Items tab.
- Look through all the login items that correspond to apps you no longer use and then click the minus button. The app will no longer start up automatically when you log in.
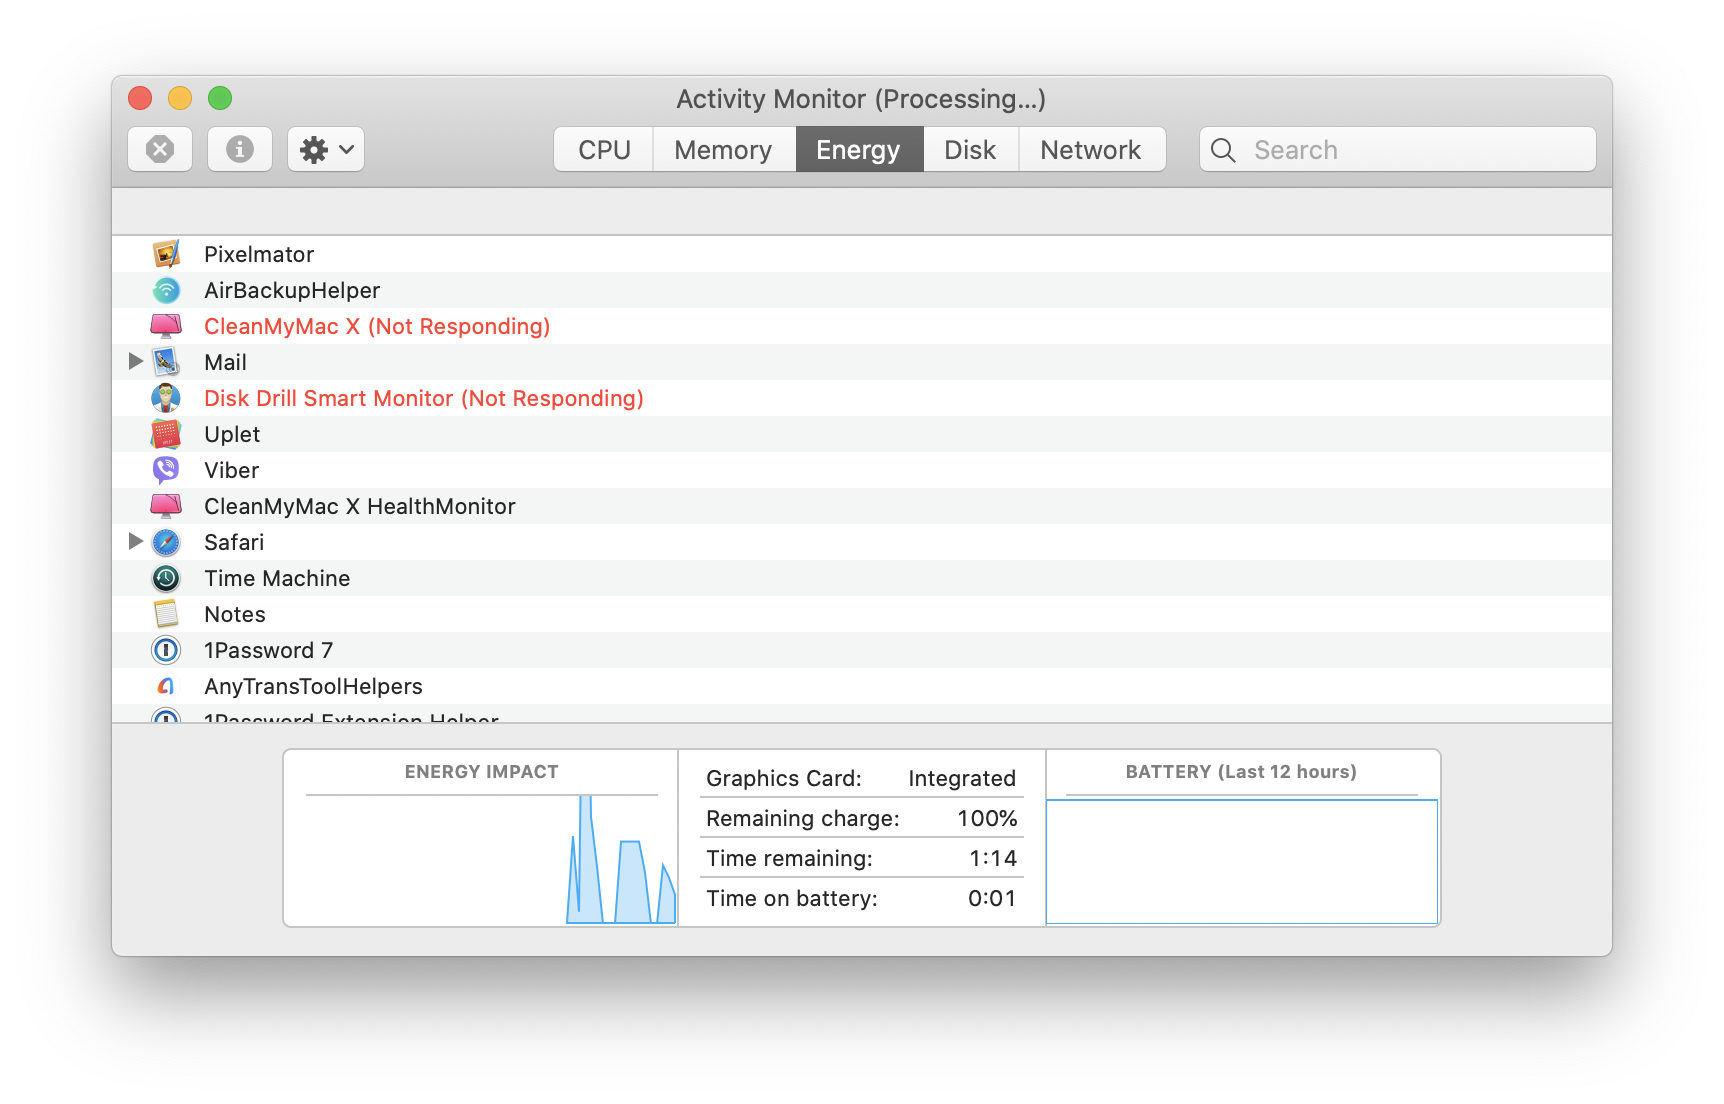
How to Force Quit an application that’s not responding
If you see the dreaded spinning beachball, or an app just won’t do anything, you should force quit it.
There are several ways to force quit an unresponsive application:
- Press Command-Alt-Esc and click on the application in the window that opens. Press Force Quit
- Control-click or right-click on the application’s icon in the Dock and choose Force Quit
- Launch Activity Monitor, locate the application and press the ‘x’ in the toolbar
- Locate the process in Activity monitor, look for the entry in the PID column and launch Terminal. Type ‘kill -9’ followed by the PID number. Press Enter
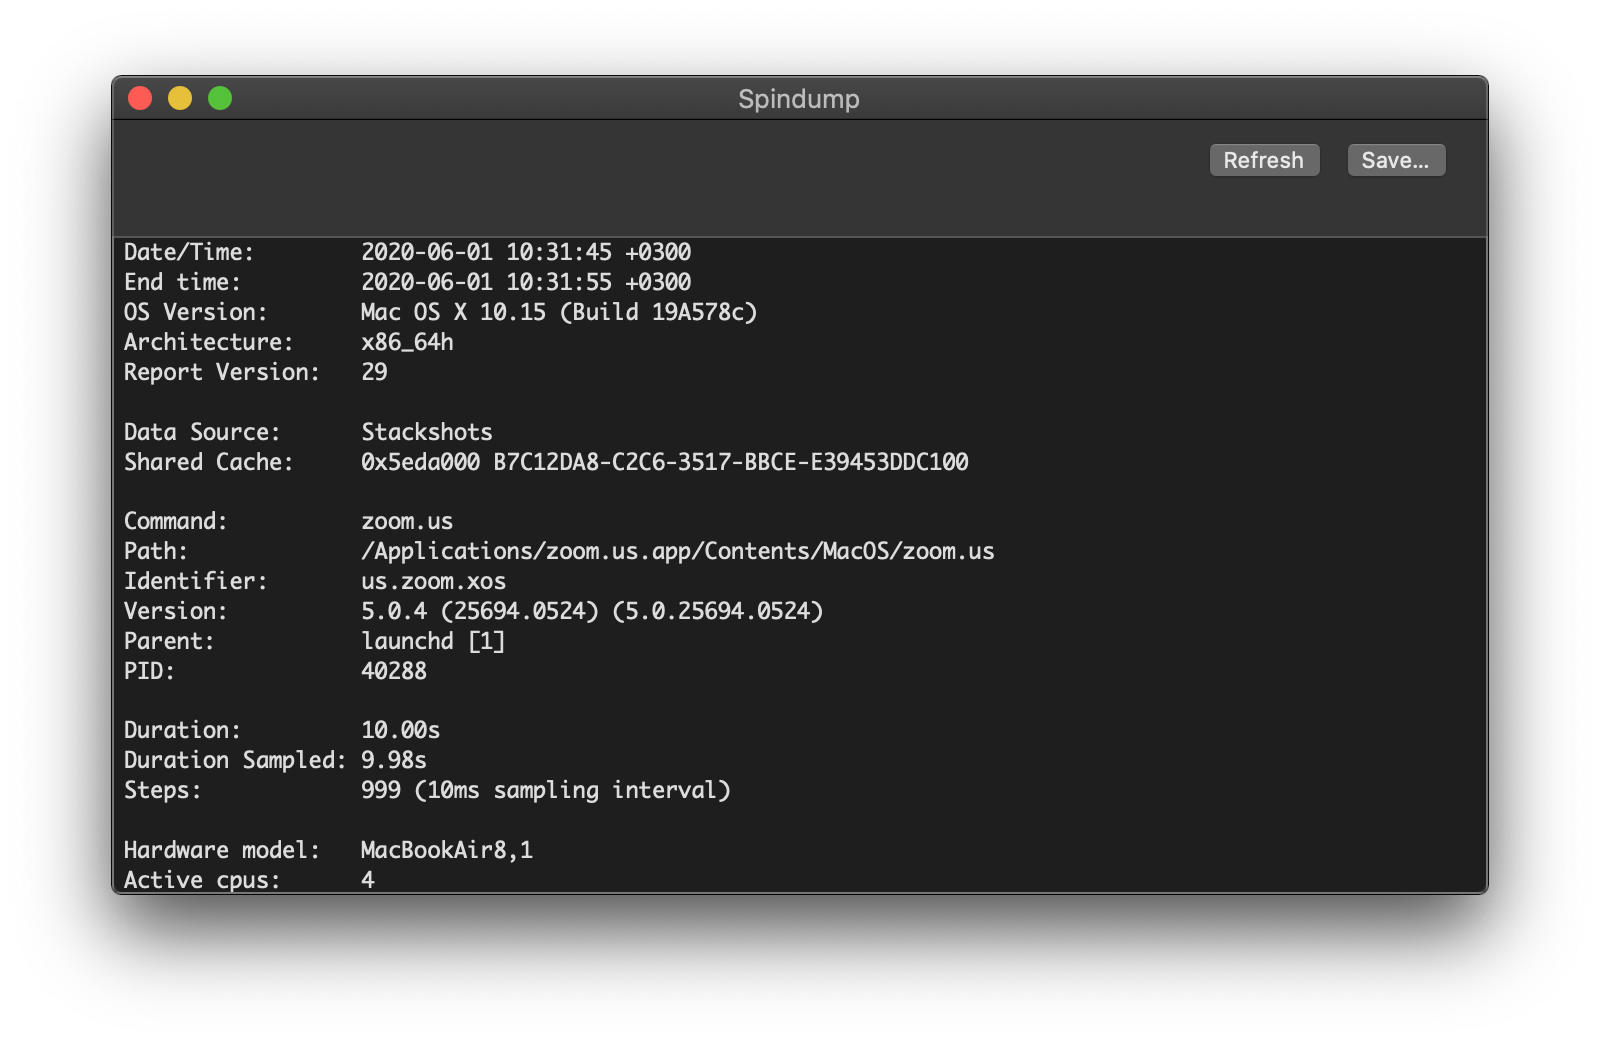
Fix crashing apps with Spindump
While Force Quit will fix the problem, it’s a temporary solution. If you’re determined to identify the source of crashing apps and prevent them from happening, use Spindump on Mac. It’s a hang reporting tool that alerts you about the crash and helps share the details with the app developer.
Whenever the app crashes, it will trigger Spindump and send the information to Apple or the app developer. Not only does it help you understand what just happened, but it also helps the developer track the conditions of app misbehavior — and fix it accordingly. A win-win.
How to create a Spindump file on Mac
- Launch Activity Monitor via Applications > Utilities
- Pick the app for which you want to create a Spindump file, then click on the Settings icon
- Select Spindump or Run Spindump
- Wait a few seconds for the file to generate
- Click Save.
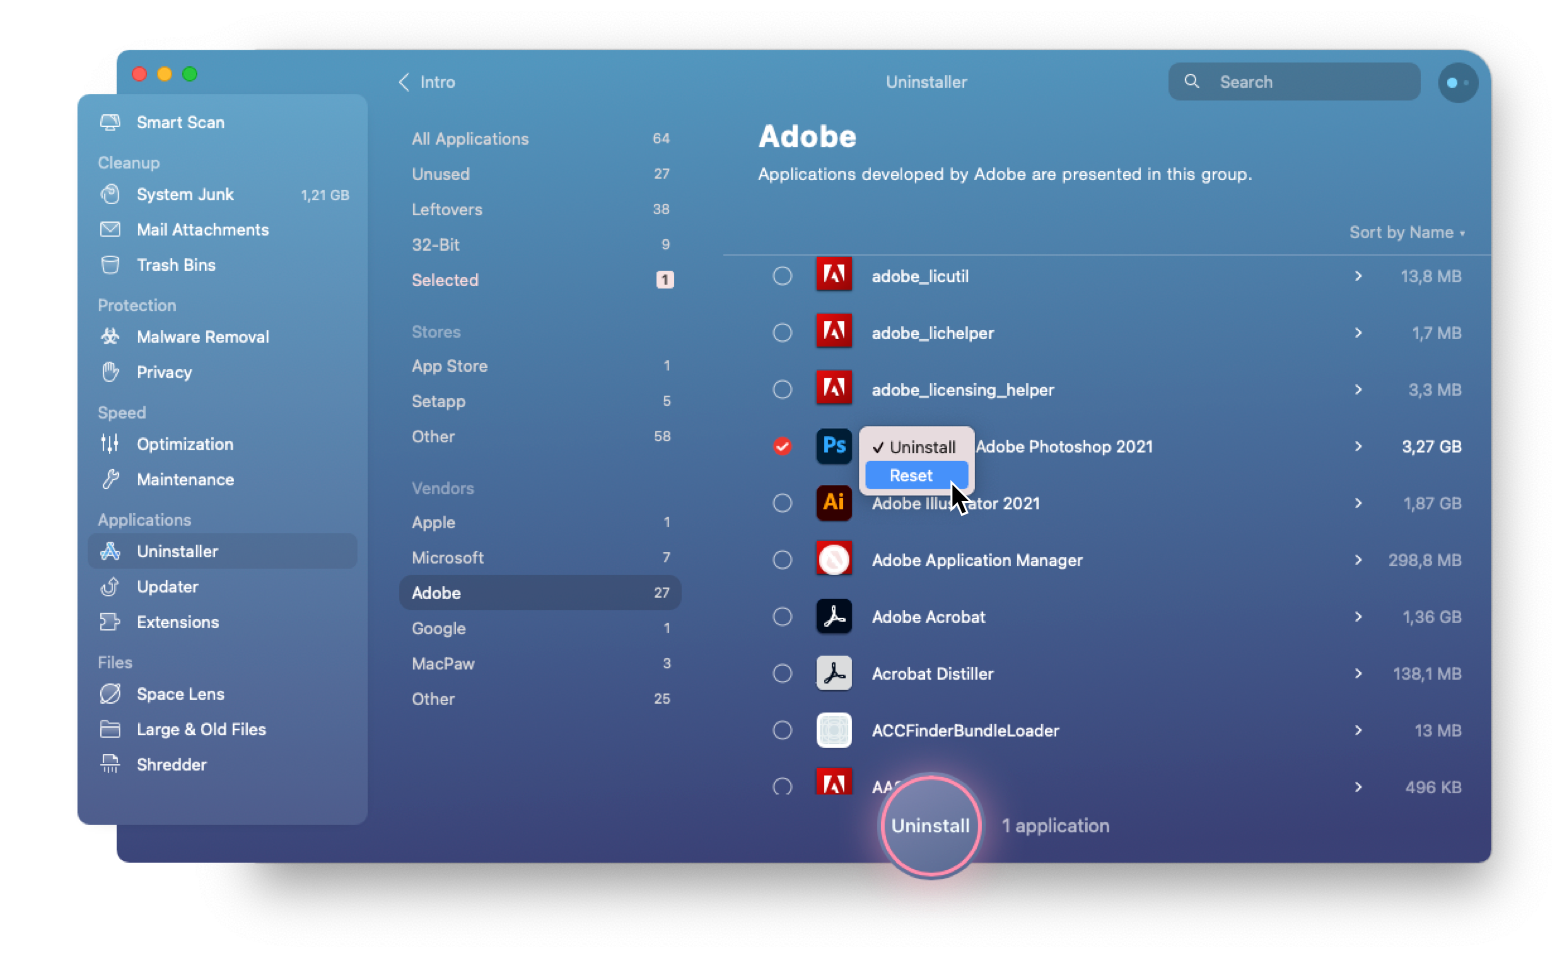
Reset a problematic app
There’s one more thing you can try if an app keeps running slowly or crashing – reset it. Thanks to CleanMyMac, resetting an app is easy. Here’s what you need to do:
- Locate the uninstaller. In the left hand sidebar of CleanMyMac, click on Uninstaller under Applications.
- Find the app that’s causing a problem. Scroll through the list of apps until you find the one that’s been crashing or running slowly. Click on it to highlight.
- Reset the app. With the app highlighted, you’ll see all the files associated with it in the right-hand window. Click Application Reset at the top of the window and all the files, except the main application file, will be selected.
- Click Uninstall. All the selected files will be trashed, effectively resetting the application to its default state. When you launch it the next time, it will behave as if it has just been installed — so you’ll need to recreate any custom settings or preferences.
If resetting the app doesn’t work, the final resort should be to uninstall the app completely and reinstall it. To do that, click Complete Uninstallation in the same menu instead of Application Reset.
As you can see there are lots of different ways and apps that help you view and kill processes in macOS. iStat Menus is a great way to passively monitor which processes are causing problems, so you can launch Activity Monitor and quit them. And running CleanMyMac’s maintenance scripts regularly prevents problems occurring in the first place. Best of all, all these apps are available to try for free on Setapp, along with over 200 high-quality macOS apps. So check your Mac for problematic processes now and see what you find.
Источник


