- Mac OSX – Testing Packet Fragmentation Over VPN
- Problem
- Solution
- Syntax;
- How to Use ping on Mac: Pinging Websites, Domains, or IP Addresses
- How to Use Ping from Mac OS X Command Line
- Ping a Destination IP or Domain Until Stopped
- Ping an IP / Domain for a Specified Packet Count
- Reading and Understanding Ping Results
- Using ping to Verify Network Assets & Test Network Latency
- How To Ping On Mac
- How To Check Ping On Mac Quickly
- Ping test IP with Network Utility
- How to ping a website with Terminal
- Check ping and bandwidth on your Mac
- Best ways to improve ping internet speed
- Пингование и другие сетевые инструменты Mac OS X
- min/avg/max/stddev
Mac OSX – Testing Packet Fragmentation Over VPN
KB ID 0001204В
Problem
Many moons ago I wrote a post about a problem where I had noВ RDP over a VPN connection, and all the hoops I jumped though to troubleshoot and fix the problem.
Today I had a similar problem, I wasВ connected to a client via Cisco AnyConnect, and I had hair-pinned that traffic, from the client site, over an IPSEC VPN to their servers in the Data Center. Pings were successful, but not RDP.В
To be honest this affects various types of TCP traffic, but it only ever seems to trip me up with RDP! In the past I used to ping and set the traffic to ‘not fragment’ and manually set the packet size, then I increased/decreased the packet size until I foundВ the optimal MTU size like this;
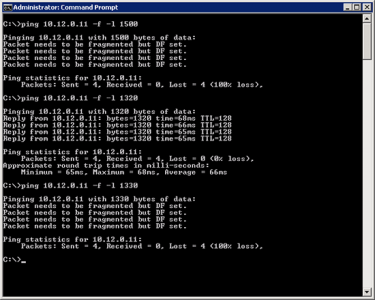
But these are Windows options, how can I do the same thing on my Mac?
Solution
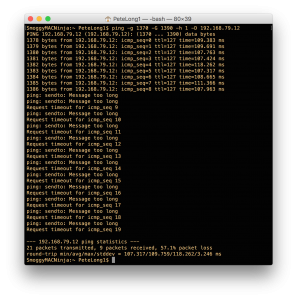
Well things on the Mac are even easier! It will even find the value for you, (in a manner of sorts). You set the minimum packet size, and the maximum packet size, and ask it to increment each ping packet by one. Below I’ve narrowed the scope to fit it on one screenshot;
Syntax;
As you can see above, I started at 1370 and the last ‘working’ ping was sequence 8, so the last working value was 1378.В
Источник
How to Use ping on Mac: Pinging Websites, Domains, or IP Addresses
 Ping is an essential utility for network administrators, but it’s also pretty handy to check if websites are online, how your internet connection is working, if you are experiencing lag or packet loss on a network connection, or to determine if a network resource is available.
Mac users can access and use ping to target any domain or IP address.
There are two ways to access ping tools in Mac OS from any Mac running any version of system software, but we’ll focus primarily on using ping from the command line since it is universal and works across platforms, meaning once you know how to use it on Mac OS X, but you’ll find it in Unix, Linux, and Windows too.
How to Use Ping from Mac OS X Command Line
Here’s how to use it the ping utility in all versions of Mac OS X from the Terminal app command line.
Ping a Destination IP or Domain Until Stopped
The most basic usage of ping will ping a destination until it is manually stopped, meaning there is no limit and no count.
- Launch the Terminal, found in the Utilities folder of Applications
- Type the following command:
Ping an IP / Domain for a Specified Packet Count
Want to send a handful of packets and measure that instead of pinging endlessly until manually stopped? Use the -c flag attached to ping, everything else is the same:
- Go back to the command line if you’re not there again
- To send a specific number of packets to an address, modify ping syntax to use the -c flag like so:
ping -c 5 192.168.0.1
In that example, -c 5 will send 5 packets to the destination IP.
Note the ping command only works if the Mac is online, and if the server you are pinging is online, and responds to ping requests. Most servers do respond if they’re online, except perhaps the most hardened networks who reject ping for security purposes.
Reading and Understanding Ping Results
An example of ping results may look like the following:
$ ping 8.8.8.8
PING 8.8.8.8 (8.8.8.8): 56 data bytes
64 bytes from 8.8.8.8: icmp_seq=0 ttl=57 time=23.845 ms
64 bytes from 8.8.8.8: icmp_seq=1 ttl=57 time=22.067 ms
64 bytes from 8.8.8.8: icmp_seq=2 ttl=57 time=18.079 ms
64 bytes from 8.8.8.8: icmp_seq=3 ttl=57 time=23.284 ms
64 bytes from 8.8.8.8: icmp_seq=4 ttl=57 time=23.451 ms
64 bytes from 8.8.8.8: icmp_seq=5 ttl=57 time=21.202 ms
64 bytes from 8.8.8.8: icmp_seq=6 ttl=57 time=22.176 ms
64 bytes from 8.8.8.8: icmp_seq=7 ttl=57 time=21.974 ms
^C
— 8.8.8.8 ping statistics —
8 packets transmitted, 8 packets received, 0.0% packet loss
round-trip min/avg/max/stddev = 18.079/22.010/23.845/1.703 ms
Each line to the destination represents a packet transission, the time specified in milliseconds at the end is most relevant for testing an internet connection as a high number there indicates there is lag or a connection problem. If there is no response at all, either the server is down, there is a connection problem, it does not respond to ping requests, or it is very slow to respond.
Perhaps next most useful is the “packet loss” number at the end. If packet loss is high, you almost certainly have network issues, because packet loss means that data being sent between you and the server is being lost (the term is quite literal in that sense). Troubleshooting packet loss can be challenging, but it can be the result of a poor internet connection, wi-fi problems, general network problems, a bad connection, a struggling connection, an interfered connection, connection interruptions, or many other potential networking issues.
Using ping to Verify Network Assets & Test Network Latency
I use ping constantly to make sure network servers are available, because it’s a lot faster to ping an IP than to try and connect to it through any number of protocols. It’s also a great way to test internet connections latency, which can be helpful for troubleshooting network issues with wi-fi or wired connections.
For users who do not feel comfortable with the command line, users can turn to the Network Utility app, which is bundled with every version of Mac OS X and provides a simple user friendly interface to ping, as well as a host of other helpful networking utilities.
Источник
How To Ping On Mac
Even with the most stable internet providers, your bandwidth might change throughout the day and let you down when it’s critical. Maybe you’re about to jump into a job interview via Skype in a local cafe or even get into a high-speed MMORPG at home — conducting an internet stability test might save you lots of frustration. You can also think of it as a ping test on Mac. But what is a ping?
Essentially, when you test ping on Mac, you’re sending a message to another computer (or server) online and then measure how long it took for that message to be delivered. The faster the ping the better your internet connection. So how to ping a website when you need to?
How To Check Ping On Mac Quickly
Knowing how to ping MAC addresses is valuable not only when you want to see how fast your online game is but also when you suspect your internet service provider (ISP) might be doing a subpar job.
A good thing to remember is that your posted internet speed (e.g. 50 Mbps) is distinct from the ping internet speed, which measures quality. So your connection might be theoretically fast, but practically bad. If you measure this information in time and can prove it, you can get a deal out of your ISP for not providing a service as advertised.
Regardless of the reason for checking your internet, there are a few ping testers you can use.
Ping Monitoring Tool for Mac
Get a huge set of best apps for troubleshooting your current network connection speed in macOS.
Ping test IP with Network Utility
To do a basic “test my ping” check, you don’t even need any third-party software — a built-in Network Utility will suffice.
You might have never heard about the Network Utility before because it’s hidden well within your Mac:
- Either follow the path of System ➙ Library ➙ CoreServices ➙ Applications ➙ Network Utility or simply open Spotlight (⌘ + Space) and search for Network Utility there
- Navigate to the Ping tab
- Enter any web address into the field (e.g. nytimes.com)
- Set the number of pings to be sent at around 10
- Click Ping
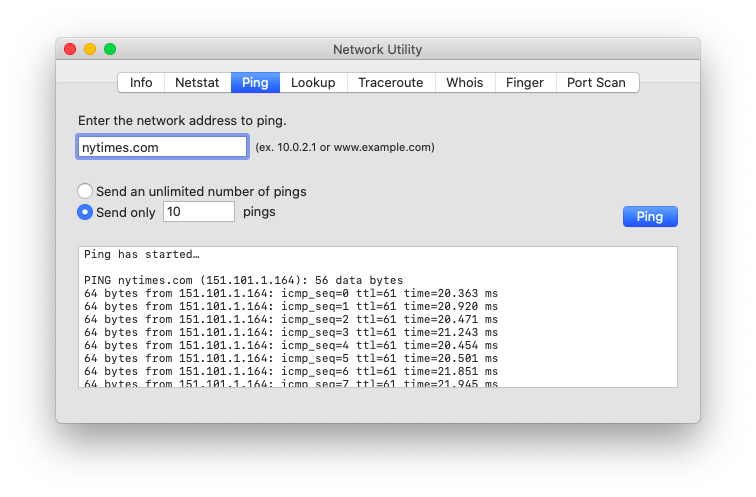
You Mac will then ping MAC addresses associated with the website 10 times to test the lag and return results in the format of minimum followed by average then maximum, and finally standard deviation. The average indicator is good enough for your purposes.
In most cases, the ping under 50 ms is considered good. Something over 200 ms might indicate a problem. Remember that you’re literally dealing with the speed of light here, so if you’re pinging a server that’s thousands of kilometres away, your ping test IP time will increase.
How to ping a website with Terminal
Those who find themselves using Terminal a lot will be happy to know that you can use it to perform ping tests as well:
- Open Terminal from Applications ➙ Utilities
- Type ping and the URL (e.g. nytimes.com)
- Hit Enter
- To stop the internet stability test, press Control + C
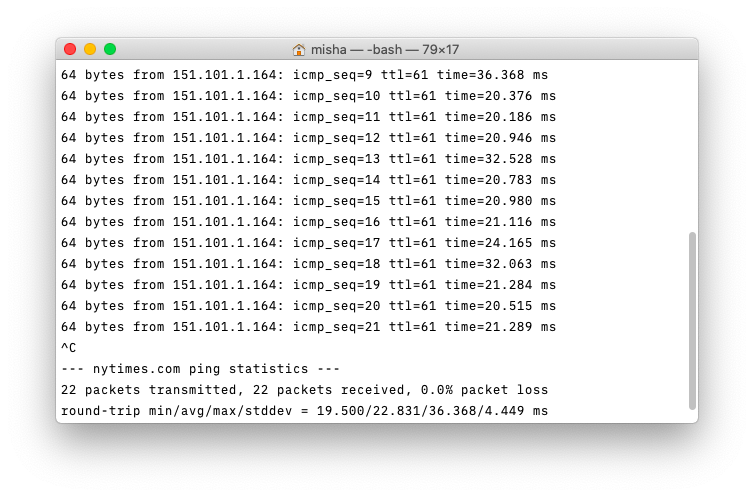
The ping tester results in Terminal are displayed exactly the same way as in Network Utility, with minimums, averages, etc. But sometimes it’s hard to decipher what’s going on with your network simply looking at the ping number. In these cases, you might want to use a more well-rounded ping internet speed tool.
Check ping and bandwidth on your Mac
Since ping shows you the quality of your signal, you might want to learn more about the quantity as well. In other words, how fast your internet is to allow for a quick ping signal.
A service like Speedtest from Ookla is a basic way to find out both:
- Simply visit the test website and hit Go
- The service will calculate your ping exactly and then measure both the outgoing and income traffic bandwidth to show you the real maximum values in Mbps
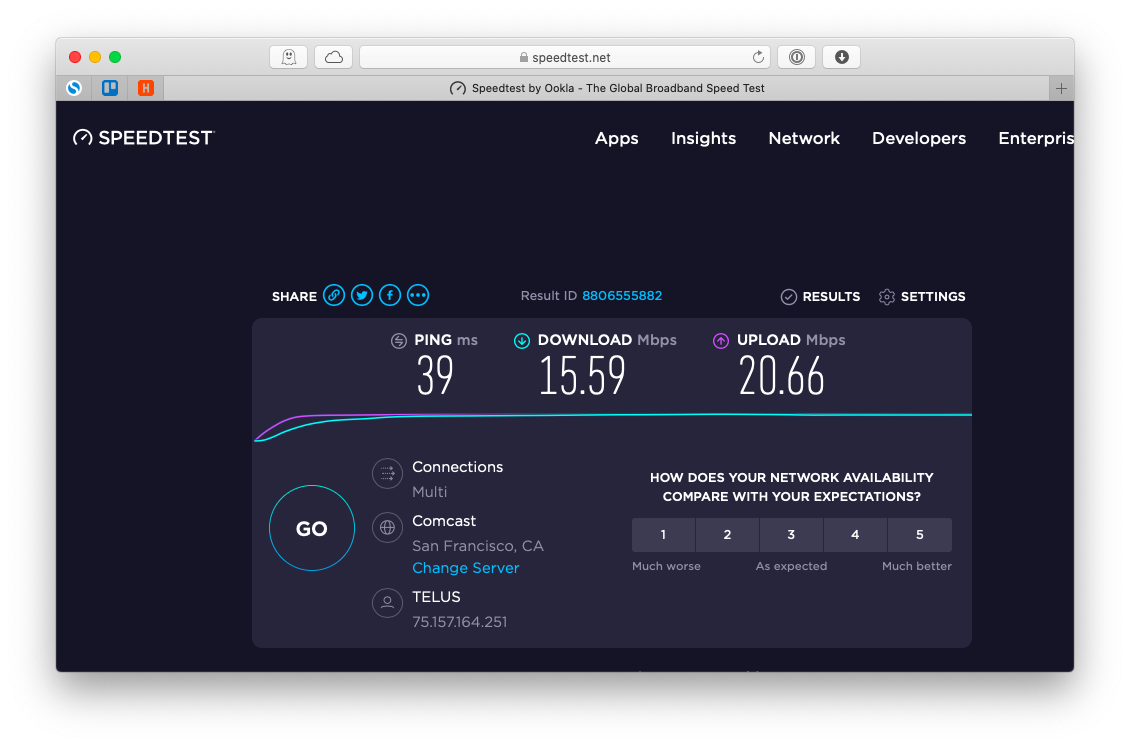
Note that the speed of your connection is measured in megabits, whereas the download speed is generally expressed in megabytes. The conversion rate is one megabyte for eight megabits. So if your download speed on Speedtest shows 32 Mbps, you can expect the real download speed (e.g. for a movie) to be around 4 MB/s.
So how do you improve your internet speed and WiFi connection?
Best ways to improve ping internet speed
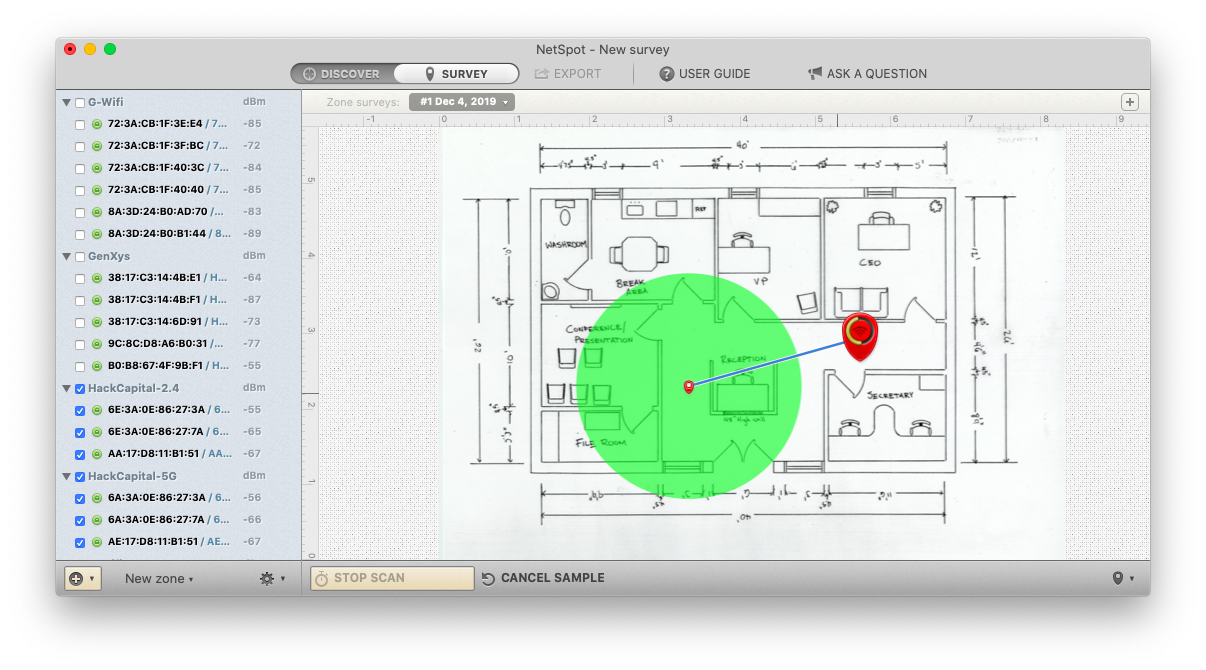
When you know the results of your ping test on Mac, including download and upload speeds — what do you do? Ping testers don’t really have any functionality to fix problems or improve the outcomes. What you need is a specialized app like NetSpot.
NetSpot is a champion app when it comes to analyzing the efficacy of your WiFi connection and troubleshooting any issues. In its Discover tab, you can see all available WiFi networks, as well as their signal strength, noise, and stability values — helping you switch to the best one, if you have such an option.
In case you’re stuck with just one underperforming WiFi network, NetSpot’s Survey function will assist you in finding dead spots in your office or home, so you can experiment with relocating your modem, for example, or getting a WiFi booster.
To see how your WiFi works:
- Navigate to the Survey tab within NetSpot
- Upload the plan of your space or draw it from scratch and click Continue
- Specify two points on the map and enter the actual distance between them. Click Continue.
- Select the networks to scan
- Now pick the points on the map and see how effective is your WiFi coverage at each of them
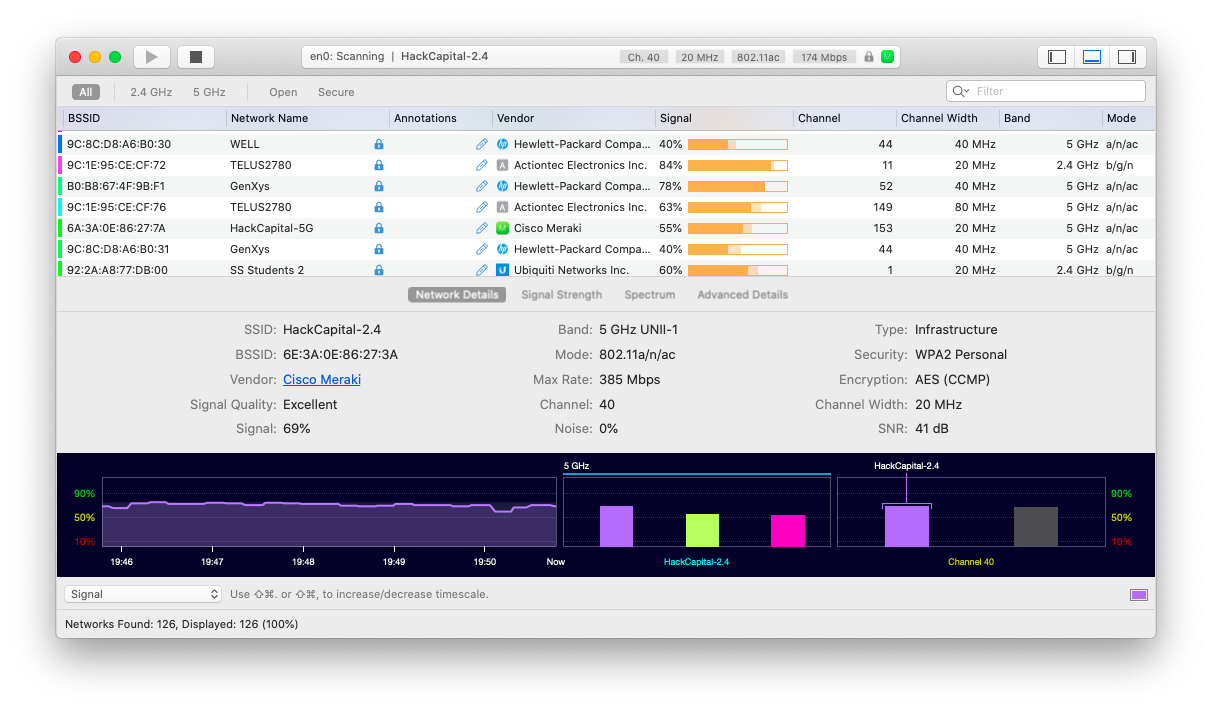
WiFi Explorer is another good app for measuring the quality of your network, especially if you like diving into specifics. It starts scanning all nearby WiFi connections at launch and gives a detailed breakdown of each, including the overall signal quality score and continuously measured graphs.
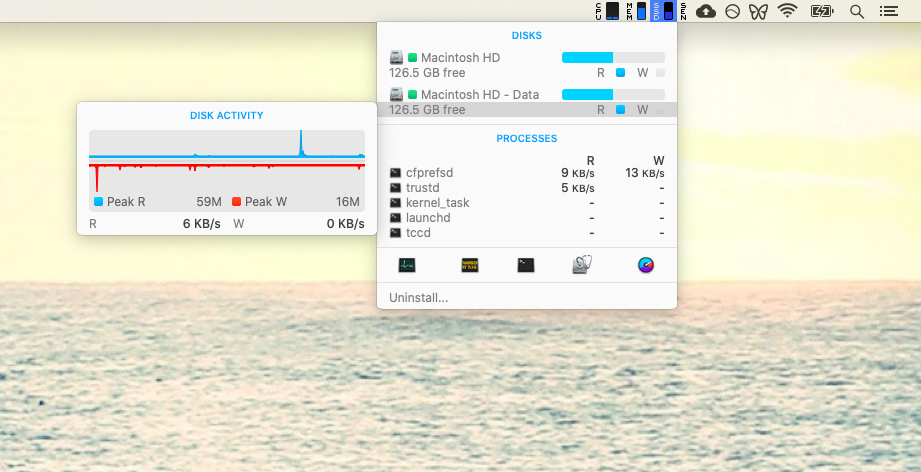
More often than not, however, when you want to check ping on Mac because a website doesn’t load fast enough, it’s not the ping test IP to blame but your overloaded CPU, RAM, or hard drive. So monitoring and keeping those metrics at bay will indirectly give your WiFi a boost by speeding up your browser itself. The best way to do that is through iStat Menus.
iStat Menus is a lightweight menu bar utility that keeps tabs on everything going on with your Mac, from graphics card output to memory load to the average sensor temperature — allowing you to stay informed at any time.
By now, you should feel in complete control of your Mac’s WiFi, with a few easy ways to test ping on Mac, see download and upload speeds, as well as detect blind spots with NetSpot and all the small details with WiFi Explorer. Finally, don’t forget to keep iStat Menus on to sample the overall health of your Mac at a glance.
Best of all, NetSpot, WiFi Explorer, and iStat Menus are available to you to try absolutely free for seven days through Setapp, a platform with more than 160 Mac apps to help you solve any Mac problem you might ever encounter. So any time you’re not sure how to fix something, just ping Setapp and find a tested solution in seconds. Great ping speed guaranteed!
Источник
Пингование и другие сетевые инструменты Mac OS X
 Не найдётся интернет-провайдера, на форуме у которого не было бы гневных отзывов пользователей о скорости и о пинге. Но если со скоростью для большинства пользователей всё понятно (правда, некоторым свойственно путать килобиты и килобайты в секунду), то про пинг знают не все. Пинг (корректнее всё-таки писать его латиницей, ping) — инструмент измерения времени прохождения пакетов данных. В итоге вы получаете значение задержки (латентность) в миллисекундах — это своего рода мера тормознутости вашего интернета. Например, провайдер может обеспечивать заявленную скорость, но зато пакеты данных будут доходить до вас с задержкой (или вообще будут доходить частично). В отличие от скорости, чем больше латентность, тем хуже для вас. Идеальное значение — менее 10 миллисекунд, но в реальности оно редко достижимо. Приемлемым значением латентности можно считать 50-60 миллисекунд. Значения более 100 миллисекунд делают невозможными игры по сети, а при 200 миллисекундах вы заметите лаги невооружённым глазом при обычном сёрфинге.
В Windows для пингования обычно используется командная строка. В Maс OS X тоже можно воспользоваться Терминалом, но гораздо полезнее и удобнее запустить Сетевую утилиту (папка Программы/Служебные программы).
Сетевая утилита Mac OS X — это целый сборник различных терминальных команд, для которых сделана единая графическая оболочка. Благодаря такой унификации эта утилита — важнейшее средство для проверки сети и всего, что с ней связано. Не зря Сетевая утилита присутствует даже на установочном DVD Mac OS.
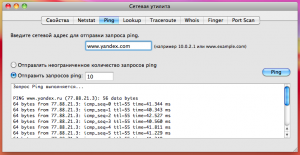
Каждая вкладка Сетевой утилиты — это самостоятельный инструмент. В первую очередь, нас будет интересовать вкладка Ping:
 Пингуем сервер Яндекса
От вас требуется указать сервер, с которым будет произведена проверка обмена данными, и количество попыток. Обычно латентность проверяется на известных сайтах, например, поисковых системах. Впрочем, ввести можно любой URL и даже IP.
Кстати, пингование по IP будет полезно, если вы не можете связать свой Мак и айфон по беспроводной сети, или если вы испытываете проблемы с соединением компьютеров Ethernet-кабелем.
Количество ping-запросов, по идее, может быть вообще бесконечным, но лучше задать разумное число в интервале 10-30. Каждый ping-запрос даст свой результат:
 Результаты пингования
Последние строки отчёта — это сводная статистика. Там вы увидите процент потерянных пакетов данных и сведения о времени в формате:
min/avg/max/stddev
Первое число — минимальная латентность, второе — средняя, третье — максимальная, а четвёртое — среднеквадратическое отклонение (чем меньше, тем лучше).
В активе Сетевой утилиты есть не менее полезные инструменты. Вкладка «Свойства» даст подробные сведения о всех сетевых адаптерах (Ethernet, Wi-Fi, Bluetooth и FireWire), а также статистику передачи данных:
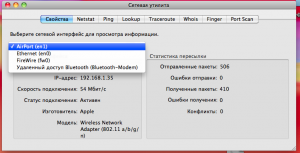 Сведения о сетях
Вкладка «Lookup» позволит вам узнать IP-адрес для любого URL:
 Утилита Lookup
Средство Traceroute — отличное дополнение к пингованию. Команда позволяет узнать, через какую цепочку IP-адресов приходится пройти данным, чтобы попасть на ваш компьютер с сайта. Время каждого звена данной цепочки замеряется отдельно, и вы можете узнать, какой IP задерживает процесс передачи данных — иными словами, понять, кто виноват в высокой латентности — ваш провайдер или пингуемый сайт.
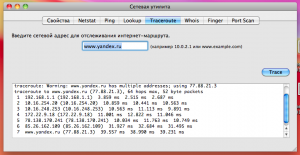 Долгая дорога между компьютером и сайтом
Утилита Whois позволит вам узнать информацию о домене — на кого он зарегистрирован, до какого времени оплачен и пр. Для работы используются специальные whois-сервера, базы данных которых могут отличаться.
А утилита Port Scan позволяет проверить настройки файрвола на вашем компьютере или у вашего провайдера. Вы сможете узнать, какие порты являются открытыми, а какие — нет. Эта информация будет полезна, например, для правильной настройки торрент-клиентов.
 Сканирование портов
В общем, Сетевую утилиту можно отнести к незаслуженно спрятанным средствам Mac OS X. Она пригодится вам как в случае проблем с сетью, так и для удовлетворения собственного любопытства.
Источник


