- How to Use the Port Scanner in macOS Network Utility?
- Port Scanner on Mac
- Conclusion
- How to Use the Port Scanner in Mac OS X Network Utility
- How to Scan Ports on an IP or Domain from Mac OS X
- Nmap для OS X: Сканирование сетей, портов и т.д.
- Устанавливаем Nmap для OS X
- Ищем открытые порты в Localhost:
- Сканирование и определение типов операционных систем
- Использование Nmap с альтернативными DNS-серверами
- Question: Q: Checking TCP/UDP ports!
- Helpful answers
How to Use the Port Scanner in macOS Network Utility?

macOS Network Utility is a collection of various terminal commands for which a single graphical shell has been made. Thanks to this unification, this utility is the most important tool for checking the network and everything connected with it. No wonder the Network Utility is present even on the macOS default installation set.
Each tab is a completely independent tool. In Windows, the command line is used for the same tasks, Apple made a beautiful shell for convenience.
In macOS you can also use the Terminal to work with the network, but it is much easier to run the Network utility located in the Utilities folder.
In this article we will look at the operation of the Mac Port Scanner in detail.
Port Scanner on Mac
Port scanner is a software tool designed to search for hosts on a network with the right ports open. These programs are usually used by system administrators and network engineers to check the security of their networks and attackers to break into the network. You can search for a number of open ports on a single host, or one specific port on many hosts. The latter is characteristic of the activities of a number of network worms.
The process itself is called port scanning or (in the case where many hosts are checked) network scanning. Port scanning can be the first step in the hacking process or preventing hacking, helping to identify potential attack targets. Using the appropriate tools, sending data packets and analyzing responses, the services running on the machine (Web server, FTP server, mail server, etc.) can be investigated, their version numbers and the operating system used.
How to Scan Ports
- Use Command + Space for Spotlight search;
- Type Network Utility;

- Open Port Scan tab;
- Enter the IP or domain name you wish to scan and press “Scan”;
- Optional, but not necessarily recommended, you can set a port range to scan between specific set of active services;

- Scan results shown us that TCPports 22, 88, 445 are open for host 192.168.31.81.
And the Port Scan Utility allows you to check the firewall settings on your computer or check port usage. You can find out which ports are open and which are not. This information will be useful, for example, to properly configure torrent clients.
Also you can find and turned off open ports you haven’t use with your device (FTP, AFP, SQL, etc.).
Conclusion
Today it is very difficult to imagine a device that is not connected to the Internet. In addition to the huge number of opportunities that the network provides, it is also a huge risk associated with the safety of our devices. That is why the basic knowledge of the network are becoming increasingly in demand even for ordinary users.
In general, the Network Utility can be attributed to undeservedly hidden macOS tools. It will be useful to you both in case of problems with the network, and to satisfy your own curiosity.
It’s the best time to ask questions and give us your feedback in comments.
Hi there! My Name is Vincent Lago! My goal is to share insightful reviews, guides, and manuals for people looking to know more about current solutions for Apple hardware and OS. I have years of technological background knowledge including owning a custom iMacs & PCs which was using for different types of business. And now, I want to share my experience with you.
Источник
How to Use the Port Scanner in Mac OS X Network Utility

Mac OS X comes with a bundled port scanner tool, just one of a variety of features tucked into the ever useful Network Utility app. That means you don’t need to bother with the command line or install more advanced tools like nmap to quickly scan for open ports on a given IP or domain, instead you can do it all through the friendly graphical interface. Despite being a fairly advanced utility, it’s actually very easy to use.
Quick sidenote: remember that newer releases of Mac OS X have relocated Network Utility to be buried in a system folder, that doesn’t mean it can’t be used, it just means you have to either make an alias, launch it from Spotlight, or get to it from System Info. For the purpose of this walkthrough we’ll use Spotlight to launch Network Utility and start the scan since it’s the easiest and quickest route, though if you plan on using the tool often you’ll probably want to make an alias yourself. OK, let’s jump right to scanning ports.
How to Scan Ports on an IP or Domain from Mac OS X
You can choose any local or remote IP to scan, if you’re solitary on a network (or even air gapped) and still want to try this out yourself, use the loopback IP of “127.0.0.1” as the target:
- Hit Command+Spacebar to summon Spotlight and type “Network Utility” followed by the return key to launch the Network Utility app
- Select the “Port Scan” tab
- Enter the IP or domain name you wish to scan for open ports and choose “scan”
- Optional, but not necessarily recommended, you can set a port range to scan between if you just want to search for a specific set of active services
127.0.0.1 or “localhost” will just check the local Mac for open ports, if you’re new to port scanning that may be the preferred way to go since most reasonably well secured remote domains reject incoming requests or don’t respond to them.
Let the Port Scan tool run and you will quickly start to see any open TCP ports and their traditionally identified usage. For example, you may see something like this if you scan localhost (127.0.0.1):
Port Scan has started…
Port Scanning host: 127.0.0.1
Open TCP Port: 22 ssh
Open TCP Port: 80 http
Open TCP Port: 88 kerberos
Open TCP Port: 445 microsoft-ds
Open TCP Port: 548 afpovertcp
Open TCP Port: 631 ipp
Open TCP Port: 3689 daap
Visible ports are going to differ per machine depending on what services and servers are available, but if you’re scanning Macs and PC’s you’ll commonly find web servers, SMB Windows sharing port 445, AFP Apple File Sharing on port 548, maybe active visible SSH server on 22, UDP servers, and potentially a wide variety of others. The port scan will go quite high as it scans, so just let it run if you want to see everything.
If you see absolutely nothing come up but you know an IP is active with open services, either the machine isn’t broadcasting, the recipient machine is rejecting all requests, or perhaps a strong firewall is configured. This makes Network Utility’s port scanner an excellent way to quickly check security and test out potential vulnerabilities or active services on neighboring Macs, iOS devices, Windows, Linux machines, and whatever other computers are getting scanned.
Network Utility is obviously limited to the Mac, and while there are no built-in tools on the iOS side of things, it is possible to perform port scanning from an iPhone and iPad with the fing app a free tool that is very handy addition to the advanced iOS users toolkit.
Источник
Nmap для OS X: Сканирование сетей, портов и т.д.
Nmap (network mapper) – это мощное средство для сканирования сетевой активности, которое используется в целях проверки безопасности системы, а также идентификации системных приложений и определения типа используемого фаерволла. Несмотря на более профессиональную направленность, программа может быть использована и обычными пользователями для несложных сетевых целей и задач.
Nmap распространяется на бесплатной основе и является проектом «open source», однако стандартной версии для OS X, идущей в комплекте с программными компонентами, не предусмотрено. Поэтому при установке Nmap для OS X будет также предложено установить дополнительные сетевые утилиты, такие как ncat, ndiff, nping и т.д.
Устанавливаем Nmap для OS X
Шаг 2: Запустите установку Nmap через dmg (правый клик и «Open», если у вас работает Gatekeeper)
Шаг 3: Установите полный пакет, либо выборочные элементы
После установки не требуется перезагрузки системы, однако если запущен Терминал, то его следует перезапустить или открыть новую вкладку.
Nmap работает как с LAN так и с WAN ip-адресами и имеет бесчисленное множество приложений, однако мы рассмотрим несколько наиболее часто используемых фишек. Следует заметить, что объём ответных данных при сканировании Mac’ов получается меньше, чем на Windows-машинах независимо от состояния работы фаерволла.
Стоит заметить, что не у всех пользователей будут работать команды, приведенные ниже. Это напрямую зависит от прав учетной записи, под которой выполняется команда. Если вы столкнулись с подобной проблемой, то используйте дополнительно «sudo» перед командой для того, чтобы выполнить ее от администратора. Также если потребуется введите пароль администратора.
Ищем открытые порты в Localhost:
nmap localhost (sudo nmap localhost)
Ответные данные будут выглядеть примерно так:
PORT STATE SERVICE
22/tcp open ssh
80/tcp open http
445/tcp open microsoft-ds
548/tcp open afp
6817/tcp open unknown
Обращаем ваше внимание на то, что переключение различных опций в Sharing (Системные Настройки) будет прямым образом влиять на отображаемую информацию, активировали ли вы SSH и SFTP серверы и удалённый вход в систему, включили/выключили расшаривание данных и т.д.
Сканируем и отображаем диапазон местных ip-адресов
Вы можете просмотреть активность локальных компьютеров с помощью простой команды, однако для этого требуется указать начальную и конечную точку. Например, если в вашей сети 15 компьютеров, а адреса начинаются с 192.168.1.2 и заканчиваются 192.168.1.14, то команда будет выглядеть следующим образом:
nmap –sP 192.168.1.2-14
В том случае, если диапазон вам не известен, то можно пойти другим путём:
Сканирование и определение типов операционных систем
В случае, если необходимо выяснить, на каких системах работают локальные компьютеры, достаточно ввести команду:
nmap -O 192.168.2-14
Если данная команда не приводит к каким-либо результатам, то можно попробовать использовать параметр «–osscan-guess»:
nmap —osscan-quess 192.168.1.2
Использование Nmap с альтернативными DNS-серверами
Nmap может пригодиться в случаях, когда возникают проблемы с сетевыми подключениями, и помогает выяснить, на чьей стороне эти проблемы возникают: у пользователя, либо со стороны провайдера.
Например, чтобы просканировать доступность DNS-серверов yandex.ru, используя альтернативные DNS-сервера google.com, нужно использовать параметр «-dns-servers»:
nmap —dns-servers 8.8.8.8 yandex.ru
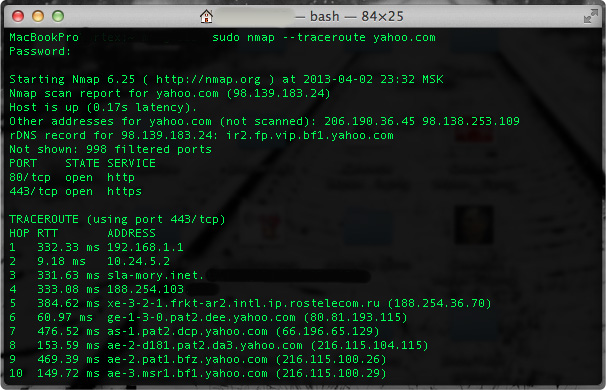
Также можно использовать параметр «–traceroute», чтобы отсканировать известные пути маршрутов:
sudo nmap —traceroute yahoo.com
Более подробно узнать о возможностях Nmap можно на специализированном сайте.
Источник
Question: Q: Checking TCP/UDP ports!
What’s up everybody,
Does anyobody know how to check if a port is open? (tcp/udp)
Posted on Jan 20, 2011 6:09 PM
Helpful answers
Even this post is rather old, but it still comes up with the search results so I would like to reply a solution to the question.
You can open the Terminal in Mac (type terminal on Spotlight) and then use NetCat command by typing like a sample below to test your specific port like this replacing 1xx with your target IP address, then the port to check.
>nc -vnzu 1xx.xxx.xxx.xxx 53
or if you want to check a range of ports for example from port 1 to 53, just type
>nc -vnzu 1xx.xxx.xxx.xxx 1-53
NetCat is already a built-in command in Mac so no need to install anything.
Hope this helps.
Jul 7, 2015 11:49 PM
There’s more to the conversation
Loading page content
Page content loaded
Use the Network Utility in the /Applications/Utilities/ folder to scan 127.0.0.1 for open ports.
Jan 20, 2011 6:11 PM
isn’t there another way?
would be better if there was a program..
Jan 20, 2011 6:48 PM
Network Utility is a program, no?
Other options include downloading and building nmap, which can be quite useful.
Or +sudo lsof -i+ might possibly be of use?
Jan 20, 2011 7:23 PM
Jan 21, 2011 10:29 PM
Welcome to the forums.
Common Mac OS X tools used here include Network Utility, lsof, and telnet and ping, and dns-sd and ping for Bonjour and mDNS, depending on details are sought.
(With the Windows entries from your footer, various of these tools and equivalents are what can be obtained by loading Cygwin or by loading Microsoft’s SUA/SFU tools, and with some add-ons. PowerShell might or does have analogs here, but the old MS-DOS shell was pretty limited in what diagnostics were available without additions. There was telnet and ping, but some other bits were missing.)
Add-on tools include nmap. (nmap is a fairly gonzo-useful tool for this sort of thing.)
telnet works nicely for brute-force port tests on the LAN.
And FWIW, if those public web site tools do work and if you’re on your own LAN, then definitely also consider checking the settings of and consider upgrading the LAN security. Those tools and those web sites should be blocked by default by the firewall or the gateway device found on most any LAN; whether that’s a low-end NAT device, a server-grade firewall, or otherwise.
Jan 22, 2011 7:31 AM
If you’re trying to figure out whether your client machine is being blocked in the outbound direction (client to Internet) by something like your home firewall, or your ISP, then try http://www.firebind.com.
Firebind is the only tool on the Internet that can test any of the 65535 TCP or UDP ports in the outbound direction. If you want, you can test the entire TCP and UDP range.
Источник


