- Как установить Python 3 на macOS в качестве версии по умолчанию
- 1. Установите pyenv
- 2. Установите Python
- 3. Установите глобальное значение по умолчанию
- Успешный результат
- Среда выполнения Python
- Чего не стоит делать
- Что можно попробовать
- Использовать Python 3 по умолчанию для macOS
- Доверить управление Homebrew
- Что делать, если нам все еще нужен Python 2?
- Не забудьте обновить pip до версии pip3!
- Заключение
- Make Python 3 default on Mac OS? [duplicate]
- 2 Answers 2
- update:
- Make python3 as my default python on Mac
- The right and wrong way to set up Python 3 on MacOS
- There are several ways to get started with Python 3 on macOS, but one way is better than the others.
- Subscribe now
- 1. Install pyenv
- 2. Install Python
- 3. Set your global default
- Success
- Understanding Python runtimes
- python_environment_xkcd.png
- What NOT to do
- Another thing not to try
- Use Python 3 as the macOS default
- Have Homebrew manage Python 3
- What if we still need Python 2?
- Don’t forget to update pip to pip3!
- Do it right from the start
Как установить Python 3 на macOS в качестве версии по умолчанию
Есть несколько способов начать работу с Python 3 на macOS, однако не все они одинаково хороши. Сегодня мы рассмотрим, как правильно настроить среду, не нарушая ничего, встроенного в операционную систему macOS.
1. Установите pyenv
Использование неправильного решения может привести к неверному представлению о том, что выбор загружаемой версии Python зависит от псевдонимов в оболочке.
Как нам перестать заботиться о том, какая версия Python используется по умолчанию? Нужно использовать pyenv. Это инструмент для управления несколькими версиями Python. Он простой и вполне соответствует традициям Unix: предназначен для решения одной задачи, и решает ее хорошо.
Хотя доступны и другие варианты установки, проще всего начать следующим образом:
2. Установите Python
Теперь давайте установим последнюю версию Python (здесь указана версия 3.7.3, однако на данный момент широко используется версия 3.8 и доступна версия 3.9):
3. Установите глобальное значение по умолчанию
Теперь, когда Python 3 установлен через pyenv, мы хотим установить его как нашу версию по умолчанию (глобально) для сред pyenv:
Сила pyenv основана на том, что он контролирует путь нашей оболочки. Чтобы он работал правильно, нам нужно добавить следующее в наш файл конфигурации (мы использовали .zshrc, а вам, возможно, подойдет .bash_profile):
После этой команды наш файл (.zshrc для zsh или .bash_profile для Bash) должен включать следующие строки:
Теперь мы точно знаем, что используем Python 3.7.3, и pip будет обновляться вместе с ним без какой-либо ручной настройки и конфликтов между версиями. Использование менеджера версий (pyenv) позволяет нам легко регулировать будущие обновления, не беспокоясь о том, какую версию Python мы используем в данный момент.
Успешный результат
Освоив этот рабочий процесс, вы сможете использовать pyenv для управления несколькими версиями Python.
Для управления зависимостями также важно использовать виртуальные среды. Тут нам пригодятся такие встроенные библиотеки, как venv и virtualenvwrapper.
Среда выполнения Python
Теперь, когда мы разобрались с версиями Python, можно углубиться в вопрос, почему эта проблема сбивает с толку так много людей.
Версия Python, поставляемая с macOS, сильно устарела по сравнению с тем, что Python рекомендует использовать для разработки. Как отмечает XKCD, размышления о выборе среды выполнения Python иногда могут быть до смешного сложными:

Многие пользователи держат десятки интерпретаторов Python на своих компьютерах, хотя понятия не имеют, как эффективно ими управлять.
Слишком часто люди просто загружают последнюю версию Python, помещают ее в свою переменную $PATH и на этом всё (или используют команду brew install python3 , которая делает примерно то же самое). Это может привести к поломкам и неисправностям, которые будет весьма сложно исправить.
Чего не стоит делать
Можно подумать, что, чтобы сделать Python 3 на macOS версией по умолчанию, нужно заменить старую версию и на новую:
Этот шаблон соответствует тому, что обычно делает /usr/bin/ между основными выпусками Python, однако это неправильный ход:
К счастью, macOS не дает сломать систему непродуманными действиями. Дальнейшие исследования вопроса показывают, что описанный выше способ не следует применять.
Что можно попробовать
Теперь, когда мы знаем, чего не следует делать, давайте посмотрим, что сделать можно. Когда мы думаем об общих шаблонах установки приложений в macOS, есть несколько вариантов.
Использовать Python 3 по умолчанию для macOS
На веб-сайте Python есть установщик macOS Python 3, который мы можем загрузить и использовать. Если мы воспользуемся установкой пакета, python3 будет доступен в /usr/local/bin/.
Поскольку двоичный файл Python, хранящийся в /usr/bin/, не может быть изменен, необходимы алиасы (псевдонимы). Что хорошо в псевдониме, так это то, что он специфичен для нашей оболочки командной строки. Поскольку по умолчанию мы используем zsh, мы помещаем в файл .zshrc следующее:
Если по умолчанию вы используете оболочку Bash, вы можете добавить следующий текст в свой .bashrc :
Эта стратегия работает, но она не идеальна для будущих обновлений Python. Это означает, что нам придется регулярно проверять сайт и загружать новые файлы, поскольку Python не включает в себя способ обновления из командной строки.
Доверить управление Homebrew
Проект Homebrew предоставляет бесплатный менеджер пакетов для macOS, на который полагаются многие люди. Он имеет открытый исходный код. Этот менеджер пакетов дает пользователям Apple возможности, аналогичные возможностям apt-get или yum.
Если вы являетесь пользователем Homebrew, возможно, у вас уже установлен Python. Чтобы быстро проверить это, запустите конвейер команд:
Если в качестве результата вы получите python, значит, он установлен. Но какая это версия? Давайте проверим:
Отлично! Мейнтейнеры Homebrew обновили Python bottle (бинарный пакет), чтобы он указывал на последний релиз. Поскольку мейнтейнеры Homebrew более ответственны в отношении обновления релиза, чем большинство из нас, мы можем использовать версию Python 3 от Homebrew с помощью следующей команды:
Теперь нам нужно, чтобы наш алиас указывал на копию Python, которой управляет Homebrew:
Чтобы убедиться, что приведенный выше путь указывает на то место, куда Homebrew установил Python в нашей среде, мы можем запустить brew info python и поискать информацию о пути.
Этот метод использования Homebrew для управления нашей средой Python является хорошей отправной точкой.
Что делать, если нам все еще нужен Python 2?
Для любого новичка в Python имеет смысл начинать сразу с Python 3. Но те из нас, кому все еще нужен Python 2 – например, для участия в проекте, где есть только Python 2, – могут продолжать использовать версию Python, доступную в macOS по умолчанию (путь — /usr/bin/python):
Homebrew настолько хорош, что даже предлагает другую формулу для Python 2:
Чтобы вернуться к использованию версии Python, которая установлена в системе по умолчанию, в любой момент можно удалить псевдонимы из файла конфигурации нашей оболочки.
Не забудьте обновить pip до версии pip3!
pip – это дефолтный менеджер пакетов Python. Хотя мы изменили нашу дефолтную команду python на третью версию, нужно также отдельно задать псевдоним нашей команде pip (если у нас предыдущая версия).
Для начала нужно проверить, какая, собственно, у нас версия:
Чтобы устанавливать пакеты, наверняка совместимые с нашей новой версией Python, мы используем еще один алиас, указывающий на совместимую версию pip.
Поскольку в данной ситуации мы используем Homebrew в качестве менеджера пакетов, мы знаем, что он установил pip3 при установке Python 3. Путь по умолчанию должен быть таким же, как и в Python 3, но мы можем проверить это, попросив оболочку найти его:
Теперь, когда мы точно знаем местоположение, мы добавим его в наш файл конфигурации оболочки, как мы это делали раньше:
Наконец, мы можем проверить, что запущенный pip указывает на pip3. Для этого нужно открыть новую оболочку или перезагрузить текущую и посмотреть, на сто указывает псевдоним:
Мы можем избежать использования Homebrew для обновления pip, но для этого потребуется гораздо более подробное руководство, основанное на документации Python.
Заключение
Если вы только начинаете разработку на Python на macOS, выполните необходимые настройки, чтобы с самого начала использовать правильную версию Python.
Установка Python 3 с Homebrew или без него и использование псевдонима позволят вам начать программировать, но в долгосрочной перспективе это не лучшая стратегия.
Использование pyenv — простое решение для управления версиями. Оно станет отличной отправной точкой.
Источник
Make Python 3 default on Mac OS? [duplicate]
I would like to ask if it is possible to make Python 3 a default interpreter on Mac OS 10 when typing python right away from the terminal? If so, can somebody help how to do it? I’m avoiding switching between the environments.

2 Answers 2
Method 1:
/.bash_profile , set an alias for your python3
Method 2(I use this way to keep multiple python versions):
Install python3(the virtualenv python3 on my machine is env-3.5) by virtualenv , in
/.bash_profile activate certain virtual environment:
I suggest use a virtual environment, it will affect your system even packages messed up.
update:
Did research on anaconda which data_garden commented. Here I post how I installed it:
- Go to page https://www.anaconda.com/download/#macos find the package meet your system requirement, for me it’s MacOS
- Add to system PATH export PATH=$HOME/anaconda3/bin:$PATH into .bash_profile
- Search available python versions conda search «^python$»
- Create env: conda create -n env-3.6.5 python=3.6.5 , env-3.6.5 is the name of the new created env
- Activate env: source activate env-3.6.5 , add it into .bash_profile
You can run conda env list to display all virtual environments you have created.
Источник
Make python3 as my default python on Mac
What I’m trying to do here is to make python3 as my default python. Except the python 2.7 which automatically installed on mac, I installed python3 with homebrew. This is the website that I’m following. http://docs.python-guide.org/en/latest/starting/install3/osx/#install3-osx
I guess I followed every instruction well, got xcode freshly installed, Command line tools, and homebrew. But here’s my little confusion occurs.
The script will explain what changes it will make and prompt you before the installation begins. Once you’ve installed Homebrew, insert the Homebrew directory at the top of your PATH environment variable. You can do this by adding the following line at the bottom of your
export PATH=/usr/local/bin:/usr/local/sbin:$PATH
I was really confused what this was, but I concluded that I should just add this following line at the bottom of
/.profile file. So I opened the
/.profile file by open .profile in the terminal, and added following line at the bottom. And now it looks like this.
And then I did brew install python, and was hoping to see python3 when I do python —version. But it just shows me python 2.7.10. I want my default python to be python3 not 2.7
And I found a little clue from the website.
Do I have a Python 3 installed?
If you still see 2.7 ensure in PATH /usr/local/bin/ takes pecedence over /usr/bin/
Maybe it has to do something with PATH? Could someone explain in simple English what PATH exactly is and how I could make my default python to be python3 when I run python —version in the terminal?
Источник
The right and wrong way to set up Python 3 on MacOS
There are several ways to get started with Python 3 on macOS, but one way is better than the others.
Subscribe now
Get the highlights in your inbox every week.
I’ve been dipping my toe back into Python development as I get ready to head to PyCon US. (If you’re headed there as well and want to share your Python story, let me know!) When I installed a module to tinker around with, I got a reminder that I needed to install Python 3 soon.
So, I did what any of us would do and googled around looking for a guide to update my development environment, which runs on Mac (the macOS operating system, formerly known as OS X). To my surprise, I found only a handful of StackOverflow posts, and they pointed me to partial solutions. Here’s the full story of how to set up your environment without breaking anything built into the macOS operating system.
1. Install pyenv
Moshe Zadka cautions that doing this wrong could result in an unreliable idea of which Python is running that depends too closely on shells loading aliases. I knew Moshe was familiar with Python, but what I didn’t know is that he is an author of many Python tutorials as well as an upcoming book on Python development on macOS. He helped 40 colleagues develop Python safely and consistently on macOS systems following one core principle:
«The basic premise of all Python development is to never use the system Python. You do not want the Mac OS X ‘default Python’ to be ‘python3.’ You want to never care about default Python.»
How do we stop caring about the default? Moshe recommends using pyenv to manage Python environments (for a deeper dive on configuring pyenv, see this article). This tool manages multiple versions of Python and is described as «simple, unobtrusive, and follows the Unix tradition of single-purpose tools that do one thing well.»
While other installation options are available, the easiest way to get started is with Homebrew:
2. Install Python
Now let’s install the latest Python version (3.7.3 as of this writing):
3. Set your global default
Now that Python 3 is installed through pyenv, we want to set it as our global default version for pyenv environments:
The power of pyenv comes from its control over our shell’s path. In order for it to work correctly, we need to add the following to our configuration file (.zshrc for me, possibly .bash_profile for you):
After that command, our dotfile (.zshrc for zsh or .bash_profile for Bash) should include these lines:
Now we know for certain that we’re using Python 3.7.3 and pip will update alongside it without any manual aliasing between versions. Using Moshe’s recommendation to use a version manager (pyenv) enables us to easily accept future upgrades without getting confused about which Python we are running at a given time.
Success
As you get comfortable with this workflow, you can use pyenv to manage multiple versions of Python. It’s also essential, for dependency management, to use virtual environments. I mention how to use the built in venv library in the article, and Moshe recommends virtualenvwrapper for managing virtual environments.
Understanding Python runtimes
Now that you have your Python versions fixed, it’s safe to explore why this problem confuses so many people.
The version of Python that ships with macOS is well out of date from what Python recommends using for development. Pondering Python runtimes can be comically challenging at times, as noted by XKCD.
python_environment_xkcd.png
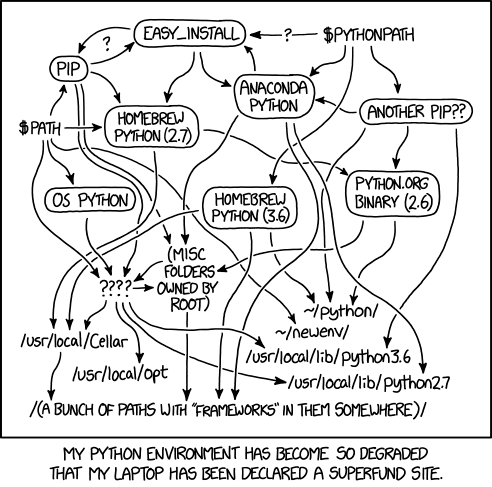
Many users have dozens of Python interpreters on their computer already, but have no idea how to manage them effectively. Too often, people just download the latest Python release, move it to their path, and call it a day (or use brew install python3, which would do something similar). This can cause breakages down the line in frustrating ways that can be difficult to troubleshoot.
What NOT to do
My first idea on how to make Python 3 the default Python on my system was to move the old version and add the new one:
The pattern followed what /usr/bin/ usually does between major releases of Python, but I quickly learned it was the wrong move:
Thankfully, macOS protected me from breaking something I don’t fully understand. Further research proves this is exactly what we shouldn’t do.
Another thing not to try
Use Python 3 as the macOS default
Python’s website has a macOS Python 3 installer we can download and use. If we use the package installation, a python3 fill will be available in /usr/local/bin/.
Aliasing is a must since the Python binary stored in /usr/bin/ can’t be changed. What’s nice about an alias is that it’s specific to our command-line shell. Since I use zsh by default, I put the following into the .zshrc file:
If you are using the default Bash shell, you can append this same text to your .bashrc:
This strategy works, but it isn’t ideal for making future updates to Python. It means we have to remember to check the website and download the new files since Python doesn’t include a command-line way to update.
Have Homebrew manage Python 3
The Homebrew project provides a free and open source package manager for macOS that many people rely on. It gives Apple users a power similar to apt-get or yum. If you are a Homebrew user, you may already have Python installed. To quickly check, run:
If Python shows up under the command, it’s installed. What version is it? Let’s check:
Okay, great! The Homebrew maintainers have updated the default Python bottle to point to the latest release. Since the Homebrew maintainers are more dependable at updating the release than most of us, we can use Homebrew’s version of Python 3 with the following command:
Now we want to point our alias (from above) to the copy of Python that Homebrew manages:
To make sure the path above points to where Homebrew installed Python in our environment, we can run brew info python and look for the path information.
This method, of using Homebrew to manage our Python environment, is a good starting place, and it made sense to me at the time.
What if we still need Python 2?
It makes sense for anyone new to Python to begin with Python 3. But those of us who still need Python 2—for example, to contribute to a Python project that’s only available in Python 2—can continue to use the default macOS Python binary available in /usr/bin/python:
Homebrew is so wonderful, it even offers a different formula for Python 2:
At any time, we can remove the aliases from our shell’s configuration file to go back to using the default copy of Python on the system.
Don’t forget to update pip to pip3!
The pip command is the default package manager specifically for Python packages. Although we changed our default Python command to be version 3, we have to alias our pip command separately if it’s on the previous version. First, we need to check what version we’re on:
To ensure we’re installing packages compatible with our new version of Python, we’ll use another alias to point to the compatible version of pip. Since we’re using Homebrew as our package manager in this situation, we know it installed pip3 when we installed Python 3. The default path should be the same as Python 3, but we can confirm this by asking the shell to find it:
Now that we know the location, we will add it to our shell configuration file, as we did before:
Last, we can confirm that running pip points to pip3 by opening a new shell or by resetting our current shell and seeing what we point to:
We can avoid using Homebrew to update pip, but that requires a much longer tutorial from the Python documentation.
Do it right from the start
If you are just getting started with Python development on a macOS, do the necessary configurations to make sure you’re using the right version of Python from the start. Installing Python 3, with or without Homebrew, and using alias will let you start coding, but it’s not a good strategy for the long run. Using pyenv as a simple version management solution to get you off to a good start.
This article was originally published in May 2019 and has been updated by the editor.
Источник


