Что дает установка SSD в Mac mini?
Привет, Geektimes! Если у вас вдруг завалялся Mac mini 2011 или 2012 года выпуска (а, может быть, вы до сих пор пользуетесь им как основным), не спешите отправлять этого «малыша» на покой раньше времени. Самый доступный компьютер в линейке Apple довольно хорошо поддается апгрейду, и с SSD вы можете дать ему вторую жизнь.

Вообще, самые распространенные способы заставить Mac mini работать быстрее — установка большего количества ОЗУ или твердотельного накопителя. И если «оперативкой» вы уже прокачали компьютер по-максимуму, самое время посмотреть в сторону пусть и сложного, но не менее действенного решения. А там уже и Fusion Drive можно будет настроить, раз такая тема пошла. Но об этом чуть позже.
Итак, вы созрели и решили установить дополнительный накопитель в Mac mini. Если покупка версии Server влетает в копеечку, то самостоятельный апгрейд хранилища при помощи SSD — наиболее бюджетный способ. Кроме того, здесь у вас развязываются руки: можно поставить любой подходящий накопитель, который нравится, причем любой емкости, и не идти на поводу у производителя.
Как вы догадались, мы все-таки рекомендуем посмотреть в сторону линейки SSD от OCZ, и вовсе не потому, что это наш блог. Во-первых, в нашей линейке можно найти накопитель практически на любой вкус и потребности, а во-вторых, многие из них подходят для установки в качестве второго накопителя для Mac mini.
Единственный, кто сразу «отлетает» — RevoDrive 350. Но вовсе не из-за своих показателей — он отлично выдает 1800 МБ/с на чтение и 1700 МБ/с на запись. Все дело в форм-факторе и интерфейсе — FH/HL и PCIe Gen. 2 x 8 нам ну никак не подойдут. Но не надо расстраиваться, достойных накопителей, поверьте, хватает.
С линейкой SSD от OCZ в общем виде мы вас уже знакомили, так что пробежимся лишь по основным моментам, которые могут пригодиться для нашего конкретного случая. Многие устанавливают SSD в Mac mini для настройки Fusion Drive или просто переноса системы на твердотельный накопитель. Здесь версии на 120 ГБ/240 ГБ будет предостаточно, да и сама Apple использует SSD в минимальной конфигурации (правда, во многом из-за экономии). Но речь не об этом. Важно определиться, для каких целей будет использоваться SSD, чтобы подобрать его правильно. Для задачи, описанной выше, запросто подойдут Trion 150 и ARC 100, у Trion 150 скорость будет даже побольше. Оба накопителя обладают хорошими показателями, выносливостью до 219 ГБ/день, да еще и три года гарантии по ShieldPlus идут в комплекте.

Если хотите запускать на компьютере игры (да, игр на Mac уже много, причем довольно качественных), а также работать с соответствующими приложениями (тот же Final Cut Pro или Logic Pro), обратите внимание на Vertex 460A и Radeon R7. У последнего показатели максимального случайного чтения и записи составляют 100,000 IOPS и 95,000 IOPS, есть 4 года гарантии по ShieldPlus и контроллер Barefoot 3 M00.
Хардкорщики, конечно, будут в восторге от связки терабайтного HDD и SSD на 960 ГБ, которая будет работать как часы с Vector 180. Такой симбиоз и высокотребовательные игры потянет, и программы для работы с тяжелой графикой. Решение, конечно, на любителя — скорее для тех, кто привык выжимать из своего компьютера все соки.
Зачем вообще нужен SSD в Mac mini, спросите вы? Ну, начнем с того, что сейчас данный компьютер в схожей комплектации обойдется почти в 80 тысяч рублей вместо 6-10 тысяч рублей за SSD. А стандартный HDD на 500 ГБ со скоростью вращения 5400 об/мин (Apple ставит такие диски даже в новые компьютеры, какой ужас) выдаст в среднем такие показатели, как на скриншоте ниже.

Так что здесь это уже, как видите, жизненная необходимость. Поэтому скорее выбирайте накопитель по своим потребностям, и давайте приступим к самой установке — наиболее интересному и сложному процессу.
Для начала нам потребуется специальный набор для установки SSD — как правило, он состоит из отверток со специальными насадками, резиновых втулок, шлейфа, диэлектрической лопатки и других элементов, которые могут пригодиться в процессе. Подобный комплект можно встретить много где в Сети, например у iFixit. Цена вопроса — около двух тысяч рублей. По сравнению с покупкой нового компьютера или Mac с Fusion Drive из коробки это просто смех.
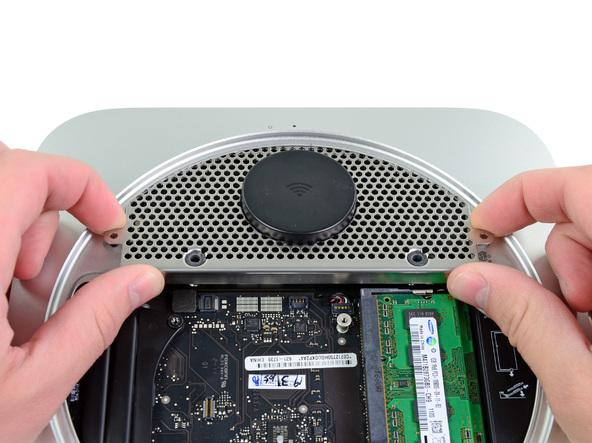
С таким комплектом уже можно приступать к установке. После того, как вы откроете крышку, необходимо открутить два винта (11,3 мм Torx T6), которые держат вентилятор.

Отключаем вентилятор и достаем его — он нам пока не понадобится. После этого откручиваем один винт (3,5 мм Torx T6) у пластины, приподнимаем и достаем её.

Затем отключите коннектор жесткого диска от материнской платы — опять же, при помощи специальной лопатки, а также инфракрасный датчик.


Откручиваем три винта, как на рисунке ниже — они закрепляют материнскую плату. Эти винты откручиваются с помощью: 5,0 мм (Torx T8), 16,2 мм (Torx T6) и 26 мм (Torx T6).

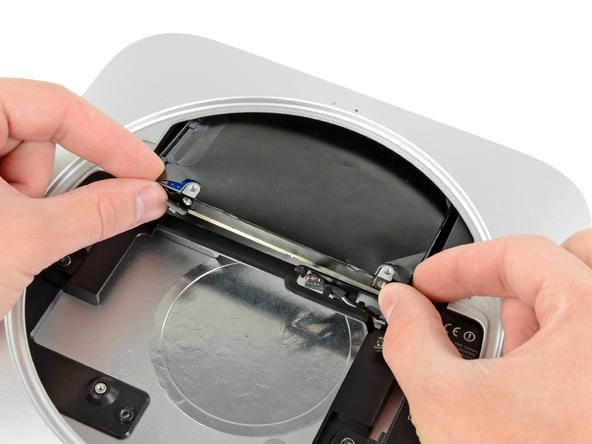
Отключаем кабели питания и материнской платы, после чего вынимаем её. После этого можно заняться извлечением жесткого диска и блока питания. Для установки твердотельного накопителя также необходимо снять и сам лоток, в котором находился жесткий диск.
В этот лоток вставляем четыре резиновые втулки.

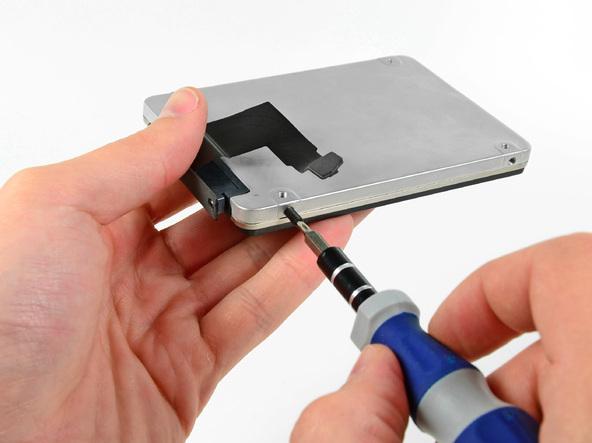
Подключаем к накопителю шлейф, выгибаем его, как на рисунке, а затем вкручиваем два установочных винта (используем Torx T6).
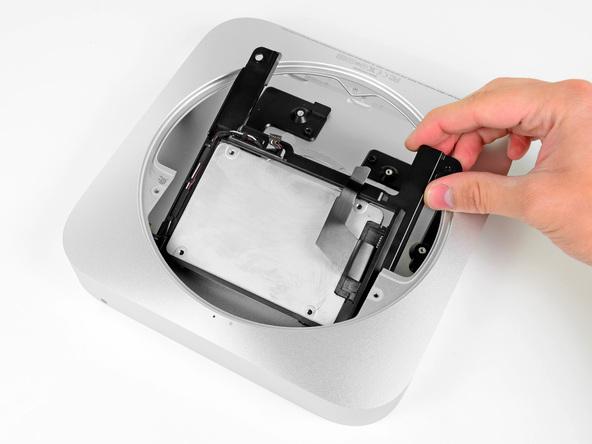
Наконец, устанавливаем SSD, закрепив его в лотке. После этого можно приступать к сборке, но строго в том же порядке. Жесткий диск советуем подключать уже после материнской платы — он помещается прямо на SSD и соединяется шлейфом.
В целом процедура занимает около часа — новичкам, соответственно, понадобится больше времени, а профессионалы могут управиться и за 30-40 минут. Советуем не торопиться, чтобы потом не пришлось все переделывать.
Многие эксперты присваивают установке SSD в Mac mini одну из высших категорий сложности и неудивительно: по сути вы полностью разбираете компьютер. Но сделан он настолько логично и правильно, что сам процесс разборки/сборки даже способен доставить удовольствие. Если вы не уверены в своих силах, лучше, конечно, обратиться к мастеру, но уже со своим SSD, который вы выбрали несколькими этапами ранее.
Итак, мы получили целых два накопителя — один HDD, другой SSD. Сразу после включения компьютера OS X отобразит оба накопителя: в целом, связкой уже можно начинать пользоваться. Однако особого толка от нее не будет, если вы оставите все, как есть. Необходимо либо переставить систему на SSD, либо вовсе настроить Fusion Drive. Последняя технология, правда, на любителя, но многие пользователи Mac, у которых она есть прямо из коробки, вроде пока не жаловались.
Если уж и начинать новую жизнь, то делать это с чистого листа. Для установки Fusion Drive нам понадобится загрузочная флешка и немного терпения.
Включаем Mac mini с зажатой клавишей Option и выбираем SSD в качестве загрузочного диска. Затем открываем терминал и смотрим, какие номера присвоены нашим накопителям — вводим команду diskutil list. Как правило, это disk0 и disk1, но в некоторых случаях номера могут различаться.
После этого создаем единую группу томов, используя параметр CoreStorage. Поможет эта команда:
Записываем имя объединенной группы томов (Logical Volume Group) в виде 12AF7FVB-1440-E3F4-NV4F-AX86DVQW и затем форматируем все в формат HFS+ при помощи команды ниже:
Все, теперь у вас есть Fusion Drive, а не просто связка HDD + SSD. Устанавливаем систему и наслаждаемся её быстрой работой. Да, еще быстрее, чем тогда, когда вы только достали свой Mac mini из коробки.
Есть одно «но» — с FD можно несколько потерять в скорости, но даже при его наличии показатели накопителя вас приятно удивят. Кстати, на OS X El Capitan связка работает более стабильно, имейте ввиду, если по каким-то причинам еще не обновились, а то в июне уже новая версия на подходе.
Источник
How to Create and Use a RAM Disk with Your Mac (Warnings Included!)
Once a popular option in the early days of the Mac, RAM disks, which were used to speed up the performance of a Mac, have fallen by the wayside.
Conceptually, RAM disks are a simple idea: a chunk of RAM set aside that looks, to the Mac system, like just another storage drive. The system, as well as any installed apps, can write files to or read files from the RAM disk, just as if it really were another storage drive mounted on your Mac.
But unlike any storage drive, a RAM disk can operate at the speed of RAM, which is usually many times faster than most drive storage systems.
RAM Disk History
RAM disks existed before the Macintosh ever hit the market, but we’re going to predominantly explore how RAM disks were used with the Mac.
The Mac Plus, released in 1986, had quite a few new features, including the use of SIM (Single Inline Memory) modules that users could easily upgrade. The Mac Plus shipped with 1 MB of RAM, but users could increase the memory size to 4 MB. That was an amazing amount of RAM in 1986, and begged the question: What can I do with all this memory space?
At the same time, many users were asking how they could speed up their Macs. And while many users were happy to just max out the RAM, and enjoy the performance gain of having more memory, which let them run more applications concurrently, some users discovered the joys of using a RAM disk to speed up the system and apps. Other users discovered that a RAM disk could be used to create an amazingly fast storage system. Remember, back then, most Mac Plus users were getting by with a single 800 KB floppy drive, while those who felt like splurging could add an additional external floppy drive. If you really had cash to burn, you could hook up a 20MB SCSI (Small Computer System Interface) hard drive, which would likely set you back well over $1,200.
The first prominent use of a RAM disk was to copy the Mac’s slow ROM (Read Only Memory), which contained many of the system’s core components, along with the operating system, which was stored on a floppy drive, and move them both to a RAM disk where they could operate at the speed of RAM; many, many times faster than either the floppy disk or the ROM.
The performance increase was amazing, and was achieved for just the cost of a RAM disk utility app.
The second common use of a RAM disk back in the Mac Plus days was to create a tiered storage system. Floppy drives weren’t fast enough for professionals or avid amateurs to work with new rich media editing systems, such as audio editors, image editors, or page layout apps. SCSI drives could meet the needs of image editing and page layout, but audio editing was at best iffy, with most SCSI drives being too slow to provide the needed bandwidth for audio or other real-time editing.
RAM disks, on the other hand, were very fast, and could easily meet the needs of real-time editing with their ability to write or read files as quickly as the RAM could be accessed, without the mechanical latency inherent in SCSI or floppy disks.
The only disadvantage to RAM disks was that the data stored in them was lost every time you turned your Mac off, or the power went out. You had to remember to copy the content of the RAM disk to your main storage system or your work would be lost.
Modern Uses for RAM Disks
RAM disks are likely to be the fastest storage location available on a Mac, easily outperforming any hard drive, and in most cases, beating out SSDs. If you can live with the downside of RAM disks, primarily their small sizes, and the issue of not being able to retain data when power to your Mac is turned off, then there are still plenty of good uses for them.
- Scratch space and temp files: Assigning RAM disk space for use with a multimedia app as scratch space can increase the app’s performance. This assumes the app in question prefers to use disk space for its temporary files.
- Games: Try loading your favorite game, or for small RAM disks, just the saved game files to a RAM disk. You should see faster load times and rendering speeds, and smoother play.
- Video or audio editing/rendering: Load textures, images, audio loops, or other media assets you’ll be using onto a RAM disk for better overall performance.
- Compression: If you need to compress a large number of files as part of your workflow, moving them to a RAM disk can speed up the compression time.
- Batch file processing: If you’re converting a number of image, audio, or video files from one format to another, moving the files to your RAM disk can increase performance.
Creating a RAM Disk
There are two ways to create a RAM disk; you can use the Terminal app to manually create a RAM disk, or you can make use of a third-party utility for creating a RAM disk.
It’s a good idea to start the process of creating a RAM disk by knowing how much free RAM space you have available to work with:
Launch Activity Monitor, located at /Applications/Utilities/.
Select the Memory button in the Activity Monitor window.
At the bottom of the window is a summary of how the RAM is being used. You should see entries for Physical Memory, and Memory Used. Subtract Memory Used from Physical Memory to figure out how much free memory is available to you.
It’s a good idea not to use all of the free memory; your Mac always needs some free memory to work with. Apps like web browsers can quickly swallow up free memory, not to mention the RAM disk you’re about to create. I suggest you leave the Activity Monitor app open, so you can see how memory is being used on your Mac as you experiment with creating and using RAM disks.
Note: The RAM disk you create will not affect the Memory Used entry until you actually use the RAM disk to store data.
Let’s start with using the included Terminal app:
Launch Terminal, located at /Applications/Utilities/.
The following command will create the RAM disk:
diskutil erasevolume HFS+ «RAMDisk» `hdiutil attach -nomount ram://2048`
The command has a number of parameters you’ll likely wish to change; the first is the name of the RAM disk, which in the example is “RAMDisk”. You can use any name you wish; just be sure the name is contained within the double-quotes.
The second option you may wish to change is the size of the RAM disk; in this example, the entry ram://2048 will create a 1 MB RAM disk. The size you enter is how many memory blocks to use in the RAM disk; 2048 blocks will create a 1 MB RAM disk. Multiply the 2048 value by the number of MB you wish to use for the RAM disk; some examples:
- 256 MB = 524288
- 512 MB = 1048576
- 1 GB = 2097152
- 2 GB = 4194304
The last note about the command is the accent grave ` character used before hdiutil and after the size parameter. The character is not a single quote; the accent grave character is found at the top left of most QWERTY keyboards; the accent grave character is usually on the same key as the tilde (
With all the notes taken into account, if you wished to create a 1 GB RAM disk, you would enter the following at the Terminal prompt:
diskutil erasevolume HFS+ «RAMDisk» `hdiutil attach -nomount ram://2097152`
and then press enter or return.
After a moment or two, the RAM disk will be mounted on your Mac’s desktop, ready for you to work with.
Third-Party RAM Disk Utilities
There are a number of utilities that make creating and managing a RAM disk a bit easier than using Terminal.
- TmpDisk: Available at github.com/imothee/tmpdisk, TmpDisk is a simple Open Source RAM disk management app. It allows you to create RAM disks by simply filling in a few fields. It installs as a menu bar item and includes the ability to create RAM disks automatically at startup.
- Ultra RAM Disk: Available from the Mac App Store, Ultra RAM Disk installs as a menu bar item that allows you to create RAM disks when needed.
- RAMDisk: Available from the Mac App Store, RAMDisk is an app for creating as well as backing up RAM disks, to allow you to save their contents as well as restore RAM disks when you restart your Mac.
Using the RAM Disk
Now that you have a RAM disk mounted on your Mac you can use it just as if it were another drive. Try copying an image file to the RAM disk and then open it in your favorite editor. You may be amazed at how fast it opens, as well as how fast you can perform edits and save the image.
If you have a favorite game, and enough free memory to house the game, try using the RAM disk to run the game from. You may be racking up points faster than ever.
Remember: The key to using a RAM disk is that the information stored within it is volatile. It won’t survive a shutdown or power loss. Make sure you copy any information you need from the RAM disk before shutting down.
Источник


