- TablePlus
- How to start and stop Redis server on Mac, Linux, and Windows?
- How to Install Redis on Mac
- Installing Redis on Mac
- Option 1: Install Redis on Mac With Homebrew
- Option 2: Install Redis on Mac Without Homebrew
- Starting and Configuring Redis on Mac
- Launch Redis on Boot
- Stop Redis from Launching on Boot
- Start Redis Server
- Test if Redis Server is Running
- Uninstalling Redis on Mac
- Red — UI for Redis 4+
- A beautiful frontend for Redis
- Echodot LLC
- Screenshots
- Description
TablePlus
How to start and stop Redis server on Mac, Linux, and Windows?
October 30, 2018
In this post, we will show you some quick ways to start and stop Redis database server on multiple operating systems: macOS, Linux, Windows.
1. On macOS
Getting started with Redis is quite easy and straightforward. Using Homebrew, you can get it up and running within a couple of commands:
- To install Redis on Mac:
- Launch Redis on computer starts.
- Start Redis server via “launchctl”.
- Start Redis server using configuration file.
- Stop Redis on autostart on computer start.
Or easier, you can use brew service:
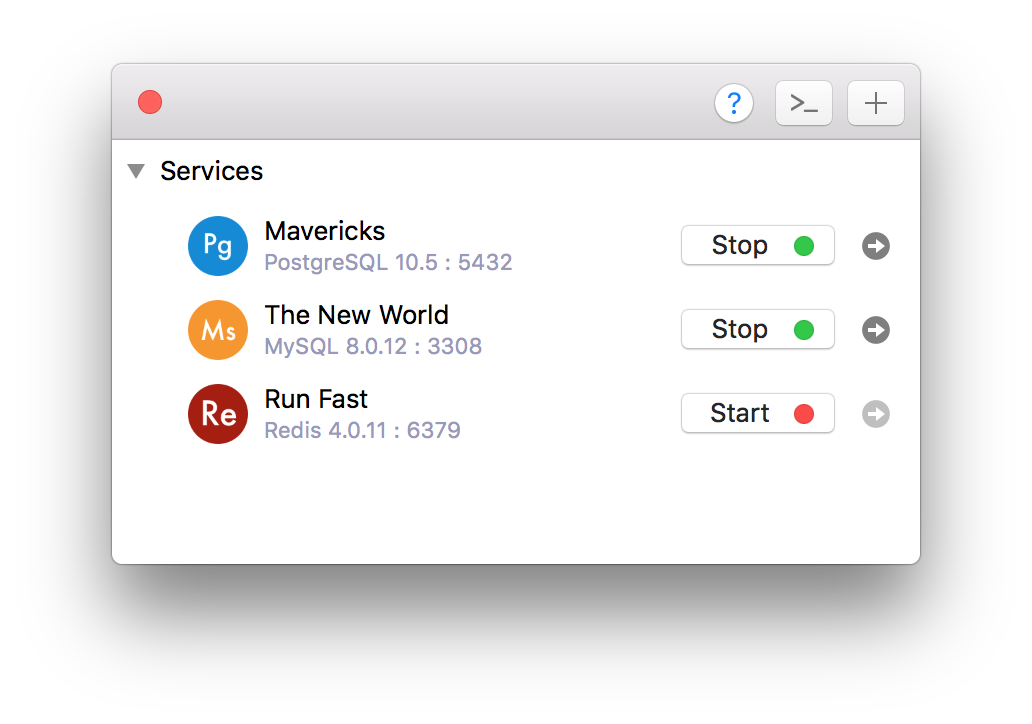
If you feel uncomfortable working with command lines, use DBngin. It’s a hassle-free way to manage the local Redis database servers. It’s just one click to start, another click to turn off.
No dependencies, no command line required, multiple drivers, multiple versions and multiple ports. And it’s free.
2. On Windows
- Open Run Window by Winkey + R
- Type services.msc
- Search Redis service
- Click stop, start or restart the service option.
3. On Ubuntu
To install Redis on Ubuntu, it’s a lot of works to do. There’s a comprehensive guide on how to install Redis server on Ubuntu 16.04. If you haven’t done it before, go take a look.
- To start Redis automatically when your server boots:
Need a good GUI tool for Redis on MacOS? TablePlus is a modern, native tool with an elegant GUI that allows you to simultaneously manage multiple databases such as MySQL, PostgreSQL, SQLite, Microsoft SQL Server, Redis and more.
Источник
How to Install Redis on Mac
Home » SysAdmin » How to Install Redis on Mac
Redis is an open-source data storage solution. It is primarily used as a database, cache storage, or message broker due to the way it stores key-value pairs.
Redis stands out with its flexibility and high performance, wide language support, and high availability.
In this tutorial, you will learn several ways to install and configure Redis on your Mac computer.
- A system running macOS Catalina
- Access to the terminal window
- A user with admin-level privileges
Installing Redis on Mac
There are two ways to install Redis on Mac:
- Installing Redis from scratch.
- Using package management software, like Homebrew.
Homebrew automates most of the installation process, making it quick and easy to add Redis to your system. It also provides more options when configuring Redis, and makes uninstalling it a lot simpler.
Option 1: Install Redis on Mac With Homebrew
If you don’t have Homebrew, install it with the following command:
If you already have a copy of Homebrew installed, update it by using:
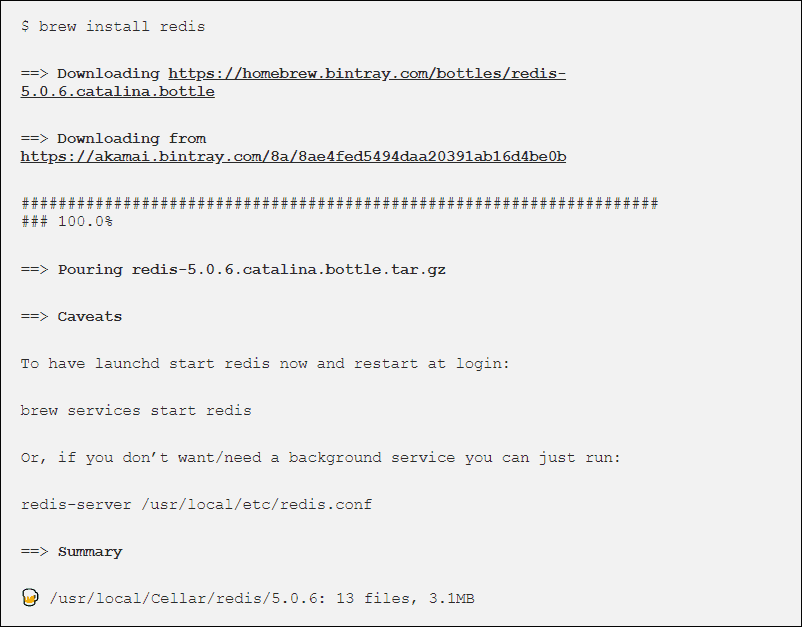
With an up-to-date version of Homebrew, install Redis by using the command:
Using this command produces the following output:
Option 2: Install Redis on Mac Without Homebrew
The second method enables you to install Redis on Mac without Homebrew.
To install Redis without Homebrew, use the following commands:
- mkdir redis && cd redis – Creates a folder called ‘redis’ and moves you to the newly created folder.
- curl -O http://download.redis.io/redis-stable.tar.gz – Downloads the Redis installation archive.
- tar xzvf redis-stable.tar.gz – Unpacks the ‘redis-stable‘ installation archive.
- cd redis-stable – Moves you to the ‘redis-stable’ folder.
The remaining commands install the Redis software.
Note: NoSQL databases, like Redis, are meant to run efficiently in distributed clusters that scale out horizontally. Using Docker to deploy Redis in a container makes horizontal scaling a routine, straightforward process.
Starting and Configuring Redis on Mac
Depending on the installation method used, there are two ways to launch Redis on your system.
If you installed Redis using Homebrew, use Homebrew to launch it:
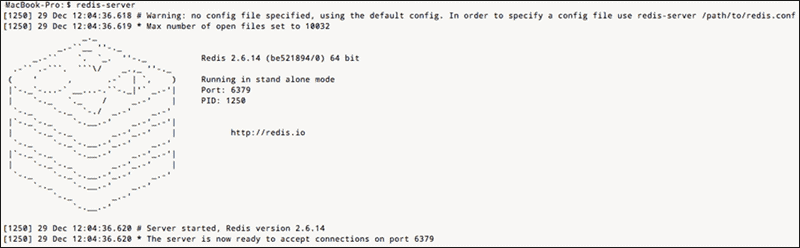
If you installed Redis without Homebrew, use the following code:
Modify your Redis instance by using the commands listed below.
Launch Redis on Boot
To have Redis launch on system boot, use:
Stop Redis from Launching on Boot
To stop Redis from starting upon system boot, use:
Start Redis Server
There are two ways to start your Redis server:
- Using the launchctl
- Using the Redis configurations file.
When starting Redis with the launchctl command, use the following syntax:
If you want to start Redis using the configuration file, use:
By default, the Redis configuration file is located at /usr/local/etc/redis.conf .
Test if Redis Server is Running
Ping your Redis server to verify if it’s running:
The system responds with a ‘pong’ if the server is up and running.
Uninstalling Redis on Mac
To uninstall Redis, use Homebrew with the following command:
Note: Remember to also remove Redis files from your hard-drive by using:
After following this tutorial, you now know how to install, configure, and uninstall Redis on your Mac computer.
For more helpful tips on using Redis, check out our comprehensive guide to Redis data types.
Источник
Red — UI for Redis 4+
A beautiful frontend for Redis
Echodot LLC
-
- 4.6 • 35 Ratings
-
- Free
- Offers In-App Purchases
Screenshots
![]()
![]()
![]()
![]()
![]()
![]()
![]()
![]()
Description
Meet Red: the only full-featured, professional Redis client written from the ground-up for the Mac!
Red provides a powerful yet wonderfully simple interface to interact with Redis.
Quickly view your data:
• Watch your keys appear and expire in real-time with Live Updates
• View data as unicode strings, hexadecimal, JSON, or MsgPack
• Add, remove, and trim streams in Redis 6
• Get a live view of broadcasted messages with Publish/Subscribe
Advanced Features:
• Intelligent console displays Redis documentation and provides sublime-style autocompletion for keys
• Simple interface to easily edit users and access control
• Integrated Lua support allows scripts to be run within the application
• Connect to remote instances via SSH
• Import and export databases
Because we love the Mac:
• A beautiful UI makes Red stand apart
• Written in native Swift as a MacOS app makes Red fast and your battery full.
• Tabbed window support for quick context switching
• Looks great in Light and Dark Mode
Download Red now and start your free trial today!
Источник


