- How to create a bootable installer for macOS
- What you need to create a bootable installer
- Download macOS
- Use the ‘createinstallmedia’ command in Terminal
- How to reinstall macOS
- Start up from macOS Recovery
- Apple silicon
- Intel processor
- Reinstall macOS
- Other macOS installation options
- How to reinstall Mac OS X from scratch
- Step 1: Back up!
- Step 2: Erase the hard drive
- Step 3: Reinstall
- Step 4: Update
- Step 5: Reconfigure
- Step 6: Import data (selectively!)
- Step 7: Reinstall applications
- 14 Comments
How to create a bootable installer for macOS
You can use an external drive or secondary volume as a startup disk from which to install the Mac operating system.
These advanced steps are primarily for system administrators and others who are familiar with the command line. You don’t need a bootable installer to upgrade macOS or reinstall macOS, but it can be useful when you want to install on multiple computers without downloading the installer each time.
What you need to create a bootable installer
- A USB flash drive or other secondary volume formatted as Mac OS Extended, with at least 14GB of available storage
- A downloaded installer for macOS Big Sur, Catalina, Mojave, High Sierra, or El Capitan
Download macOS
- Download: macOS Big Sur, macOS Catalina, macOS Mojave, or macOS High Sierra
These download to your Applications folder as an app named Install macOS [ version name ]. If the installer opens after downloading, quit it without continuing installation. To get the correct installer, download from a Mac that is using macOS Sierra 10.12.5 or later, or El Capitan 10.11.6. Enterprise administrators, please download from Apple, not a locally hosted software-update server. - Download: OS X El Capitan
This downloads as a disk image named InstallMacOSX.dmg. On a Mac that is compatible with El Capitan, open the disk image and run the installer within, named InstallMacOSX.pkg. It installs an app named Install OS X El Capitan into your Applications folder. You will create the bootable installer from this app, not from the disk image or .pkg installer.
Use the ‘createinstallmedia’ command in Terminal
- Connect the USB flash drive or other volume that you’re using for the bootable installer.
- Open Terminal, which is in the Utilities folder of your Applications folder.
- Type or paste one of the following commands in Terminal. These assume that the installer is in your Applications folder, and MyVolume is the name of the USB flash drive or other volume you’re using. If it has a different name, replace MyVolume in these commands with the name of your volume.
Big Sur:*
Catalina:*
Mojave:*
High Sierra:*
El Capitan:
* If your Mac is using macOS Sierra or earlier, include the —applicationpath argument and installer path, similar to the way this is done in the command for El Capitan.
After typing the command:
- Press Return to enter the command.
- When prompted, type your administrator password and press Return again. Terminal doesn’t show any characters as you type your password.
- When prompted, type Y to confirm that you want to erase the volume, then press Return. Terminal shows the progress as the volume is erased.
- After the volume is erased, you may see an alert that Terminal would like to access files on a removable volume. Click OK to allow the copy to proceed.
- When Terminal says that it’s done, the volume will have the same name as the installer you downloaded, such as Install macOS Big Sur. You can now quit Terminal and eject the volume.


Источник
How to reinstall macOS
Use macOS Recovery to reinstall the Mac operating system.
Start up from macOS Recovery
Apple silicon
Turn on your Mac and continue to press and hold the power button until you see the startup options window. Click the gear icon labeled Options, then click Continue.
Intel processor
Make sure that your Mac has a connection to the internet. Then turn on your Mac and immediately press and hold Command (⌘)-R until you see an Apple logo or other image.
If you’re asked to select a user you know the password for, select the user, click Next, then enter their administrator password.
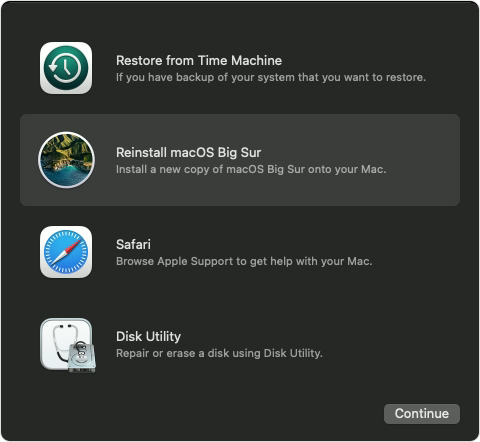
Reinstall macOS
Select Reinstall macOS from the utilities window in macOS Recovery, then click Continue and follow the onscreen instructions.
Follow these guidelines during installation:
- If the installer asks to unlock your disk, enter the password you use to log in to your Mac.
- If the installer doesn’t see your disk, or it says that it can’t install on your computer or volume, you might need to erase your disk first.
- If the installer offers you the choice between installing on Macintosh HD or Macintosh HD — Data, choose Macintosh HD.
- Allow installation to complete without putting your Mac to sleep or closing its lid. Your Mac might restart and show a progress bar several times, and the screen might be empty for minutes at a time.
After installation is complete, your Mac might restart to a setup assistant. If you’re selling, trading in, or giving away your Mac, press Command-Q to quit the assistant without completing setup. Then click Shut Down. When the new owner starts up the Mac, they can use their own information to complete setup.
Other macOS installation options
When you install macOS from Recovery, you get the current version of the most recently installed macOS, with some exceptions:
- On an Intel-based Mac: If you use Shift-Option-Command-R during startup, you’re offered the macOS that came with your Mac, or the closest version still available. If you use Option-Command-R during startup, in most cases you’re offered the latest macOS that is compatible with your Mac. Otherwise you’re offered the macOS that came with your Mac, or the closest version still available.
- If the Mac logic board was just replaced, you may be offered only the latest macOS that is compatible with your Mac. If you just erased your entire startup disk, you may be offered only the macOS that came with your Mac, or the closest version still available.
You can also use these methods to install macOS, if the macOS is compatible with your Mac:
- Use the App Store to download and install the latest macOS.
- Use the App Store or a web browser to download and install an earlier macOS.
- Use a USB flash drive or other secondary volume to create a bootable installer.
Источник
How to reinstall Mac OS X from scratch
Published April 11th, 2013 at 11:11 AM EDT , modified January 2nd, 2016 at 9:32 PM EST

For whatever reason, you have decided that you want to reinstall the system from scratch, restoring your machine to an “out-of-the-box” state. Regardless of the reason, this is not something to be undertaken lightly. The possibility of data loss looms any time you erase your primary hard drive. Further, if you do the job wrong, whatever problem you’re trying to solve may not even be solved. Fortunately, there are some easy steps you can take to do the job right.
Before I start, note that if you are trying to get the machine ready to sell, you should follow some slightly different directions. See How to prepare your Mac for sale.
Step 1: Back up!
Backing up your data is something you should be doing on a regular basis – every single day, for most people. However, any time you propose erasing your primary data storage, it becomes critical. You must do it right, or you will risk losing data. So how do you do it right? Most importantly, make redundant backups. If you only have one backup, remember that when you erase your hard drive, those backups become the one-and-only copy of your data. That’s an extremely vulnerable state to be in. Don’t put yourself in that state. Before erasing the hard drive, make sure you have a minimum of two completely separate backups, on completely separate media, and preferably made with two different backup programs. I highly recommend Time Machine to back up to one hard drive or a Time Capsule, and Carbon Copy Cloner to back up to one or more additional hard drives.
Note that, for the purposes of these instructions, I will assume that you have a backup clone (ie, an exact copy of your hard drive’s current state) made with something like Carbon Copy Cloner.
Also, note that if you’re running Lion or later (Mac OS X 10.7 and up), before making that clone backup, it would be extremely helpful if you were to run the following command in the Terminal (to make sure your user Library folder is visible on your backup):
Step 2: Erase the hard drive
If you plan to install Snow Leopard (Mac OS X 10.6), or any previous system, insert the appropriate Mac OS X install disc and restart the computer. Hold down the ‘c’ key as soon as you hear the chime, then let go when you see the Apple logo. The system should eventually boot into the installer, where you first must choose a language. Do so, then choose Disk Utility from the Utilities menu.
If you are reinstalling Lion (Mac OS X 10.7) or later, restart the computer and hold command-R as soon as you hear the chime. When you see the Apple logo, you can let go. This will start the computer in recovery mode. Once you have fully booted into recovery mode, open Disk Utility. Note that when you begin the install process, you will need to download about 4 GB of data, so be sure your internet connection can handle that before proceeding.
Once in Disk Utility, you need to select your hard drive in the list and select the Erase tab. Select “Mac OS Extended (Journaled)” from the Format pop-up, if that’s not already chosen, then click the Erase button. When Disk Utility is finished, choose Quit from the Disk Utility menu.
Step 3: Reinstall
This step is pretty simple – just follow the directions to reinstall the system on the newly-erased drive.
One important thing to know, though, is that you don’t want to let the installer import anything from backups when it finishes. That can import more than you want, and that could very well bring back whatever bad settings file or third-party software or whatnot that is causing the problems you’re trying to solve in the first place. Instead, when the installer finishes, import nothing, and go through the setup process as if this were your first computer.
Step 4: Update
Once your system restarts successfully, you will need to be sure that it is fully up-to-date. From the Apple menu, choose Software Update, and install any updates that show up. Installing from older system disks can leave you with a somewhat outdated system, so you’ll want to be sure that you take care of bringing it back up to speed.
If you reinstalled Mac OS X 10.7 or 10.8, this should not be an issue, since you will have downloaded the most up-to-date version. Still, it can’t hurt to go ahead and check for updates anyway.
Step 5: Reconfigure
Once your clean, new system is up and running and fully updated, work on getting all the settings back to the way you like them. Don’t worry about getting things like Mail or iTunes set up again yet, though. Just make sure to do things like get connected to your wireless network, get your mouse/trackpad settings back the way you like them, set up your printer again, etc.
Step 6: Import data (selectively!)
At this point, you can manually copy your user data from the clone backup back into your new user folder. Don’t try to copy any settings files – nothing from your Library folder, for example – just documents.
When it comes to restoring data for apps that are not document-centric, like iTunes, iPhoto or Mail, you need to find and copy the data from your backup to the same location on your new drive. The items you need to copy for such apps are found in the following locations (note that the ‘
’ means “your home folder”):
/Music/iTunes
/Library/Preferences/com.apple.iTunes.plist
/Pictures/iPhoto Library
/Library/Preferences/com.apple.iPhoto.plist
/Library/Mail
/Library/Preferences/com.apple.mail.plist
/Library/Containers/com.apple.mail
Copy the files/folders from those locations on the backup to the same location in your new user folder. For other apps, you may need to search for instructions on where to find the data and preference files.
Step 7: Reinstall applications
At this point, you can start reinstalling any other applications you might have had installed. Do not try to copy them from your backup. Reinstall them from the original disks, or download them from the original source.
Note that if you’re trying to solve problems like frequent system crashes or performance problems, this step is one that you should draw out over an extended period of time. Don’t just slap every application you had back onto the new system! If you do, and one of those applications was causing the problem, you’ll never know which one it was and you’ll be back at square one, with a lot of time wasted. Install third-party applications one at a time, with a period of testing afterward to be sure the problem doesn’t come back.
Once you have completed the seventh step, you should have your machine back to a state pretty close to where it was before, though hopefully without the issues that caused you to go to all this trouble in the first place.
14 Comments
Just out of curiosity, let’s say that somehow I manage to get some sort of malware on my Mac and I decide to reinstall from scratch. Is it enough to choose Erase? if I choose to Zero Out Data, would that be too much?
Are the results of Erase command similar to Format option from Windows?
There is no need to zero out the drive. Erasing is sufficient, there is no malware that can survive that.
When you say “no malware” do you mean “no malware YET?”
Malware would have to somehow embed itself into the hardware (such as in the firmware) in order to survive a hard drive erasure.
While just hitting Erase gives you a clean drive to reinstall to, it would be a very good idea to to zero the data. The zeroing touches every block of the drive, so if you do have a bad block it would be found and retaliated to a good block. This would be more important on a drive 3 years and older vs a newer drive. Just a good “best practices” way of doing things. Of course, this is only needed on a conventional spinning HD and not needed on a SSD drive.
The idea that zeroing the drive fixes bad blocks is a common one, but it’s no longer entirely accurate. It was true years ago, but modern drives automatically map out bad blocks as they are encountered. Zeroing the drive these days is only important if you want to wipe the data and prevent it from being recoverable.
So, for example, you’d want to zero out data if you wanted to sell the computer, right?
Источник


