- How to reinstall macOS
- Start up from macOS Recovery
- Apple silicon
- Intel processor
- Reinstall macOS
- Other macOS installation options
- How to fix a split Fusion Drive
- Before you begin
- Use Terminal to create a Fusion Drive again
- If you’re using macOS Mojave or later
- If you’re using macOS High Sierra or earlier
- Question: Q: Can’t reinstall OS X — «This disk is locked»
- Helpful answers
How to reinstall macOS
Use macOS Recovery to reinstall the Mac operating system.
Start up from macOS Recovery
Apple silicon
Turn on your Mac and continue to press and hold the power button until you see the startup options window. Click the gear icon labeled Options, then click Continue.
Intel processor
Make sure that your Mac has a connection to the internet. Then turn on your Mac and immediately press and hold Command (⌘)-R until you see an Apple logo or other image.
If you’re asked to select a user you know the password for, select the user, click Next, then enter their administrator password.
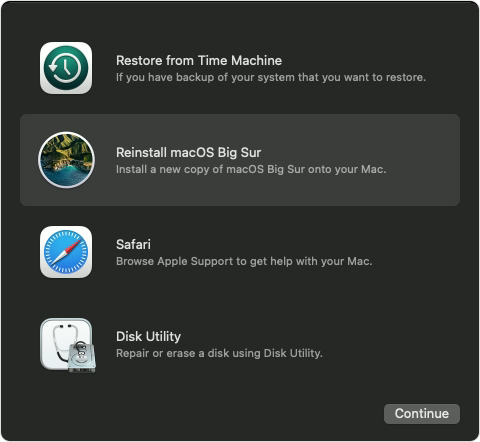
Reinstall macOS
Select Reinstall macOS from the utilities window in macOS Recovery, then click Continue and follow the onscreen instructions.
Follow these guidelines during installation:
- If the installer asks to unlock your disk, enter the password you use to log in to your Mac.
- If the installer doesn’t see your disk, or it says that it can’t install on your computer or volume, you might need to erase your disk first.
- If the installer offers you the choice between installing on Macintosh HD or Macintosh HD — Data, choose Macintosh HD.
- Allow installation to complete without putting your Mac to sleep or closing its lid. Your Mac might restart and show a progress bar several times, and the screen might be empty for minutes at a time.
After installation is complete, your Mac might restart to a setup assistant. If you’re selling, trading in, or giving away your Mac, press Command-Q to quit the assistant without completing setup. Then click Shut Down. When the new owner starts up the Mac, they can use their own information to complete setup.
Other macOS installation options
When you install macOS from Recovery, you get the current version of the most recently installed macOS, with some exceptions:
- On an Intel-based Mac: If you use Shift-Option-Command-R during startup, you’re offered the macOS that came with your Mac, or the closest version still available. If you use Option-Command-R during startup, in most cases you’re offered the latest macOS that is compatible with your Mac. Otherwise you’re offered the macOS that came with your Mac, or the closest version still available.
- If the Mac logic board was just replaced, you may be offered only the latest macOS that is compatible with your Mac. If you just erased your entire startup disk, you may be offered only the macOS that came with your Mac, or the closest version still available.
You can also use these methods to install macOS, if the macOS is compatible with your Mac:
- Use the App Store to download and install the latest macOS.
- Use the App Store or a web browser to download and install an earlier macOS.
- Use a USB flash drive or other secondary volume to create a bootable installer.
Источник
How to fix a split Fusion Drive
If your Fusion Drive appears as two drives instead of one in the Finder, it’s no longer working as a Fusion Drive. Here’s how to fix it.
Fusion Drive, a storage option on some iMac and Mac mini computers, combines a hard drive and flash storage in a single volume for improved performance and storage capacity. If your Fusion Drive appears as two drives instead of one in the Finder, it’s no longer working as a Fusion Drive. This can happen after replacing either drive of your Fusion Drive, or using software to intentionally split them into separate volumes.
You can continue using the two drives independently, or follow these steps to regain the benefits of having the single logical volume of a Fusion Drive.
Before you begin
If you’re not sure that your Mac was configured with a Fusion Drive, or that the drive has been split:
- Disconnect any external storage devices from your Mac.
- Choose Apple menu > About This Mac, then click Storage.
- If you see a drive labeled Fusion Drive, your Fusion Drive is working and this article doesn’t apply to you.
- If you have a Fusion Drive that has been split, you should see two drives. One of them should be labeled Flash Storage, with a capacity of 24GB, 32GB, or 128GB. The other should be at least 1TB.
Use Terminal to create a Fusion Drive again
These steps permanently delete all data stored on the drives that make up your Fusion Drive. Make sure that you have a backup before continuing.
If you’re using macOS Mojave or later
- Turn on your Mac, then immediately press and hold Command-R to start up from macOS Recovery. Release the keys when you see the Apple logo or spinning globe.
- When you see the macOS Utilities window, choose Utilities > Terminal from the menu bar.
- Type diskutil resetFusion in the Terminal window, then press Return.
- Type Yes (with a capital Y) when prompted, then press Return.
- When Terminal indicates that the operation was successful, quit Terminal to return to the macOS Utilities window.
- Choose Reinstall macOS, then follow the onscreen instructions to reinstall the Mac operating system. Your Mac restarts from your Fusion Drive when done.
If you’re using macOS High Sierra or earlier
- Turn on your Mac, then immediately press and hold Command-R to start up from macOS Recovery. Release the keys you see the Apple logo or spinning globe.
- When you see the macOS Utilities window, choose Utilities > Terminal from the menu bar.
- Type diskutil list in the Terminal window, then press Return.
- Terminal displays a table of data about your drives. In the IDENTIFIER column, find the identifier for each of the two internal, physical drives that make up your Fusion Drive. Usually the identifiers are disk0 and disk1. One of them should be 128GB or less in size. The other at least 1TB in size.
- Type the following command, replacing identifier1 and identifier2 with the identifiers you found in the previous step. Then press Return.
Example: diskutil cs create Macintosh\ HD disk0 disk1
Example:
+— Logical Volume Group 8354AFC3-BF97-4589-A407-25453FD2815A
| =========================================================
| Name: Macintosh HD
Example: diskutil cs createVolume 8354AFC3-BF97-4589-A407-25453FD2815A jhfs+ Macintosh\ HD 100%
Источник
Question: Q: Can’t reinstall OS X — «This disk is locked»
After Disk Utility couldn’t repair my hard drive, and I was told to erase and reformat, I attempted to reinstall Mountain Lion but I keep getting this message saying «This disk is locked».
Any help would be greatly appreciated, thanks.
macbook, Mac OS X (10.7.1)
Posted on Mar 1, 2014 9:55 AM
Helpful answers
You say there are ways to back up a computer that isn’t fully functional. Help! The only way I can get into my computer is via command>r. I assume I need to back up my computer before I do a reinstall. How do I do that. I tried disk utility repair and got ‘Invalid node structure’, ‘Disk full error’ and ‘Error: disk Utility can’t repair this disk. Back up as many of your files as possible, reformat the disk, and restore your backed up files’. I have a Seagate external hard drive. I cannot get to my desktop at all. Can’t reinstall Lion because the HD is locked, although I think I need to back up first if possible. I have tried double clicking the HD in the utilities window and nothing happens. FYI, when starting the computer with no commands I get the apple, the progression bar and then it shuts down. Thanks in advance!
Jun 1, 2014 11:26 AM
Shut the computer down and then Restart.
Start up into Recovery HD and double click the Macintosh HD.
If it asks for, authenticate it.
Mar 1, 2014 10:41 AM
SOLUTION: Guys don’t waste your time. I had this exact problem but I tried using command + alt + r during boot up. Hold it till you see the globe pop up and let it do its thing and that should fix the problem (at least it did for me). Then you can install without problems. Good luck!
If didnt work buy an external hard disk and connect it to your mac and go to disk utilities and go to ur old hard drive then go to restore ,if the sorce is your hard disk name so thats ok usually its macintosh hd and in the other side destination grab the new hard disk, the new hard disk is gonna erase and copy the old hard disk so you are gonna have a back up ,when it finishes go to ur old drive theb click erase it will work ,you must put it on macOS (journaled) or the first option then just do the same on the first and it will work.
Aug 9, 2017 6:14 PM
Thanks, where do i do that though? When I restart it brings me to the OS X Utilities page.
Mar 1, 2014 10:55 AM
There’s more to the conversation
Loading page content
Page content loaded
Shut the computer down and then Restart.
Start up into Recovery HD and double click the Macintosh HD.
If it asks for, authenticate it.
Mar 1, 2014 10:41 AM
Thanks, where do i do that though? When I restart it brings me to the OS X Utilities page.
Mar 1, 2014 10:55 AM
Here’s how the unlock procedure works for Disk Utility:
1. Boot your Mac and hold down ⌘-R (Command –R) to boot from the Recovery HD partition.
2. Open Disk Utility.
3. Select your locked hard drive.
4. Under the File menu, select Unlock “Drive Name”
5. When prompted for a password, enter the password of the authorized account on the drive.
6. Once you unlock the disk, hold down the Option key on your keyboard and click on the File menu.
7. Under the File menu, select Turn Off Encryption… with the Option key held down, it is no longer grayed-out.
8. When prompted for a password, enter the password of the authorized account on the drive.
9. Disk Utility should display a progress window labeled Starting conversion to JHFS+
10. Your drive should now be unlocked.
Mar 1, 2014 1:30 PM
The drive is failing, or has failed. If you don’t already have a current backup, you need to back it up immediately. Do not try repair it or reinstall OS X.
Mar 1, 2014 1:57 PM
Thanks for the help, I’ve already backed it up. But if I can’t repair it or reinstall, what are my options?
Mar 1, 2014 2:02 PM
If you live near an Apple Store, make a Genius Bar appointment to have the computer tested. Supposedly there is no charge for testing.
Mar 1, 2014 2:19 PM
Back up all data on the internal drive(s) before you hand over your computer to anyone . There are ways to back up a computer that isn’t fully functional — ask if you need guidance.
If privacy is a concern, erase the data partition(s) with the option to write zeros* (do this only if you have at least two complete, independent backups , and you know how to restore to an empty drive from any of them.) Don’t erase the recovery partition, if present.
Apple also recommends that you deauthorize a device in the iTunes Store before having it serviced.
*An SSD doesn’t need to be zeroed.
Mar 1, 2014 2:21 PM
You have three options
- Replace the hard drive
- Install an external HD and us it as your boot drive
- Replace the computer
If you are still under warranty of AppleCare Apple will replace the hard drive with a similar drive of the same capacity — they will not upgrade your HD. If your warranty and AppleCare have expired you can find instructions for replacing the drive yourself at Other World Computing.
Mar 1, 2014 2:26 PM
You say there are ways to back up a computer that isn’t fully functional. Help! The only way I can get into my computer is via command>r. I assume I need to back up my computer before I do a reinstall. How do I do that. I tried disk utility repair and got ‘Invalid node structure’, ‘Disk full error’ and ‘Error: disk Utility can’t repair this disk. Back up as many of your files as possible, reformat the disk, and restore your backed up files’. I have a Seagate external hard drive. I cannot get to my desktop at all. Can’t reinstall Lion because the HD is locked, although I think I need to back up first if possible. I have tried double clicking the HD in the utilities window and nothing happens. FYI, when starting the computer with no commands I get the apple, the progression bar and then it shuts down. Thanks in advance!
Jun 1, 2014 11:26 AM
That is what my iMac is doing!!
Aug 13, 2016 2:01 PM
You might want to consider starting a new discussion. Since this one is a couple of years old, less people are likely to look at it. A new post would be much more visible. You can link to this one.
Try using Disk Utility/Restore to copy the data to a new location. Please note that this will reformat the destination partition.
Boot to the Recovery Volume (command — R on a restart or hold down the option/alt key during a restart and select Recovery Volume). Run Disk Utility Verify/Repair Disk and Repair Permissions until you get no errors. Then re-install the OS.
Aug 14, 2016 8:01 AM
I’m writing this as I search for it and found solutions and none of them worked and I noticed I wasn’t the only one.
Easy solution is hold down command + R and get into disk utility, select the main HD and select File > «Enable journaling» but if you are like me, it was greyed out. What the issue is, you are trying to modify the drive you are currently working on which it doesn’t like. You need to create a USB flash installer, then reformate the drive then reinstall. The steps are below
The easiest way to create a USB flash installer is with the free program, Disk Creator.
- Download the macOS Sierra installer and Disk Creator.
- Insert an 8GB (or larger) flash drive. If you have any other data on that flash drive, back it up now, because the installer will delete everything on it.
- Open Disc Creator and click the “Select the OS X Installer” button.
- Find the Sierra installer file. This is should be located in your Applications folder.
- Select your flash drive from the drop-down menu.
- Click “Create Installer.”
- When it’s done, insert your USB drive into any Mac, then launch the installer by holding down the Option key
Step 2 (now that you are booted on a the USB stick and not the main HD):
- Once it loads, go into Disk Utilities and Erase the main drive and select the journaling formate style.
- Then choose to reinstall the OS and the disk will not be greyed out this time.
Источник


