- Docker на macOS
- Использование MacOS машины как хоста
- Современный способ (Docker for Mac)
- Старый способ (Docker Toolbox)
- Другой гипервизор
- Использование облачных сервисов и управление через Docker API
- Другая машина (VPS, VDS, любой «соседний» ПК на Linux или ВМ)
- IaaS Azure, AWS, OpenStack и прочие
- Дополнительные драйверы для docker-machine
- Автодополнение Docker для шелла
- Homebrew
- Только установка docker (CLI), docker-machine, docker-compose
- Docker on Mac with Homebrew: A Step-by-Step Tutorial
- What Are Homebrew and Homebrew Cask?
- How to Install Homebrew
- Installing Docker on Mac With Homebrew Cask
- Preferences
- Using Docker on Mac with Homebrew
- Running an Example
- Making the Console Interactive
- Port Forwarding
- Summary
Docker на macOS
Немного о консольных составляющих
docker — утилита, общающаяся через сокет с хостом Docker ( docker daemon ). Является клиентом.
docker-machine — средство для управления машинами с Docker, а так же их создания. Расширярется так называемыми драйверами.
docker-compose — утилита для определения и выполнения кросс-контейнерных приложений. Позволяет объединить и настроить связку отдельных приложений в контейнерах, например, для веб-сервера: nginx, MySQL, PHP.
Использование MacOS машины как хоста
Самый очевидный способ использования Docker на Mac, учитывая, что Docker может создавать контейнеры только на ядре Linux, это использование виртуальной машины. Уже самые первые Mac на платформе Intel позволяли использовать паравиртуализацию и аппаратное ускорение для запуска виртуальных машин, но родного гипервизора не было: различные производители ПО, вроде VMware и Parralells заняли нишу гипервизоров на MacOS. Конечно же, было еще и бесплатное решение от Oracle (Virtual Box), но оно не такое удобное. В любом случае эти гипервизоры были сделаны в виде расширения ядра и порой были не очень стабильны. Начиная с Yosemite Apple добавили Hypervisor.framework, представляющий из себя API для создания HVM (аппаратных виртуальных машин). Сложно назвать это средство полноценным гипервизором, но первое достаточно массовое решение на нем — xhyve и Veertu. xhyve — гипервизор, портированный с FreeBSD и позволяет запускать Linux-машины.
До появления Hypervisor.framework и проекта xhyve предлагалось запускать Docker в виртуальной машине, используя гипервизор Virtual Box или любой другой (при помощи утилиты docker-machine у которой есть свои «драйверы», позволяющие автоматизировать создание, запуск и работу с виртуальными машинами) из предложенных. Это legacy-решение, но оно до сих пор поддерживается.
Современное же решение – это запуск виртуальной машины с использованием встроенного в MacOS процесса виртуализации. Docker назвали его HyperKit и его кодовая база практически полностью основана на проекте xhyve.
Старый способ (Docker Toolbox), как и драйверы для многих гипервизоров, разворачивают в стороннем гипервизоре образ ОС Boot2Docker.
Современный способ (Docker for Mac)
Данный способ поддерживает только Yosemite 10.10.3 и старше, но рекомендуется El Capitan и выше. Используется HyperKit, встроенная в MacOS виртуализация.
Установка проста и описана на странице Docker for Mac. Необходимо скачать DMG-контейнер, перетащить его содержимое и запустить Docker. Будут установлены консольные утилиты (docker, docker-machine, docker-compose), а также графическая оболочка для управления виртуальной машиной, в которой запущен Docker и бета-версия официальной графической утилиты для управления контейнерами Kitematic. Сразу же после этого можно использовать Docker в полную силу.
Старый способ (Docker Toolbox)
Установка так же простая и описана на странице Docker Toolbox. Установщик сам установит все необходимое, в том числе и гипервизор Oracle VirtualBox. Управлять можно с приложения Kitematic и терминала. Специально сделан шорткат, который можно найти в Launchpad и который позволит подключиться к виртуальной машине. Его же необходимо будет запустить в первый раз, так как он сам сделает виртуальную машину и настроит ее. Далее можно подключаться просто с терминала, выполнив вначале eval $(docker-machine env dev) , после чего можно общаться с docker посредством команды docker .
Рекомендуется настроить виртуальную машину Virtual Box так, чтобы она имела статический IP адрес, но была за NAT. В таком случае можно будет запускать контейнер через docker-machine или VBoxManage , либо с графического интерфейса, после чего работать с ней с обычного терминала.
Другой гипервизор
Для использования другого гипервизора необходимо установить комплект консольных утилит (docker, docker-mahine, docker-compose[^*]). Сделать это можно, установив Docker любым из способов, описанных выше, либо установив консольные утилиты через Homebrew. Кроме того, если уже установлен Virtual Box и Homebrew, то установив через него утилиты можно сделать виртуальные машины для Docker и управлять самим Docker.
[^*]: Необязателен для использования, зависит от поставленной задачи.
Чтобы создать виртуальную машину через docker-machine необходимо изучить документацию к необходимому драйверу. Для тех, что присутствуют по умолчанию, можно посмотреть в официальной документации Docker. Например, для создания виртуальной машины в VMware Fusion необходимо выполнить
После чего для для управления через docker необходимо выполнить
Чтобы точно знать, что мы управляем нужной машиной всегда можно набрать
Использование облачных сервисов и управление через Docker API
Другая машина (VPS, VDS, любой «соседний» ПК на Linux или ВМ)
Чтобы управлять Docker на любой другой машине необходимо воспользоваться драйвером Generic. Он позволит добавить через SSH с ключом или паролем любую машину в реестр docker-toolbox для удобства дальнейшего подключения через утилиту docker .
Почитать по управлению с по мощью драйвера можно в отдельной статье.
IaaS Azure, AWS, OpenStack и прочие
Используя необходимый драйвер в docker-machine можно создать виртуальную машину с Docker на практически любом популярном IaaS сервисе.
Для примера разберем MS Azure в отдельной статье.
Дополнительные драйверы для docker-machine
Если хочется использовать Docker с xhyve или же Parallels, Vultr, то можно поставить драйверы их Homebrew.
Автодополнение Docker для шелла
Чтобы было наиболее удобно управлять Docker имеет смысл установить автодополнение для шела. К сожалению, в версии для Mac оно не поставляется ни в одном варианте.
Homebrew
Если еще не установлен менеджер пакетов brew, то стоит его установить.
/usr/bin/ruby -e «$(curl -fsSL https://raw.githubusercontent.com/Homebrew/install/master/install)»
Лучше использовать шел ZSH. Он легко расширяется модулями и для него больше хороших модулей автодополнения. <==Почитать про устновку можно в отдельной статье==>.
Установить автодополнение для docker, docker-machine, docker-compose не составит труда.
brew install docker-completion docker-machine-completion docker-compose-completion
После установки чтобы автодополнение работало проще всего открыть новую вкладку терминала и проверить работоспособность.
Для установки автодополнения для шела bash необходимо выполнить после установки с Homebrew.
Только установка docker (CLI), docker-machine, docker-compose
Используя Homebrew можно установить указанные выше утилиты для управления docker на любой виртуальной (иди другой) машине без лишних утилит. Можно добавить машину в docker-machine и легко получить к ней доступ через команду eval $(docker-machine env machinename) , после чего управлять ей через docker .
Copyright © 2017 Александр Пинегин aka Bloody Foxy
Источник
Docker on Mac with Homebrew: A Step-by-Step Tutorial
Docker has changed the way developers work. It provides an easy way to safely move code from one machine to another without worrying about dependencies and server versions. It simplifies many operational aspects of running applications. In this post, you’ll learn how to install Docker on Mac OS using Homebrew.
What Are Homebrew and Homebrew Cask?
Don’t know Homebrew yet? It’s a package manager for macOS. It works on the command line and allows you to install software for your Mac. It’s handy and easy to use, which is why it’s also popular.
To install pretty much anything, you can simply type
and wait a few seconds. For Docker installation, however, you’ll need to use Homebrew Cask.
“What’s Homebrew Cask, and why can’t I install Docker with brew install docker?” you might ask. Let’s clarify…
If you have ever installed any GUI software on Mac the “standard way,” you probably know that it normally requires downloading the package, opening it, and installing by the drag-and-drop method to the Application folder. Homebrew, by default, can only install command-line tools.
Homebrew Cask is a Homebrew extension for installing GUI software on Mac. It means that instead of the standard download and drag-and-drop process, you can use this.
Docker on Mac is a GUI tool, so you need to use Homebrew Cask for the installation. But let’s take a step back and answer why you’d use Homebrew in the first place.
As I mentioned earlier, the standard way of installing GUI tools (including Docker) requires you to perform a few steps. First, find a Docker package on the internet. Then you download it, and then you open it on your Mac. Only after those steps can you use drag-and-drop to actually install it.
With Homebrew Cask, you can achieve the same result with only one command. So the main reason to use Cask is simplicity. It’s easier and takes less time.
How to Install Homebrew
In case you don’t have Homebrew installed yet, you only need to open a terminal and execute the following command:
The script explains what it will do and then pauses before it does it.
After installing Homebrew, you’re ready to install Docker.
Installing Docker on Mac With Homebrew Cask
Now that you have Homebrew installed, you can execute the following command to install Docker:
 That’s it. Homebrew will find and download the Docker package and run the installer. After that, you only need to follow the Docker GUI to run the initial configuration.
How can you validate that the installation finished successfully from the command line? Execute:
If the above command doesn’t return the Docker version, you may need to start the Docker daemon first. You can do that by searching for Docker in Spotlight or in the Application folder in Finder and running it.
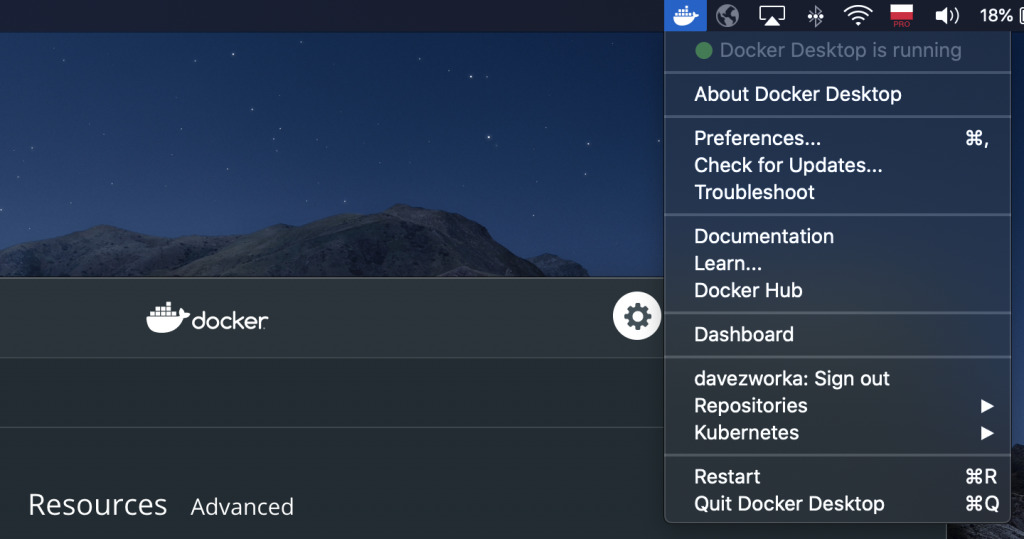
Whenever Docker’s running, you should also see its icon in the status bar:
 Now let’s talk about how you can customize Docker to your liking.
Preferences
You can start using Docker directly after installation, but you can also customize it to your wishes. If you click the Docker icon in the status bar and go to Preferences, you’ll be able to choose whether Docker should start automatically with system startup.
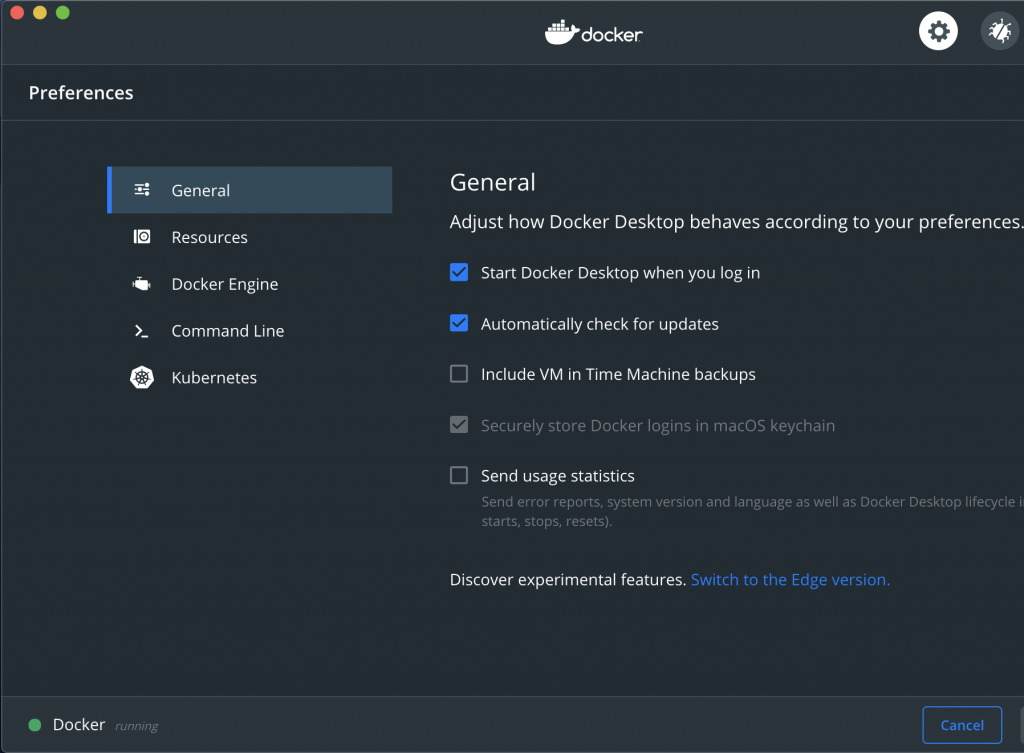 If you plan to use Docker daily, then it’s smart to check that box. But if you’ll use it only from time to time, you’ll save some resources by leaving it unchecked. It takes only a few seconds to start Docker.
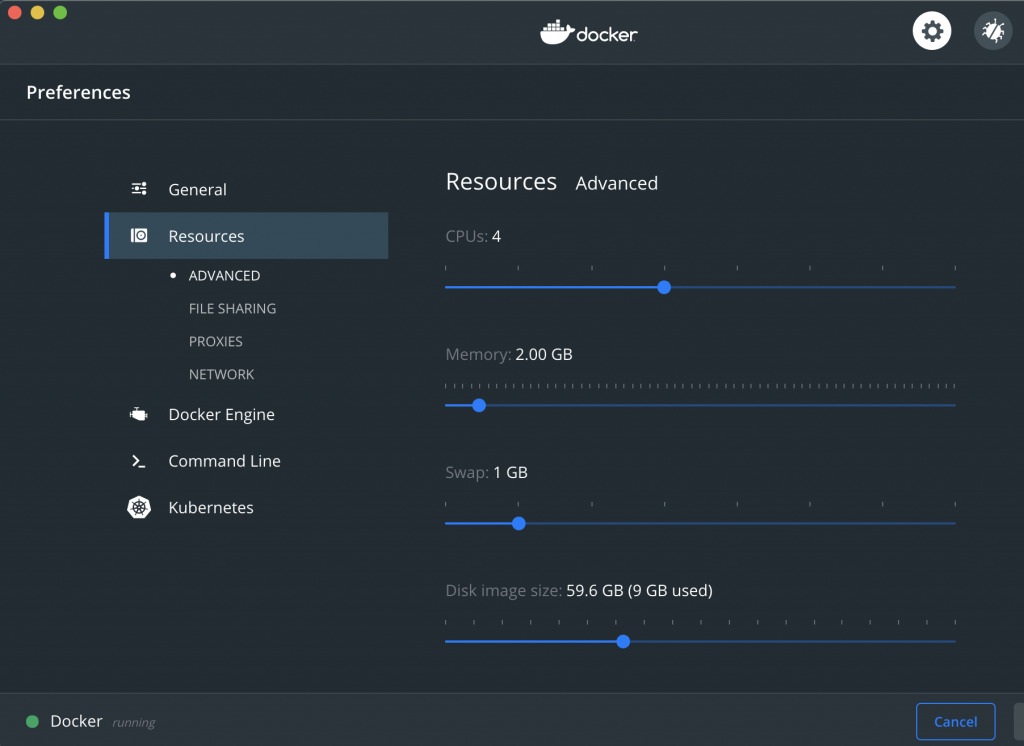
Next, if you go to the Resources section, you’ll be able to customize how much CPU, RAM memory, swap disk space, and disk size Docker will be able to use. Again, you may want to customize it depending on your needs.
If you use Docker for testing only, then you may lower the Docker resource usage. On the other hand, if you use it extensively for many containers at the same time, it makes sense for you to assign more resources for Docker.
Using Docker on Mac with Homebrew
Now that you have Docker installed and running, let’s discuss what you can do with it. To simply run a container, you can execute:
Docker will first try to find a [image_name]:latest. If you don’t specify a Docker image version when executing the docker run command, then Docker will default to the latest version. Since you just installed Docker and don’t have any images on your Mac, Docker won’t find an image there. It will then try to find one on DockerHub, the official Docker registry. If Docker finds the image version there, it will download it and run it for you.
Running an Example
Let’s see an example:
Congratulations! You just started your first Docker container on your Mac.
As you can see in the output, the hello-world container also nicely explains step by step what happened.
If you try to run the same command again, Docker will check again if hello-world is available locally. Since you just downloaded it seconds ago, there’s no need to download it again. Therefore, Docker will run a new container from a local copy of the hello-world image.
Making the Console Interactive
You may have noticed that you ran the container, but you couldn’t do anything with it. It did its job (printed a welcome message) and exited.
To get the console access to the inside of the container, you need to execute a docker run command with -it parameter. Doing this instructs Docker to allocate a pseudo-TTY connected to the container’s stdin, which means creating an interactive Bash shell in the container.
For example, to run an Ubuntu container and get access to Bash inside that container, you need to run:
Now let’s look at another Docker functionality.
Port Forwarding
Ability to get access into the shell inside the container and port forwarding are the two most commonly used Docker functionalities. Port forwarding allows you to access applications running inside the container through your host machine’s IP address (or localhost address).
For example, to run a NGINX server inside a container and expose it on port 8080 of your local machine, you need to pass -p 8080:80 parameter as follows:
Then, you can access an application running on port 80 inside the container by making an HTTP call to localhost:8080.
Summary
In this post, you learned what Homebrew and Homebrew Cask are and how to use the latter to install Docker on your Mac. I explained some customization options and showed you a basic usage of Docker on Mac.
We covered only very basic commands, but Docker offers much more than that. If you want to learn more about Docker, this Docker containerization boot camp is a great way to do it. It covers in detail basics like these:
- How Docker works
- How to use it
- How and where to store images
This tutorial from Cprime also offers more advanced topics, including:
- Continuous integration
- Orchestration
If you want, you can register here . Best of luck to you as you learn more about Docker, Homebrew, and Homebrew Cask!
Источник


