- Установка окружения для разработки PHP на macOS и Linux
- Настройка окружения PHP-разработчика в macOS
- Пакетный менеджер
- Установка PHP
- Установка веб-сервера
- Использование веб-сервера из редактора
- Установка nginx
- Интеграция PHP и веб-сервера
- Установка xdebug
- Проверка работы
- Установка MySQL в macOS
- Установка на Linux
- Установка PHP
- Настройка xdebug
- macOS 11.0 Big Sur Apache Setup: Multiple PHP Versions
- First part in a multi-part blog series for Mac developers
- XCode Command Line Tools
- Homebrew Installation
- Big Sur Required Libraries
- Apache Installation
- Troubleshooting Tips
- Visual Studio Code
- Apache Configuration
- User & Group
- Servername
- Sites Folder
- My User Web Root
- Troubleshooting Non-Sudo httpd Services Start
- PHP Installation
- Apache PHP Setup — Part 1
- Validating PHP Installation
- PHP Switcher Script
- Check Your Path
- Testing the PHP Switching
- Troubleshooting PHP Switching
- Test Your Setup with Grav CMS!
- Updating PHP and other Brew Packages
- Activating Specific/Latest PHP Versions
Установка окружения для разработки PHP на macOS и Linux
22 августа 2017

Настройка окружения PHP-разработчика в macOS
Как установить и настроить все необходимые компоненты, чтобы подготовить свой мак к полноценной разработке на PHP.
Пакетный менеджер
Скачивать и устанавливать весь требуемый софт мы будем с помощью пакетного менеджера Homebrew.
Пакетный менеджер — это инструмент, который значительно облегчает процесс установки любых программ. С Homebrew установка программы на компьютер сводится буквально к одной команде в терминале.
Но сам Homebrew тоже требуется установить, так как по умолчанию он не входит в состав операционной системы.
Понятная инструкция по его установке есть на главной странице этой программы. Выполните её и переходите к следующему шагу.
Установка PHP
Начнём с установки PHP-интерпретатора.
Все последующие команды выполняются через терминал.
Установить интерпретатор можно через одну простую команду:
Проверим, что всё установилось корректно:
Установка веб-сервера
PHP — это язык программирования, на котором можно создавать современные сайты. Обработкой запросов пользователей и отдачей им запрошенных страниц занимаются специальные программы — веб-сервера.
PHP работает в тесной связке с веб-сервером, так как именно последний обращается к нему и, в конечном счёте запускает наши сценарии. В общем, без веб-сервера нам никак не обойтись.
Поднять веб-сервер можно с помощью плагинов для редактора или настроить веб-сервер самостоятельно. Рассмотрим оба варианта.
Использование веб-сервера из редактора
Современные редакторы могут самостоятельно запускать сервер. В VS Code это можно сделать через плагин PHP Server, а в PHP Storm через — PHP Debug Server. По ссылкам есть инструкция с настройками. Для того, чтобы сервер стартовал, нужно чтобы локально был установлен php интерпретатор.
Установка nginx
Рассмотрим как установить веб-сервер самостоятельно.
Установим последнюю версию nginx:
Запускаем nginx, чтобы он работал в фоне и обслуживал наши запросы:
Проверяем, что всё установилось корректно, и nginx успешно работает на нашем компьютере:
откройте любой браузер и введите в адресной строке следующий URL:
в ответ вы должны увидеть страницу с текстом «Welcome to nginx!»
Интеграция PHP и веб-сервера
На этом шаге мы «подружим» PHP-интерпретатор и nginx, чтобы при запросе веб-страниц с расширением.php автоматически выполнялся php-сценарий и мы видели результат его работы в браузере.
Мы сделаем простую настройку сервера так, чтобы он слушал одну папку проекта и выдавал результат через запрос на страницу http://localhost/ .
Откройте конфигурационный файл nginx:
(*) nano — консольный текстовый редактор для Unix и Unix-подобных ОС. Вместо него файлы можно открывать в других редакторах, заменив на nano на phpstorm , code (нужно установить поддержку команды через редактор) для VS Code или другие.
Добавим в конец документа перед закрывающей скобкой от блока http следующий код:
USERNAME нужно будет в двух местах заменить на имя вашего пользователя
Здесь мы говорим серверу, чтобы он слушал 80 порт страницы localhost и при запросе показывал содержимое папки yeticave . После USERNAME вы можете выбрать путь до любой удобной для вас папки.
Разрешим nginx читать содержимое нашего проекта
(*)Поменяйте USER на имя вашего пользователя и yeticave на папку вашего проекта
Для того, чтобы изменения применились на 80 порт, нужно перезагрузить сервер с доступом администратора командой:
Установка xdebug
Установить xdebug можно простой командой:
Проверка работы
Базовая настройка окружения закончена. Осталось проверить, что мы всё сделали правильно.
Создадим тестовый PHP-сценарий со следующим содержимым:
Сохраните его по адресу вашего проекта, например, /Users/user/Sites/yeticave в файл index.php . Вновь откройте браузер и перейдите по ссылке http://localhost/index.php. Вы должны увидеть большую страницу с подробной информацией об установленной версии PHP и всех настройках. Это будет означать, что вы всё сделали правильно, а значит готовы писать и запускать свои первые php-сценарии. Обратите внимание, что все файлы и папки проекта при этой конфигурации должны лежать в корне папки yeticave .
Установка MySQL в macOS
Актуальную версию MySQL для macOS можно загрузить с официальной страницы. Для удобства установки рекомендуется загружать DMG Archive. В этом случае процесс установки будет выполняться с помощью стандартного инсталлятора.
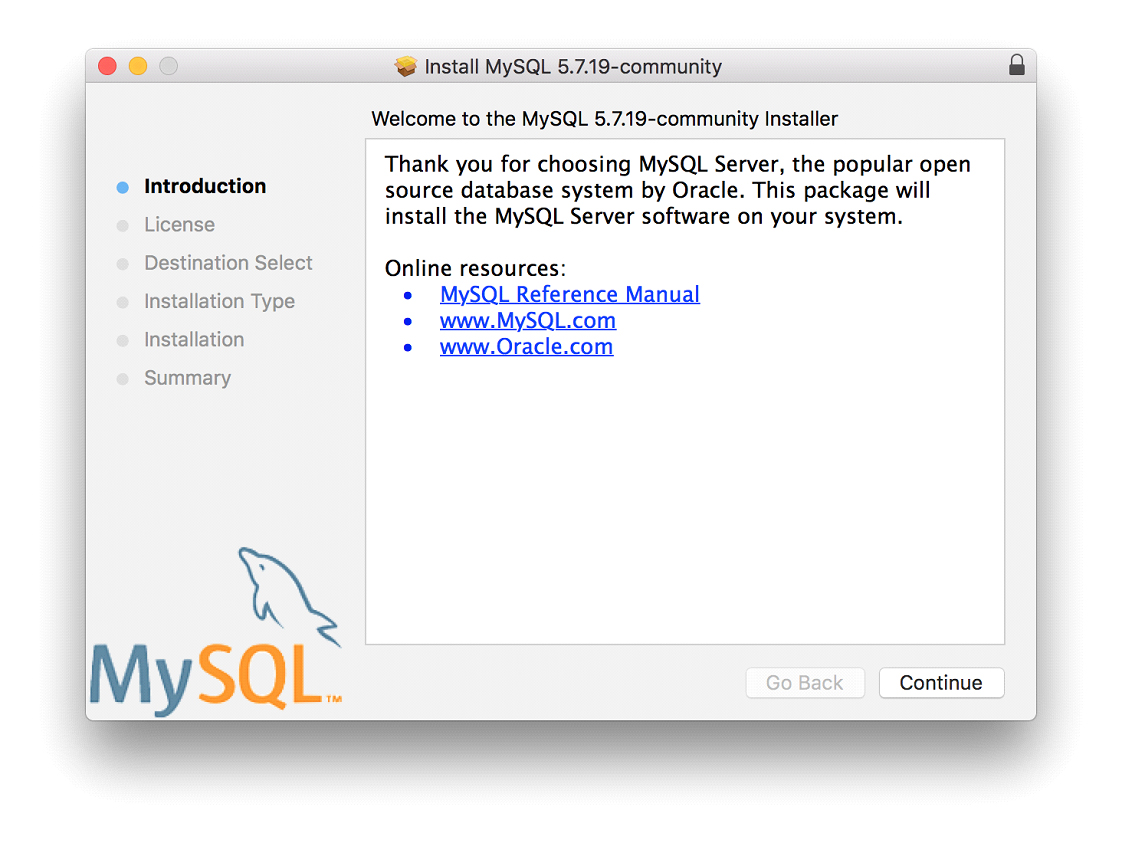 Рисунок 1. Окно инсталлятора
Нажимаем Continue пока не дойдём до шага Installation Type . На этом шаге необходимо проверить перечень компонентов для установки. Нажимаем кнопку Customize . Отмечаем все флаги как на рисунке 2.
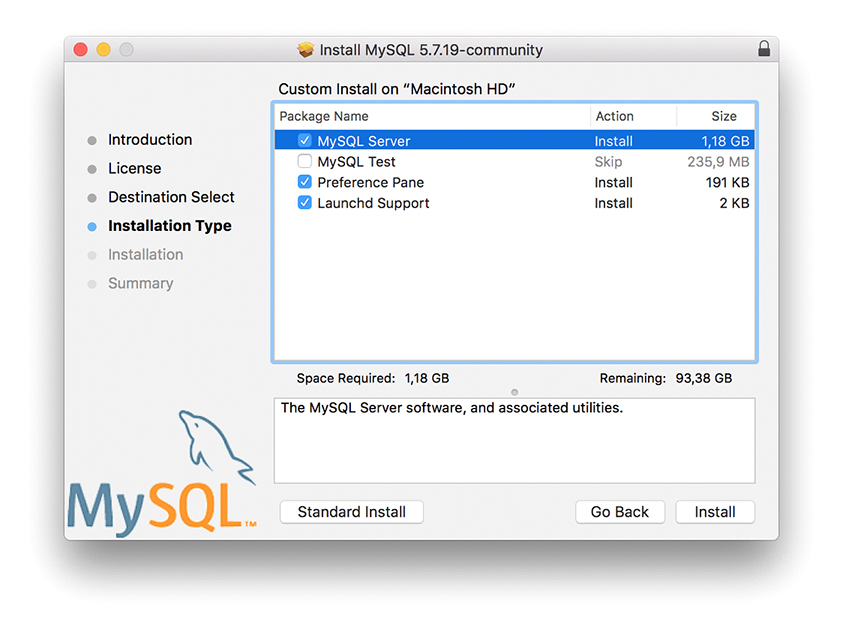 Рисунок 2. Выбор компонент для установки
Нажимаем Install . После установки отобразится всплывающее окно с автоматически сгенерированным паролем для пользователя root. Обязательно его запомните. Пример окна с автоматически сгенерированным паролем приведён на рисунке 3. Далее нажимаете кнопку Finish . На этом установка MySQL завершена.
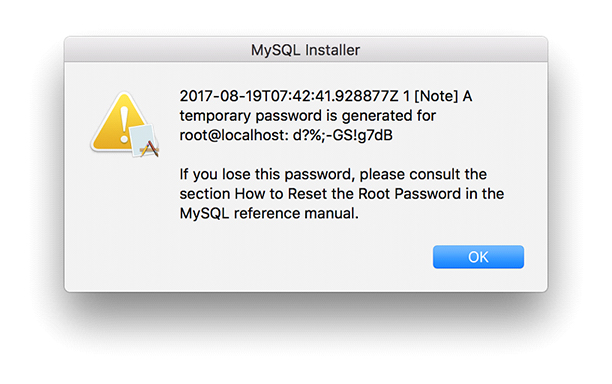 Рисунок 3. Автоматически сформированный пароль
Сразу после установки служба MySQL не будет запущена. Запуск необходимо выполнить вручную. Проще всего это сделать через аплет System Preferences . Открываем и запускаем аплет для управления MySQL (рисунок 4). В появившемся окне нажимаем кнопку Start MySQL Server .
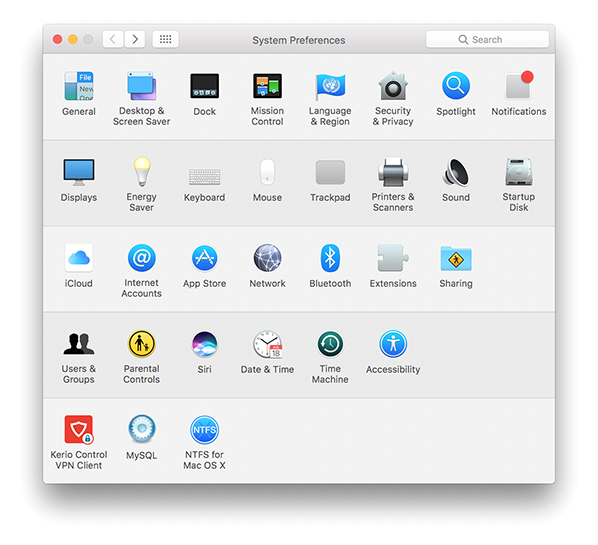 Рисунок 4. Окно System Preferences
  Рисунок 5. Аплет запуска MySQL
Чтобы протестировать соединение с MySQL и получить возможность выполнять базовые задачи, вам потребуется фирменная утилита от Oracle — MySQL Workbench. Установка утилиты выполняется стандартным для macOS способом: запускаем загруженный DMG и в окне инсталлятора перетаскиваем иконку MySQL Workbench в папку Application.
Для тестирования корректности установки MySQL запустим MySQL Workbench и попробуем установить соединение.
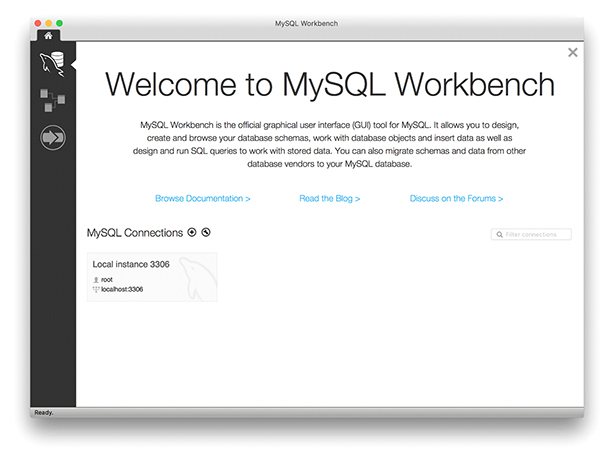 Рисунок 6. Главное окно MySQL Workbench
В главном окне MySQL Workbench, в разделе MySQL Connections кликаем по автоматически подготовленному профилю Local instance . Появится окно ввода пароля. Вводите пароль, который вы сохранили на этапе установки. Если пароль верный, то появится окно с предложением указать текущий пароль и установить новый. Выполните это действие и нажмите Ok . В случае установки соединения вы увидите окно как на рисунке.
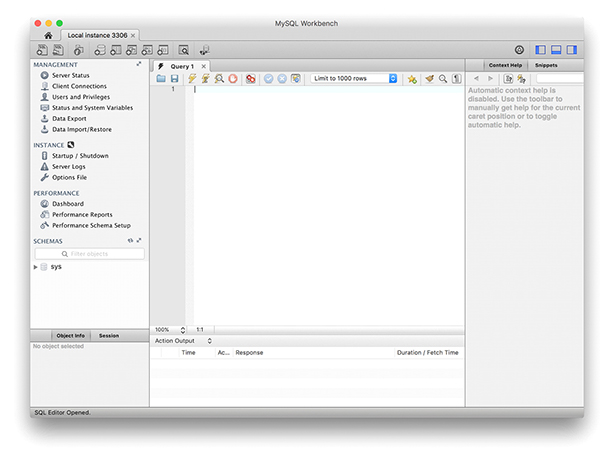 Рисунок 7. Соединение с MySQL установлено
Установка на Linux
Настроить рабочее окружение для разработки на PHP в Linux возможно несколькими способами. Рассмотрим один из наиболее быстрых способов: настройка связки PHP плюс nginx.
Запустите приложение «Терминал». Ярлык на запуск доступен в менеджере приложений.
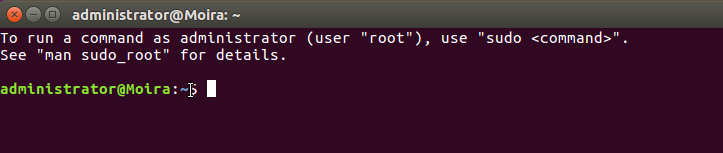 Рисунок 1. Окно терминала
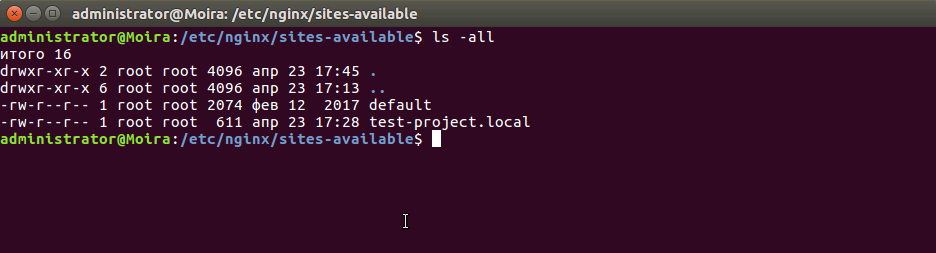 Рисунок 2. Список доступных виртуальных хостов
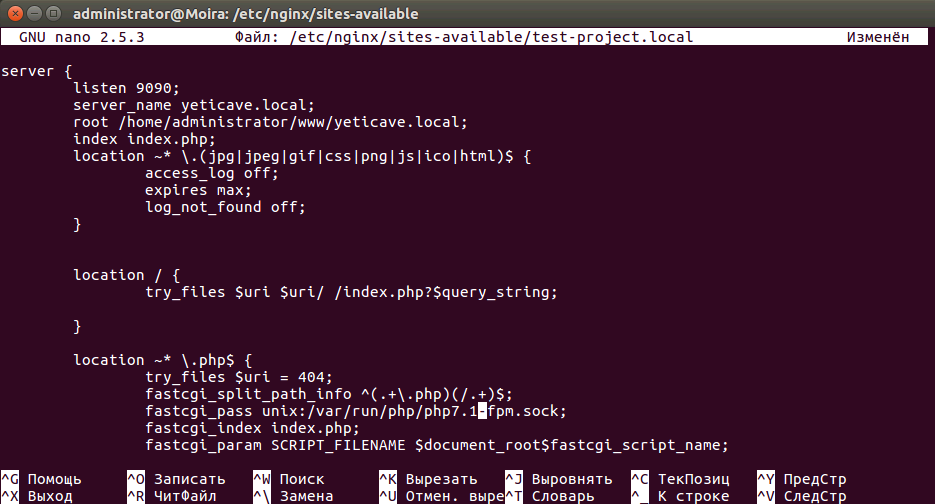 Рисунок 3. Подготовка конфига Для сохранения изменений в файле нажмите комбинацию клавиш ctrl + o. Затем закройте редактор nano сочетанием клавиш ctrl + x.
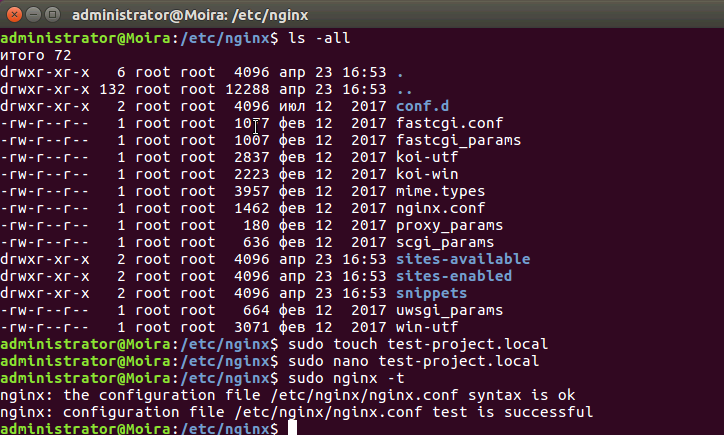 Рисунок 4. Тестирование конфигурационного файла nginx
Установка PHP
Последним компонентом в настройке рабочего окружения станет PHP.
В окне терминала введите команду для установки php-fpm из репозитория.
Важно: обязательно обратите внимание на устанавливаемую версию. В зависимости от дистрибутива она может отличаться. Например, в Ubuntu 16.04 устанавливается 7.0. Если номер версии отличается от той, что мы указали в конфигурационном файле yeticave.local , то необходимо её исправить.
Настройка xdebug
- Вводим команду редактирования файла:
- Добавляем в файл конфигурацию для xdebug.
Сохраняем изменения ctrl + o и закрываем редактор nano ctrl + x.
Источник
macOS 11.0 Big Sur Apache Setup: Multiple PHP Versions
First part in a multi-part blog series for Mac developers
Part 1: macOS 11.0 Big Sur Web Development Environment
Developing web applications on macOS is a real joy. There are plenty of options for setting up your development environments, including the ever-popular MAMP Pro that provides a nice UI on top of Apache, PHP and MySQL. However, there are times when MAMP Pro has slow downs, or out of date versions, or is simply behaving badly due to its restrictive system of configuration templates and non-standard builds.
It is times like these that people often look for an alternative approach, and luckily there is one, and it is relatively straight-forward to setup.
In this blog post, we will walk you through setting up and configuring Apache 2.4 and multiple PHP versions. In the second blog post in this two-post series, we will cover MySQL, Apache virtual hosts, APC caching, and Xdebug installation.
11/27/2019 Updated to add some information on PHP 8.0
11/13/2020 Updated to reflect the release of macOS 11.0 Big Sur
12/02/2019 Updated to reflect the latest release of PHP 7.4 and the removal of PHP 7.1 from Official tap
12/02/2019 Updated to reflect the latest release of PHP 7.4 and the removal of PHP 7.1 from Official tap
10/08/2019 Updated to reflect the release of macOS 10.5 Catalina
01/10/2019 Updated to add back PHP 5.6 and PHP 7.0 from and external deprecated keg
12/12/2018 Updated to reflect the latest release of PHP 7.3 and the removal of PHP 7.0 from Brew.
If you have followed this guide in the past with the Homebrew/php tap, and are looking to upgrade to the new Homebrew/core approach, then you should first clean-up your current installation by following our new Upgrading Homebrew.
This guide is intended for experienced web developers. If you are a beginner developer, you will be better served using MAMP or MAMP Pro.
XCode Command Line Tools
If you don’t already have XCode installed, it’s best to first install the command line tools as these will be used by homebrew:
Homebrew Installation
This process relies heavily on the macOS package manager called Homebrew. Using the brew command you can easily add powerful functionality to your mac, but first we have to install it. This is a simple process, but you need to launch your Terminal ( /Applications/Utilities/Terminal ) application and then enter:
Just follow the terminal prompts and enter your password where required. This may take a few minutes, but when complete, a quick way to ensure you have installed brew correctly, simply type:
You should probably also run the following command to ensure everything is configured correctly:
It will instruct you if you need to correct anything.
Big Sur Required Libraries
When installing fresh on Big Sur, I ran into a few libraries that were missing when completing all the steps below. To make things easier, please simply run this now:
Apache Installation
aa The latest macOS 11.0 Big Sur comes with Apache 2.4 pre-installed, however, it is no longer a simple task to use this version with Homebrew because Apple has removed some required scripts in this release. However, the solution is to install Apache 2.4 via Homebrew and then configure it to run on the standard ports (80/443).
If you already have the built-in Apache running, it will need to be shutdown first, and any auto-loading scripts removed. It really doesn’t hurt to just run all these commands in order — even if it’s a fresh installation:
Now we need to install the new version provided by Brew:
Without options, httpd won’t need to be built from source, so it installs pretty quickly. Upon completion you should see a message like:
Now we just need to configure things so that our new Apache server is auto-started
You now have installed Homebrew’s Apache, and configured it to auto-start with a privileged account. It should already be running, so you can try to reach your server in a browser by pointing it at http://localhost:8080 , you should see a simple header that says «It works!».

Troubleshooting Tips
If you get a message that the browser can’t connect to the server, first check to ensure the server is up.
You should see a few httpd processes if Apache is up and running.
Try to restart Apache with:
You can watch the Apache error log in a new Terminal tab/window during a restart to see if anything is invalid or causing a problem:
Apache is controlled via the brew services command so some useful commands to use are:
Visual Studio Code
In past guides, I’ve always provided instructions to edit files using the default TextEdit application that comes pre-installed. However, this is not what I use myself as it’s a terrible editor and when testing my guide for Big Sur, I kept running into problems with encoding, finding line numbers etc. The better solution is to simply install a better editor. So please install the amazingly versatile yet, 100% free, Visual Studio Code. It’s available on Mac, Windows, and Linux, but right now we only care about the mac version.
We can make use of the HomeBrew and install VSCode and the accompanying code CLI command in one shot with:
Apache Configuration
Now that we have a working web server, we will want to do is make some configuration changes so it works better as a local development server.
In the latest version of Brew, you have to manually set the listen port from the default of 8080 to 80 , so we will need to edit Apache’s configuration file /usr/local/etc/httpd/httpd.conf .
If you followed the instructions above you should be able to use Visual Studio Code to edit your files using the code Terminal command. However, if you want to use the default TextEditor application to perform edits, you can use the open -e command followed by the path to the file.

Find the line that says
and change it to 80 :
Next we’ll configure it to use the to change the document root for Apache. This is the folder where Apache looks to serve file from. By default, the document root is configured as /usr/local/var/www . As this is a development machine, let’s assume we want to change the document root to point to a folder in our own home directory.
Search for the term DocumentRoot , and you should see the following line:
Change this to point to your user directory where your_user is the name of your user account:
You also need to change the tag reference right below the DocumentRoot line. This should also be changed to point to your new document root also:
We removed the optional quotes around the directory paths as TextEdit will probably try to convert those to smart-quotes and that will result in a Syntax error when you try to restart Apache. Even if you edit around the quotes and leave them where they are, saving the document may result in their conversion and cause an error.
In that same block you will find an AllowOverride setting, this should be changed as follows:
Also we should now enable mod_rewrite which is commented out by default. Search for mod_rewrite.so and uncomment the line by removing the leading # by pushing ⌘ + / on the line (this is a quick way to uncomment and comment a single or multiple lines:
User & Group
Now we have the Apache configuration pointing to a Sites folder in our home directory. One problem still exists, however. By default, apache runs as the user daemon and group daemon . This will cause permission problems when trying to access files in our home directory. About a third of the way down the httpd.conf file there are two settings to set the User and Group Apache will run under. Change these to match your user account (replace your_user with your real username), with a group of staff :
Servername
Apache likes to have a server name in the configuration, but this is disabled by default, so search for:
and replace it with:
Sites Folder
Now, you need to create a Sites folder in the root of your home directory. You can do this in your terminal, or in Finder. In this new Sites folder create a simple index.html and put some dummy content in it like:
My User Web Root
Restart apache to ensure your configuration changes have taken effect:
If you receive an error upon restarting Apache, try removing the quotes around the DocumentRoot and Directory designations we set up earlier.
Pointing your browser to http://localhost should display your new message. If you have that working, we can move on!
Makes sure you remove the :8080 port we used earlier. Also, you might need to Shift + Reload to clear the browser cache and pick up the new file.

Troubleshooting Non-Sudo httpd Services Start
I will be updating this section with more tips and things to try as I find solutions to common problems. Please hop on our #macos Discord Chat to get some «live» help.
This year, with macOS Big Sur, I’ve switched from using sudo to launch httpd with root (even though it ran as the user/group defined in httpd.conf ), and for people who have upgraded from that version to this, there have been problems.
I ran into some problems myself but was able to get it working pretty easily, but others have reported more wide-spread problems. Please try these steps if your Apache is not starting when you use brew services start httpd .
First, try to start apache directly with:
This bypasses the brew services command and often prints out specific issues. If you have issues reported about not being able to write to log files, try removing all the current log httpd log files:
Then try starting again.
If you have see a message saying something like Address already in use: AH00072: make_sock: could not bind to address , try changing the Listen config in httpd.conf to:
PHP Installation
If you have existing PHP installations via Brew, you need to first cleanup your setup with our Upgrading Homebrew guide before continuing with this section.
Up until the end of March 2018, all PHP related brews were handled by Homebrew/php tab, but that has been deprecated, so now we use what’s available in the Homebrew/core package. This should be a better maintained, but is a much less complete, set of packages.
PHP 5.6, PHP 7.0, and PHP 7.1 have been deprecated and removed from Brew because they are out of support, and while it’s not recommended for production, there are legitimate reasons to test these unsupported versions in a development environment. These versions also need to «built from source» in order to use the latest versions of icu4c and openssl .
Remember only PHP 7.2 through 7.4 are officially supported by Brew, but these also have to be built which is pretty slow. For the latest version of our guide we will use the new tap from @shivammahtur as there are many versions (including PHP 8.0 builds) pre-built.
PHP 8.0 has just been released and you are able to install it, but it might take some time for compatible PHP modules are fully available.
We will proceed by installing various versions of PHP and using a simple script to switch between them as we need. Feel free to exclude any versions you don’t want to install.
Also, you may have the need to tweak configuration settings of PHP to your needs. A common thing to change is the memory setting, or the date.timezone configuration. The php.ini files for each version of PHP are located in the following directories:
At this point, I strongly recommend closing ALL your terminal tabs and windows. This will mean opening a new terminal to continue with the next step. This is strongly recommended because some really strange path issues can arise with existing terminals (trust me, I have seen it!).
We have installed but not linked these PHP versions. To switch to PHP 5.6 for example we can type:
Quick test that we’re in the correct version:
and to switch to to 7.4 :
And check that it’s changed correctly:
Apache PHP Setup — Part 1
You have successfully installed your PHP versions, but we need to tell Apache to use them. You will again need to edit the /usr/local/etc/httpd/httpd.conf file scroll to the bottom of the LoadModule entries.
If you have been following this guide correctly, the last entry should be your mod_rewrite module:
Below this add the following libphp modules:
We can only have one module processing PHP at a time, so for now, so we have left our [email protected] entry uncommented while all the others are commented out. This will tell Apache to use PHP 5.6 to handle PHP requests. (We will add the ability to switch PHP versions later).
Also you must set the Directory Indexes for PHP explicitly, so search for this block:
and replace it with this:
Save the file and stop Apache then start again, now that we have installed PHP:
Validating PHP Installation
The best way to test if PHP is installed and running as expected is to make use of phpinfo(). This is not something you want to leave on a production machine, but it’s invaluable in a development environment.
Simply create a file called info.php in your Sites/ folder you created earlier with this one-liner.
Point your browser to http://localhost/info.php and you should see a shiny PHP information page:

If you see a similar phpinfo result, congratulations! You now have Apache and PHP running successfully. You can test the other PHP versions by commenting the LoadModule . [email protected] . entry and uncommenting one of the other ones. Then simply restart apache and reload the same page.
PHP Switcher Script
We hard-coded Apache to use PHP 5.6, but we really want to be able to switch between versions. Luckily, some industrious individuals have already done the hard work for us and written a very handy little PHP switcher script.
This sphp script has been updated to support PHP 8.0. If you want to use that version, please repeat the process below to get the latest version.
We will install the sphp script into brew’s standard /usr/local/bin :
Check Your Path
Homebrew should have added its preferred /usr/local/bin and /usr/local/sbin to your path as part of its installation process. Quickly test this by typing:
If you don’t see this, first try closing your terminal and restarting it. If that doesn’t work, check that you have /usr/local/bin before /usr/bin and /usr/local/sbin before /usr/sbin in the path definition of your
/.zshrc file. You can do it temporarily in the shell by typing:
Testing the PHP Switching
After you have completed these steps, you should be able to switch your PHP version by using the command sphp followed by a two digit value for the PHP version:
You will probably have to enter your administrator password, and it should give you some feedback:
Test to see if your Apache is now running PHP 7.4 by again pointing your browser to http://localhost/info.php . With a little luck, you should see something like this:

Troubleshooting PHP Switching
If you have upgraded from a previous version of this guide and have installed PHP8, you may see message like: Unknown version of PHP. PHP Switcher can only handle arguments of: 5.6,7.0,7.1,7.2,7.3,7.4 , then you need to reinstall the sphp script which has been updated.
If you get a message about conflicting PHP versions, then you probably have a conflict of taps. You will need to uninstall your previous PHP versions, then remove the old tap, then add the new tap, and then reinstall PHP versions using the syntax above. For example:
Test Your Setup with Grav CMS!
What better way to test your new powerful setup than to quickly install and test Grav. The best flat-file CMS in the world 😆! We can do this with just a couple of quick terminal commands:
Then just extract the zip file:
This will extract the zip into a
/Sites/grav-admin folder. Then simply point your browser at this directory http://localhost/grav-admin :

Fill in the relevant information to create a new administator user, and simply click Create User to get into the admin. No other steps needed.

Updating PHP and other Brew Packages
Brew makes it super easy to update PHP and the other packages you install. The first step is to update Brew so that it gets a list of available updates:
This will spit out a list of available updates, and any deleted formulas. To upgrade the packages simply type:
You will need to switch to each of your installed PHP versions and run update again to get updates for each PHP version and ensure you are running the version of PHP you intend.
Activating Specific/Latest PHP Versions
Due to the way our PHP linking is set up, only one version of PHP is linked at a time, only the current active version of PHP will be updated to the latest version. You can see the current active version by typing:
And you can see the specific versions of a PHP package by typing:
OK, that wraps up Part 1 of this 3 part series You now have a fully functional Apache 2.4 installation with a quick-and-easy way to toggle between PHP 5.6, 7.0, 7.1, 7.2, 7.3, 7.4, and 8.0. Check out Part 2 to find out how to setup your environment with MySQL, Virtual Hosts, APC caching, YAML, and Xdebug. Also take a gander at Part 3 to find out how to setup SSL for your Apache Virtual Hosts.
Источник


