- How to zoom in or out on Mac
- Use keyboard shortcuts to zoom
- Zoom in
- Zoom out
- Toggle zoom
- Use scroll gesture with modifier keys to zoom
- Enable Hover Text
- Enable Touch Bar zoom
- Change Zoom advanced options for accessibility on Mac
- Zoom appearance options
- Zoom controls options
- Enable Screen Zoom in Mac OS X
- How to Enable Screen Zoom in Mac OS X (El Capitan, Yosemite, Mavericks)
- Enabling Screen Zoom in Mac OS X (Lion, Mountain Lion)
- Zoom with Trackpad or Mouse
- Zoom Screen with Keyboard Shortcuts
- MacOS zoom: How to zoom in and zoom out a Mac screen
- Mac Pro and iMac zoom in/out commands
- Zoom in and out using a MacBook trackpad
- Zoom in and out with a Magic Mouse
- Not working? Look in Preferences
- Preferences on older Macs
- How to Share Screen with Zoom on Mac
- How to Share Screen with Zoom on Mac
How to zoom in or out on Mac
Use these accessibility features to zoom all or part of your screen.
To set up zoom, choose Apple menu > System Preferences, then click Accessibility. Click Zoom in the sidebar, then select any of these zoom features:
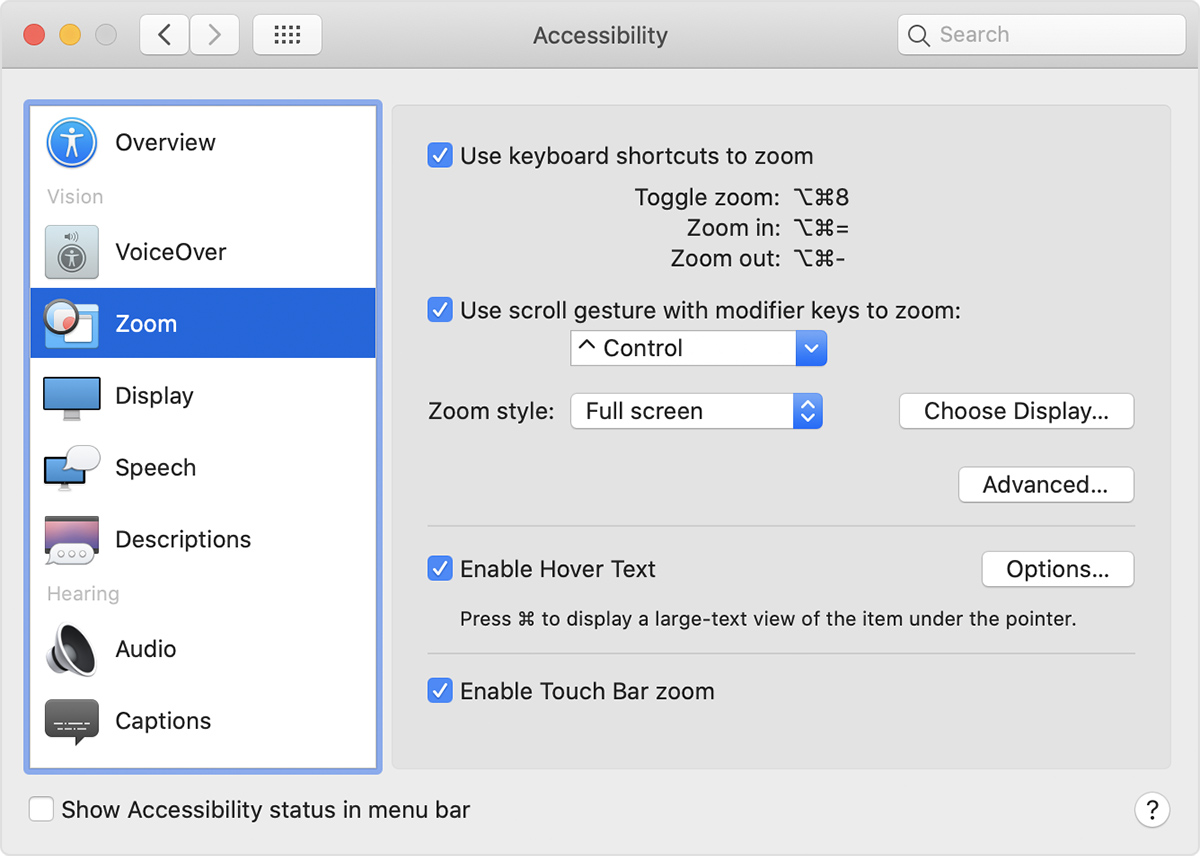
Use keyboard shortcuts to zoom
After selecting ”Use keyboard shortcuts to zoom,” you can use these key combinations to zoom:
Zoom in

To zoom in, press these three keys together: Option, Command, and Equals sign (=).
Zoom out

To zoom out, press these three keys together: Option, Command, and Minus sign (-).
Toggle zoom

To switch between no zoom and your last amount of zoom, press these three keys together: Option, Command, and 8.
Use scroll gesture with modifier keys to zoom
After selecting ”Use scroll gesture with modifier keys to zoom,” you can press and hold the Control key while scrolling with your mouse or trackpad to zoom. Use the ”Zoom style” menu to choose from three zoom styles: full screen, split screen, or picture-in-picture.

Full screen zoom

Split screen zoom

Enable Hover Text
After selecting ”Enable Hover Text,” you can press and hold the Command key, then move your pointer over an item to display a larger, high-resolution version of that item.

Use the Options button in the Zoom pane to set the size, font, location, and color of this text. Learn more about Hover Text.
Enable Touch Bar zoom
After selecting ”Enable Touch Bar zoom,” you can touch and hold the Touch Bar on your MacBook Pro to display a larger version of the Touch Bar onscreen. Learn more about Touch Bar zoom.
Источник
Change Zoom advanced options for accessibility on Mac
On your Mac, use the Zoom options of Accessibility Zoom preferences to set appearance and control options for the selected zoom style (Full screen, Split screen or Picture-in-picture).
To change these preferences, choose Apple menu

> System Preferences, click Accessibility, click Zoom, then click Advanced.
Zoom appearance options
Continuously with pointer
Make the screen image move with the pointer.
Only when the pointer reaches an edge
Prevent the screen image from moving until you move the pointer to an edge of the screen.
So the pointer is at or near the centre of the zoomed image
Keep the centre point of the screen image near the pointer.
Restore zoom factor on startup
Apply the current zoom factor whenever you turn on zoom or start up your Mac.
While using the Split screen or Picture-in-Picture zoom style, invert the colours of the contents in the window. If the screen shows black on white, the zoom window shows white on black.
Make zoomed screen images appear smooth.
Flash screen when notification banner appears outside zoom view
Flash the screen when a notification arrives if the upper-right corner of the screen isn’t shown in the zoom area.
Follow keyboard focus
Magnify the area that has the keyboard focus.
Keep zoom window stationary
While using the Picture-in-Picture zoom style, keep the zoom window in one location on the screen.
Adjust size and location
While using the Split screen or Picture-in-Picture zoom style, change the size and position of the zoom area or window.
For Split screen: To resize the zoom area, drag the separator bar up or down. When you’re ready, click OK.
For Picture-in-picture: To resize the window, drag any edge or corner of it. To reposition the window, drag it to a new location. When you’re ready, click OK.
If you select the option in the Controls pane to use keyboard shortcuts to adjust the zoom window, you can easily resize and reposition the window while working:
Resize the window: Press the Control-Option-Command-arrow keys to make the window larger or smaller.
Reposition the window: Press the Option-Command-arrow keys to reposition the zoom area or window on the screen.
Zoom controls options
Hold 
 to temporarily toggle zoom
Temporarily zoom in or out on the screen when you press and hold the Control and Option keys at the same time.
Hold  to temporarily detach zoom view from pointer
If the screen is zoomed in, making it difficult to see information displayed under the pointer, press and hold the Control and Command keys at the same time to hide the pointer and move the zoom view without changing the location of the pointer.
Hold F to toggle between full screen and picture-in-picture zoom
Press and hold the Control and Command keys at the same time to switch between zoom styles.
Use keyboard shortcuts to adjust zoom window
Select the tickbox to be able to change the size and position of the zoom window while working using the indicated keyboard shortcuts.
Use trackpad gesture to zoom
Select the tickbox to be able to zoom using the indicated trackpad gestures.
Maximum Zoom, Minimum Zoom
Drag a slider to set the maximum or minimum level of magnification.
Источник
Enable Screen Zoom in Mac OS X

Screen zoom is a useful feature of Mac OS X that zooms into the screen where ever the cursor is located, making it easier to see parts of the screen, examine pixels, read small fonts, and perform other functions with greater visual clarity. The zoom feature was enabled by default in some earlier versions of Mac OS X whenever the control key was held down, but in modern versions of Mac OS X, the screen zoom feature has been turned off by default, and is now a feature of Accessibility settings.
The Screen Zoom feature is an accessibility feature aimed at making it easier to read certain screen elements. Accessibility is sometimes called Universal Access, depending on the version of Mac OS X on the computer. We’ll show you how to enable the Screen Zoom option on any Mac with any version of OS X System Software.
How to Enable Screen Zoom in Mac OS X (El Capitan, Yosemite, Mavericks)
- Open ‘System Preferences’ from the Apple menu
- Click on “Accessibility” and then click on the “Zoom” section
- Check the boxes next to Zoom for the type and modes of screen zoom you would like to enable
Older versions of Mac OS system software also support screen zoom modes. Here is how to enable it in Lion and Mountain Lion:
Enabling Screen Zoom in Mac OS X (Lion, Mountain Lion)
- Open System Preferences from the Apple menu
- Click on “Universal Access” and then click on the “Seeing” tab
- Check the box under “Zoom” to “ON”
Now with Screen Zoom turned on, the feature can be accessed with either the trackpad, mouse, or keyboard:
Zoom with Trackpad or Mouse
For trackpads, scrolling is achieved with two fingers gesturing up or down, with a mouse it’s simply the scrollwheel in either direction, with both you need to hold down the Control key to access.
- Control+Scroll Up to zoom in
- Control+Scroll Down to zoom out
Zoom Screen with Keyboard Shortcuts
New to Screen Zoom in modern versions of OS X are optional keyboard shortcuts to zoom in and out:
- Command+Option+= to zoom in
- Command+Option+- to zoom out
Just like other versions of Mac OS X, you can still toggle anti-aliasing on and off within the Zoom feature by hitting Command+Option+/.
Remember, screen zoom is enabled by default in earlier versions of Mac OS X, just hold down the Control button and zoom with the mouse wheel or trackpad, just like it works in modern versions of Mac OS once it has been enabled.
Источник
MacOS zoom: How to zoom in and zoom out a Mac screen
MacOS screen zoom FAQ: Is there a way I can zoom in and zoom out my Mac screen (iMac, MacBook, MacBook Pro)?
Yes, you can “zoom in” or “zoom out” your Mac screen. The solutions are shown in the sections that follow. Note that this solution has been tested on macOS (formerly Mac OS X) systems from OS X 10.6 through macOS 10.14.
Mac Pro and iMac zoom in/out commands
If you’re using a Mac desktop system (iMac or Mac Pro) with a keyboard and a mouse with a mousewheel, just press and hold the [control] key, then scroll the mousewheel up and down, and you’ll see what I mean. The entire Mac screen zooms in and out, just like the “software zoom” on a digital camera.
Note: If this doesn’t work on your system, scroll down to the “Not working?” section below, where I describe how to fix this problem.
To summarize, here are the Mac/iMac screen zoom commands:
Zoom In: Press the [Ctrl] key and scroll up with the mouse.
Zoom Out: Press the [Ctrl] key and scroll down with the mouse.
Zoom in and out using a MacBook trackpad
You can also zoom in and zoom out your screen on a MacBook Pro trackpad. Again, hold down the [ctrl] key, but this time take two fingers and swipe upwards on the trackpad area to zoom in, then use your two fingers to swipe downwards to zoom out.
This is very cool. A lot of times I’ll find myself making text larger in Firefox by changing the font size ( [command] + to make the font larger, [command] — to make it smaller), but I prefer this Mac zoom-in/zoom-out approach.
Zoom in and out with a Magic Mouse
I just bought an Apple Magic Mouse for use with my iMac, and you can use it to zoom in/out just like you can use a mouse with a scrollwheel. Just hold down the [control] key, then slide your finger to the top or bottom of the mouse, and you’ll zoom in and out just like you would with a mouse scrollwheel.
Not working? Look in Preferences
If this tip doesn’t work for you by default, take a look at your System Preferences settings. On Mac OS X 10.9 (and possibly 10.7 and 10.8), I find it easiest to search for the word “zoom” inside of the System Preferences dialog, then go to the Accessibilities option that lets you click the checkbox that needs to be clicked.
In the following image, the “1” indicates that the first step in the process is to search for “zoom,” and then the “2” shows the checkbox that needs to be clicked:
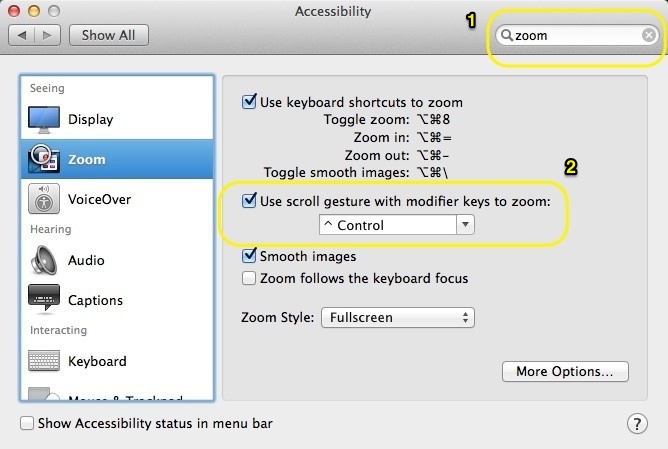
Once you click the “Use scroll gesture with modifier keys to zoom,” you should find that the zoom-in, zoom-out feature works as I’ve described here.
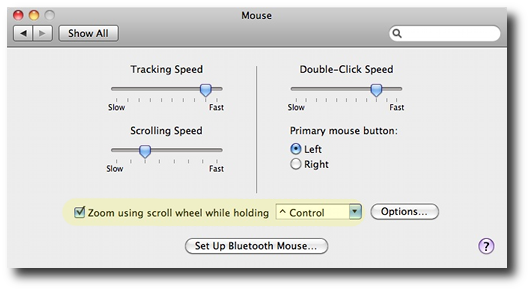
Preferences on older Macs
On Mac OS X 10.6.x, follow these steps to set this preference:
- Click the Apple icon in the menu bar.
- Click System Preferences
- Click the Mouse icon
In that panel there will be a setting that says, “Zoom using scroll wheel while holding . ”, and then you can select which key to use. Mine shows the “^ Control” key. This preferences panel is shown in the following image:
This screen may be a little different on newer Mac OS X systems, but I’ve loaned my new MacBook Pro to a friend, and can’t look at it at the moment.
Источник
How to Share Screen with Zoom on Mac
You likely already know that you can host Zoom meetings and join them from your Mac, but did you know you can also screen share? Whether video conferencing for work, personal, family, or any other reason, you may be interested in checking out Zoom’s screen sharing functionality.
As the name would imply, this feature lets you share whatever is on your Mac screen with other participants in the Zoom meeting.
How to Share Screen with Zoom on Mac
Before you go ahead with the following procedure, make sure your Mac is running macOS Mojave or later. Assuming you already know how to host and join a Zoom Meeting on your Mac, let’s get started with the necessary steps.
- Launch “Zoom” on your Mac and host or join a meeting.
Once you’re in an active meeting, click on the “Share Screen” option from the bottom menu, as shown in the screenshot below.
This will open a new window on your screen. Here, you’ll be able to choose your desktop for screen sharing. Click on “Share” to get started. When you’re prompted to give Zoom the necessary permissions to share your screen, click on “Open System Preferences”.
This will automatically take you to the Security & Privacy section. Here, choose “Screen Recording” from the left pane and check the box next to Zoom. You may be prompted to relaunch your Zoom, but that’s not necessary. You can close this window and go back to Zoom.
Now, select your desktop and click on “Share” again to start the screen sharing session.
You’ll be notified when you’ve started sharing your screen. You will be able to pause the share using the controls at the top. When you’re done screen sharing, click on “Stop Share”, as shown below.
There you go. Now you’ve successfully managed to share your Mac’s screen during an ongoing Zoom meeting.
This wouldn’t have been possible if it wasn’t for the native screen recording functionality in modern MacOS releases. If your Mac is running an older version of macOS, you won’t be able to take advantage of Zoom’s screen sharing tools.
If you own other Apple devices like the iPhone or iPad, you can connect them to your Mac via AirPlay or Lightning/USB-C cable and then use your iOS device as the screen sharing display while you’re actively video chatting and looking at other participants on your Mac. This feature could come in handy during an online lecture or presentation, or for many other purposes. Or, you can even use the Zoom Meetings mobile app to share your iPhone or iPad’s screen conveniently.
Zoom certainly isn’t the only video conferencing software that lets you share your screen with other users. You can also do so from Google Hangouts Meet, Skype for Business, and there’s even macOS native screen sharing, so you can use whichever works for you for your particular needs.
Did you share your Mac screen using Zoom? Do you use another screen sharing solution instead? Let us know your thoughts, experiences, and opinions on Zoom screen sharing in the comments section down below.
Источник


