- Просмотр сообщений журнала в Консоли на Mac
- Use Apple Diagnostics to test your Mac
- Prepare your Mac
- Start Apple Diagnostics
- Apple silicon
- Intel processor
- View the test results
- Learn more
- Использование служб в приложениях на Mac
- Используйте службу
- Изменение служб, доступных в приложениях
- Если Вы не можете использовать службу
- ¿Qué es SMART Status y cómo verificarlo en su Mac? (10.10.21)
- Video de Youtube: ¿Qué es SMART Status y cómo verificarlo en su Mac?
- Use Apple Diagnostics to test your Mac
- Prepare your Mac
- Start Apple Diagnostics
- Apple silicon
- Intel processor
- View the test results
- Learn more
Просмотр сообщений журнала в Консоли на Mac
Используйте Консоль для просмотра журнальных сообщений, собранных компьютером и подключенными к нему устройствами. Такие журнальные сообщения содержат сведения о системных событиях, текст диалогов, записи об ошибках, состоянии системы и другую информацию. При возникновении неполадки есть возможность найти подробную информацию о причине ее возникновения либо в журнальных сообщениях, либо в записях об активности.
Примечание. Если Вы вошли в систему не как администратор, необходимо ввести имя и пароль администратора для просмотра записей журналов.
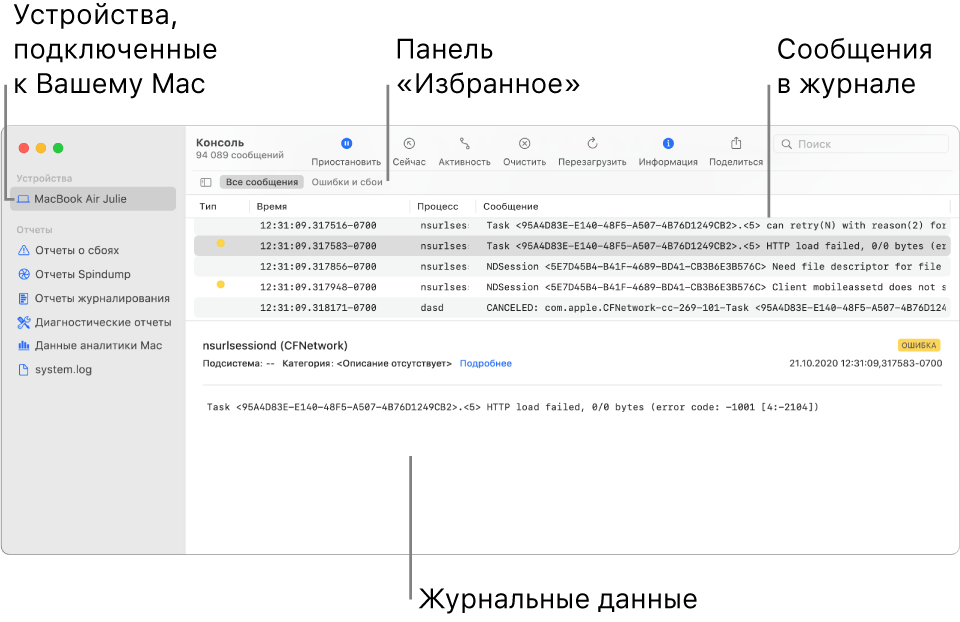
В приложении «Консоль»  на Mac в списке устройств слева выберите устройство, для которого Вы хотите просмотреть сообщения журнала (например, Mac, iPhone, iPad, Apple Watch или Apple TV). Если список устройств не отображается, нажмите кнопку «Боковая панель»
  на панели «Избранное».
В окне справа нажмите «Начать потоковую передачу».
Журнальные сообщения, относящиеся к выбранному устройству, появятся в окне справа.
Тип журнального сообщения обозначается точкой в столбце «Тип».
 Красная точка: сбои в работе.
 Желтая точка: ошибки.
 Темно-серая точка: журнальные сообщения, связанные с отладкой.
 Светло-серая точка: информационные журнальные сообщения.
Примечание. Если точки в столбце «Тип» нет, значит, журнальное сообщение относится к типу «По умолчанию».
Выполните любые из следующих действий.
Как увидеть журнальное сообщение целиком в столбце «Сообщения». Нажмите журнальное сообщение и нажмите стрелку вправо или выберите «Вид» > «Развернуть выбранную строку». Чтобы снова сократить сообщение до одной строки, нажмите стрелку влево или выберите «Вид» > «Свернуть выбранную строку».
Просмотр полных журнальных сообщений. Нажмите «Подробнее» в сведениях о журнальном сообщении в нижней половине окна Консоли. Если сведения о журнальном сообщении не отображаются, нажмите кнопку «Информация»  в панели инструментов (или воспользуйтесь панелью Touch Bar) или выберите «Вид» > «Показать панель свойств». Чтобы отображалось меньше сведений, нажмите «Скрыть».
Поиск конкретных журнальных сообщений в текущей информации. Нажмите журнальное сообщение и нажмите Command-F. См. Поиск текста в сообщениях журнала и отчетах.
Просматривая журнальные сообщения, можно перемещать столбцы и менять их перечень, находить последние записи об активности, применять сохраненные поисковые запросы. См. Настройка окна журнала.
Источник
Use Apple Diagnostics to test your Mac
Apple Diagnostics, formerly known as Apple Hardware Test, can check your Mac for hardware issues.
If you think your Mac might have a hardware issue, you can use Apple Diagnostics to help determine which hardware component might be at fault. Apple Diagnostics also suggests solutions and helps you contact Apple Support for assistance.
Prepare your Mac
- Shut down your Mac.
- Disconnect all external devices except keyboard, mouse, display, Ethernet connection (if applicable), and connection to AC power.
- Make sure that your Mac is on a hard, flat, stable surface with good ventilation.
Start Apple Diagnostics
Apple silicon
- Turn on your Mac and continue to press and hold the power button as your Mac starts up.
- Release when you see the startup options window, which includes a gear icon labeled Options.
- Press Command (⌘)-D on your keyboard.
Intel processor
- Turn on your Mac, then immediately press and hold the D key on your keyboard as your Mac starts up.
- Release when you see a progress bar or you’re asked to choose a language.

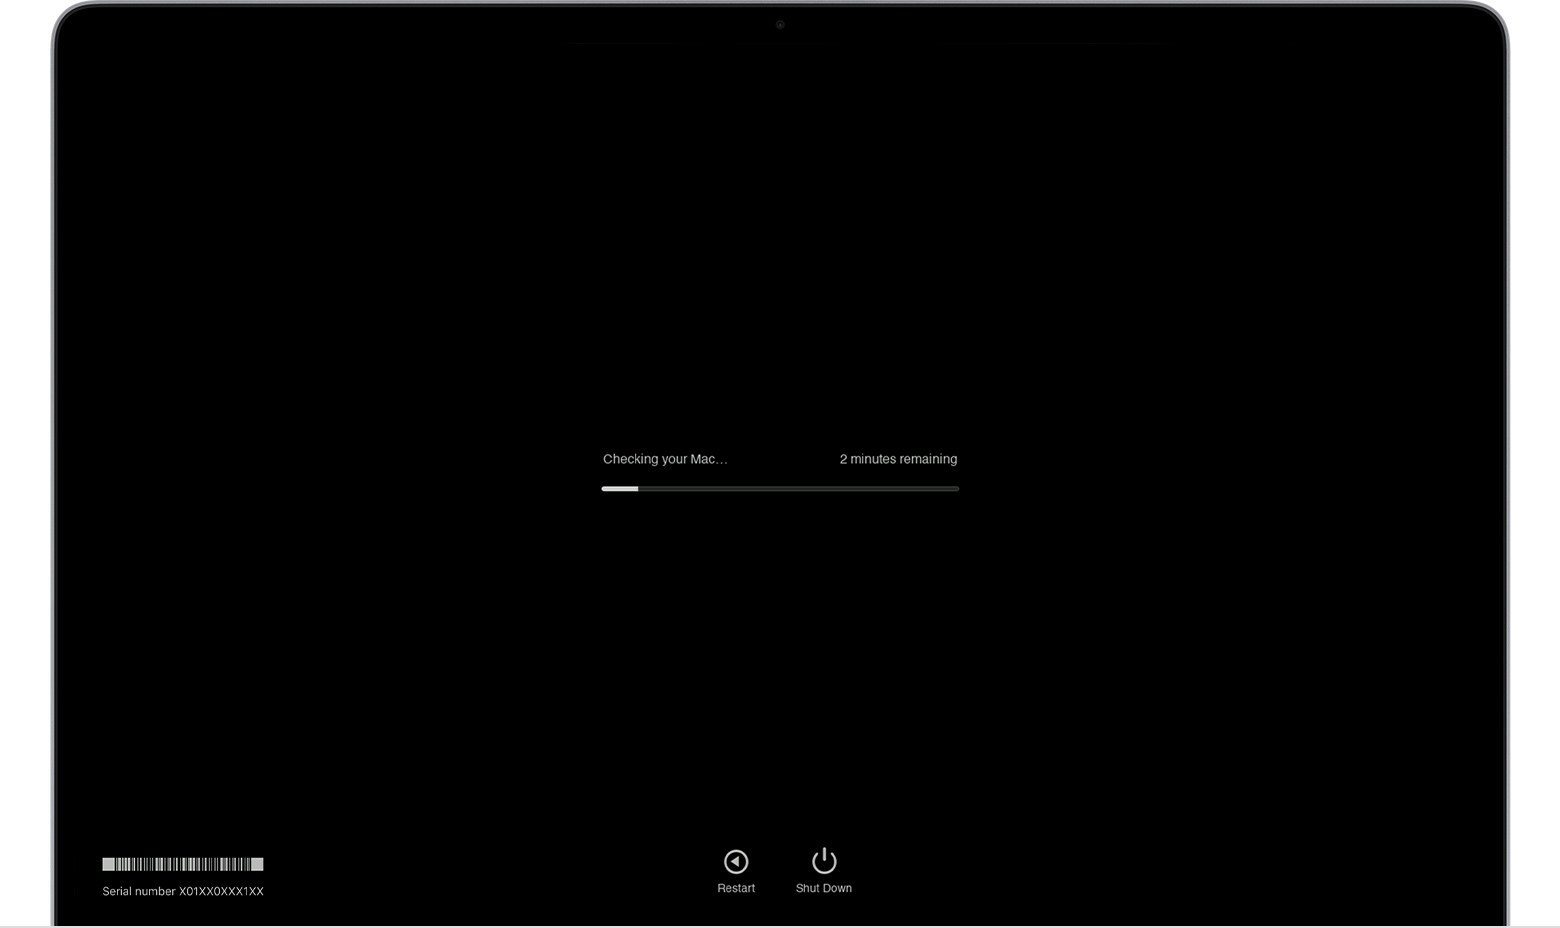
View the test results
Apple Diagnostics shows a progress bar while it’s checking your Mac:
When testing is complete, Apple Diagnostics shows the results, including one or more reference codes. Learn about Apple Diagnostics reference codes.
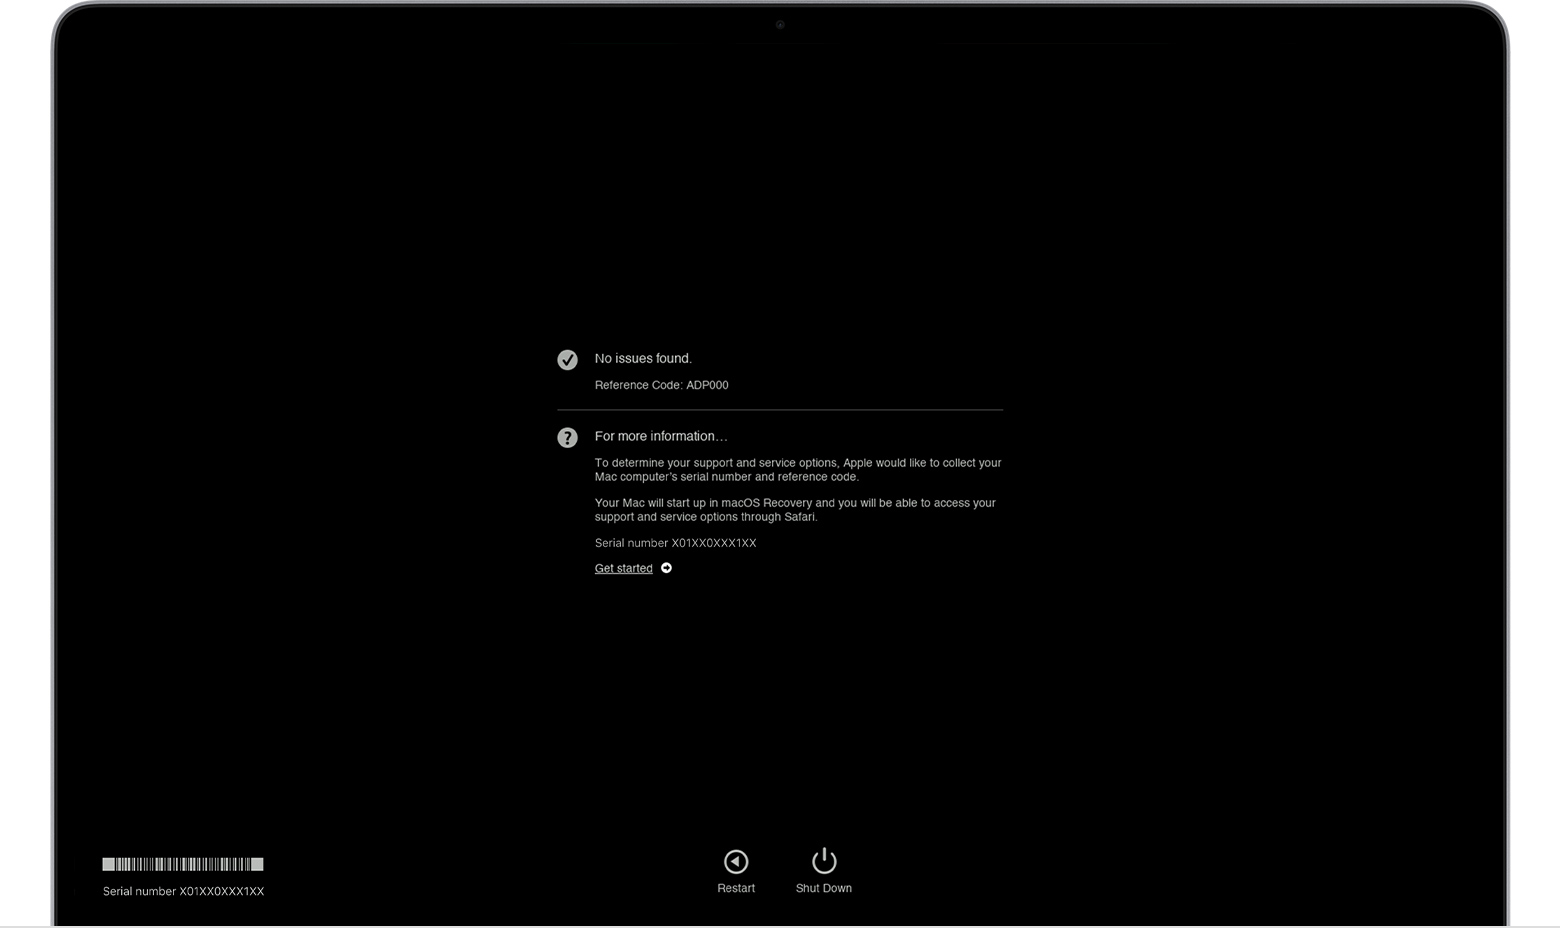
To repeat the test, click “Run the test again” or press Command-R.
To restart your Mac, click Restart or press R.
To shut down, click Shut Down or press S.
To get information about your service and support options, make sure that your Mac is connected to the internet, then click ”Get started” or press Command-G. Your Mac will restart to a webpage with more information. When you’re done, choose Restart or Shut Down from the Apple menu.
Learn more
On an Intel-based Mac, if you can’t start Apple Diagnostics with the D key, try these solutions:
- Press and hold Option-D at startup to use Apple Diagnostics over the internet.
- Make sure that your Mac isn’t using a firmware password.
Источник
Использование служб в приложениях на Mac
Службы позволяют использовать функции других приложений для выполнения нужных действий, не открывая эти приложения.
Используйте службу
На Mac выберите объект, например файл на рабочем столе или текст в документе.
Откройте меню приложения (справа от меню Apple

), выберите «Службы», затем выберите службу.
Изменение служб, доступных в приложениях
На Mac выберите пункт меню «Apple»
> «Системные настройки», нажмите «Клавиатура», затем нажмите «Сочетания клавиш».
В боковом меню нажмите «Службы», затем выберите объекты, чтобы добавить их в меню «Службы», или отмените выбор объектов, чтобы удалить их из меню.
Объекты отображаются в меню «Службы» приложения только, если они имеют отношение к данному приложению или задаче.
Можно создать сочетания клавиш для вызова служб, чтобы не нужно было использовать меню «Службы» приложения.
Если Вы не можете использовать службу
Если у Вас нет прав на открытие приложения, которое предоставляет службу, следует войти в систему под учетной записью администратора.
Если приложение отсутствует или его невозможно открыть, попробуйте найти его на Mac и открыть. Попытайтесь еще раз воспользоваться Службами.
Если приложение находится в Корзине, выберите его, затем выберите «Файл» > «Восстановить». Попытайтесь еще раз воспользоваться Службами.
Источник
¿Qué es SMART Status y cómo verificarlo en su Mac? (10.10.21)
¿Tu Mac tiene algún problema de hardware? ¿Sigue funcionando en buena forma? La única forma de responder a estas preguntas es comprobar el estado SMART de su almacenamiento en disco interno y discos duros. Pero espere, ¿qué es el estado SMART?
SMART son las siglas de Self-Monitoring Analysis and Reporting Technology System, es un mecanismo que se utiliza para informar cualquier problema de disco o problema de salud del disco al sistema operativo. Aunque su función puede parecer bastante simple, es conveniente. Si el estado SMART en Mac indica que una unidad está fallando o se ha encontrado un error fatal en el hardware del disco, solo significa que hay una necesidad urgente de hacer una copia de seguridad de todos los archivos y datos críticos para evitar que se corrompan. Después de eso, la unidad debe ser reemplazada.
Ahora que sabe que el estado de un disco duro SMART juega un papel vital en el mantenimiento de su computadora, vale la pena saber más sobre él, particularmente cómo verificarlo en una Mac. Por esa razón, creamos esta guía paso a paso para usted.
Cómo verificar el estado de SMART en Mac
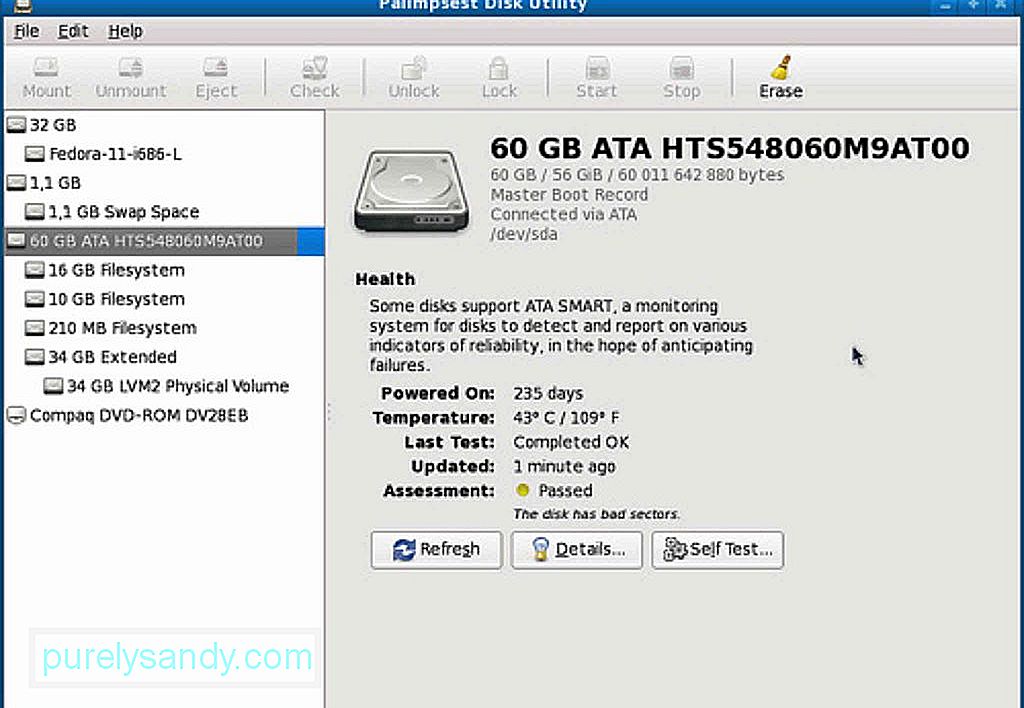
Los pasos a continuación funcionan en todas las versiones de macOS que tienen la aplicación Utilidad de Discos. Revíselos paso a paso:
- Vaya a Aplicaciones & gt; Utilidades & gt; Utilidad de disco .
- Seleccione un disco de la lista que desee verificar. Asegúrese de elegir un disco real y no solo una partición.
- Verifique el estado SMART de su disco duro. Si dice «Verificado», significa que su disco está en buenas condiciones. Si dice «Fallido», solo significa que se debe realizar una copia de seguridad de la unidad y reemplazarla. Y si muestra un mensaje que dice que hay un problema de hardware fatal, significa que su disco duro está condenado a fallar y puede requerir una copia de seguridad y reemplazo lo antes posible.
- Una vez que haya verificado el estado, cierre Utilidad de disco .
Qué hacer si su disco duro falla
Ya sea que su disco duro esté fallando o no, hacer copias de seguridad de su Mac con regularidad es algo bueno que puede hacer. Hacer copias de seguridad no debería ser un problema porque hay muchas herramientas y aplicaciones que puedes usar para hacer copias de seguridad de tus archivos importantes con regularidad. Time Machine es uno. También puede ejecutar Primeros auxilios en la Utilidad de disco para reparar unidades dañadas. Sin embargo, tenga en cuenta que los problemas que First Aid puede solucionar son aquellos que no están relacionados con fallas SMART u otros problemas de hardware.
Soluciones a otros problemas
Ahora, si su estado SMART dice que no hay errores, pero su disco duro aún tiene problemas, entonces puede intentar verificar y reparar su disco ejecutando Utilidad de Discos en Modo de Recuperación . Simplemente siga los pasos a continuación:
- Reinicie su Mac mientras mantiene presionados los botones CMD + R .
- En el menú de inicio, elija Recovery HD .
- En Utilidades de Mac OS X, seleccione Utilidad de disco .
- Seleccione la unidad o partición que desea reparar.
- Vaya a Pestaña Reparar .
- Haga clic en Reparar disco para comenzar a reparar la unidad o partición.
Si su unidad aún no se muestra en Utilidad de Discos , puede que solo signifique dos cosas. Puede ser que la unidad ya haya fallado o que no esté conectada físicamente.
Otros consejos útiles
Si bien la unidad de tu Mac sigue funcionando de manera eficiente, asegúrate de cuidarla bien. Compruebe su estado de vez en cuando para poder prepararse para el peor de los casos. Mejor aún, haga una copia de seguridad de sus archivos con regularidad, de modo que aún tenga acceso a ellos cuando sus unidades fallen de repente. Por último, pero no menos importante, descargue e instale herramientas como la aplicación de reparación de Mac. Aunque instalarlo en su Mac no tendrá un impacto directo en su disco duro, definitivamente ayudará a garantizar que su dispositivo funcione de manera eficiente mientras lo está usando.
Video de Youtube: ¿Qué es SMART Status y cómo verificarlo en su Mac?
Источник
Use Apple Diagnostics to test your Mac
Apple Diagnostics, formerly known as Apple Hardware Test, can check your Mac for hardware issues.
If you think your Mac might have a hardware issue, you can use Apple Diagnostics to help determine which hardware component might be at fault. Apple Diagnostics also suggests solutions and helps you contact Apple Support for assistance.
Prepare your Mac
- Shut down your Mac.
- Disconnect all external devices except keyboard, mouse, display, Ethernet connection (if applicable), and connection to AC power.
- Make sure that your Mac is on a hard, flat, stable surface with good ventilation.
Start Apple Diagnostics
Apple silicon
- Turn on your Mac and continue to press and hold the power button as your Mac starts up.
- Release when you see the startup options window, which includes a gear icon labeled Options.
- Press Command (⌘)-D on your keyboard.
Intel processor
- Turn on your Mac, then immediately press and hold the D key on your keyboard as your Mac starts up.
- Release when you see a progress bar or you’re asked to choose a language.
View the test results
Apple Diagnostics shows a progress bar while it’s checking your Mac:
When testing is complete, Apple Diagnostics shows the results, including one or more reference codes. Learn about Apple Diagnostics reference codes.
To repeat the test, click “Run the test again” or press Command-R.
To restart your Mac, click Restart or press R.
To shut down, click Shut Down or press S.
To get information about your service and support options, make sure that your Mac is connected to the internet, then click ”Get started” or press Command-G. Your Mac will restart to a webpage with more information. When you’re done, choose Restart or Shut Down from the Apple menu.
Learn more
On an Intel-based Mac, if you can’t start Apple Diagnostics with the D key, try these solutions:
- Press and hold Option-D at startup to use Apple Diagnostics over the internet.
- Make sure that your Mac isn’t using a firmware password.
Источник


